Deploying the 1E Client using Configuration Manager
 |
| The product formerly referred to as Nomad has been rebranded as Content Distribution. Although the new name is implemented in the majority of documentation and user interfaces, references to Nomad may still appear in specific tools, scripts, or contexts.
Learn how to deploy the 1E Client using Microsoft Configuration Manager for automated enterprise-wide software distribution and peer-to-peer content delivery. This guide covers creating Configuration Manager applications, deployment types, client settings, distribution point configuration, Content Distribution enablement, installation verification, bandwidth optimization, and deployment monitoring across Windows environments.
A step-by-step guide for using Configuration Manager to deploy the 1E Client to computers with the Content Distribution enabled.
Using Configuration Manager to deploy the 1E Client
Using Configuration Manager to deploy Content Distribution to all the Configuration Manager client machines is a relatively simple and efficient way of configuring all the installations in one go. 1E Client Deployment Assistant (CDA) is recommended as the most efficient way of creating Configuration Manager applications and deployments for clients, and packages for use in Task Sequences, or you can follow the instructions below to manually create applications, refer to Client Deployment Assistant.
Also refer to Using Configuration Manager to enable and reconfigure the 1E Client after installation. The page describes how to use a Configuration Manager Configuration Baseline, and includes a zip file with template Configuration Items that can be imported into Configuration Manager.
If you are upgrading Content Distribution or any other features in the 1E Client (1E, Shopping, WakeUp), refer to the note about Application Supersedence.
Creating a Configuration Manager application to install the 1E Client
Only 64-bit installations are supported for 1E Client installations, refer to 1E Platform 24.9 release notes.
1EClient-x64.msi is used for 64-bit OS.
Creating an application with a deployment type for the 64-bit 1E Client installer
To create an application to install the 1E Client:
-
In the Configuration Manager console, open Software Library > Application Management.
-
Right-click Applications and choose Create Application.
-
On the General settings screen in the Create Application Wizard, select Manually specify the application information.
-
Click Next.
-
Populate the details for the application as follows:
-
Name: 1E Client
-
Publisher: 1E
-
Software Version: 24.5
-
Select the option: Allow this application to be installed from the Install Application task sequence action without being deployed.
-
-
On the Software Center screen, click Next.
-
On the Deployment Types screen, click Add....
-
From the Type drop-down in the Create Deployment Type Wizard, ensure that Windows Installer (*msi file) is selected.
-
Ensure Automatically identify information about this deployment type from installation files is selected.
-
Set the Location of the 1EClient-x64.msi installer using Browse... and locating the file from the share where the file has been stored.
-
Click Next.
-
On the Import Information screen, (assuming the import from the msi was successful), click Next.
-
On the General Information screen, set the Name: field to 1E Client (64-bit).
-
Change the Installation program to something similar to the following:
Copy> msiexec /i 1EClient-x64.msi MODULE.NOMAD.ENABLED=true MULTICASTSUPPORT=0 LOGPATH=C:\Windows\CCM\Logs [other properties] /qn-
MULTICASTSUPPORT=0 turns off multicast (it makes the logs noisy if multicast hasn’t been set up).
-
LOGPATH=C:\Windows\CCM\Logs sets the location of the 1E Client log files. When troubleshooting, it can be useful for Configuration Manager administrators to have the 1E Client log files in the same location as the Configuration Manager client log files.
-
You might also consider using a Windows Installer Transform (.mst) if there are a number of properties to define making the installer command-line long.
-
-
When the Installation program edit field has been set click Next to continue.
-
On the Requirements screen, click Add…
-
In the Create Requirement dialog, populate the requirements as follows:
-
Category: Device
-
Condition: Operating system
-
Rule type: Value
-
Operator, select One of from the drop-down list and then check any of the 64-bit OS you may encounter in your environment, for example All Windows 10 (64-bit).
-
-
Click OK.
-
Click Next.
-
On the Dependencies screen, click Next.
-
On the Summary screen, click Next to start apply these settings.
-
You should see the heading The Create Deployment Type Wizard completed successfully, on the Completion screen of the Create Deployment Type Wizard. Click Close to close the wizard.
-
A new deployment type called 1E Client (64-bit) will have been added to the Deployment types field in the Create Application Wizard.
-
Once you've finished creating the deployment types, click Next on the Deployment Types screen to continue.
-
On the Summary screen, click Next to start the creation of the application.
-
You should see the heading The Create Application Wizard completed successfully, on the Completion screen of the Create Application Wizard. Click Close to close the wizard
The 1E Client application should now be created in Configuration Manager.
Adding content to your distribution point
To add content to your distribution point:
-
From the Applications node in the Software Library workspace, right-click the 1E Client Application and from the context menu, choose Distribute Content.
-
On the General screen of the Distribute Content Wizard, click Next.
-
On the Content screen, click Next.
-
On the Content Distribution screen, click Add and choose Distribution Point from the drop-down list.
-
In the Add Distribution Points dialog, choose the distribution point.
-
Click OK to close the Add Distribution Points dialog and add the selected distribution points.
-
Click Next on the remaining screens of the Distribute Content Wizard to start adding the content to the selected distribution point(s).
-
If everything goes well you should see the message The Distribute Content Wizard completed successfully. Click Close to close the wizard.
Deploying the 1E Client to All Desktop and Server Clients
To deploy the 1E Client:
-
From the Applications node in the Software Library workspace, right-click the 1E Client application and from the context menu, choose Deploy.
-
On the General screen of the Deploy Software Wizard, click Browse… next to the Collection: field to open the Select Collection dialog.
-
From the drop-down list, choose Device Collections, then select All Desktop and Server Clients.
-
Click OK to return to the General screen.
-
Click Next to continue.
-
On the Content screen, ensure the content has been deployed to your distribution point (see step 6 under the Adding content to your distribution point heading). Click Next to continue when you have confirmed the distribution points.
-
On the Deployment Settings screen, ensure Install is selected on the Action: field drop-down list and select Required from the Purpose: field drop-down list, then click Next to continue.
-
On the Scheduling screen, click Next to accept the default deadline (As soon as possible after the available time).
-
On the User Experience screen, choose Display in Software Center, and only show notifications for computer restarts from the drop-down list.
-
Click Summary to skip to the Summary screen.
-
On the Summary screen, check the settings and click Next to start the deployment.
-
If everything goes well you should see the message The Deploy Software Wizard completed successfully. Click Close to close the wizard window.
Speeding up and monitoring the progress of the installation
To speed up and monitor the progress of the installation:
-
In the Configuration Manager console, select the Assets and Compliance workspace.
-
Select the Device Collections node, right-click All Desktop and Server Clients and choose Client Notification > Download Computer Policy.
-
A dialog is displayed showing the number of resources in this collection. Click OK.
This process causes each of the Configuration Manager clients to download the new deployment policy you just created rather than waiting for them to do it on their regular schedule. This may speed up the uptake of the new deployment.
-
Select the Monitoring workspace and choose the Deployments node.
-
Right-click the 1E Client deployment and choose View Status from the context menu. You can view the next task when the current one finishes.
Reviewing the installation on the client
To review the installation on a Windows 10 client (Previous version of Windows may differ):
-
Login to the client with administrative privileges.
-
From the Start menu, type services in the search box to open the Services app, note the 1E Nomad Branch service is running.
-
Leave the Services App open, and from the Start menu, select Computer Management.
-
In Computer Management, expand Local Users and Groups and click Users. Note that the local user SMSNomadP2P& has been created.
-
Expand the Shared Folders node and click Shares, note that NomadSHR has been created – this is the The Content Distribution share.
-
Right-click NomadSHR and from the context-menu, choose Properties.
-
In the NomadSHR Properties dialog, note the path to the share as well as the 6 user (connection) limit.
-
Click the Share Permissions tab and note the permissions for the share.
-
Cancel the NomadSHR Properties dialog.
-
Leave Computer Management open and return to the Services app.
-
Right-click the 1E Nomad Branch service and select Stop.
-
Return to Computer Management and refresh the Shares node, note the NomadSHR is deleted when the service is stops.
-
Switch to Services and start the 1E Nomad Branch service.
-
Return to Computer Management and refresh Shares, note that the NomadSHR is recreated when the service starts.
-
Close Services and Computer Management.
-
Start Windows Explorer, and click folder Options.
-
On the View tab, ensure Hidden Files and Folders can be viewed, and uncheck Hide extensions for known file types and click OK.
-
Browse to C:\ProgramData\1E\NomadBranch, this is the folder that is shared as NomadSHR and is the root of the Nomad cache.
-
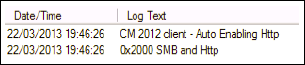
Browse to C:\Windows\CCM\Logs and double-click the NomadBranch.log to open it. Observe the Nomadservice startup activity in the log, note the client detected it is running on a Configuration Manager client and automatically enables the option to use HTTP and SMB.
-
Close the log file.
-
From the Start menu, run regedit.
-
Navigate to HKLM\Software\1E\NomadBranch. This registry key contains all the configuration options used by Content Distribution.
Reviewing the installation on a distribution point
The installation on the Distribution Point (DP) server results in the same components being installed on the server, however the service will automatically perform the LSZ generation and RDC processing if it identifies that it is running on Configuration Manager on a Site Server and DP. For standalone DPs (distribution point not on a site server) the MODULE.NOMAD.SIGSFOLDER and MODULE.NOMAD.SPECIALNETSHARE installer properties will need to be correctly configured to enable the LSZ generation and RDC processing to take place, and MODULE.NOMAD.PERMITTEDLSZSHARES may also need to be configured.
To review the installation on a site server distribution point:
-
Login to the server with administrative privileges.
-
From the Start screen, click Services. Note the 1E Nomad Branch service is running. Close the Services console.
-
From the Start screen, start typing regedit and click regedit when it appears in the search results. Note the HKLM\Software\1E\NomadBranch registry key.
-
From the Start screen type C:\ProgramData and press Enter to open the folder. Browse to the 1E\NomadBranch folder. Note that as this is a DP, the client has created the LSZFILES folder.
-
Browse to C:\Windows\CCM\Logs and open NomadBranch.log using cmtrace.exe
-
Near the top of the log file, notice that the computer has been identified as an SMS Site Server and an SMS distribution point.
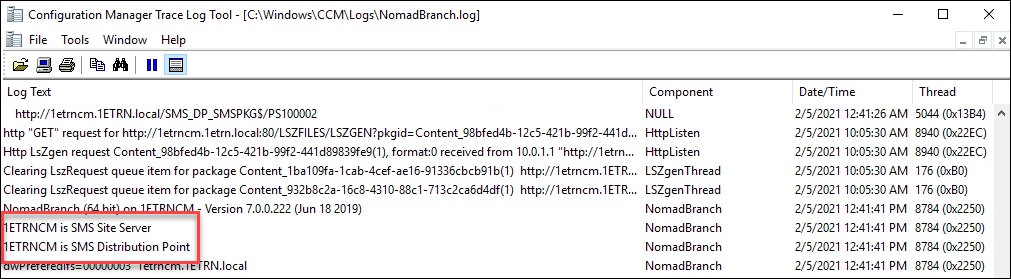
The HTTP LSZ generation option (normally set in SpecialNetShare) has also been enabled as Content Distribution has detected this is a Configuration Manager DP and will therefore be using HTTP.
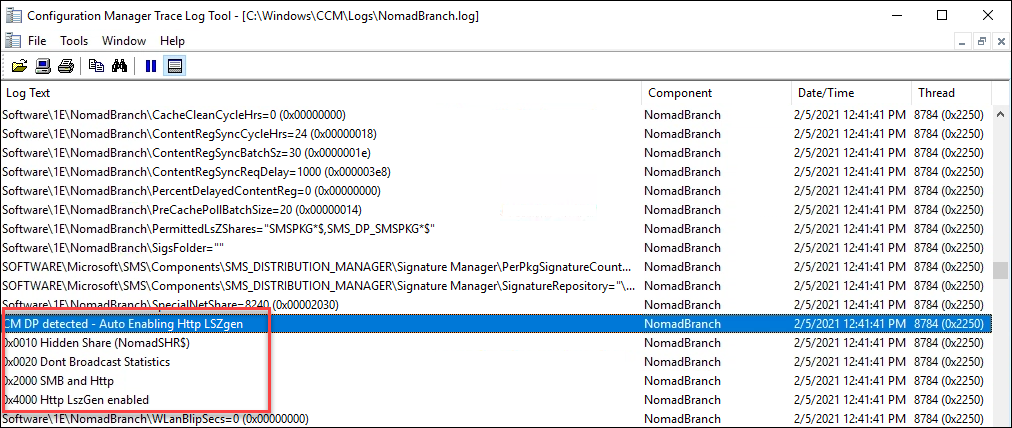
The LSZFILES folder is also established as a virtual directory in IIS.