Post-installation tasks
Post-installation tasks, these tasks include mandatory and optional configuration tasks.
App Menu
ServiceNow provides an application navigator that enables administrators to navigate from one screen to another easily. To use TeamViewer DEX CMDB Connect application, first install it from ServiceNow app store and then search for TeamViewer DEX CMDB Connect in the application navigator. Non-administrators (end users) do not see TeamViewer DEX CMDB Connect at all. The menu is shown in the picture.
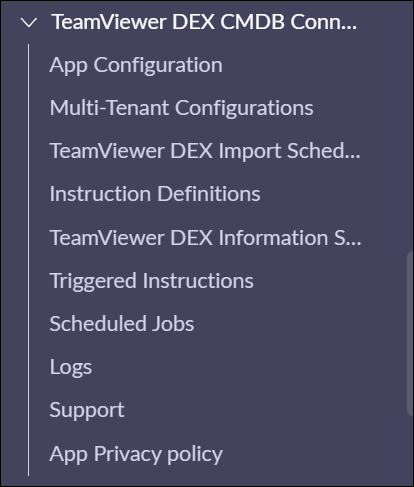
Here's an overview of the TeamViewer DEX CMDB Connect menu items and the roles needed to access each page:
|
Item |
Description |
Roles needed to view the Item's page |
|
|---|---|---|---|
|
TeamViewer DEX CMDB Connect app roles |
ServiceNow roles |
||
|
App Configuration |
Displays the application settings. |
x_1e_tachyon_cmdb.admin |
admin (System Administrator) |
|
Multi-Tenant Configurations |
Displays the settings screen for multi-tenant instances. |
x_1e_tachyon_cmdb.admin |
admin (System Administrator) |
|
TeamViewer DEX Import Schedules |
Displays a list of scheduled imports related to this application. |
x_1e_tachyon_cmdb.admin |
admin (System Administrator) |
|
Instruction Definitions |
Displays a list of available TeamViewer DEX CMDB Connect instructions. |
x_1e_tachyon_cmdb.admin |
admin (System Administrator) |
|
TeamViewer DEX Information Services |
Displays a list of available TeamViewer DEX CMDB Connect instructions that can be run on the targeted endpoints all at once. |
x_1e_tachyon_cmdb.admin, x_1e_tachyon_cmdb.config_manager |
admin (System Administrator) |
|
Triggered Instructions |
Displays a list of instructions that have been run. |
x_1e_tachyon_cmdb.admin |
admin (System Administrator) |
|
Scheduled Jobs |
Displays the scheduled jobs to retrieve instructions on daily basis. |
n/a |
admin (System Administrator) |
|
Logs |
Displays the application specific logs. |
n/a |
admin (System Administrator) |
|
Support |
Displays information on how to contact TeamViewer Support Portal. |
x_1e_tachyon_cmdb.admin |
admin (System Administrator) |
|
App Privacy policy |
Displays policy information explaining data handling practices to ensure transparency and regulatory compliance. |
x_1e_tachyon_cmdb.admin |
admin (System Administrator) |
App Configuration
After a successful TeamViewer DEX CMDB Connect install, an admin user must complete and save the App Configuration form listed under the TeamViewer DEX CMDB Connect module. Completing the configuration allows the TeamViewer DEX CMDB Connect app to communicate with TeamViewer DEX Platform.
The domain separation feature (single-tenant or multi-tenant) will be auto-populated based on the configuration done in TeamViewer DEX Core. It can be configured from the x_1e_core_connect.multi_tenant_instance system property. If you set this property to true, the multi-tenant feature is activated; otherwise, the single-tenant feature is enabled. Depending on whether you have a single or multi-tenant Instance, you should now follow the instructions in one of these pages:
 Configuring single-tenant instance
To test whether the application is successfully synced with Platform, click Test Server Connection in the top right corner. Once the connection is established, click Retrieve Instruction to import the instructions from Platform into ServiceNow.
If all the toggle options for devices are disabled, then no devices would be synced from Platform into ServiceNow.
The App Configuration page displays these fields:
|
Configuration field |
Description |
|---|---|
|
TeamViewer DEX User Name |
This is the user configured in ServiceNow and is responsible to fetch or execute instructions to or from Platform. Enter the username and domain here. |
|
TeamViewer DEX User Password |
This is the password for Platform user to fetch and execute instructions. |
|
TeamViewer DEX Instructions keep answers minutes |
This value is used when ServiceNow sends an instruction to Platform and displays how long a response is active after the instruction is executed, with a default value of 120 with a valid range between 10 and 10080. The same feature is available in TeamViewer DEX Core as well. If an admin has not provided a value, Platform uses the value saved in the TeamViewer DEX Core app. |
|
TeamViewer DEX Instructions gather data minutes |
This value shows the timeframe in minutes for how long Platform should gather the instruction response data. It has a default value of 60 with a valid range between 10 and 10080. The same feature is available in TeamViewer DEX Core as well. In case admin has not provided any value, then Platform by default considers the value saved in TeamViewer DEX Core app. |
|
Page size |
When devices are fetched (synced) from Platform into ServiceNow, these are fetched into batches. This feature sets the batch size for same. The default value is set to 1000. |
|
Response batch size |
The responses of instruction that are fetched from Platform into ServiceNow are fetched into batches. This feature sets the batch size for these responses. The default value is set to 100. |
|
Response batch size for TeamViewer DEX Information Service |
The feature TeamViewer DEX Information Service trigger instructions on all available end-user devices at once. These responses of instructions that are fetched from Platform into ServiceNow are fetched into batches. This feature sets the batch size for these responses. The default value is set to 1000. |
|
Response API wait seconds for TeamViewer DEX Information Service |
When an instruction is triggered from ServiceNow to Platform as a part of TeamViewer DEX Information Service, there is a continuous calling from ServiceNow to Platform for fetching the responses. In case there is no response available on Platform for this instruction, then the next response call is triggered after these many seconds. The default value is set to 10. |
|
Test Server Connection |
This button checks whether the integration between Platform and ServiceNow has been established successfully. |
|
Retrieve Instructions |
This button retrieves instructions into your ServiceNow Instance. On clicking of this button, you will receive an appropriate message. A scheduled job TeamViewer DEX Platform-Retrieve Instruction is added. This scheduled job will allow users to retrieve instructions from Platform periodically. |
|
Save |
This button allows you to save your settings. |
There is a continuous counter on Platform from ServiceNow for getting responses. If responses are not empty, then the counter is set to 0 whereas if responses are empty (i.e. there is no response) then the counter is increased by 1. In case there is no response for more than three times from Platform, then we increase this wait time as shown in the following formula:
Wait time = (Counter value / 3) * 5 * (Response API wait seconds for TeamViewer DEX Information Service)
For example: If wait counter is 7 and wait time is set to 10 seconds by an admin on the configuration page, then wait time = (7 / 3) * 5 * 10 = 2 * 50 = 100 seconds.
The value 5 here is called a poll multiplier. To change this value, update the value in the x_1e_tachyon_cmdb.pollMultiplier property.
The listed devices allow an admin user to configure the types of devices that are to be synced from Platform to ServiceNow. In the current version, the Endpoints (Desktop/Laptop) and Windows Server are available for configuration. This toggle allows the population of endpoint devices (cmdb_ci_computer) and Windows server (cmdb_ci_win_server).
Configuring multi-tenant instance
To configure TeamViewer DEX CMDB Connect when your ServiceNow instance is domain separated, follow the steps below:
The domain separation feature (single-tenant or multi-tenant) will be autopopulated. It can be configured from the x_1e_core_connect.multi_tenant_instance system property. Subsequently, any settings seen on the TeamViewer DEX Core App Configuration page and on the TeamViewer DEX CMDB Connect App Configuration page will no longer be used. Instead, domain specific settings will have to be done on the Multi-Tenant Configuration page. This page allows an admin user to set up the details required by the application to communicate with Platform in domain separated instances.
Multi-Tenant Configurations is a sub-menu available under the Administration tab of TeamViewer DEX CMDB Connect. This page shows the list of all the available multi-tenant configurations. This configuration can be done only when the domain separation system property is enabled in the TeamViewer DEX Core application.
To configure Platform and associate with a particular domain, click New. You will then need to fill out the values against each of the settings. All the fields on the page are mandatory except for the Enable Approval checkbox.
A table describing each field, and expected values, is given below. Only one configuration record per domain can exist in the list.
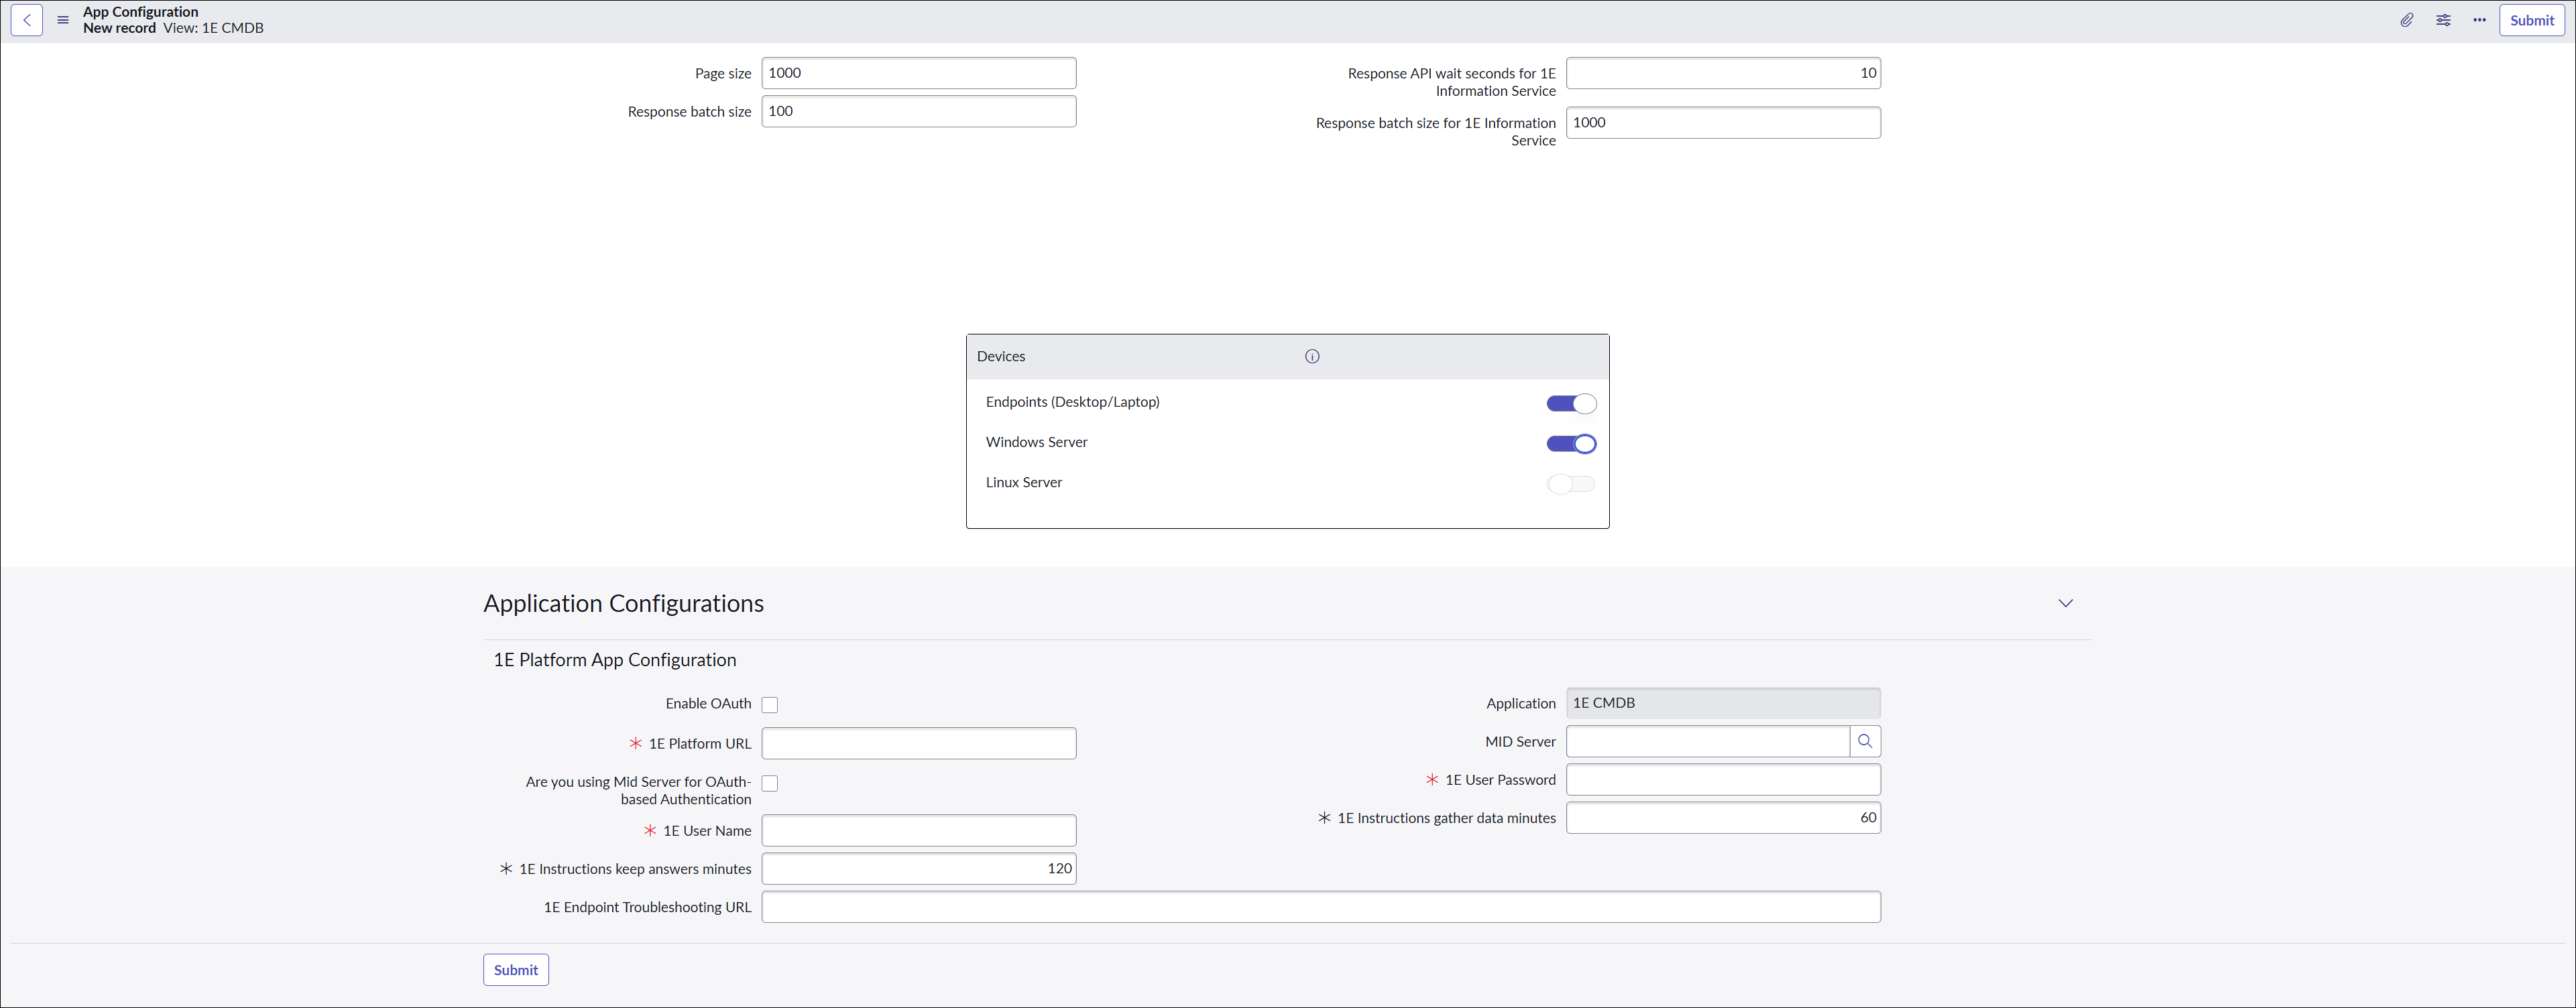
The Multi-Tenant Configurations page for basic authentication is shown below.
The Multi-Tenant Configurations page for OAuth authentication is shown below.
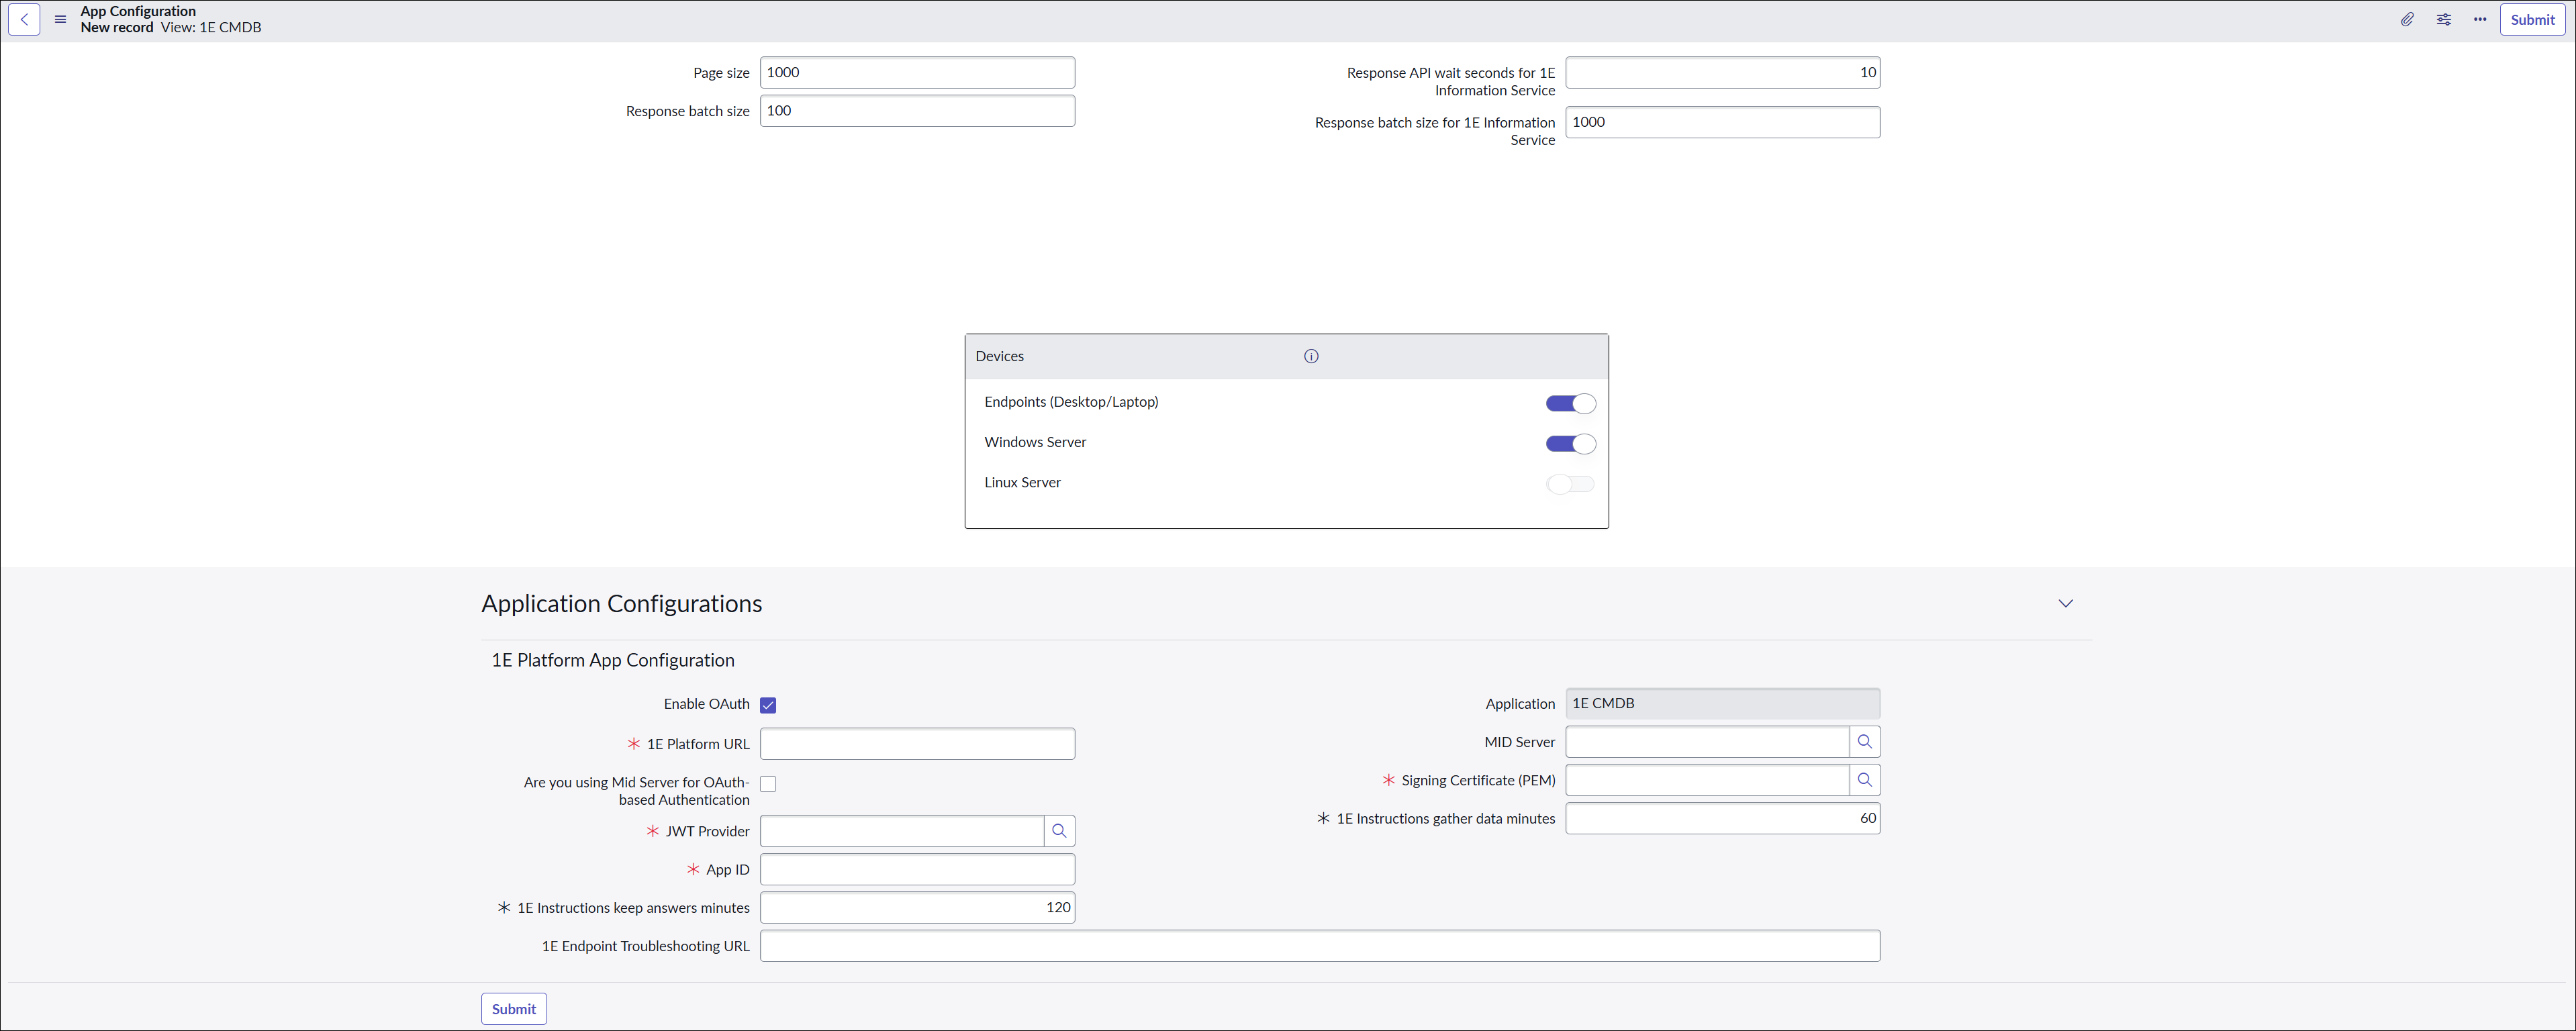
The following table describes the fields available on this page. Each of these settings becomes unique to a particular domain. If you configure multiple domains and have one Platform for each of the domains, you will need to create multiple records. There are few additional fields available for users with OAuth authentication, as mentioned below.
|
Field |
Description |
|---|---|
|
Page size |
This setting specifies the default page size of response table. The available values for this property are 10, 25, 50, and 100. By default, 10 is selected. |
|
Response batch size |
This setting specifies the number of result sets that are fetched from Platform in one call. Each time the user clicks the load more link, a new call is made and the specified number of responses from Platform are stored in the ServiceNow table. For example, if a user triggered an instruction with a batch size of 100 and the instruction is expected to bring 500 records in total from Platform, then the first response will be returned as soon as the first batch of 100 records are ready. When the ServiceNow user clicks the load more link, then the next set of 100 responses will be loaded and so on. |
|
Response API wait seconds for TeamViewer DEX Information Service |
When an instruction is triggered from ServiceNow to Platform as a part of TeamViewer DEX Information Service, there is a continuous calling from ServiceNow to Platform for fetching the responses. In case there is no response available on Platform for this instruction, then the next response call is triggered after these many seconds. The default value is set to 10. |
|
Response batch size for TeamViewer DEX Information Service |
The feature TeamViewer DEX Information Service trigger instructions on all available end-user devices at once. These responses of instructions that are fetched from Platform into ServiceNow are fetched into batches. This feature sets the batch size for these responses. The default value is set to 1000. |
|
Devices |
The listed devices allow an admin user to configure the types of devices that are to be synced from Platform to ServiceNow. In the current version, the Endpoints (Desktop/Laptop) and Windows Server are available for configuration. This toggle allows the population of endpoint devices (cmdb_ci_computer) and Windows server (cmdb_ci_win_server). |
|
Application |
Name of the application from where the configuration record is created. Auto-populated by TeamViewer DEX CMDB Connect. |
|
Enable OAuth |
This checkbox controls the application's authentication method. When selected, the application will authenticate via Modern Authentication; if not selected, it will authenticate via Basic Authentication. |
|
MID Server |
The MID server name used by Platform, if applicable. A MID Server is a software application which gets installed on any local machine with internet connectivity. It can access the Platform server on the local network and is configured to point to the desired ServiceNow instance on the Internet. MID Servers are specific to the release version of ServiceNow and must be downloaded from the ServiceNow instance itself. For more information about the MID Server set up, please refer to the ServiceNow MID Server installation documentation. Multiple MID Servers can be installed on a single machine, and they can be configured to connect to either the same or different ServiceNow instances. Note : When installing an MID Server, ensure to install it in the correct domain in which you will connect the MID Server with Platform. |
|
TeamViewer DEX Platform URL |
The URL for the Platform server. |
|
Are you using MID Server for OAuth-based Authentication |
This checkbox determines whether an application will use an MID Server with OAuth on-premises. It has no impact if the application uses Basic Authentication with the MID Server, and the functionality remains unchanged. When selected, the application will use the MID Server for OAuth; if not selected, it will not. |
|
TeamViewer DEX User Name and TeamViewer DEX User Password |
This is the domain user name and password for a user that is assigned to an Actioners role in Platform. Enter the user name in the format domain\username. |
|
JWT Provider |
This setting contains the JWT Provider that is associated with a JWT Key. Its SysID is passed onto retrieve the JWT Token. |
|
Signing Certificate (PEM) |
This setting allows you to select the required PEM (.pem) file. It contains a Public key and a Private key in base64 encoded standard format. |
|
App ID |
This setting specifies the App ID, which is unique to an Identity Provider (IdP). This is the key identifier generated by the resource server and sent as a key ID claim. |
|
TeamViewer DEX instructions keep answers minutes |
This setting is specific to Platform. The value is used when ServiceNow sends an instruction execution request to Platform and controls the number of minutes that Platform should keep the instruction responses active. The setting unit is minutes. This has a default value of 120 minutes with a valid range between 10 and 10080. |
|
TeamViewer DEX instructions gather data minutes |
This setting is specific to Platform. The value is used when ServiceNow sends an instruction execution request to Platform and controls the number of minutes that Platform should continuously gather an instruction's responses. The setting unit is minutes. This has a default value of 60 minutes with a valid range between 10 and 10080. |
|
TeamViewer DEX Endpoint Troubleshooting URL |
This setting is used to open Endpoint Troubleshooting from the "Related Links" within an Incident. This does not affect the connectivity between ServiceNow and Platform, but rather points to Endpoint Troubleshooting directly. |
|
Submit |
This button allows you to save your settings. |
|
Test Server Connection |
This button checks whether the integration between Platform and ServiceNow has been established successfully. |
|
Retrieve Instructions |
This button retrieves instructions into your ServiceNow Instance. On clicking of this button, you will receive an appropriate message. A scheduled job TeamViewer DEX Platform-Retrieve Instructions is added. This scheduled job will allow users to retrieve instructions from Platform periodically. |
|
Delete |
This button allows a specific record created for multi-tenant to be deleted. |
Completing this configuration allows the connector to communicate with Platform. To test whether the application is successfully synced with the Platform, click Test Server Connections in the top right corner. Once the connection is established, click Retrieve Instructions to import the instructions from Platform into ServiceNow.
Cross-scope privilege
To add the cross-scope privilege to your TeamViewer DEX CMDB Connect application for multi-tenant configuration, follow the steps below:
-
Login to your ServiceNow instance.
-
Type cross in the filter navigator and press enter. Select Application Cross-Scope Access from the search result.
-
This opens up Cross-Scope privileges page, click New to create a new record.
-
Fill in the required fields as shown below.

The following table describes the fields available on this page.
Field
Description
Source Scope
The scope to which cross-scope privilege is added.
Application
The name of the application to which cross-scope privilege is added.
Target Scope
Set the scope as TeamViewer DEX Core.
Operation
Defines the type of operation to be performed. The suggested values are Read, Write, Create, and Delete.
Status
Defines the status of the operation. The suggested values are Requested, Denied, and Allowed.
Target Name
The name of the application configuration table used for multi-tenant configuration.
Target Type
This field indicates the type of the target inserted. The suggested values are Table, Script Include, Scriptable.
-
Click Submit to save the changes.
Once you have made the above changes, return to your multi-tenant configuration page. To verify that the application is successfully synced with Platform, click Test Server Connection in the top right corner. Once the connection is established, click Retrieve Instruction to import the instructions from Platform into ServiceNow.
Personalizing your Computers List
To configure the Computers list for TeamViewer DEX CMDB Connect, follow these steps:
-
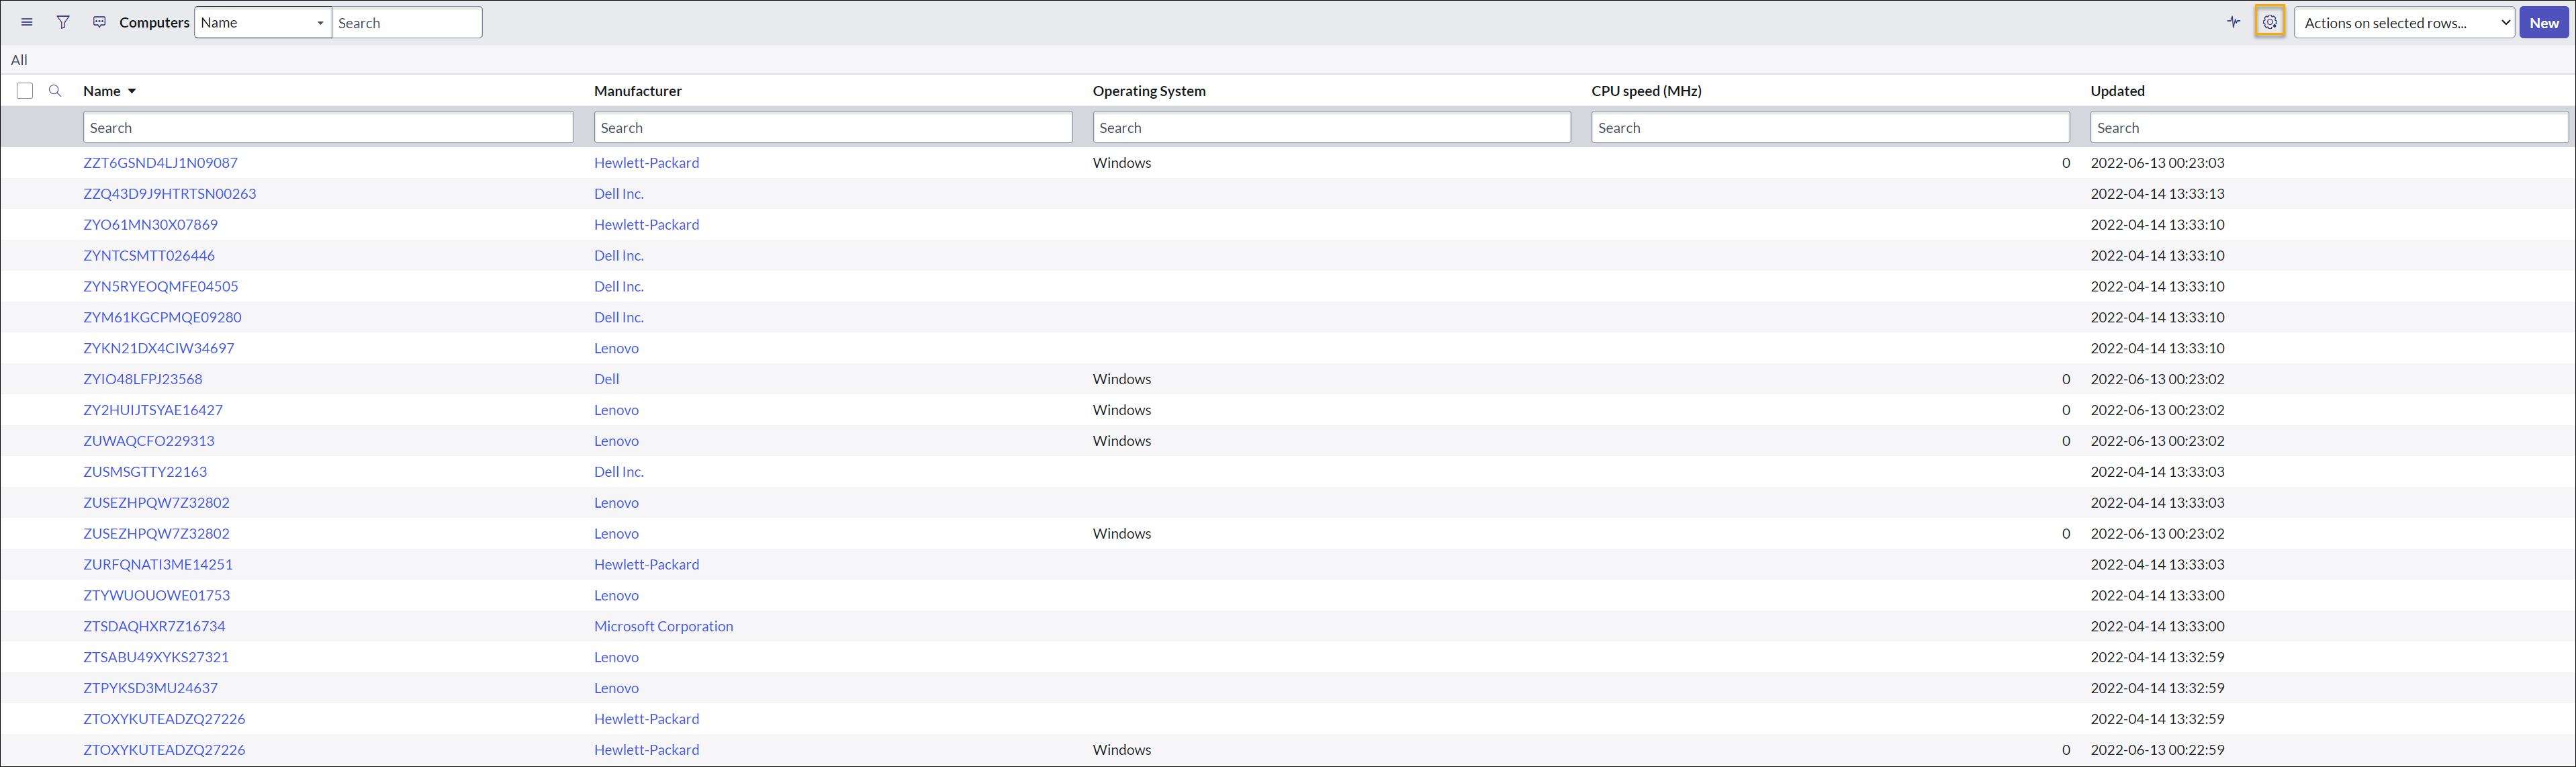
Type cmdb_ci_computer.list in filter navigator and press enter. If you have not added any fields to the Personalize List, then it will only show the default fields, as shown in the picture below.
-
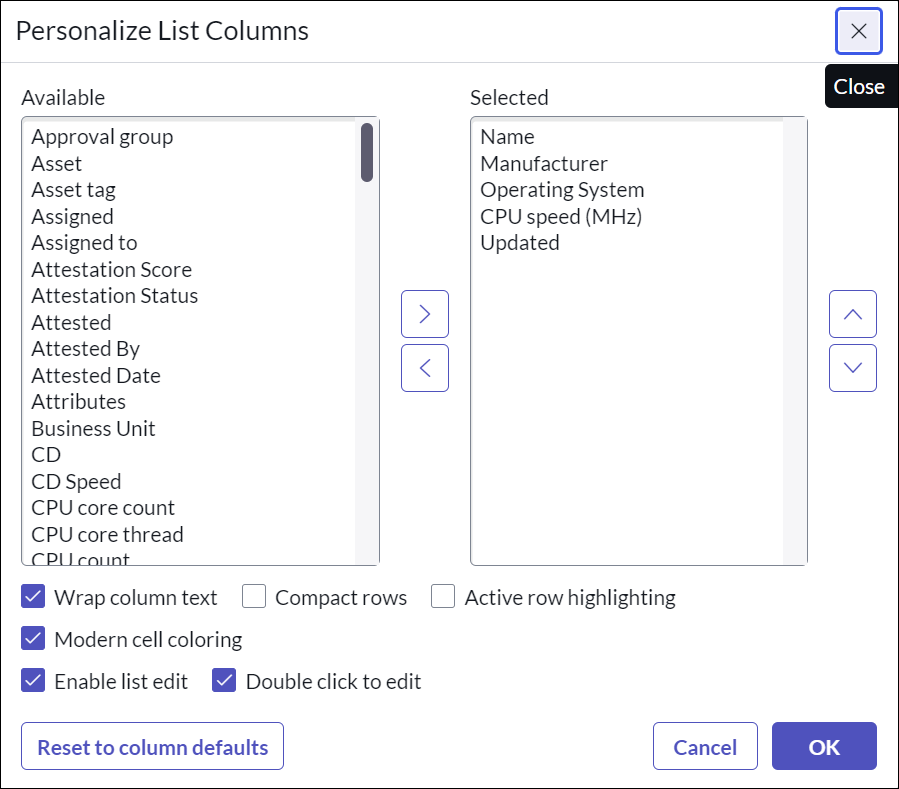
To add more fields, click the Personalize List (cogwheel icon) given in the top right corner and then select the fields from Personalize List Columns that you want to see in your Computers table and click OK to save.
-
Once you refresh, you can now see all the selected fields in the Computers table.
Configure these system properties
The Computes page retrieves and displays information about devices from the Computer table. You can add more details to the Computer table by adding these two system properties. By configuring the system property x_1e_tachyon_cmdb.enable_all_fields_mappings the below mentioned fields get mapped to the Computer table, otherwise you don't see these fields:
-
CPU Type
-
CPU Name
-
RAM
-
Chassis Type
On the other hand you can configure the system property x_1e_tachyon_cmdb.enable_os_name_with_version. By setting the value of this property to true you can get the full name of the OS along with version displayed in the Computer table.
Adding CMDB Connect tab for Computers
To perform this task, ensure that your current application scope is Global.
To configure the Computer form for TeamViewer DEX CMDB Connect, follow these steps:
-
Type cmdb_ci_computer.list in filter navigator and press enter.
-
This opens up the Computers page as shown in the picture. To open an existing record of a device, click the Name or Fully qualified domain name, whichever is the first field listed in the table. You can also click the information icon of the device to open an existing record. You can also click the New button given at the top for a blank record.
-
A form will open up as shown in the picture below.
-
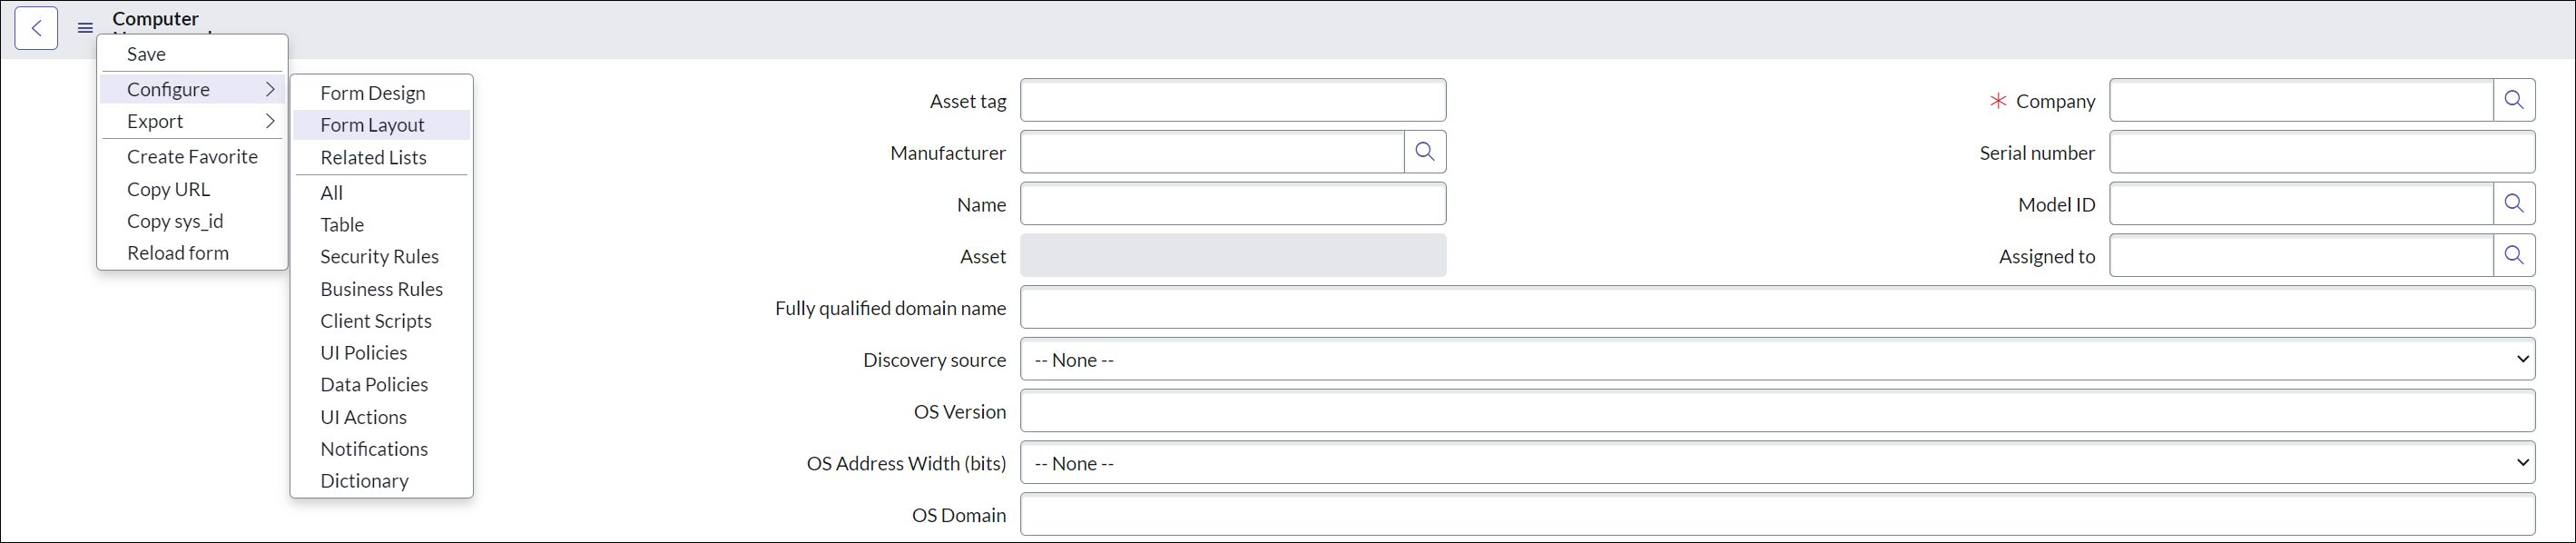
Click the hamburger (three horizontal bars) and select Configure, then select Form layout.
-
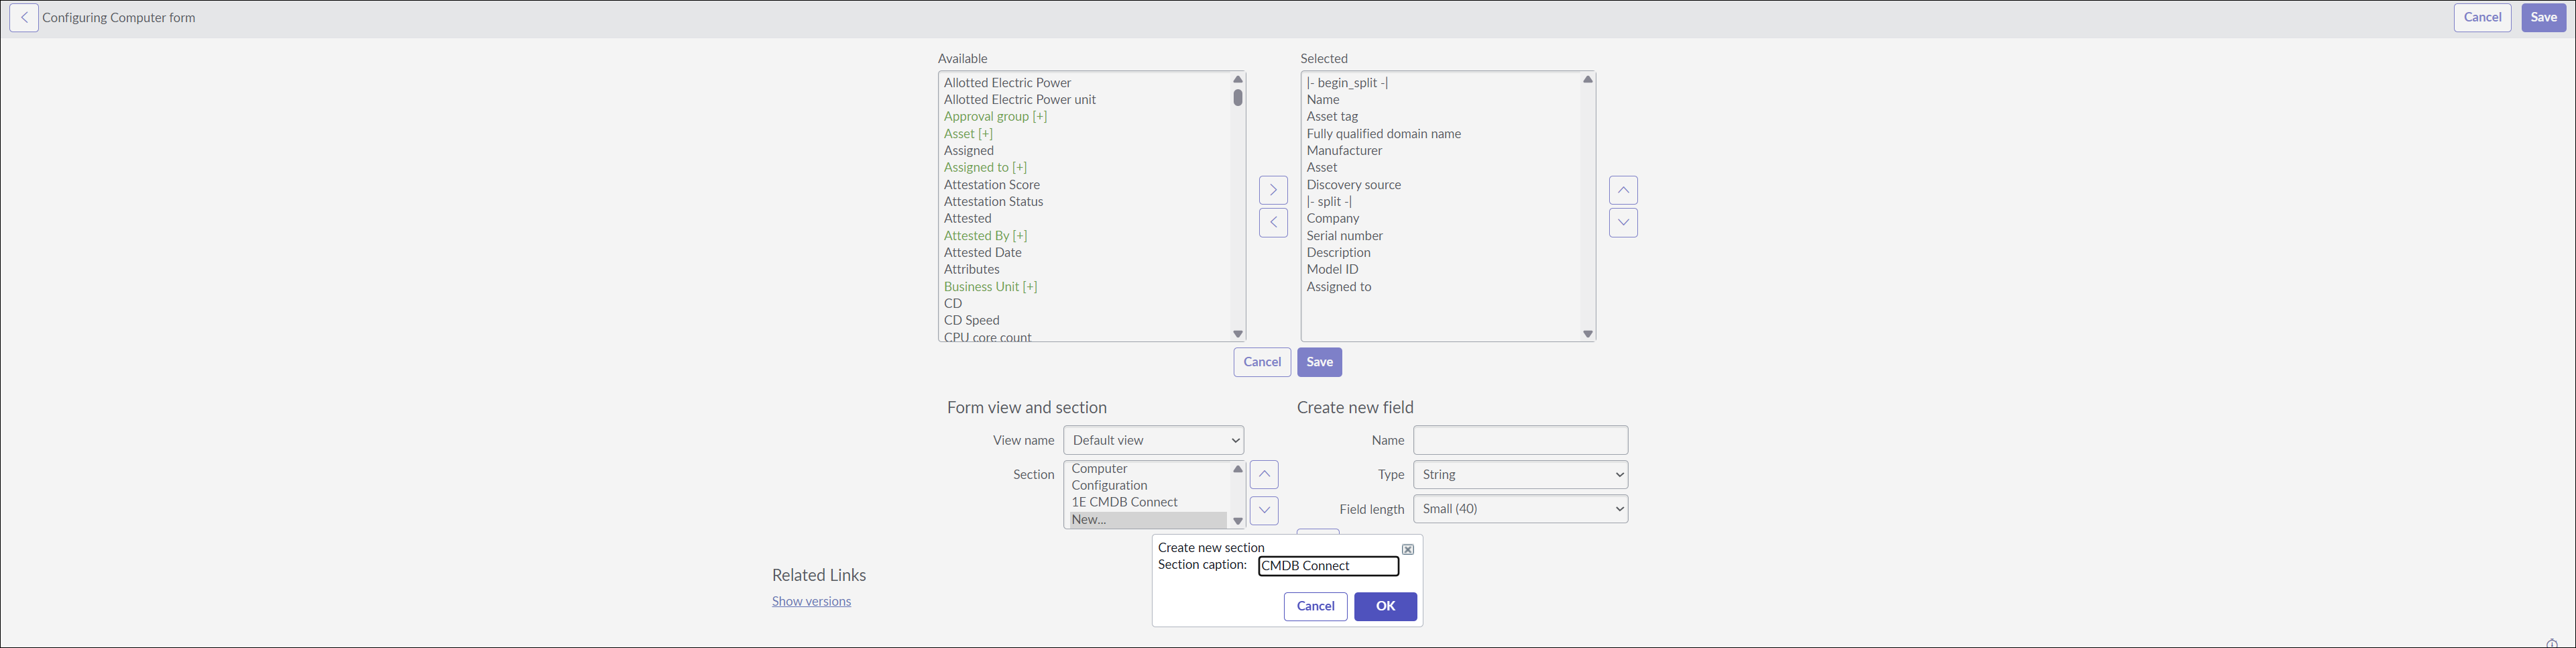
On the Configuring Computer Form page, under the Form view and Section, select New... item in the Section drop down list to create a new section.
-
A pop-up for Create New Section opens up. Type the section caption as CMDB Connect and click OK.
-
After successful creation of the section, select CMDB Connect in Section and move 1E CMDB Connector item from Available to Selected list box. Click Save to complete the form layout setup.
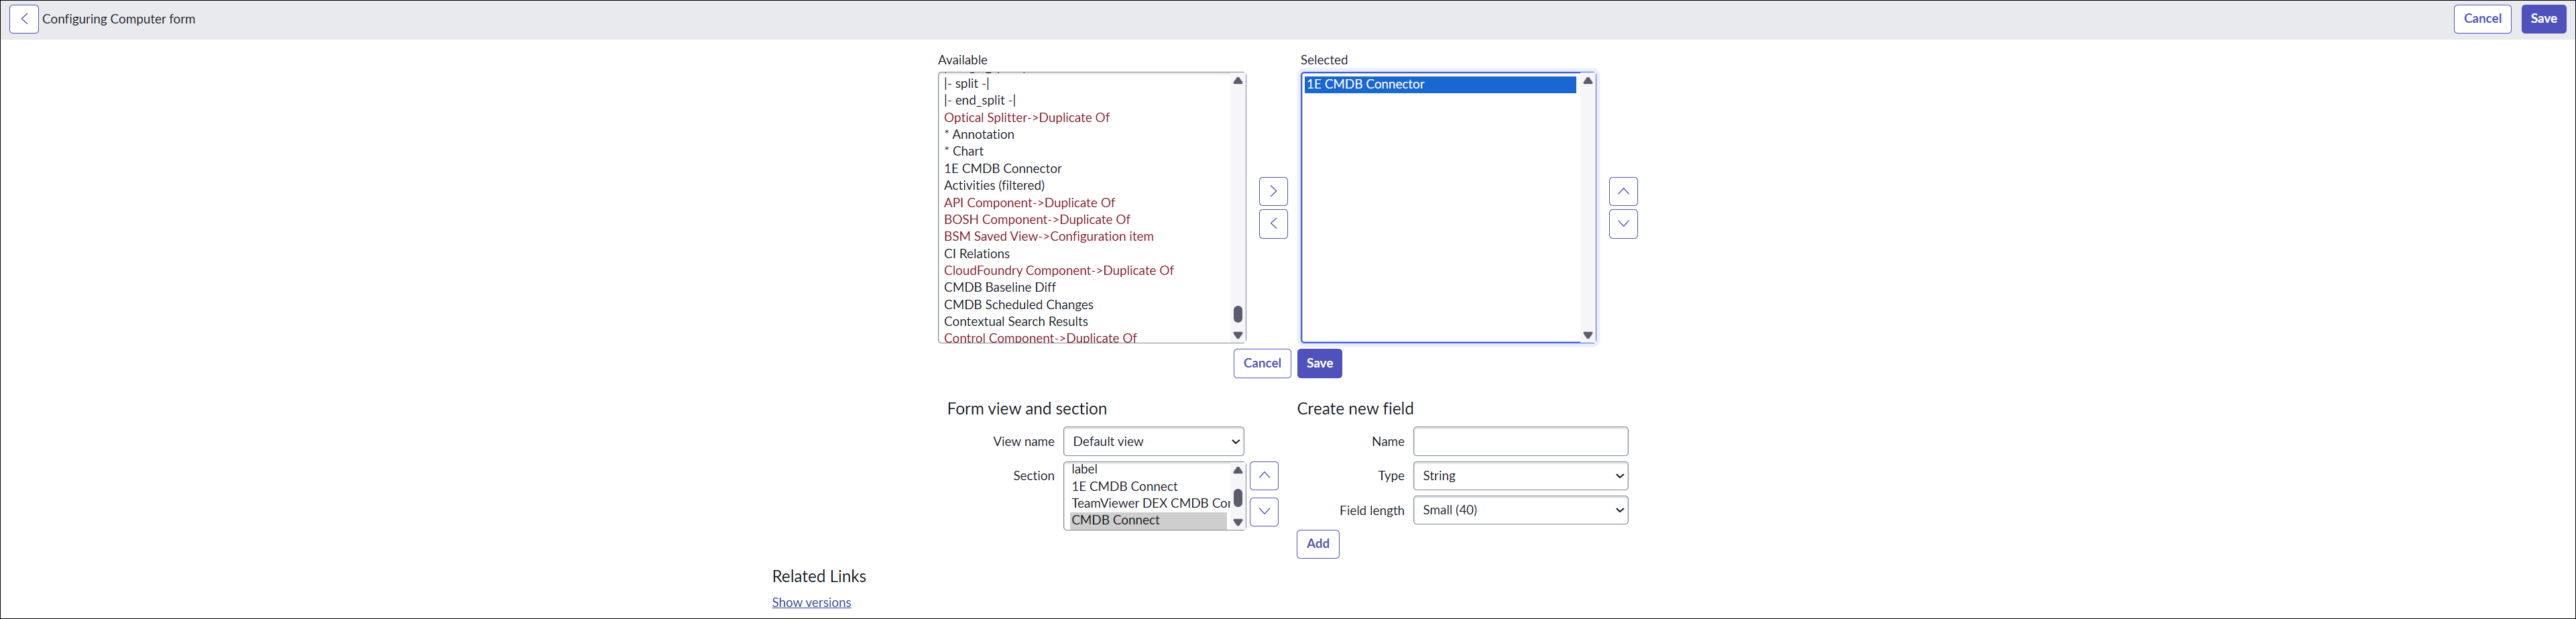
-
Now open any existing record for device in cmdb_ci_computer table, and you can see that the CMDB Connect tab (with TeamViewer logo) is now available.
An admin user can add multiple tabs of any specification as required.
Adding Related Lists for Computers
To perform this task, ensure that your current application is Global.
Follow these steps to configure Related Lists:
-
Type cmdb_ci_computer.list in the filter navigator and press enter.
-
To open an existing device record on the Computers page, click the Name or Fully qualified domain name, whichever is the first field in the table. You can also click the information icon of the device to open an existing record. You can also click New given at the top of the page for a blank record.
-
A form will open up as shown in the picture below.
-
Click the hamburger (three horizontal bars), select Configure, then select Related Lists.
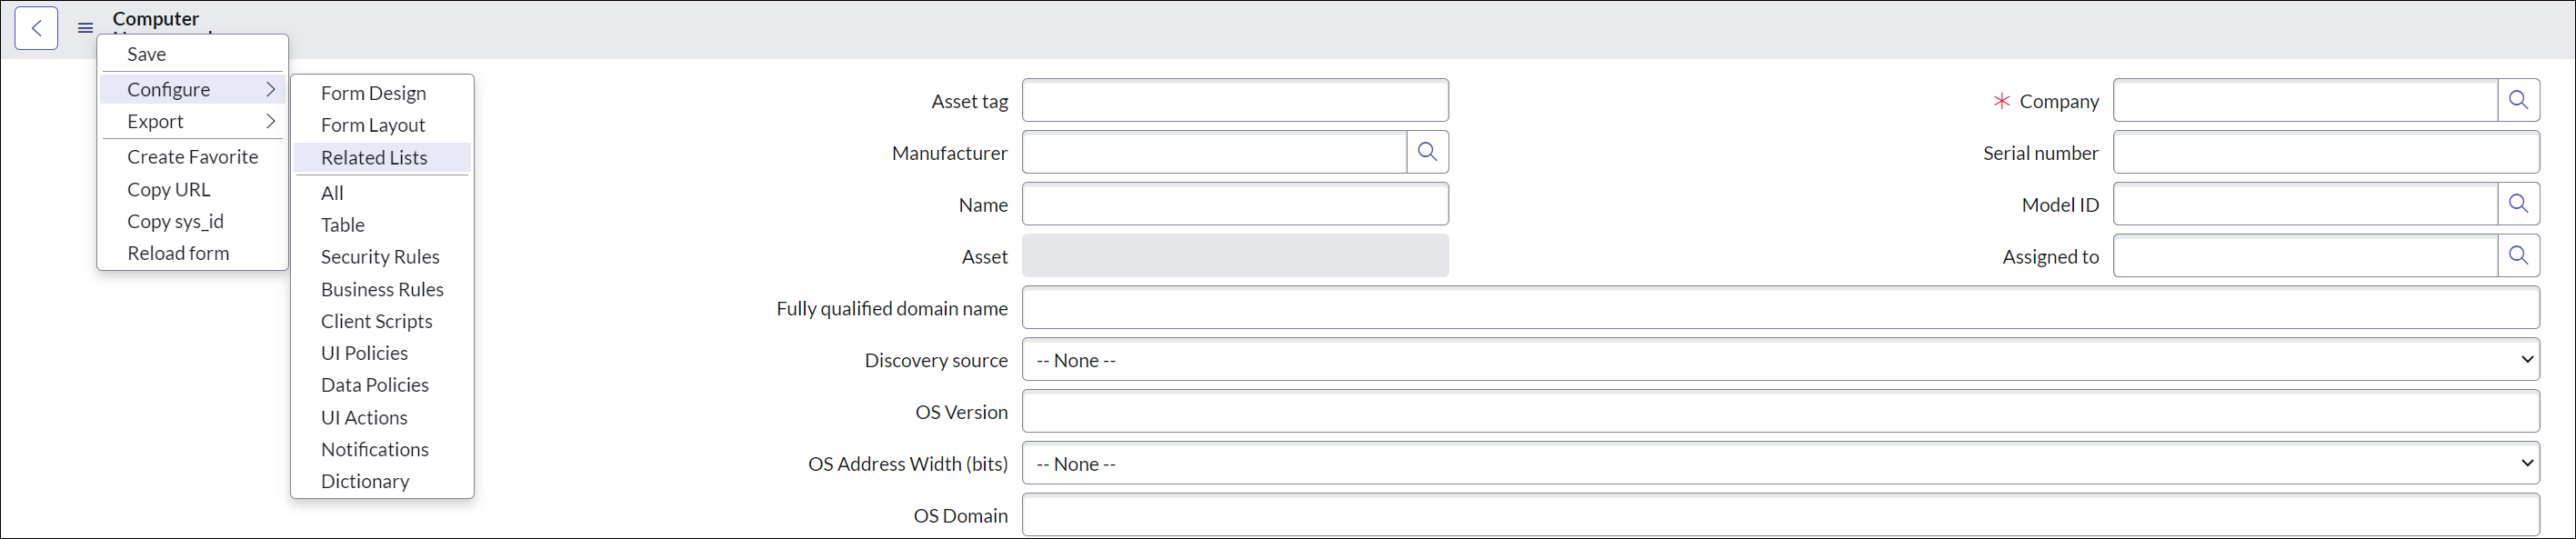
-
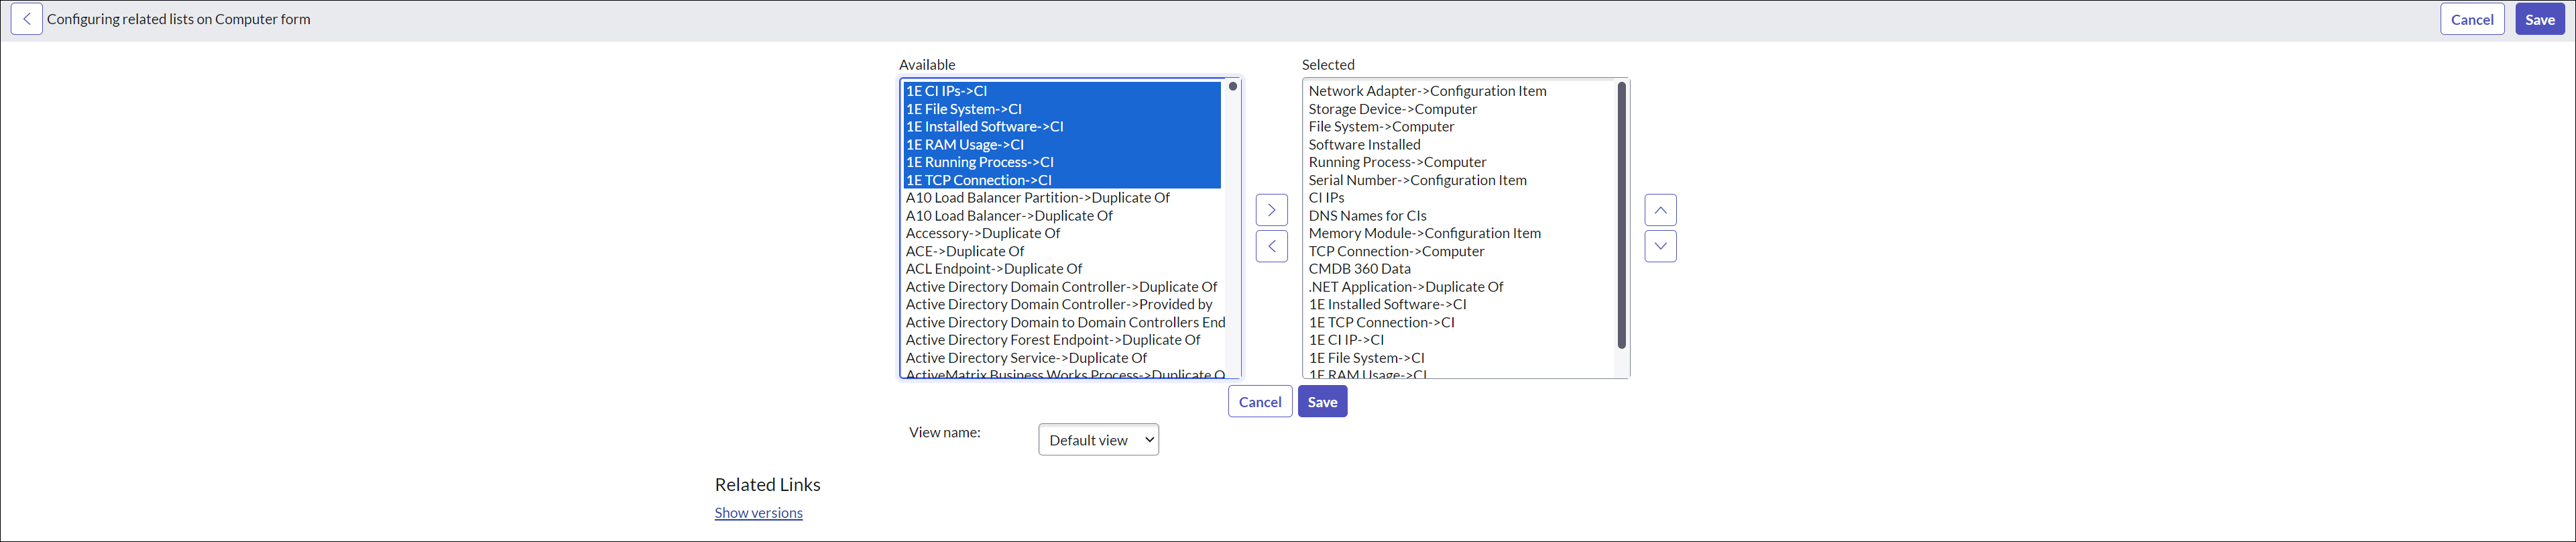
On the Configuring related lists on Computer form screen, select all six options present in Available list and move them onto the right under Selected list using > arrow as shown in the picture below.
-
Click the Save to save the selection of lists. Now open any existing record for device in cmdb_ci_computer table and observe that the related lists (with TeamViewer logo) are available.
For each selected related list, there is a respective button added on the Computer page. When you click a button, the related instruction is triggered. The table below shows the mapping between the related list and the respective Tachyon instruction:
|
Related list |
Required instruction |
|---|---|
|
CI IPs |
1E-Explorer-TachyonCore-GetIpAddresses.xml |
|
File Systems |
1E-Explorer-TachyonCore-LogicalDiskDetails.xml |
|
Installed Software |
1E-Explorer-TachyonCore-AllInstalledSoftware.xml |
|
RAM Usage |
1E-Explorer-Examples-GetMemoryFromSysInfo.xml |
|
Running Process |
1E-Explorer-TachyonCore-NetworkListeningProcessesAndPorts.xml |
|
TCP Connections |
1E-Explorer-Examples-GetConnections.xml |
An admin user can add any number of Related Lists as required.
Adding 1E CMDB as a discovery source
Follow the steps below to add 1E CMDB as a discovery source:
-
Type sys_choice.do in the filter navigator. This opens into a form that allows an admin user to add a new record to the sys_choice table.
-
In Table drop-down list, select Configuration Item [cmdb_ci].
-
In Element Textbox type discovery_source.
-
Type 1E CMDB in Label text box.
-
Type 1E CMDB in Value text box.
-
Click Submit.
-
1E CMDB is successfully added as a discovery source.

Adding Windows Server table
After you have saved the configuration on App Configuration page, to populate Windows server devices in the CMDB table, you need to perform these tasks.
To configure form layout and related list for Windows server table for TeamViewer DEX CMDB Connect, follow these steps:
-
Ensure that your current application scope is Global.
-
Type cmdb_ci_win_server.list in the filter navigator and press enter.
-
This opens up the Windows Server page as shown in the picture. To open an existing record of a device, click Name or Fully qualified domain name, whichever is the first field listed in the table. You can also click the information icon of the device to open an existing record. To open a new or blank record, you can click the New button.

-
A blank record opens up as shown in the picture below.
-
Click the hamburger (three horizontal bars) or right-click the header and select Configure, then select Form layout.
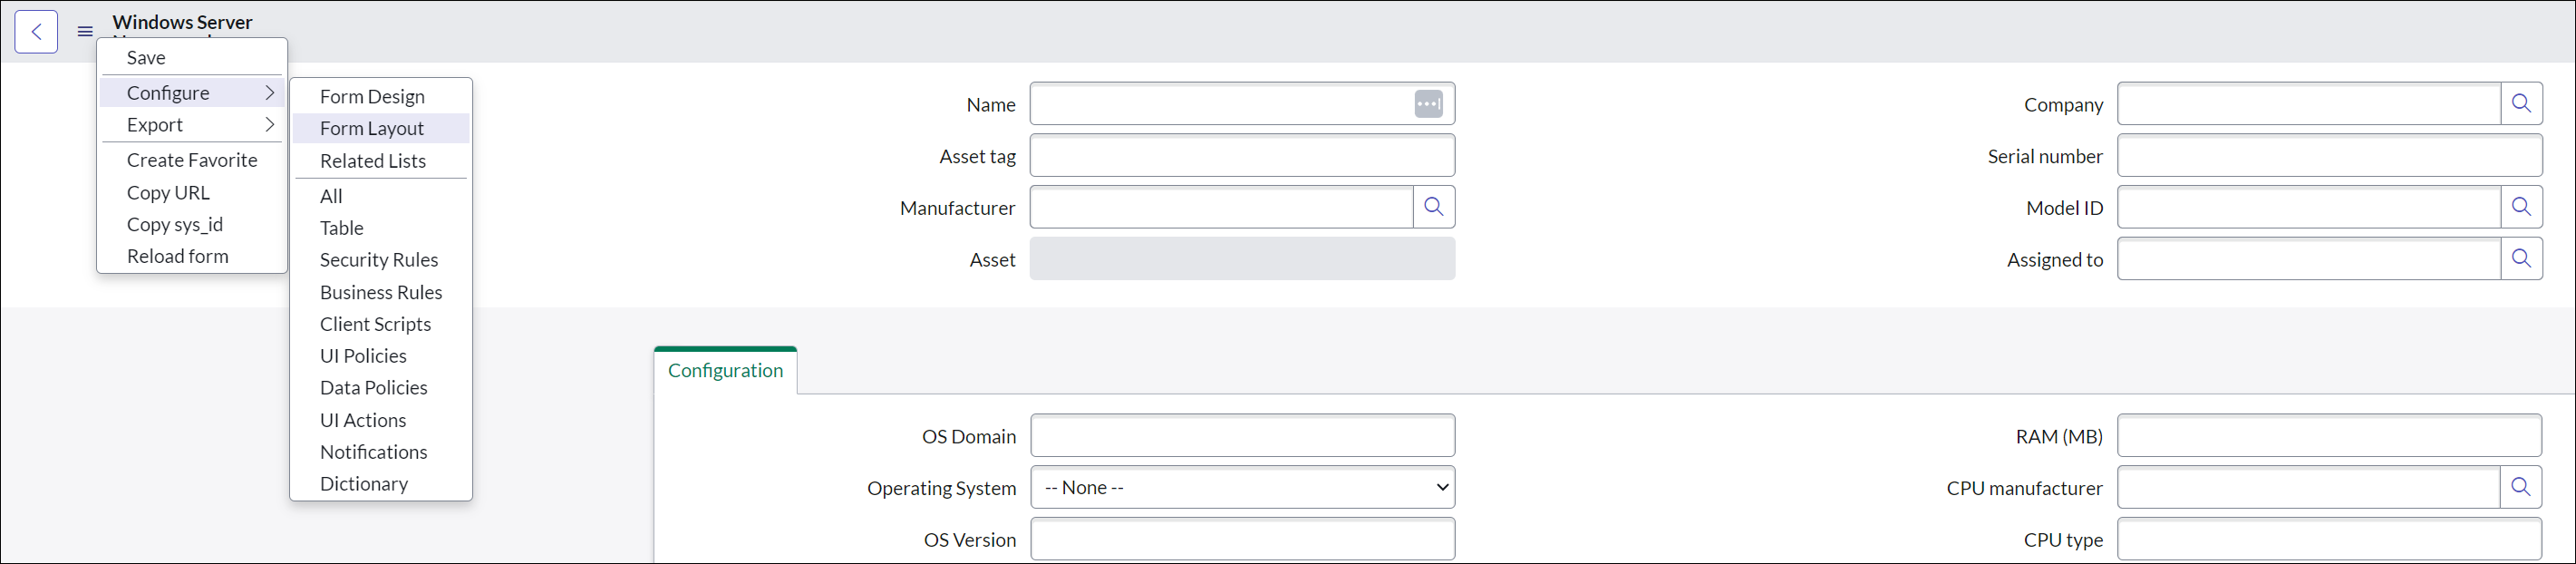
-
On the Configuring Windows Server Form page, under the Form view and Section, select New... item in the Section drop down list to create a new section.
-
A pop-up for Create New Section opens up. Type the section caption as CMDB Connect and click OK.
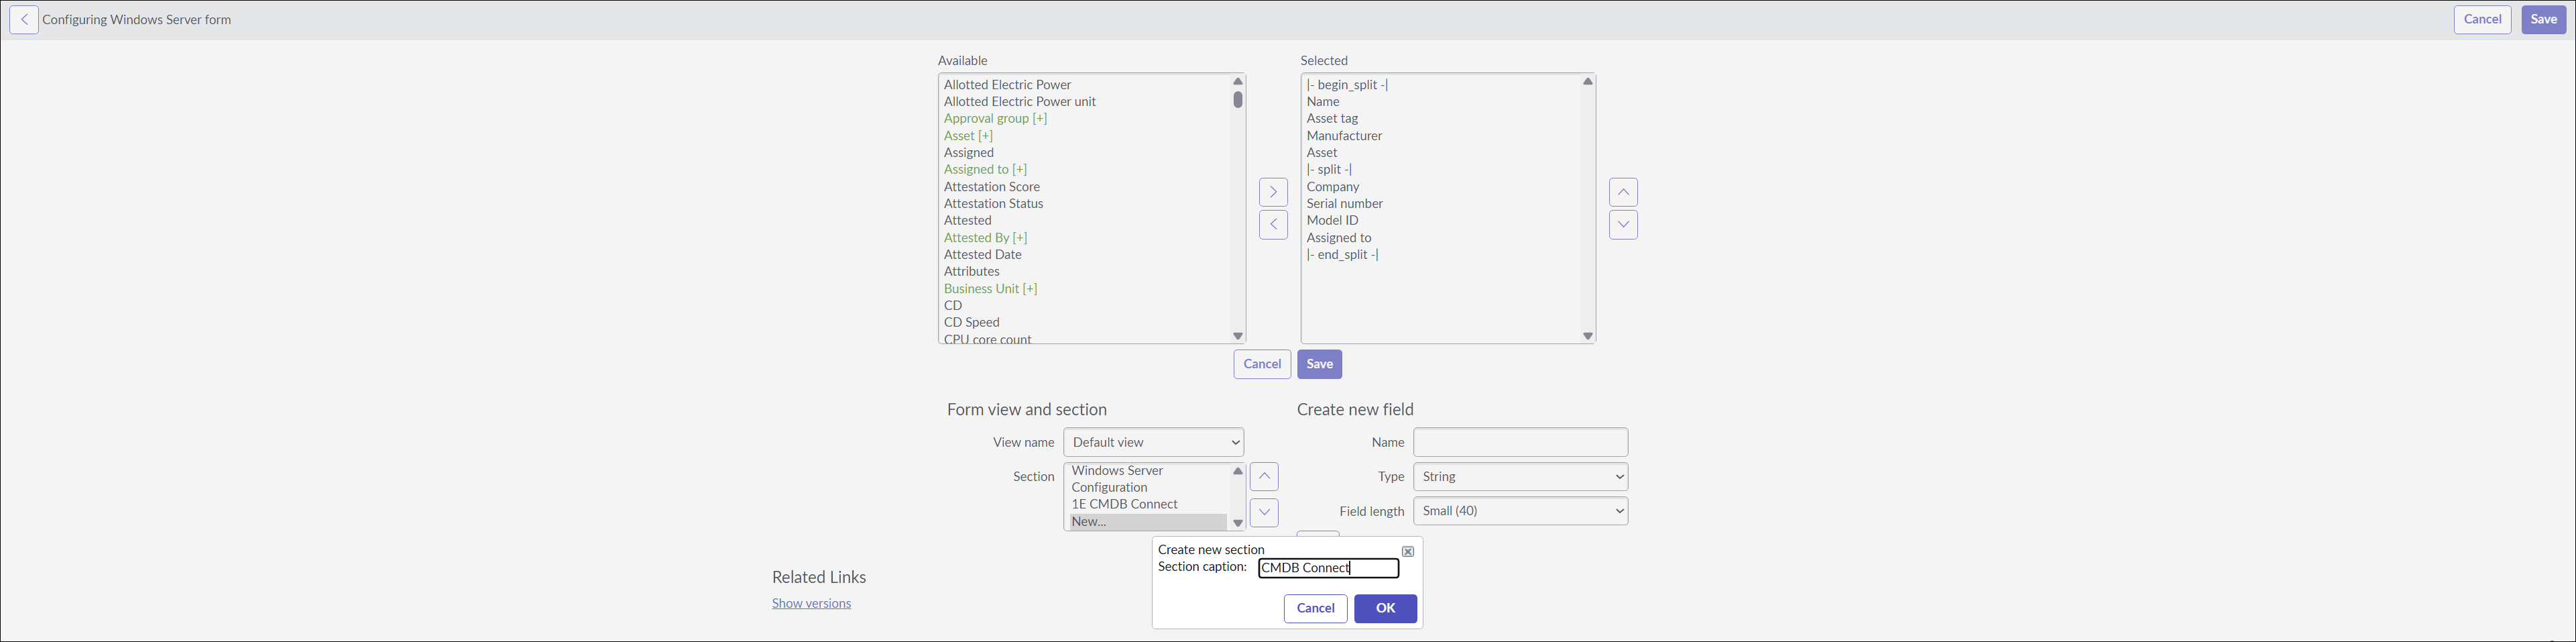
-
After successful creation of the section, select CMDB Connect in Section and move 1E CMDB Connector item from Available to Selected list box. Click Save to complete the form layout setup.
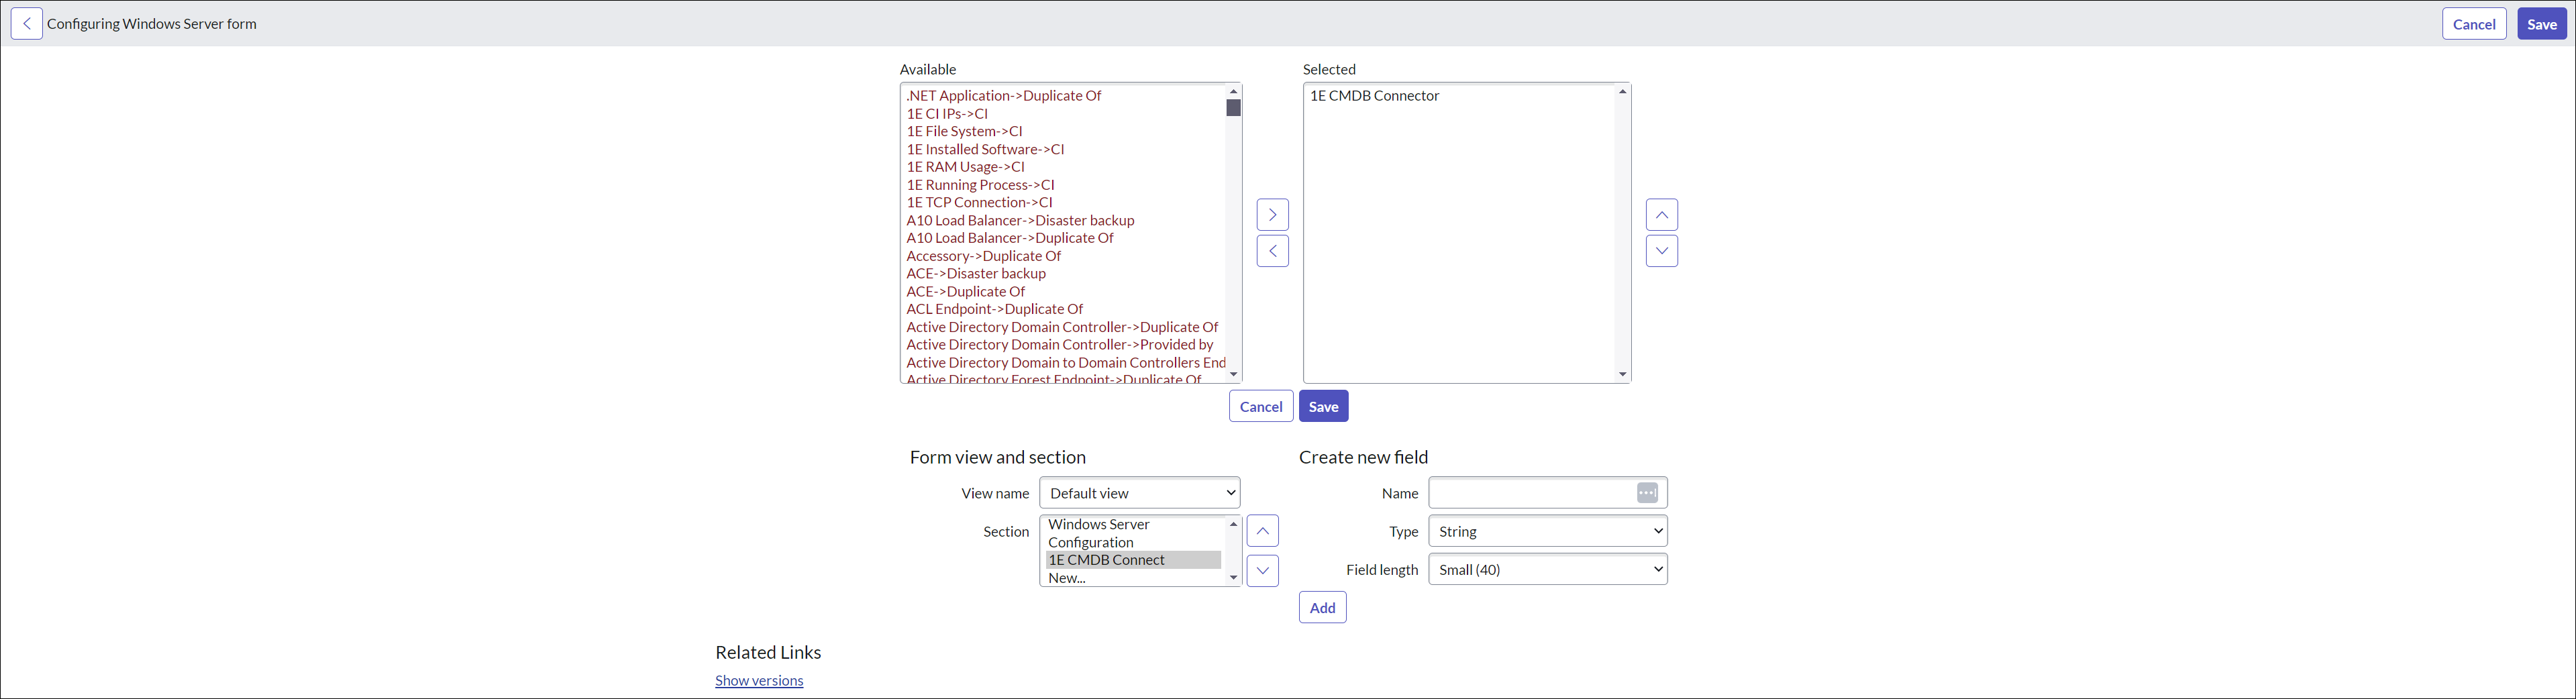
-
Now to configure the related lists, go back to blank record. Click the hamburger (three horizontal bars) or right-click the header and select Configure, then select Related Lists as shown in the picture.
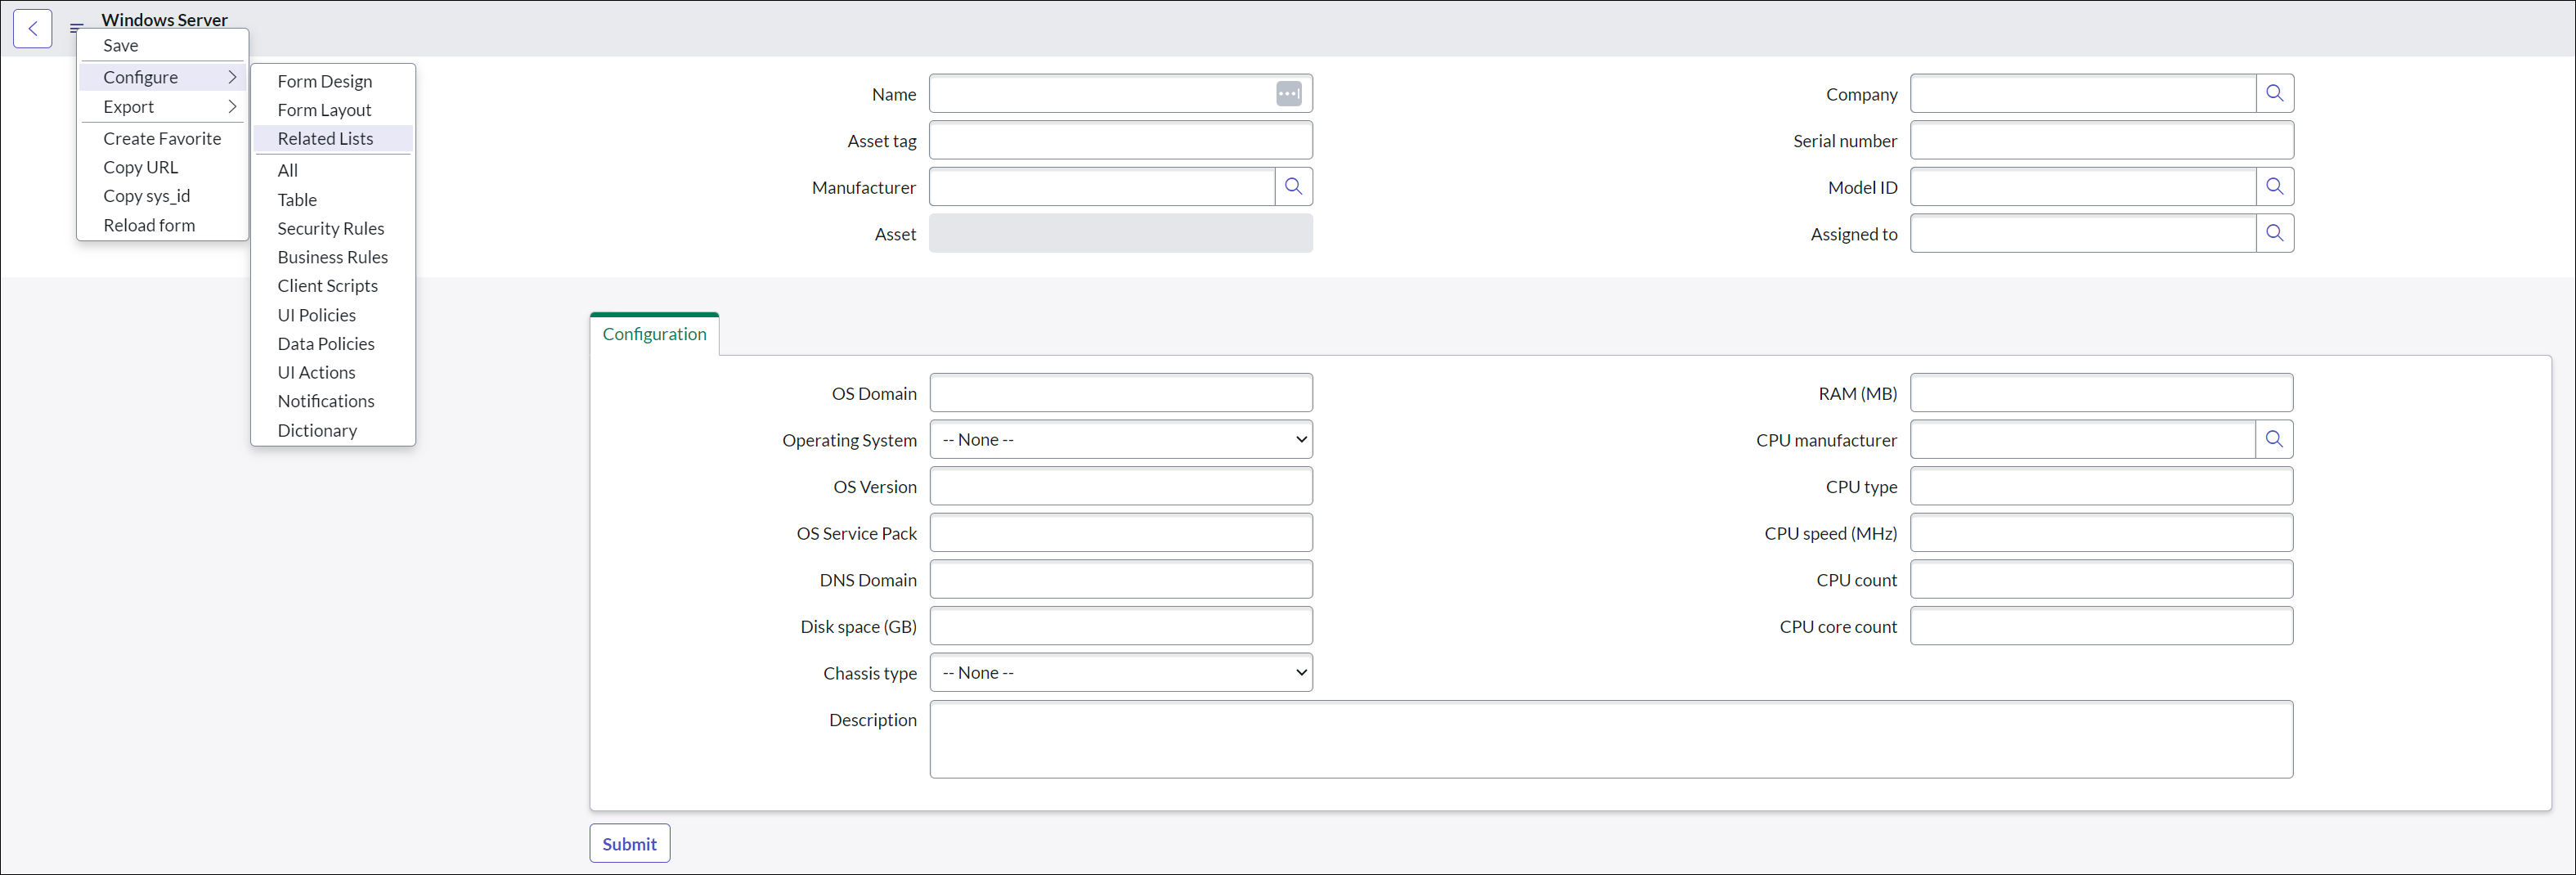
-
On the Configuring related lists on Windows Server form screen, select all six options present in the Available list and move them onto the right under Selected list using > arrow as shown in the picture below.
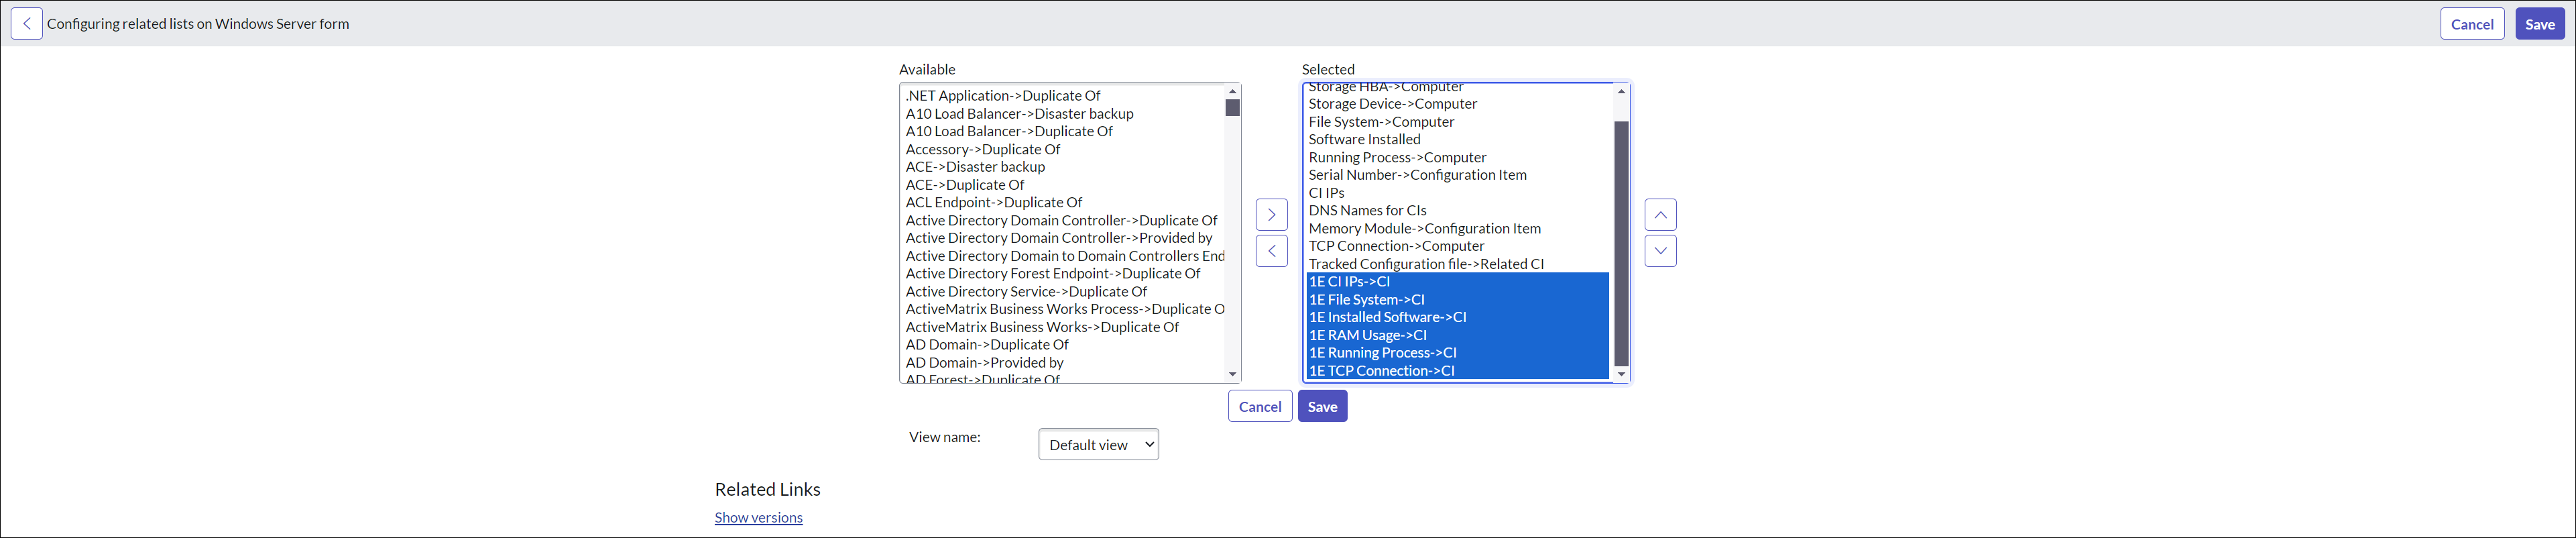
-
Click Save to save the selection of lists. Now open any existing record for device in cmdb_ci_win_server table and observe that the related lists are available.
-
Next step is to create an import schedule to populate the Windows Server data.
-
Navigate to TeamViewer DEX Import Schedules tab available under the TeamViewer DEX CMDB Connect menu.

-
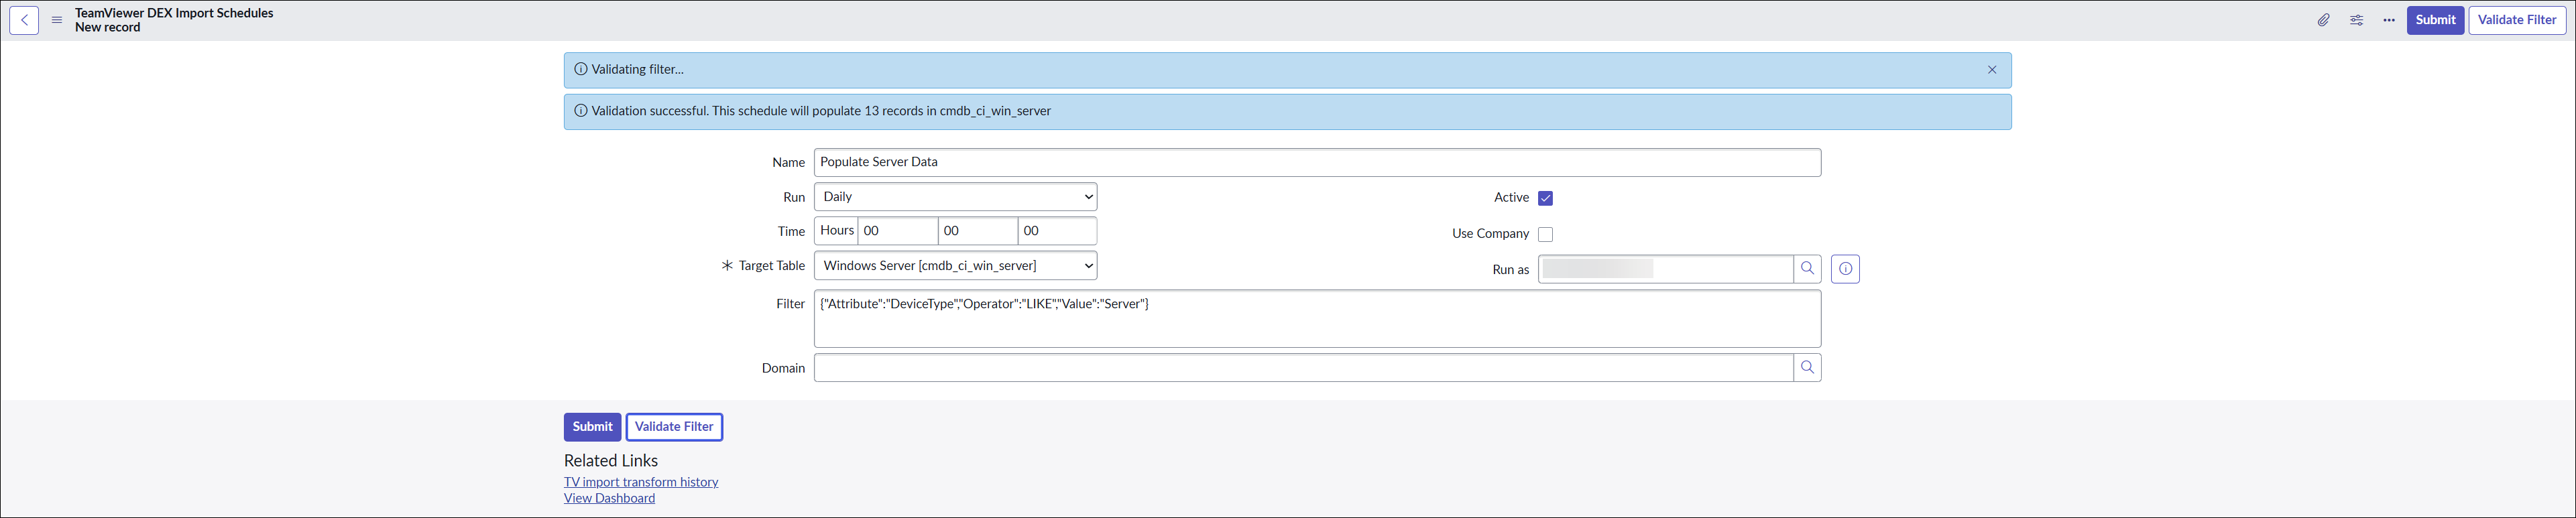
Create a new record by clicking New given in the top right corner. Select the Target Table as Windows Server (cmdb_ci_win_server). Based on the selection of the Target Table, the Filter value gets populated.
-
Click Validate Filter. Upon successful validation, click Submit to save the changes.
-
Click Execute Now to populate the Windows Server data into the Windows Server table.

-
Now go to Windows Server table (cmdb_ci_win_server) and check whether the list of populated servers are from discovery source 1E CMDB.

-
Open any record and verify the population of mapped fields and the details populated under TeamViewer DEX CMDB Connect and Related lists.
User Roles provided by TeamViewer DEX CMDB Connect
ServiceNow provides role based access to users. TeamViewer DEX CMDB Connect provides three custom roles, as given below:
|
Role |
User Persona |
Description |
|---|---|---|
|
x_1e_tachyon_cmdb.admin |
App Administrator |
This user will be able to modify App configuration settings. As an App Administrator a user will have access to other features like TeamViewer DEX Import Schedules, Instruction Definition, TeamViewer DEX Information Service, Triggered Information and Support. |
|
x_1e_tachyon_cmdb.config_manager |
App Manager |
This user will have access to the TeamViewer DEX Information Service module to run any instructions on the devices. |
|
x_1e_tachyon_cmdb.user |
App User |
This user will be able to view the device information fetched from Platform. The user will also be able to view the Related Lists available on the same Computer page. |