Configuring 1E ITSM Connect
This article explains how to administer and maintain the 1E ITSM Connect app. The 1E ITSM Connect app enables ServiceNow to integrate with 1E’s powerful capabilities, allowing for rapid investigation of your network environment and retrieval of device sets on which you can perform immediate actions.
Configure the following system properties on your ServiceNow instance:
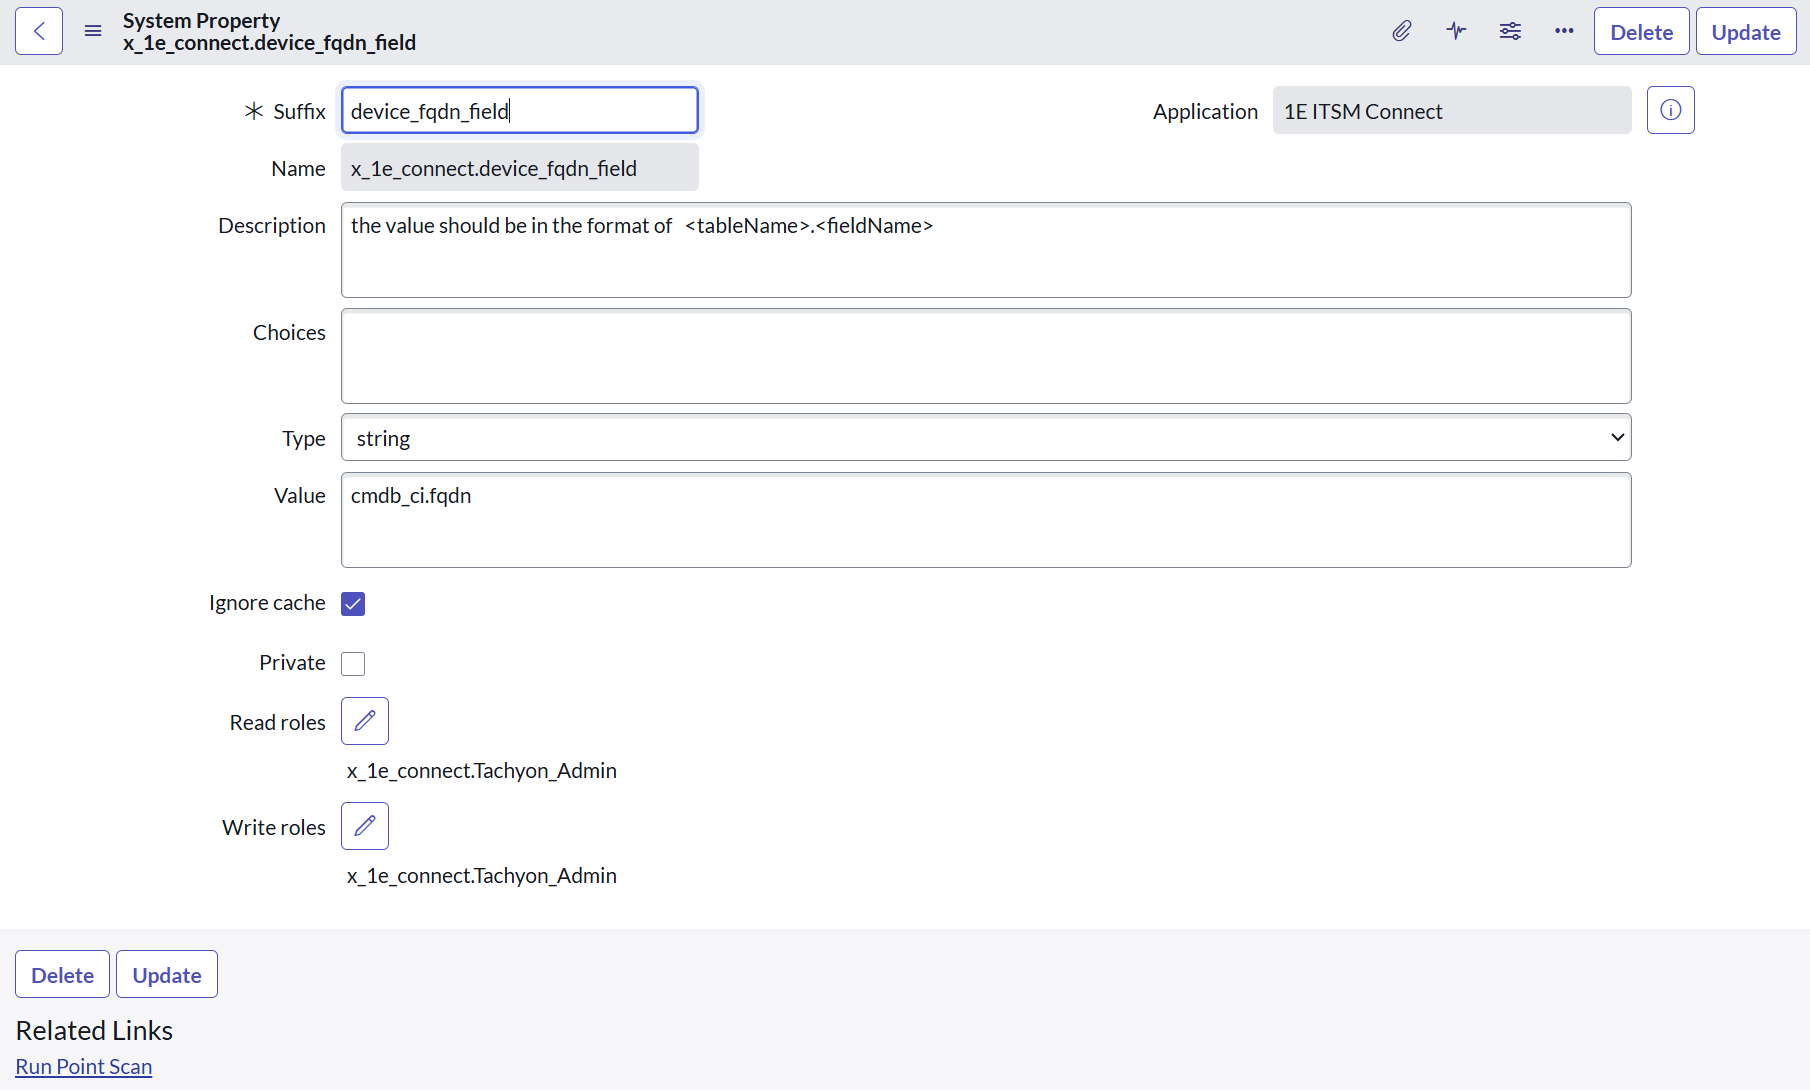
Any table any field support to pick device FQDN
To support this feature of any table any field, the system property x_1e_connect.device_fqdn_field must be configured. This property allows the admin user to specify from which table and column values the value of device FQDN should be picked. The default value of this property is cmdb_ci.fqdn, where cmdb_ci is the table name and FQDN is the column name. The table and column names are separated by a .(dot).
Ensure that FQDN column is available in the computer table, otherwise add it to the computer table. Navigate to cmdb_ci_computer.list table and open an existing record. Click the hamburger menu and then select Configure → Form Layout. Now move the Fully qualified domain name into selected on the Configuring Computer form.
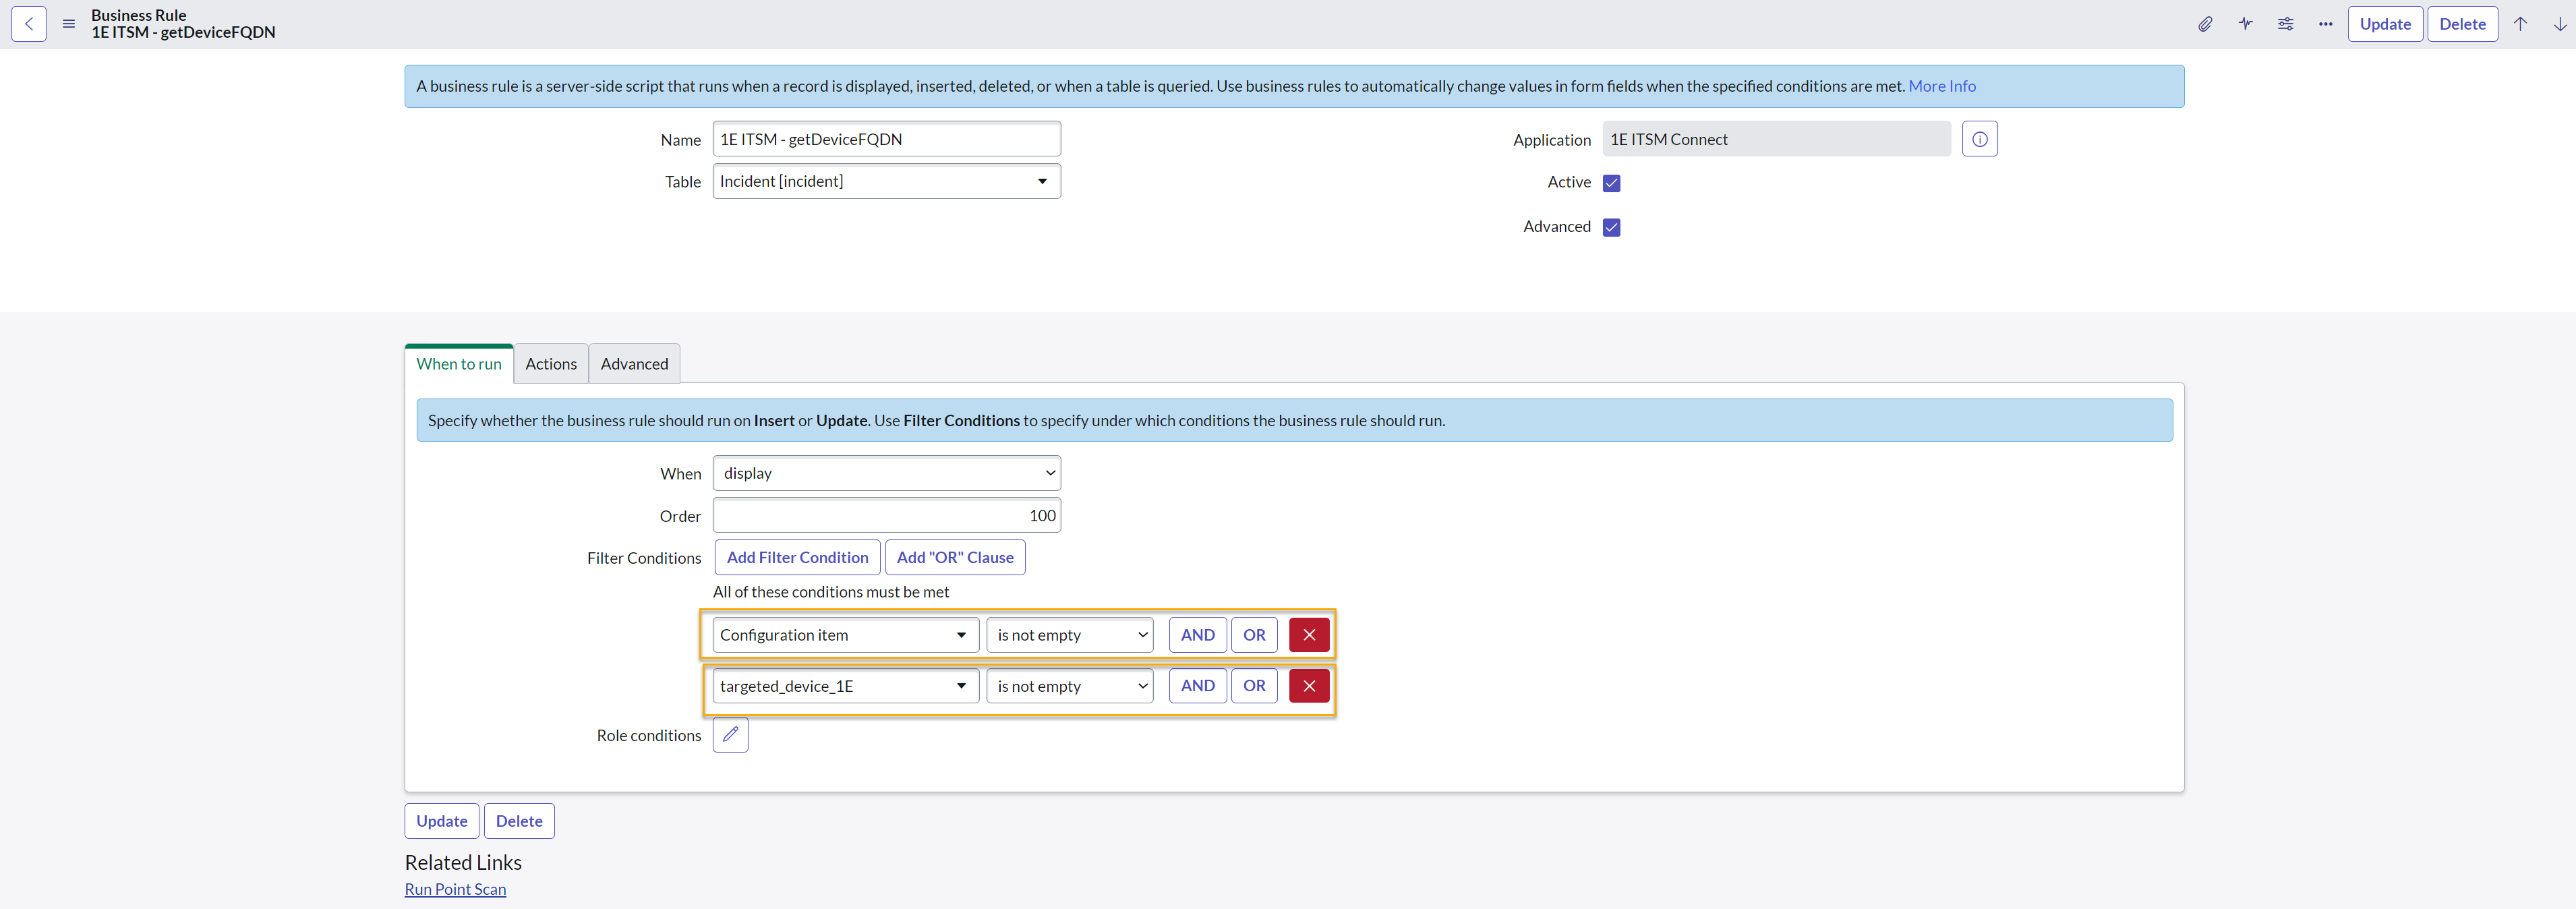
Note that the Configuration item and any other field that you want to pick should have a business rule is not empty as shown below to support the above feature.
CI Criteria
Any type of incident can be raised for any kind of CI in ServiceNow. To have control on what type of CIs the 1E ITSM Connect functionality (i.e. Device Info icon, 1E ITSM Connect and 1E CMDB Connect) should work, the app should configure the system property x_1e_connect.device_info_ci_criteria. The default value of this property is sys_class_name=cmdb_ci_pc_hardware^ORsys_class_name=cmdb_ci_computer, which states that the selected device class should be either ci_pc_hardware or cmdb_ci_computer. This property contains an encoded query to define the criteria for valid CIs. Therefore, any incident where CI fulfills this criterion will show the 1E ITSM Connect functionality.
Device Info Sync Time
The system property, x_1e_connect.DeviceInfoSyncTime accepts an encoded query that is used to filter the device information data from the x_1e_connect_device_info table. If the query returns a record, then it means that data is not fetched from 1E, rather it is the saved data that is shown on the UI. The default value of this system property is 15 minutes, and the encoded query is sys_updated_on>=javascript:gs.beginningOfLast15Minutes().
Device look-up to Caller ID
This feature enables look-up for user's device based on the Caller ID field. This is activated by adding the dictionary attribute x_1e_connect_user_related_ci to the Caller ID field. When clicked, a pop-up window appears displaying all the devices assigned to the user. Refer to Instruction management.
Device look-up without saving the Incident form
This feature enables all the functionalities, such as device information, executing instructions, and experience scores, to remain operational when the device related to the incident is changed, even without saving the form in the native UI. This means the user can always switch between the available devices and view the device related details, execute any instruction, and view experience score prior to saving the incident form in native UI, as shown in the picture below.
To enable this feature, the system property x_1e_connect.device_lookup_without_save_incident_form has to be configured, and the value set to true. By default, this property is set to false.

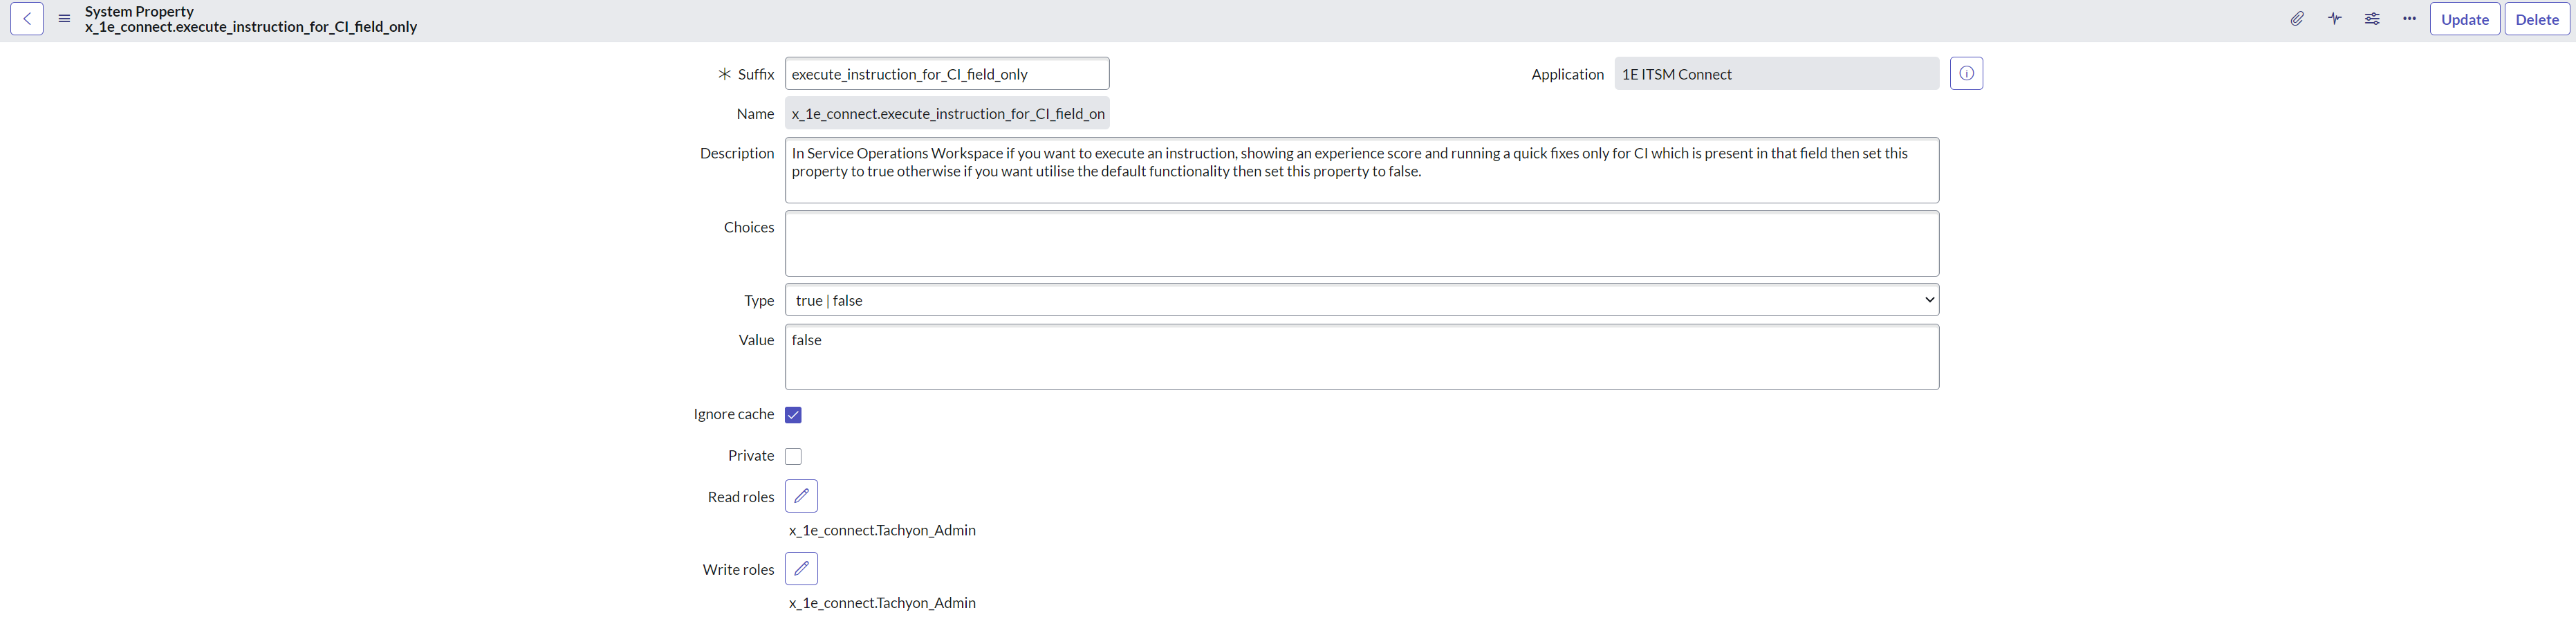
Execute instructions, Quick fix and Experience score only on the selected CI field
This feature restricts the use of affected CIs while using 1E functionalities in the Service Operations Workspace. When this feature is added it allows executing instructions, displaying an experience score and running Quick fix only on the device that is added to the incident form in Service Operations Workspace.
To enable this feature, the system property x_1e_connect.execute_instruction_for_CI_field_only has to be configured, and the value is set to true. By default, this property is set to false.
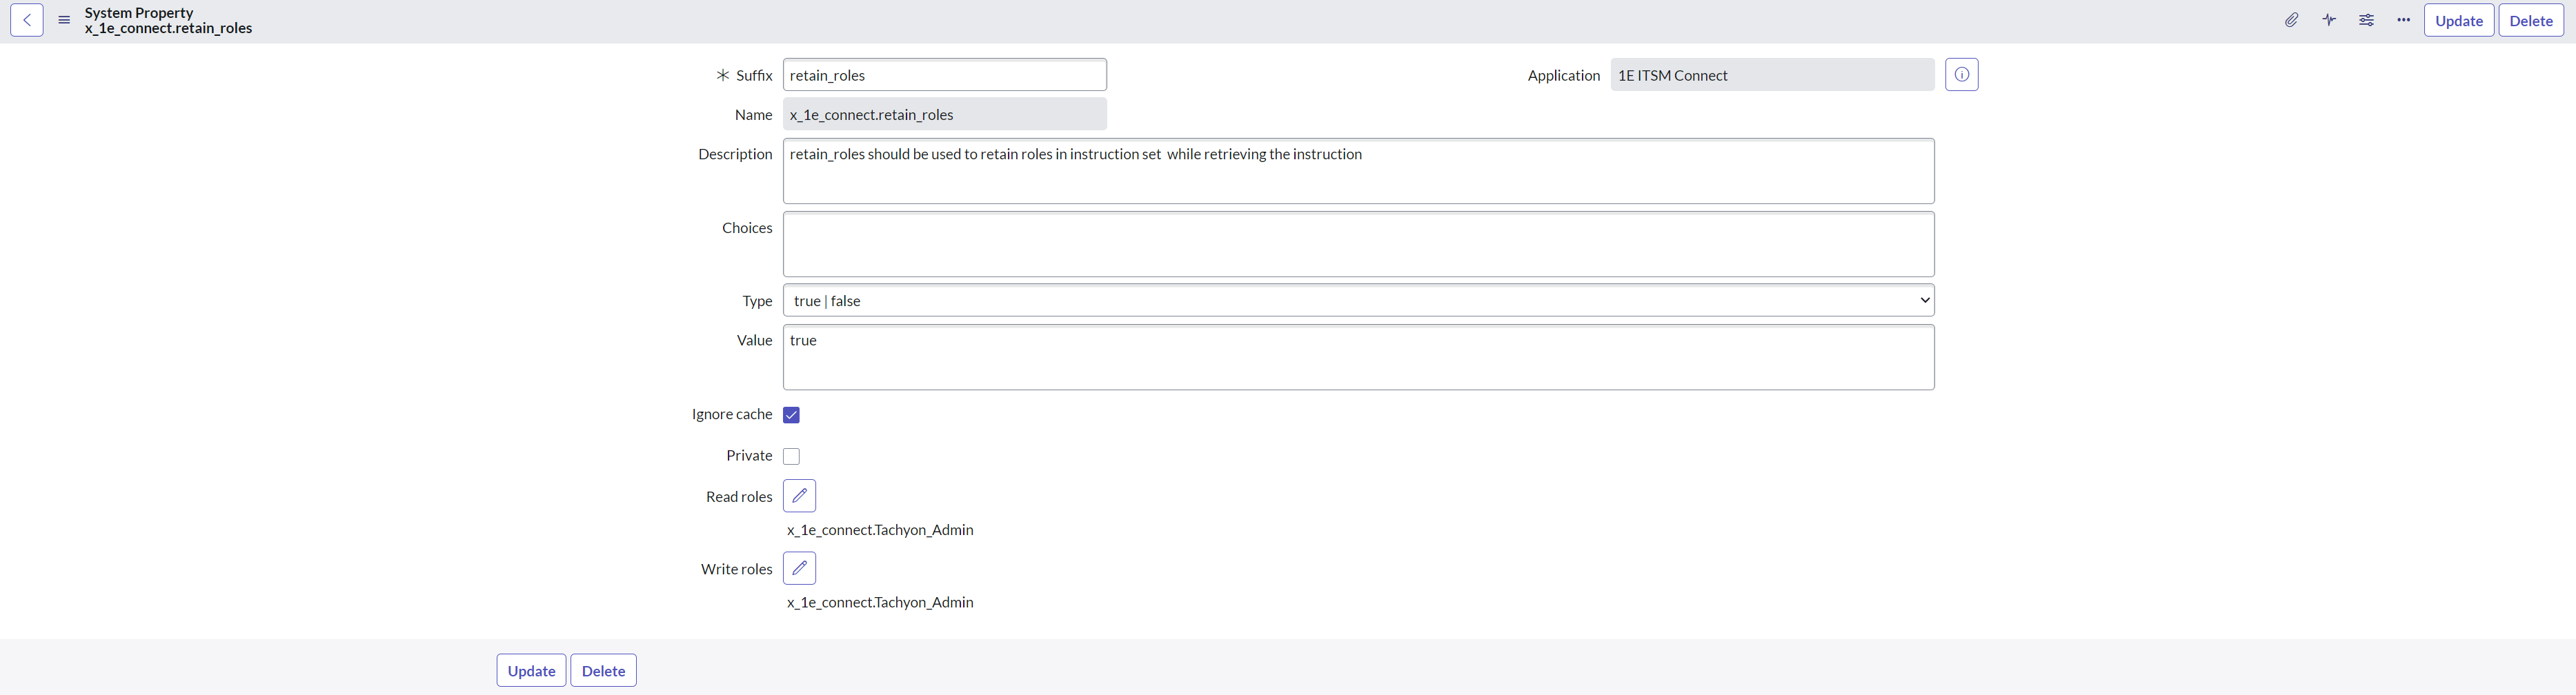
Change in default role mapping to instruction sets
The 1E ITSM Connect application's default behavior is that whenever the instructions are retrieved, the respective instruction sets are generated and each instruction set is assigned admin and tachyon admin as default roles.
If the instruction set already exists and there is a role added to the instruction set, then retrieving the instructions will again add admin and tachyon admin roles to the already added list of roles to the instruction set.
To enable this feature, the system property x_1e_connect.retain_roles has to be configured, and the value of the property is set to true to disable the default behavior. By default, this property is set to false. Once the property is set to true then the roles will not be added to instruction sets by default.
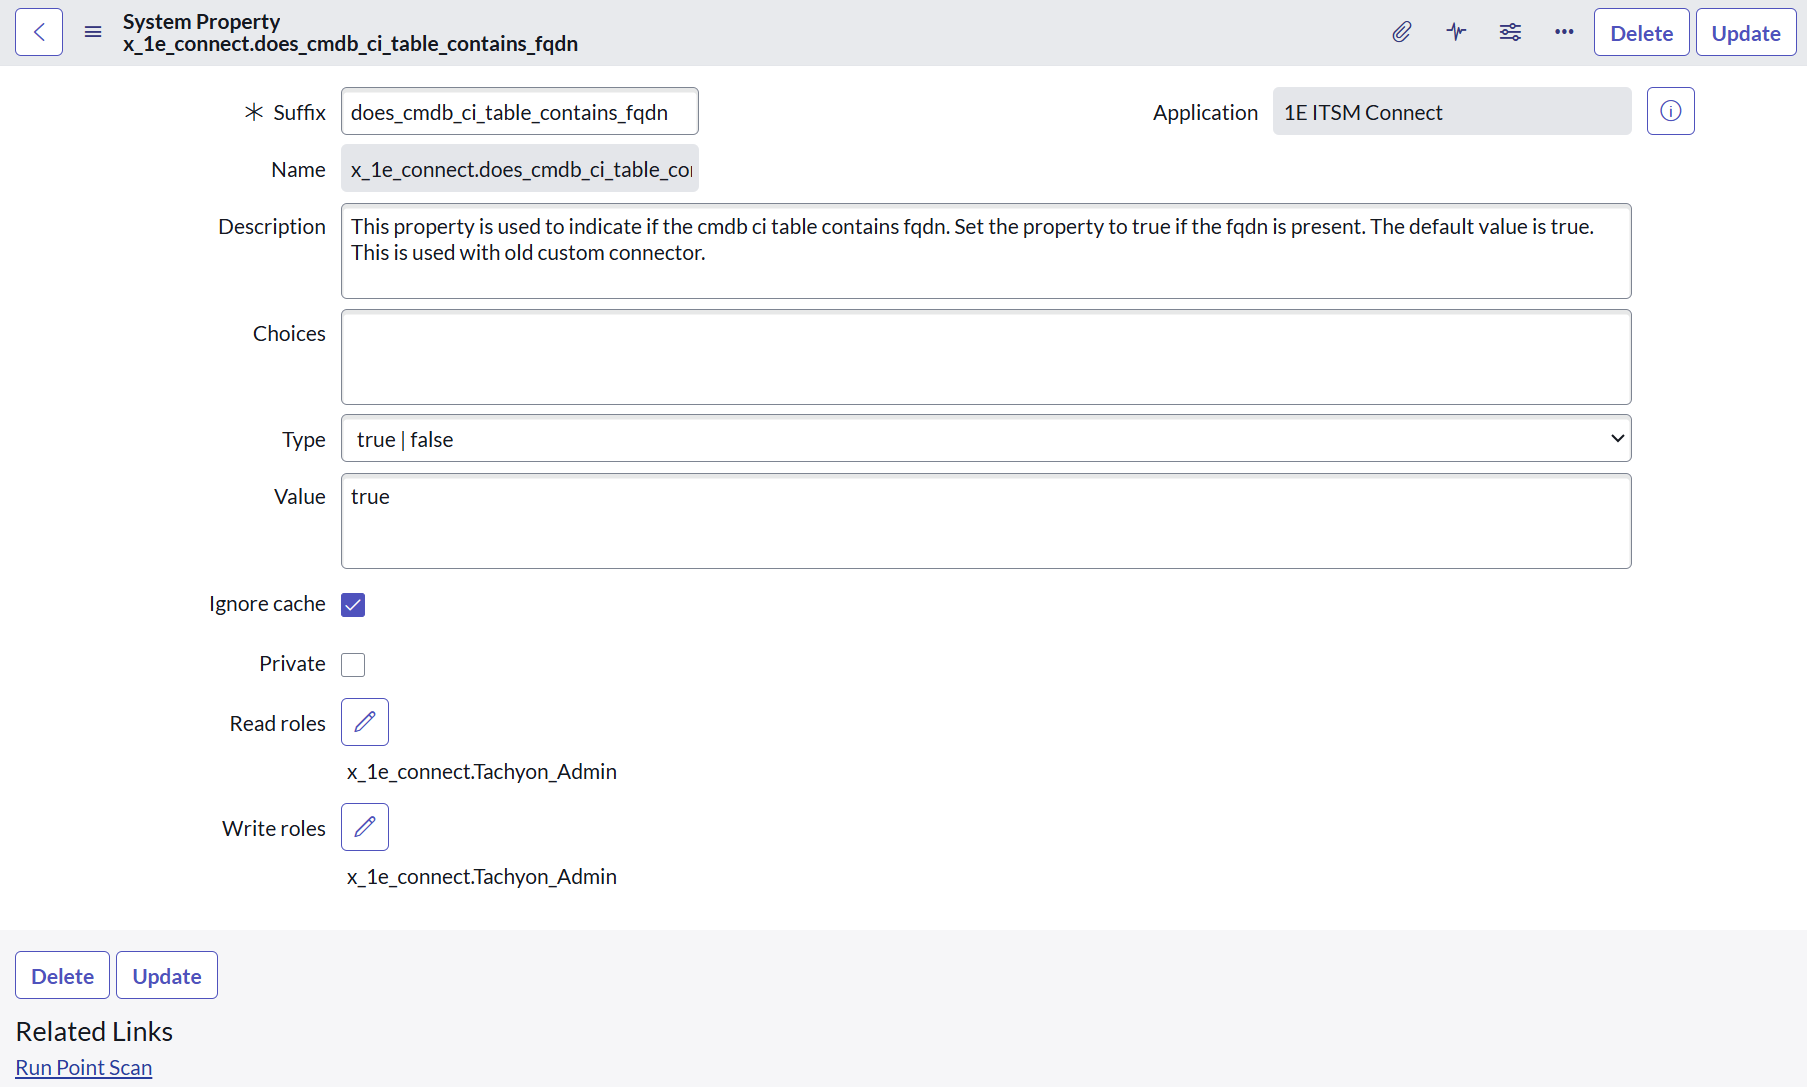
Removed duplicate entries of devices on Device Info tab
This feature removes duplicate entries of devices that appear on Device Info tab in Service Operations Workspace, when a custom connector is used. There is only one entry per device that shows the current status of the device and experience score.
To enable this feature, the system property x_1e_connect.does_cmdb_ci_table_contains_fqdn has to be configured, and the value is set to false if custom connector is used. By default, this property is set to true.

Configurable retry message for the instructions
This is an optional system property. It customizes the retry message displayed when the response takes longer than expected. To enable this feature, configure the system property x_1e_connect.retryMessage. The value of this system property is set to the message- Please wait, the instruction is still running. After the device provides results, they will time out in {timeout} minutes. {Click Here} to see if the instruction has finished and returned results. is displayed when response takes time.
Additionally, two new fields- Instruction TTL Minutes and Response TTL Minutes have been added to the Instruction Definition table in 1E Core to manage instruction response behavior. To make the retry message dynamic, the 1E Platform fetches the Instruction TTL/Respnse TTL, ensuring that the retry logic aligns with real-time instruction parameters. When the instruction is executed, the values from Instruction TTL Minutes and Response TTL Minutes are dynamically incorporated into the retry message, providing users with a clear message if response takes longer.
Enable ITSM Connect feature based on Category and Subcategory
This is an optional system property. It can enable or disable 1E ITSM Connect application features based on the category and subcategory of the incident. To enable this feature, configure the system property x_1e_connect.enable_itsm_category_subcategory. By default, this property is set to false.
However, if the property is populated with specific category and subcategory values, the 1E ITSM Connect features will be enabled only for the listed category-subcategory combinations. For categories or subcategories not included, all 1E ITSM Connect features will be disabled.
To add category and subcategory details to the system property, define the JSON object using the format below:
{
"<category1>": ["<subcategory1>", "<subcategory2>"],
"<category2>": ["<subcategory1>"]
}
Here is an example for you:
{
"hardware": ["monitor", "cpu"],
"software": ["email"]
}
Whereas, if the property is set to false, all 1E ITSM Connect features will be enabled across all categories and subcategories.
This feature is supported for users having 1E ITSM Connect 5.2.16 and later versions.
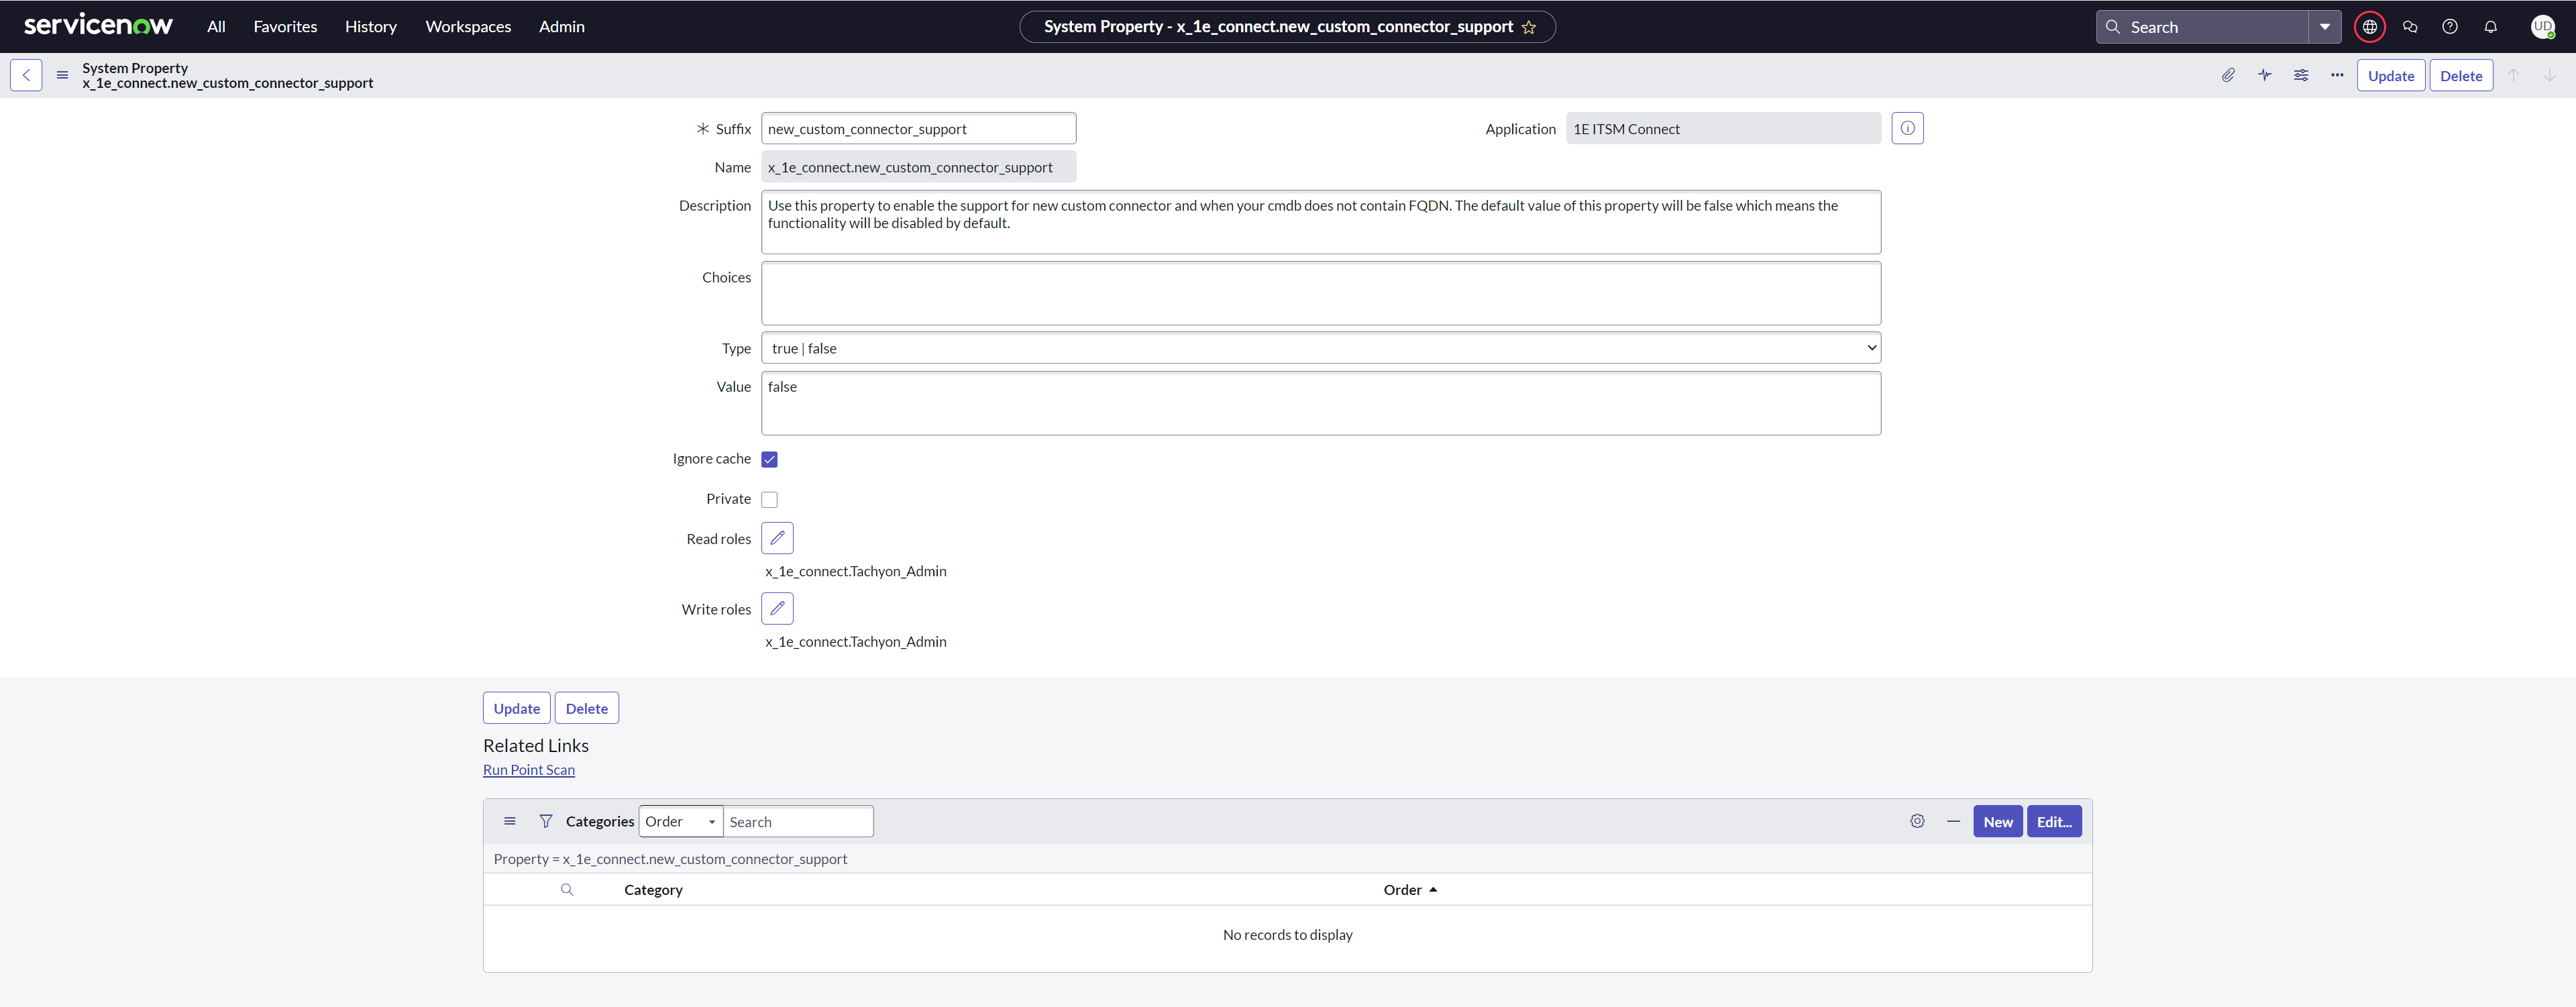
This unique device identification (UDI) feature (earlier called custom connector) now has enhanced support for customers who do not have FQDN stored for the computer CIs in the CMDB. Customers have the option to specify which fields (name, serial number and mac address) they want to use with the custom connector. To enable this feature, configure the below mentioned system properties.
To open the System Properties table, type sys_properties.list in the filter navigator and press enter. The System Properties table opens up into a new page. Now search for the properties from the list. You can also edit the values of the system properties to suit your needs.
There are three features that are added to support custom connector:
-
x_1e_connect.does_cmdb_ci_table_contains_fqdn:
The value of this system property must be set to true.
Modifying this system property must not alter the value in x_1e_connect.device_fqdn_field system property.
- x_1e_connect.new_custom_connector_support:
This system property enables support for the custom connector, when the value of this property is set to true. By default this property is set to false.
- x_1e_connect.device_field_for_identication:
This system property can be used only when the value of the property x_1e_connect.new_custom_connector_support is set to true. This property specifies which field on the 1E device table is used to identify the device and hence makes the custom connector work. One of the fields from name, Serial number, MAC address can be chosen as the identifying field. By default the value of this property is set to name.
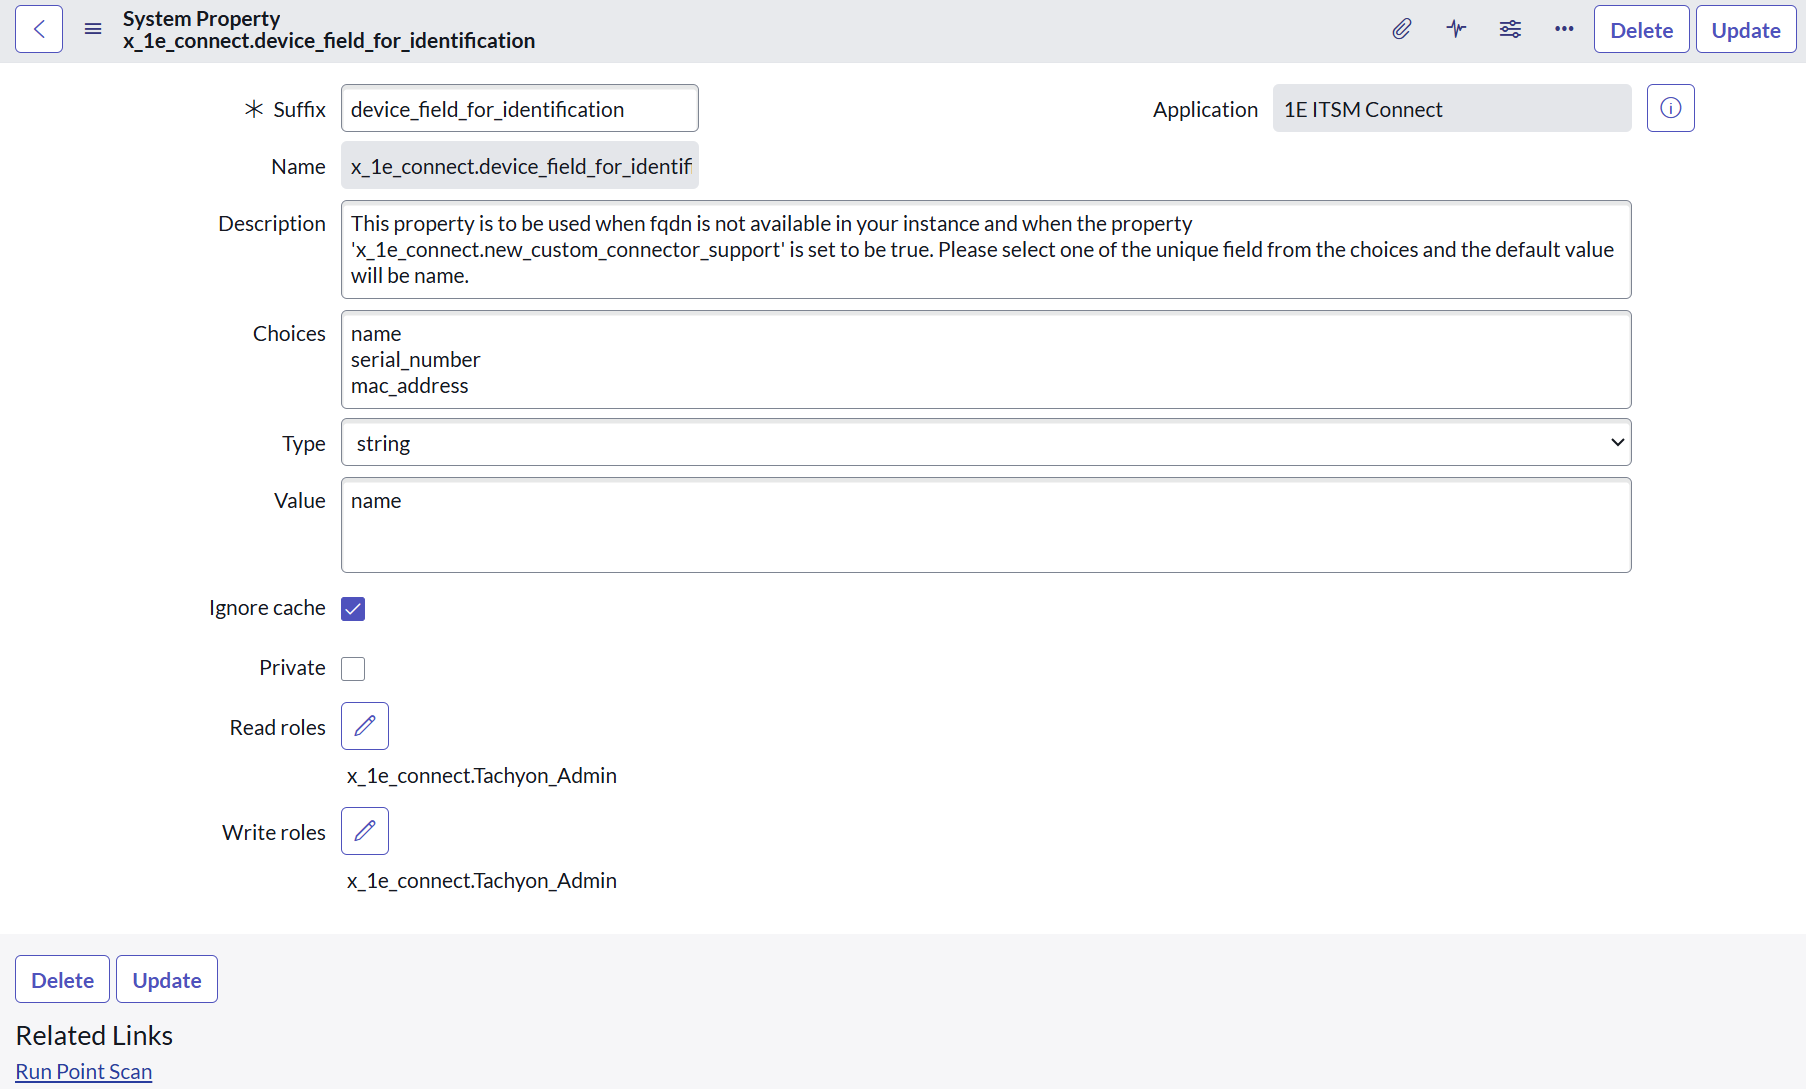
ServiceNow will utilize the CI (Configuration Item) values specified in the system property x_1e_connect.device_fqdn_field and will perform a look-up for that value in the devices table. The specific column used for this look-up is defined by the property x_1e_connect.device_field_for_identication.
- x_1e_connect.device_fqdn_field:
The value of this system property should be in the format of <tableName>.<fieldName> and the value is set to cmdb_ci.name.
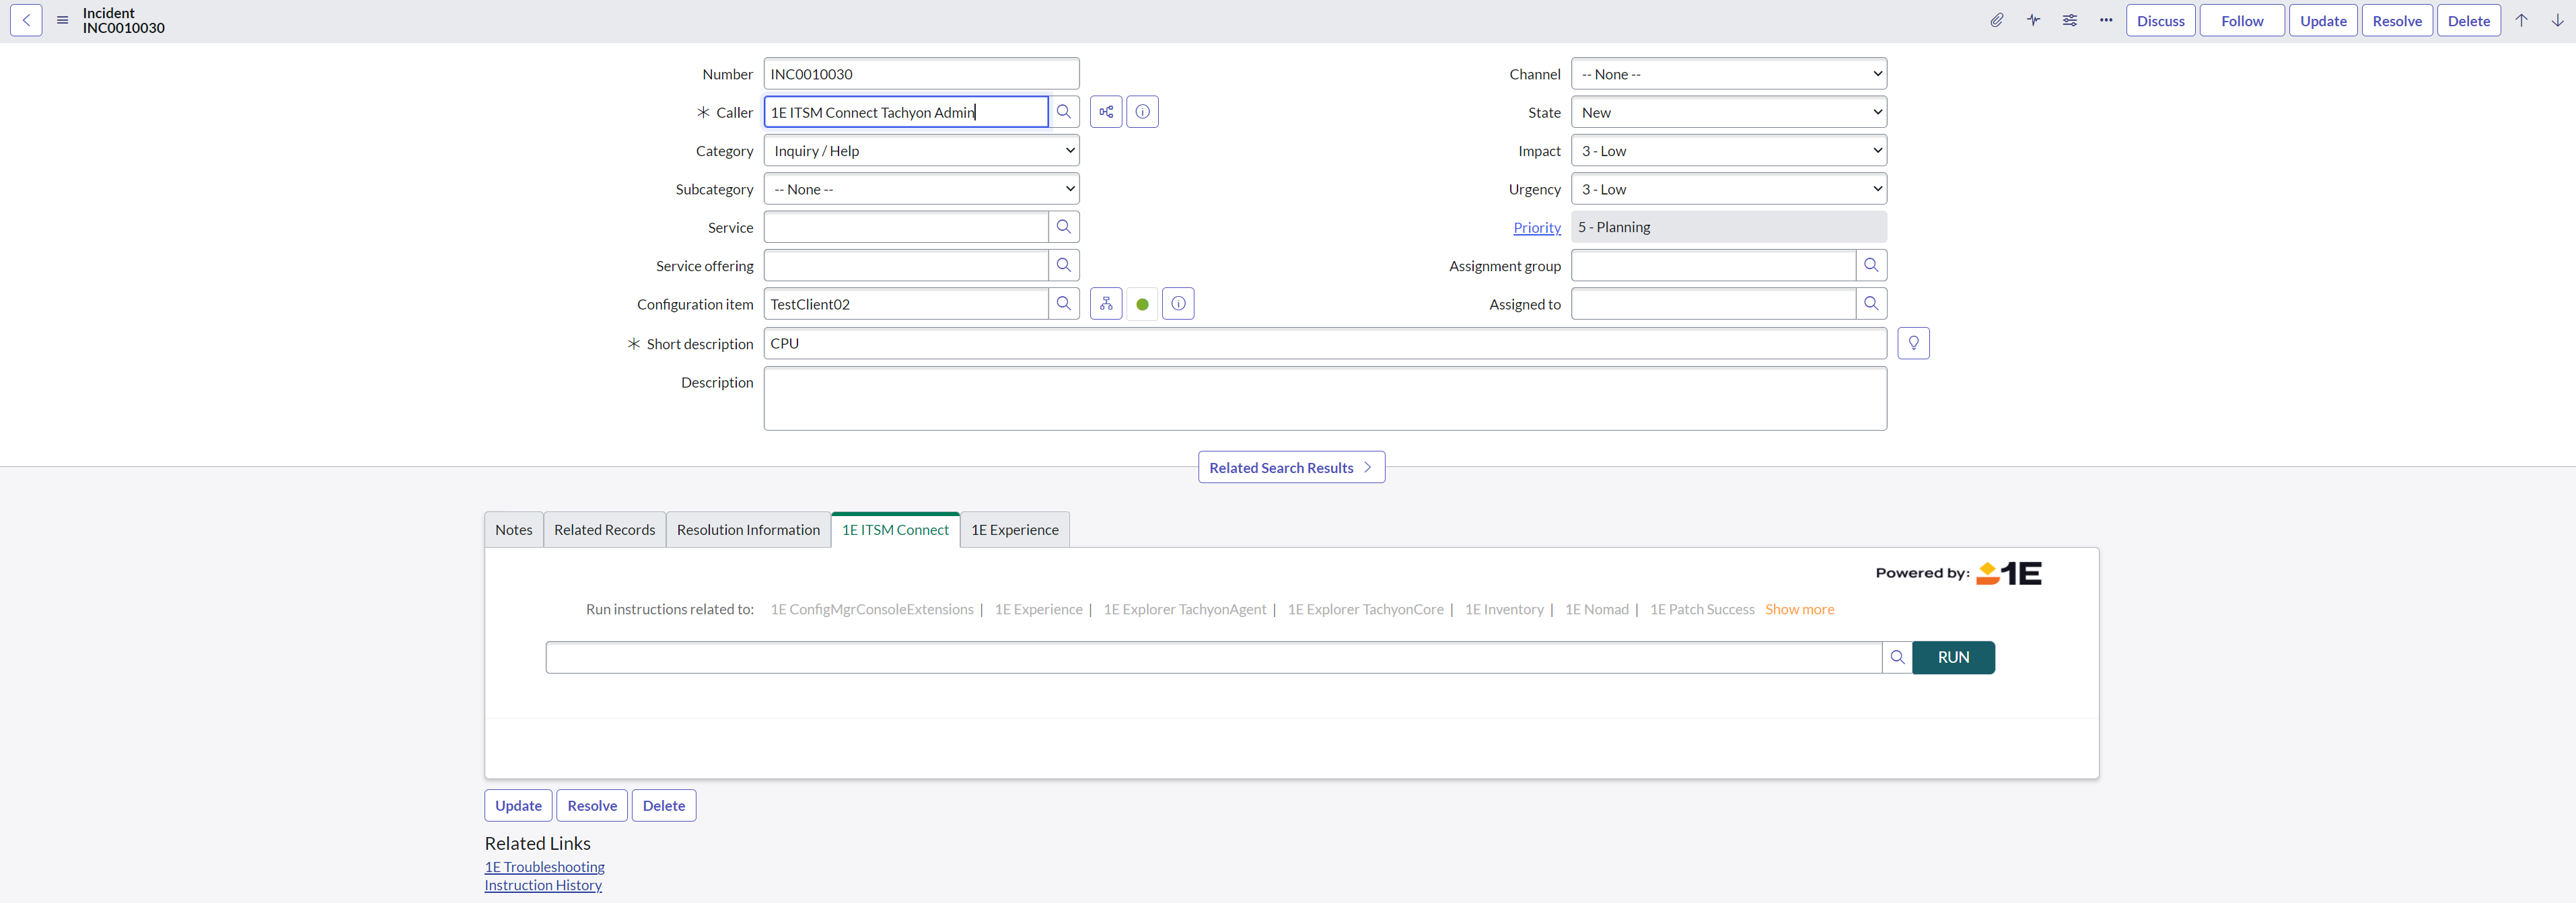
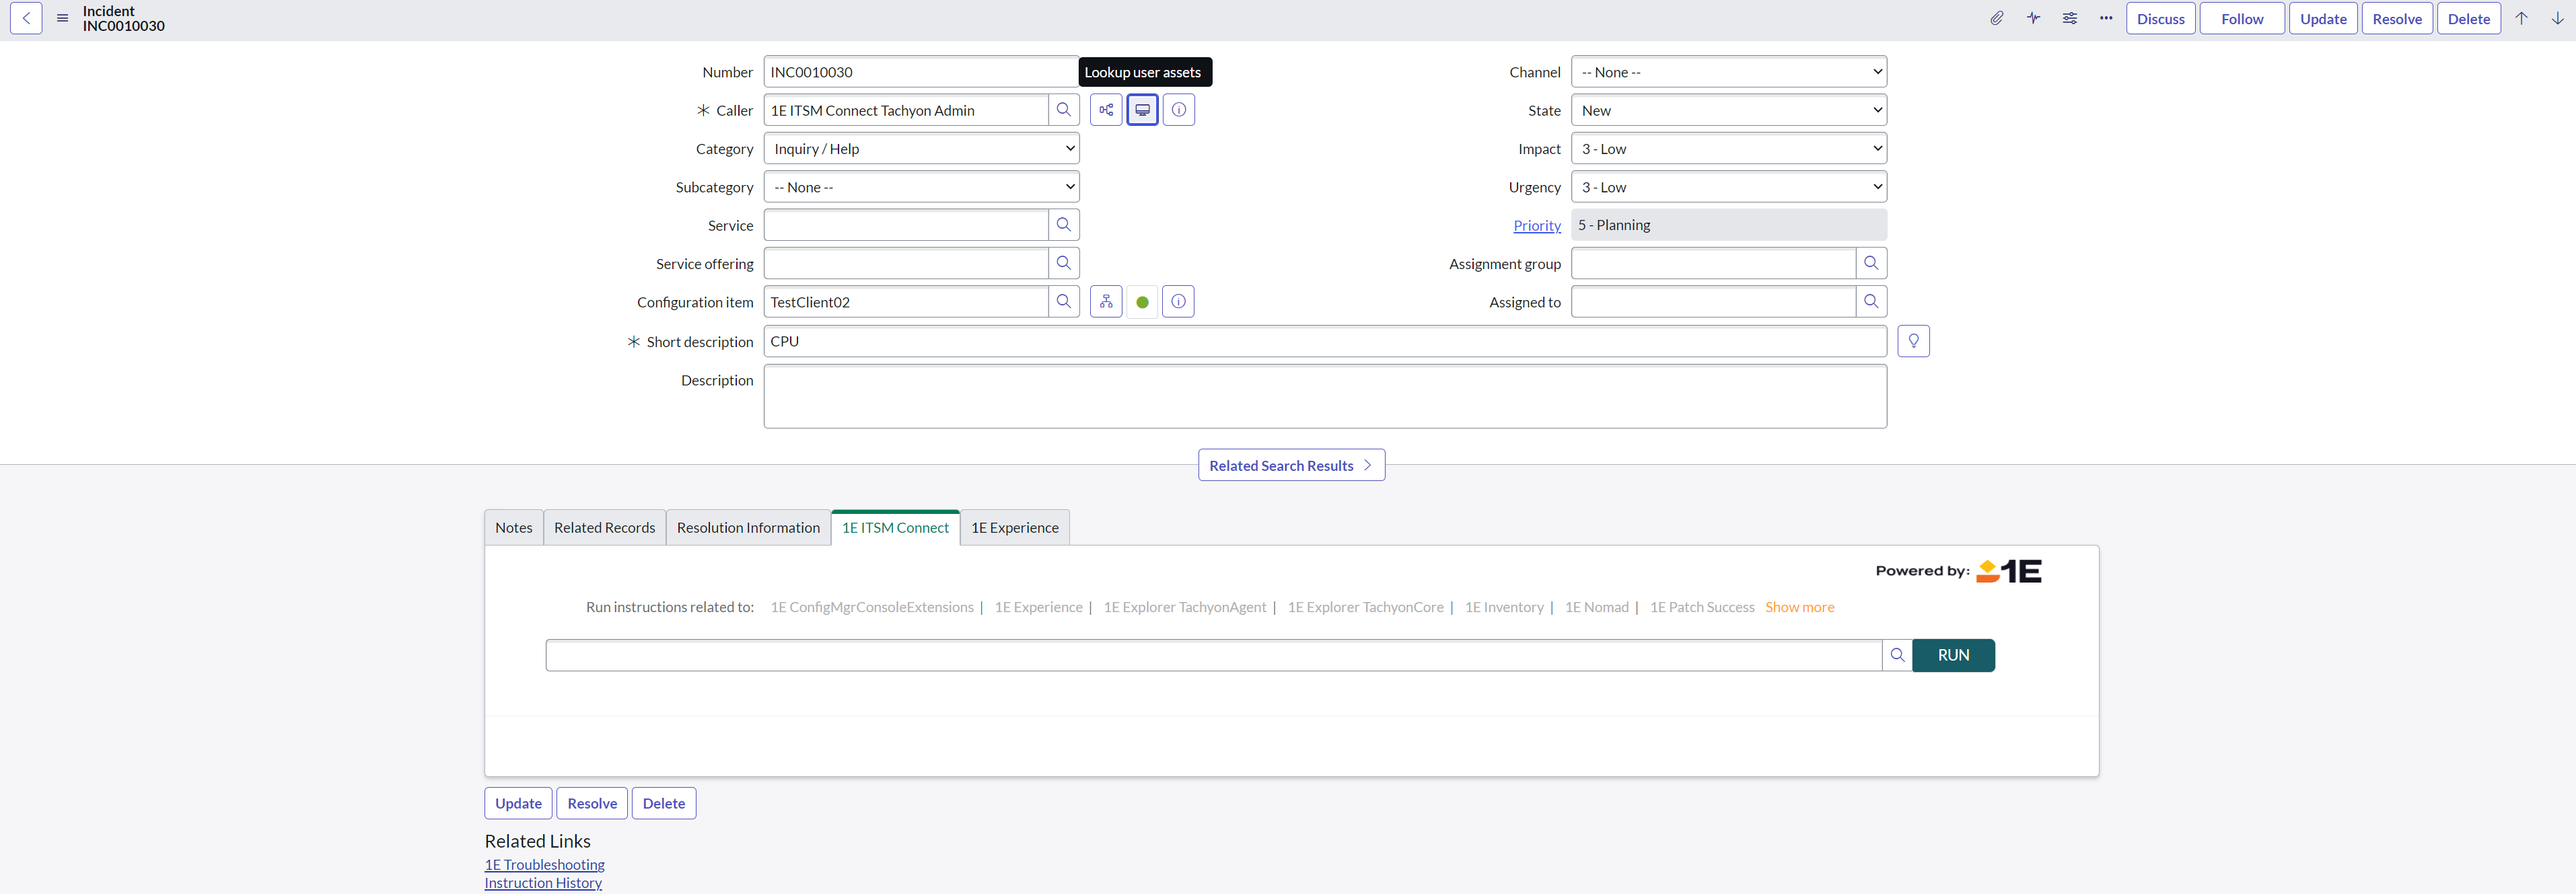
1E ITSM Connect allows you to view the list of Configuration Items (CI) associated to a user.
To configure this user assets icon to the Caller field, follow the steps below:
-
Log in to your ServiceNow instance.
-
Navigate to 1E ITSM Connect>Incidents.
-
Change your application scope to Global.
-
Open the incident from the list that you want to work on.
-
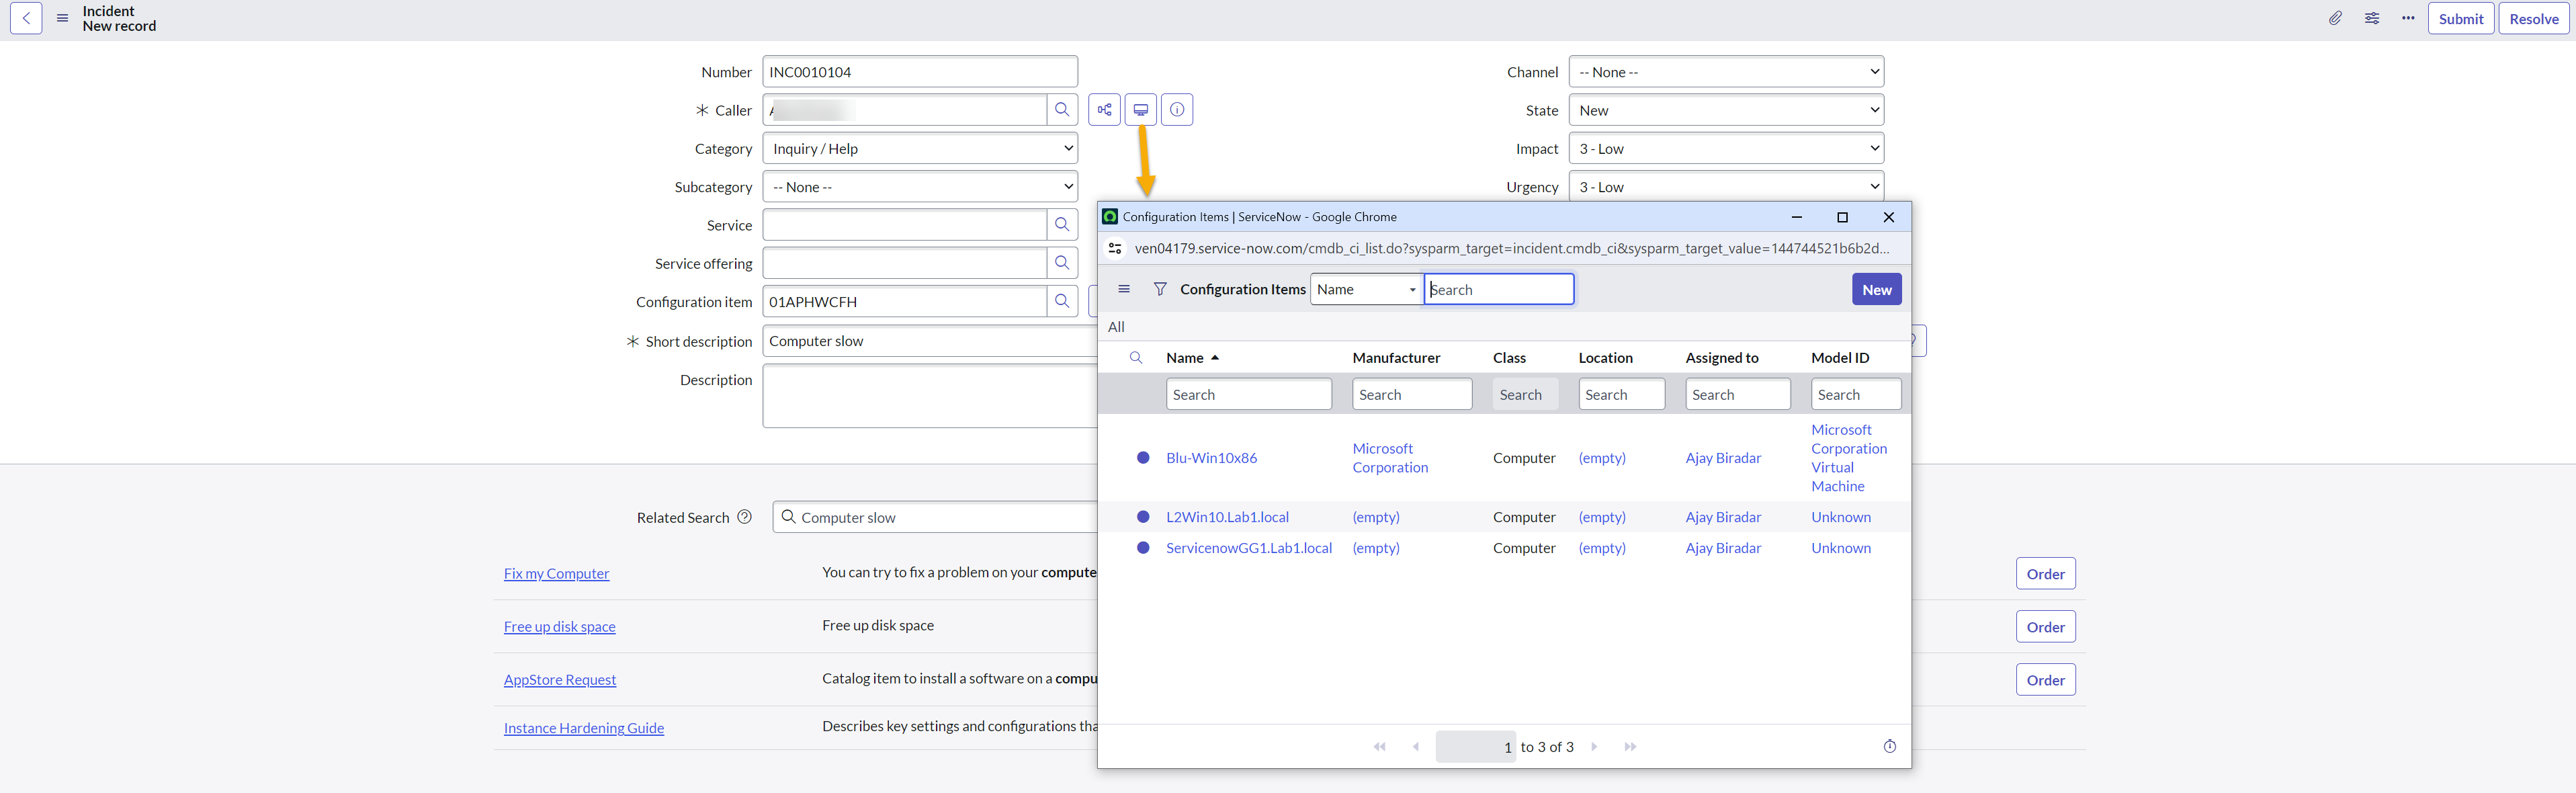
Select the Caller field from the incident form to add the CI selector icon, as shown in the picture below.
-
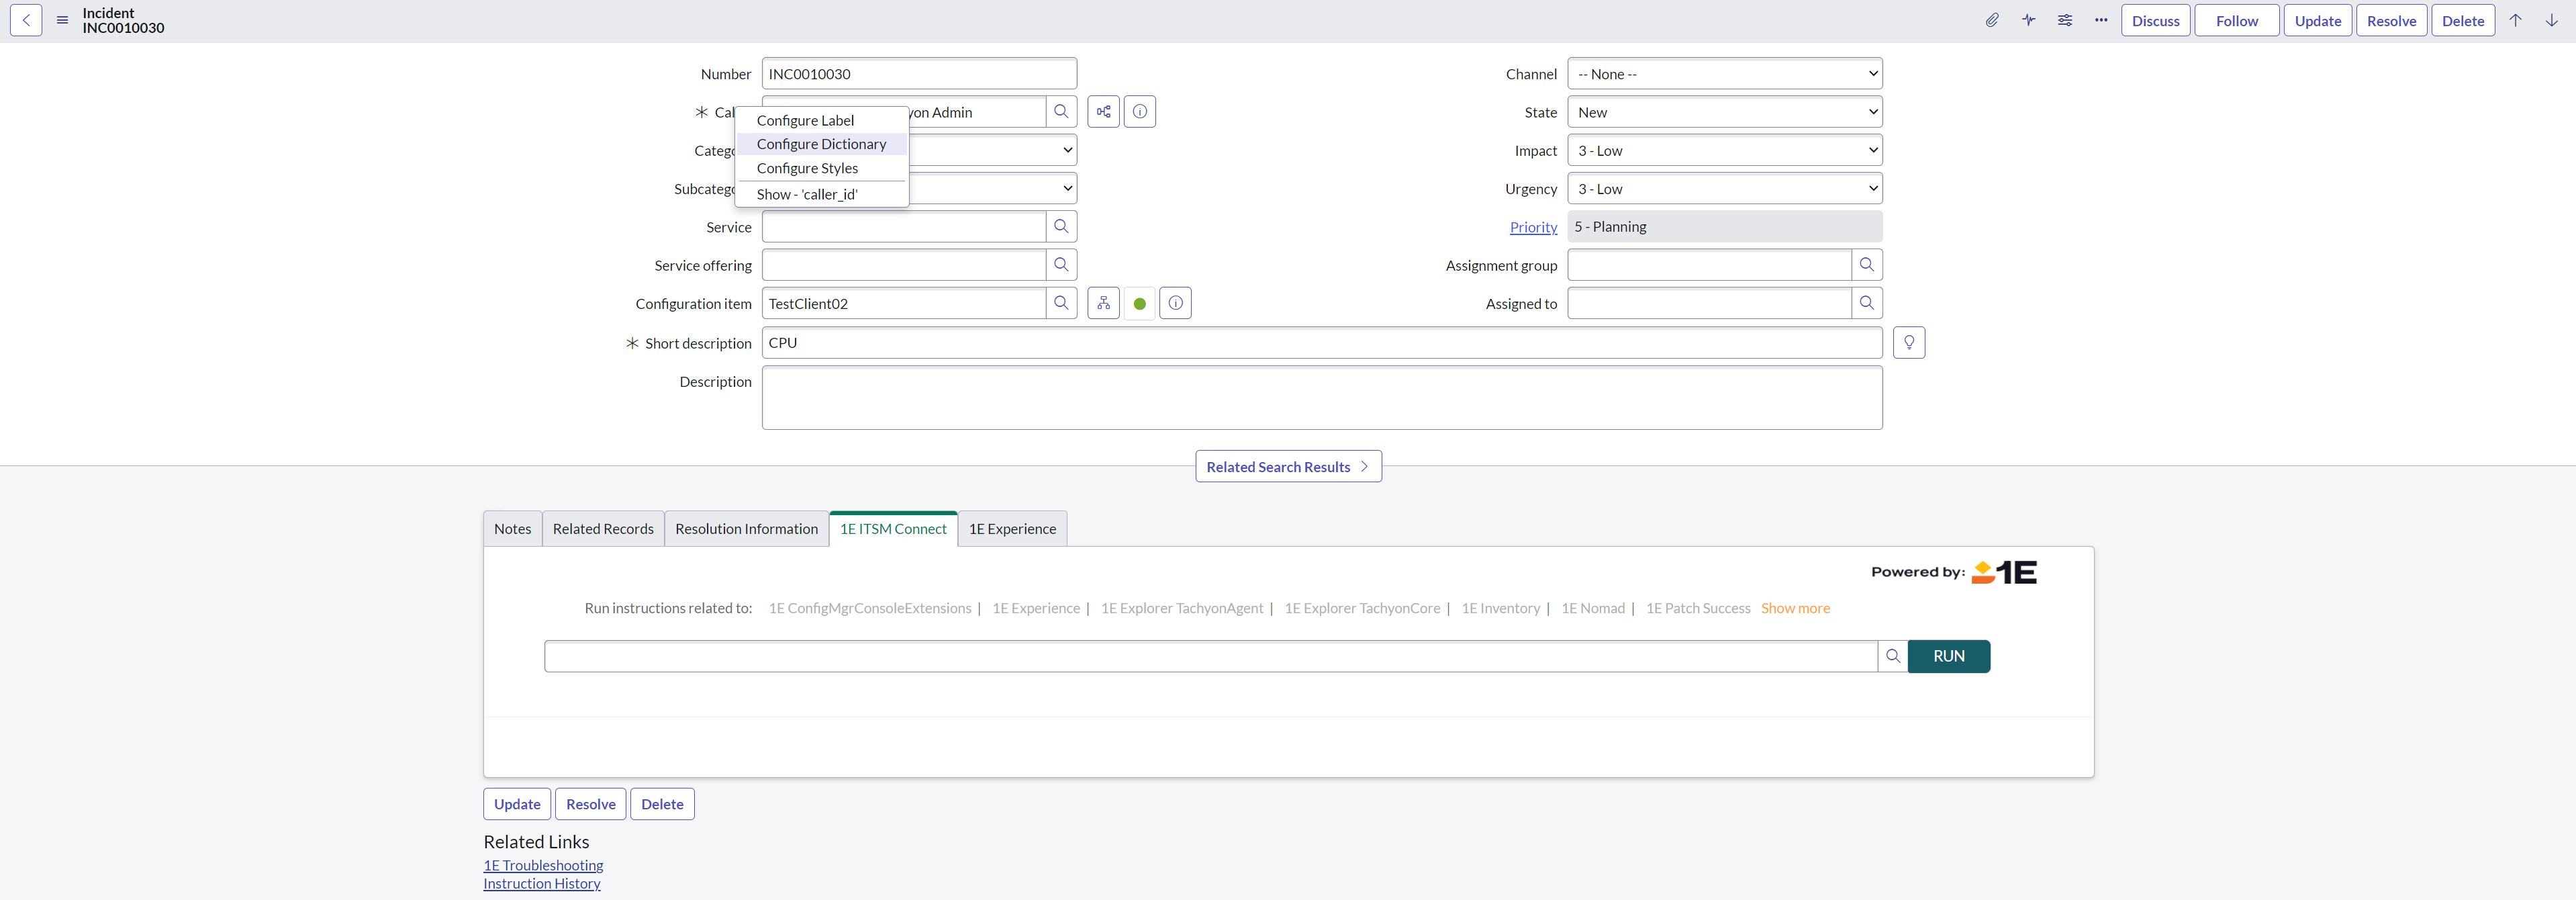
Right-click the field label and select Configure Dictionary from the drop-down list that appears.
-
It opens the Dictionary Entry - Caller page. Now select the column with label Attributes on the page and append the value with x_1e_connect_user_related_ci. Click Update to save the changes.
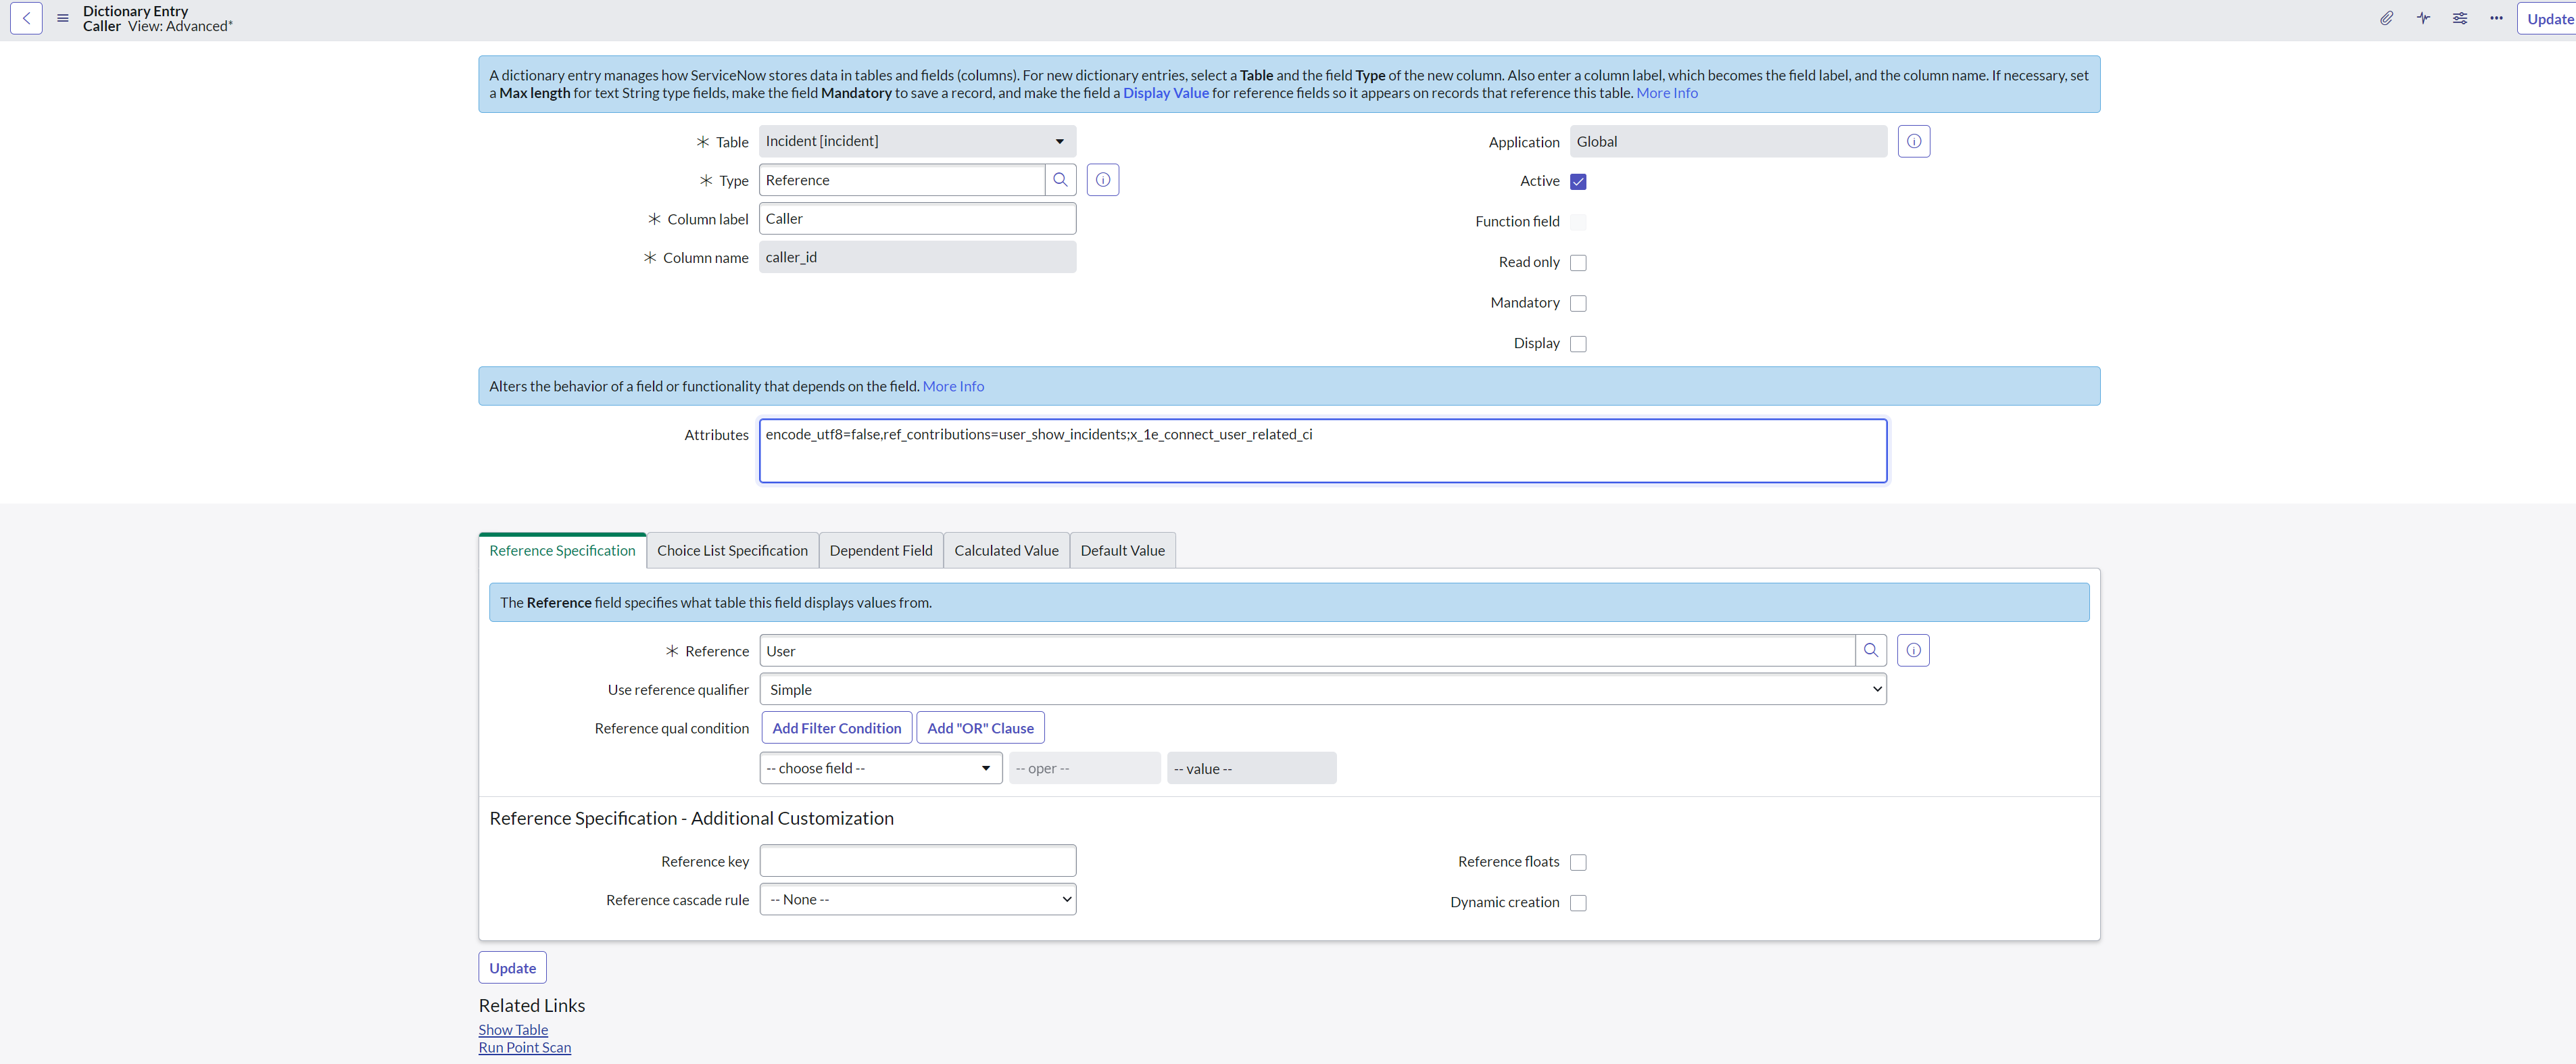
If you don't see the dictionary attribute field on the Dictionary Entry page, click Advanced view under Related Links to locate it.
-
An icon appears on the selector field that provides you with the look-up list for user assets as shown below.
Similarly you can also configure the device look-up for any custom reference field that you have created in the incident form, follow the steps below:
-
Create a new custom user reference field on the incident form.
-
Right-click the field label and select Configure Dictionary from the drop-down list that appears.
-
It opens the Dictionary Entry page. In the Attributes field, append the value with ref_contributions=x_1e_connect_user_related_ci. Click Update to save the changes.
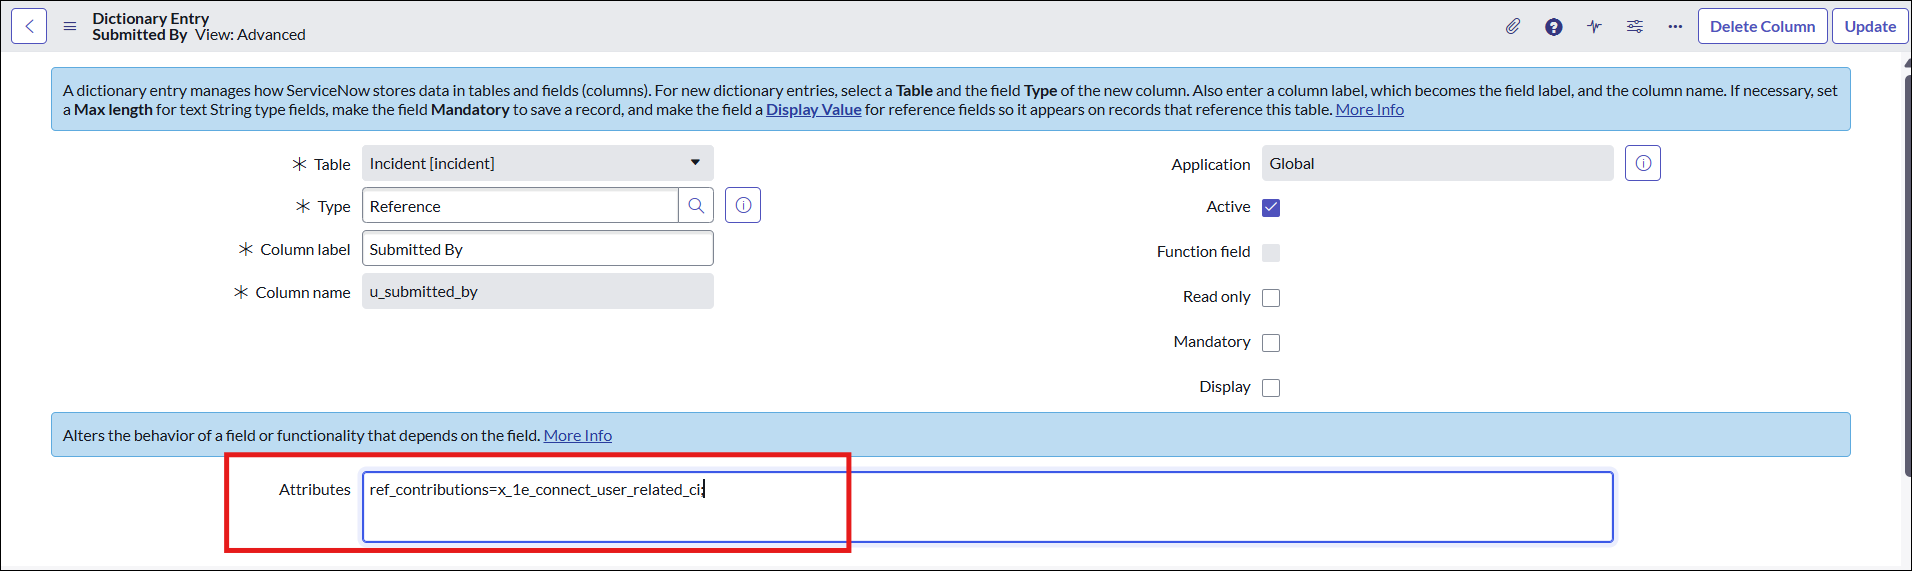
If you don't see the dictionary attribute field on the Dictionary Entry page, click Advanced view under Related Links to locate it.
-
The look-up user asset feature is added to the custom reference field. When you click the icon, it displays all the devices assigned to the selected user.
You can also configure the device look-up for Assigned to (Out of the box field) in the incident form, follow the steps below:
-
Open the incident.
-
Right-click the Assigned to field label and select Configure Dictionary from the drop-down list that appears.
-
It opens the Dictionary Entry page. Since the Assigned to field is inherited from the Task table, we need to add the attribute to the Dictionary Override of the Incident table as shown below.
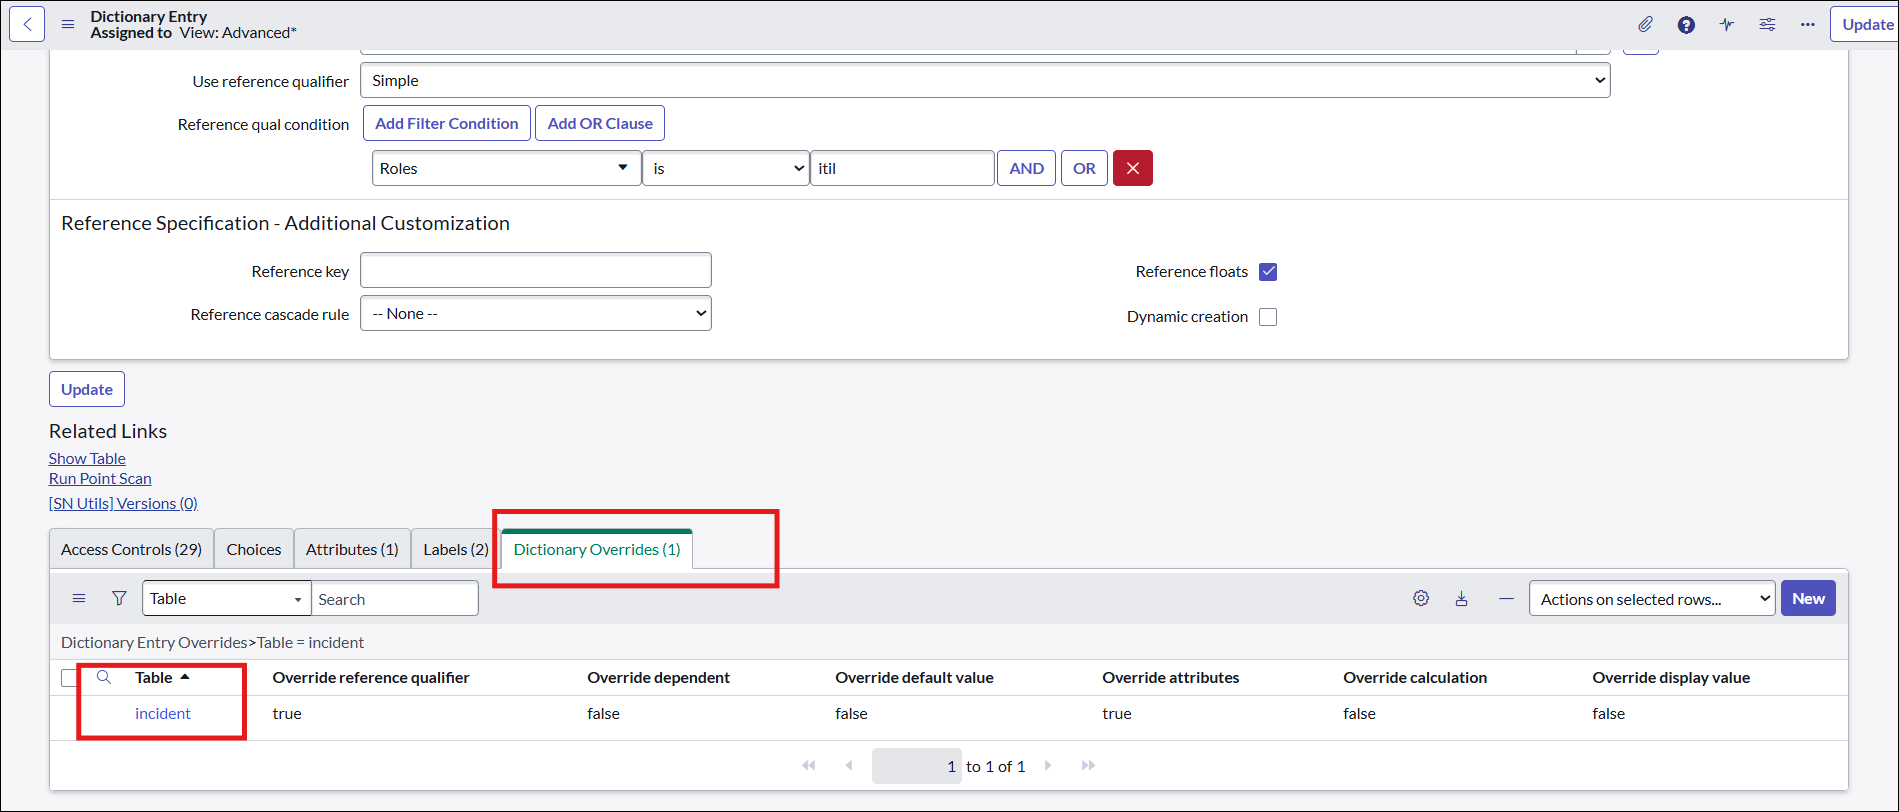
-
Open the Dictionary Override record of the Incident table and append the Attribute field value with ref_contributions=x_1e_connect_user_related_ci. Click Update to save the changes.
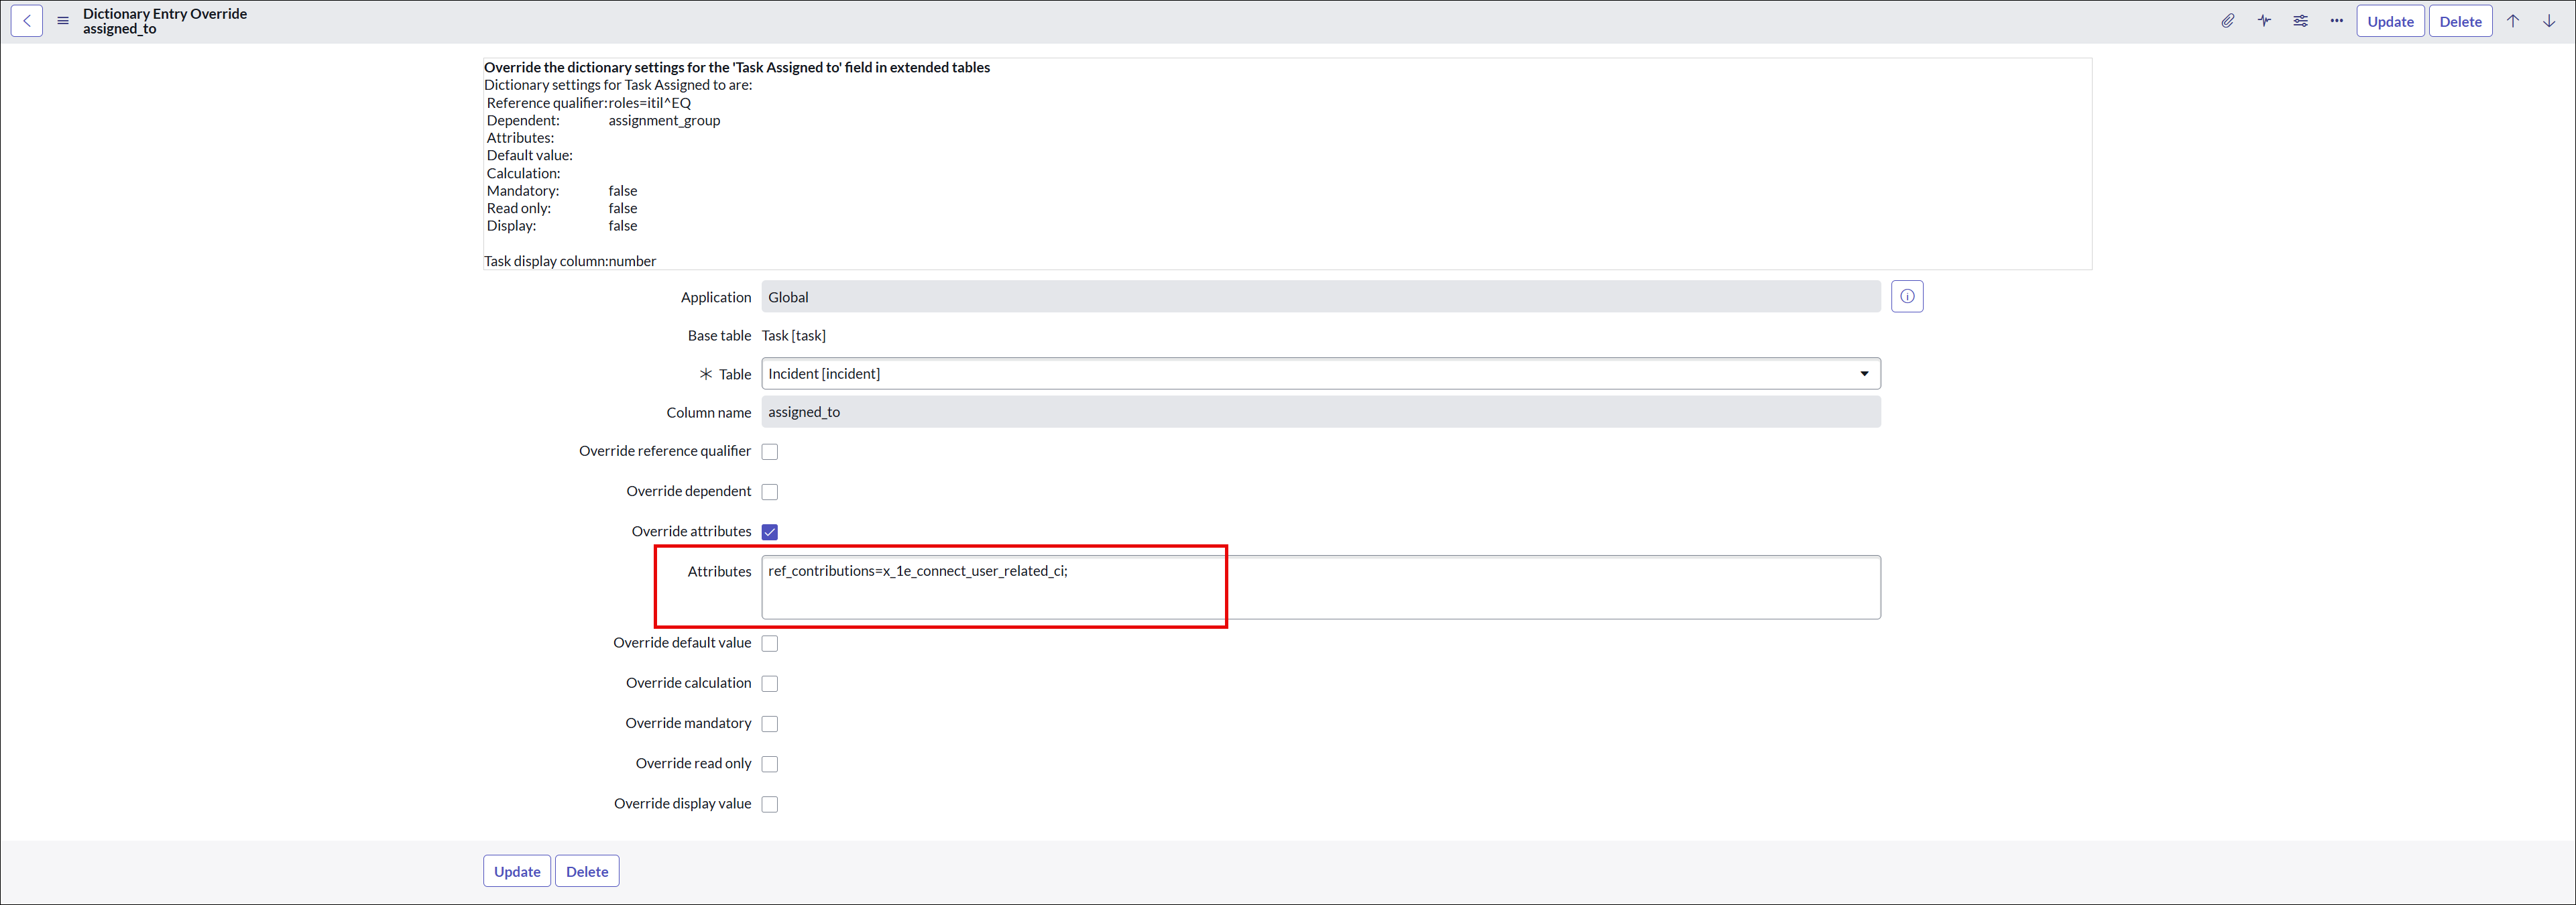
-
The look-up user asset feature is added to Assigned to field. When you click the icon, it displays all the devices assigned to the selected user.
1E ITSM Connect uses ServiceNow's Natural Language Understanding (NLU) to comprehend words, recognize word contexts, and infer user or system actions. The 1E ITSM Connect application has its own NLU model and can be customized based on your own needs. In the customer environment, this model is trained and published automatically using fixed scripts. However, to manually configure it, follow the steps below:
-
Login to your ServiceNow instance as an admin.
-
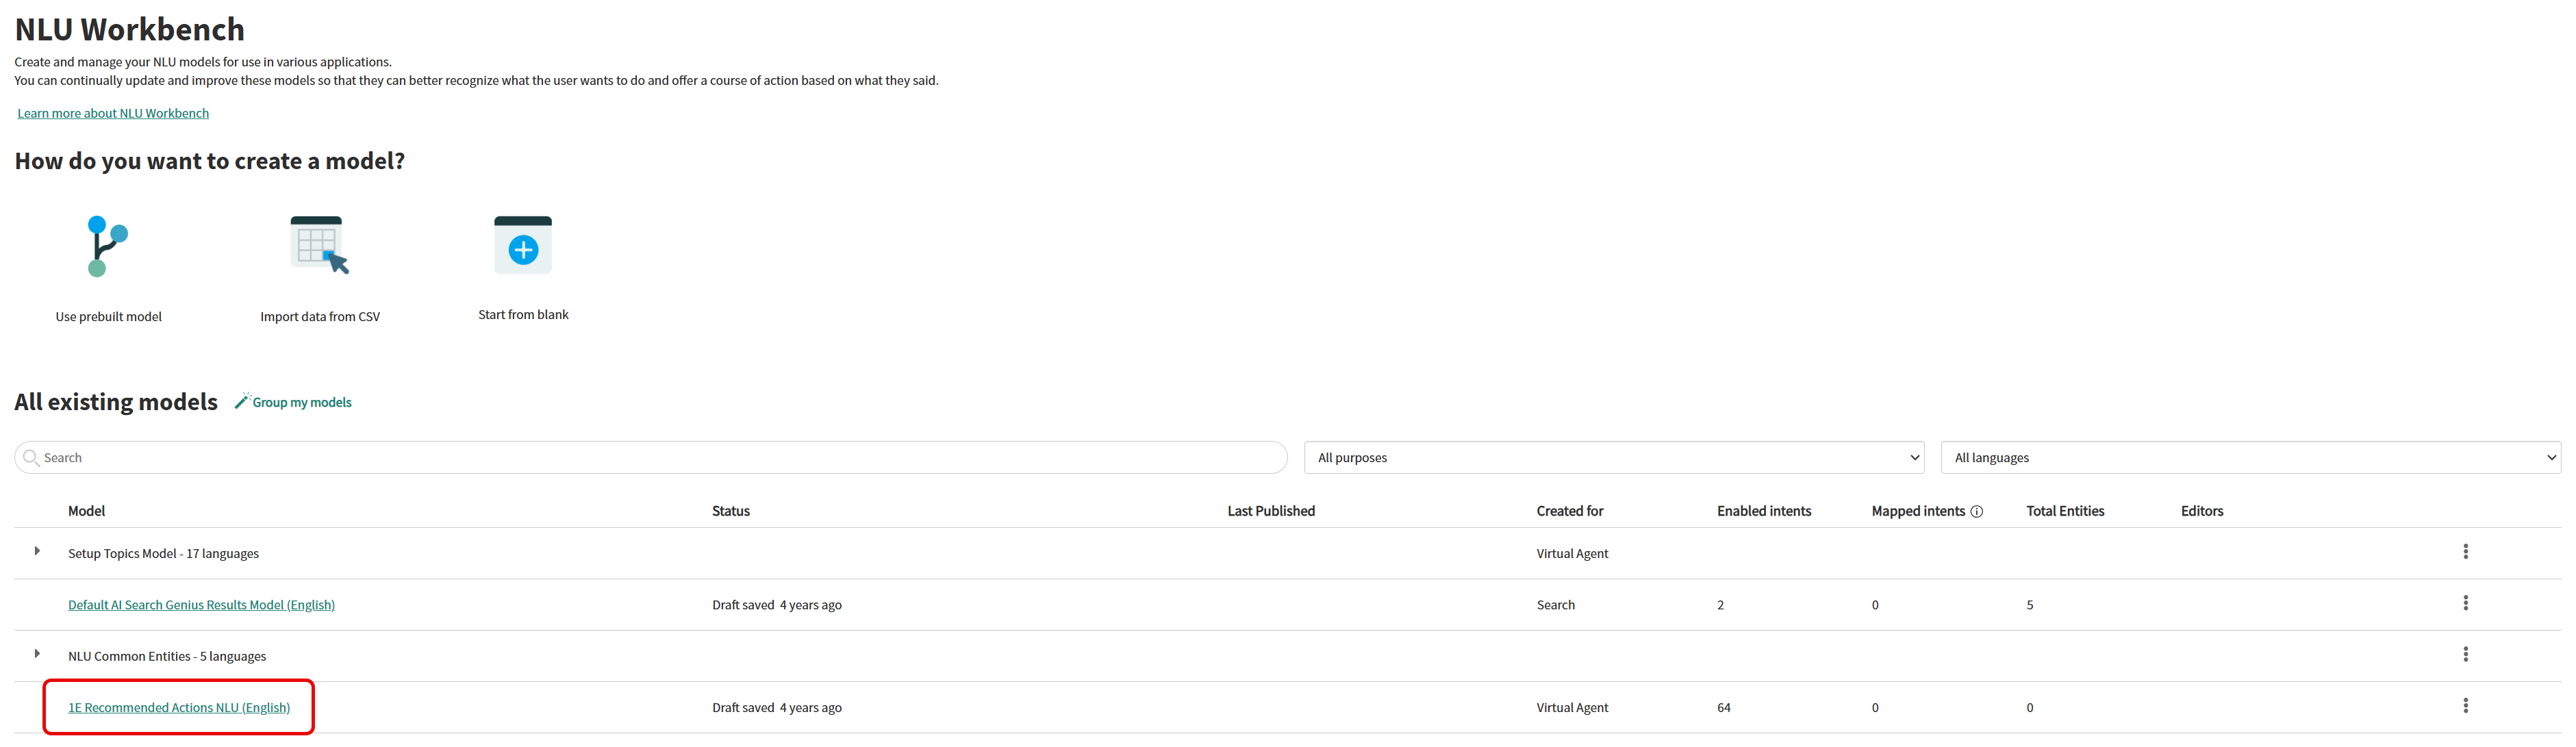
Navigate to NLU Workbench > Models in the application navigator. The page NLU Workbench opens up with the list of All existing models on the right side of the window panel. Look for the 1E Recommended Actions NLU (English) model in the list as shown in the picture below.
-
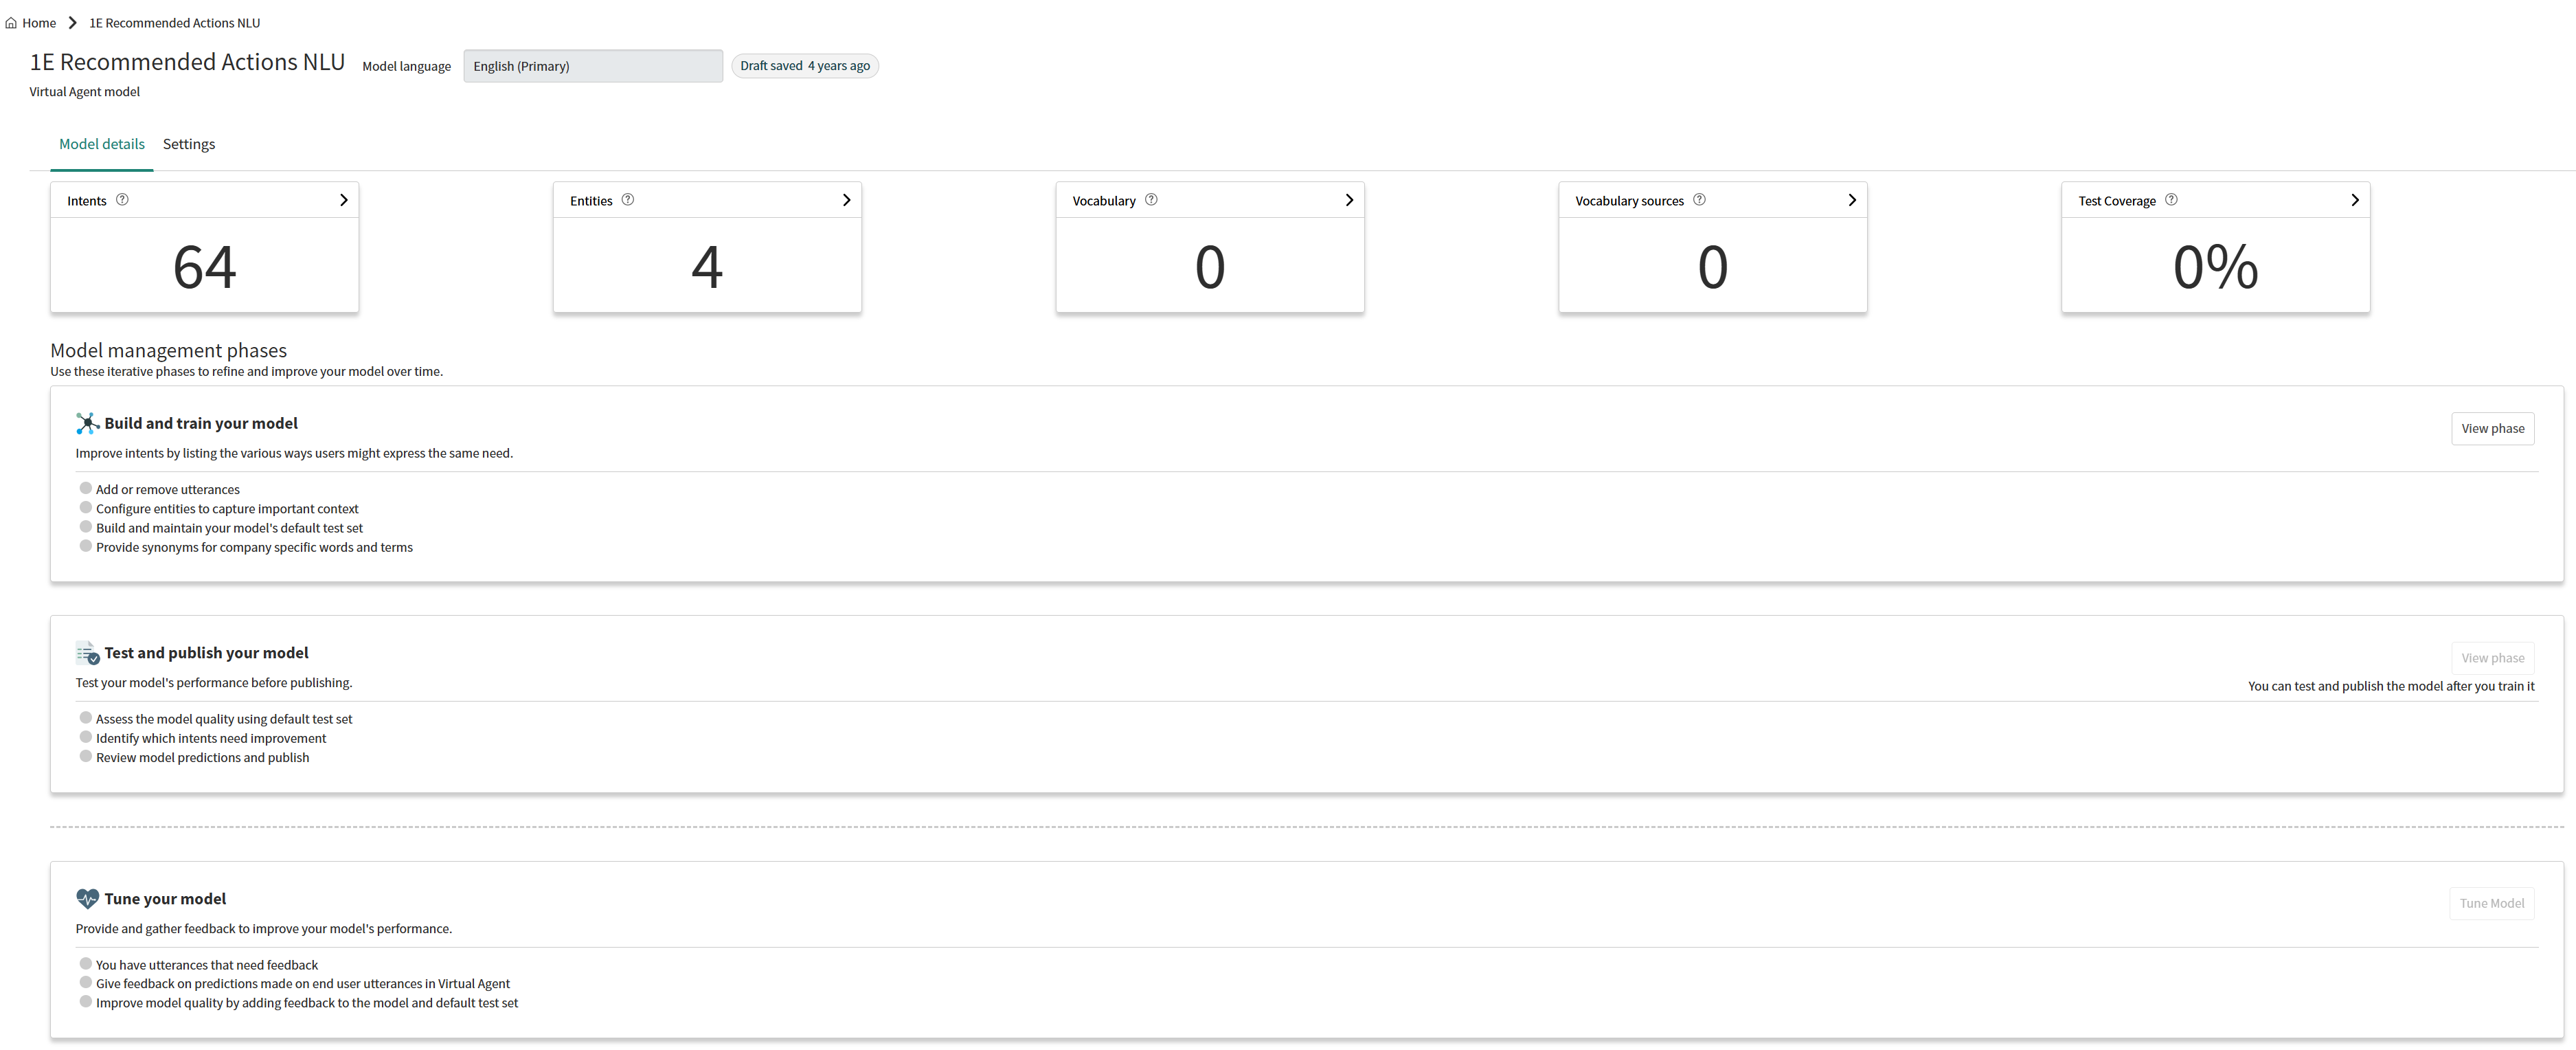
Click the model, 1E Recommended Actions NLU (English), to open the record. This opens the model details page, as shown in the picture below.
-
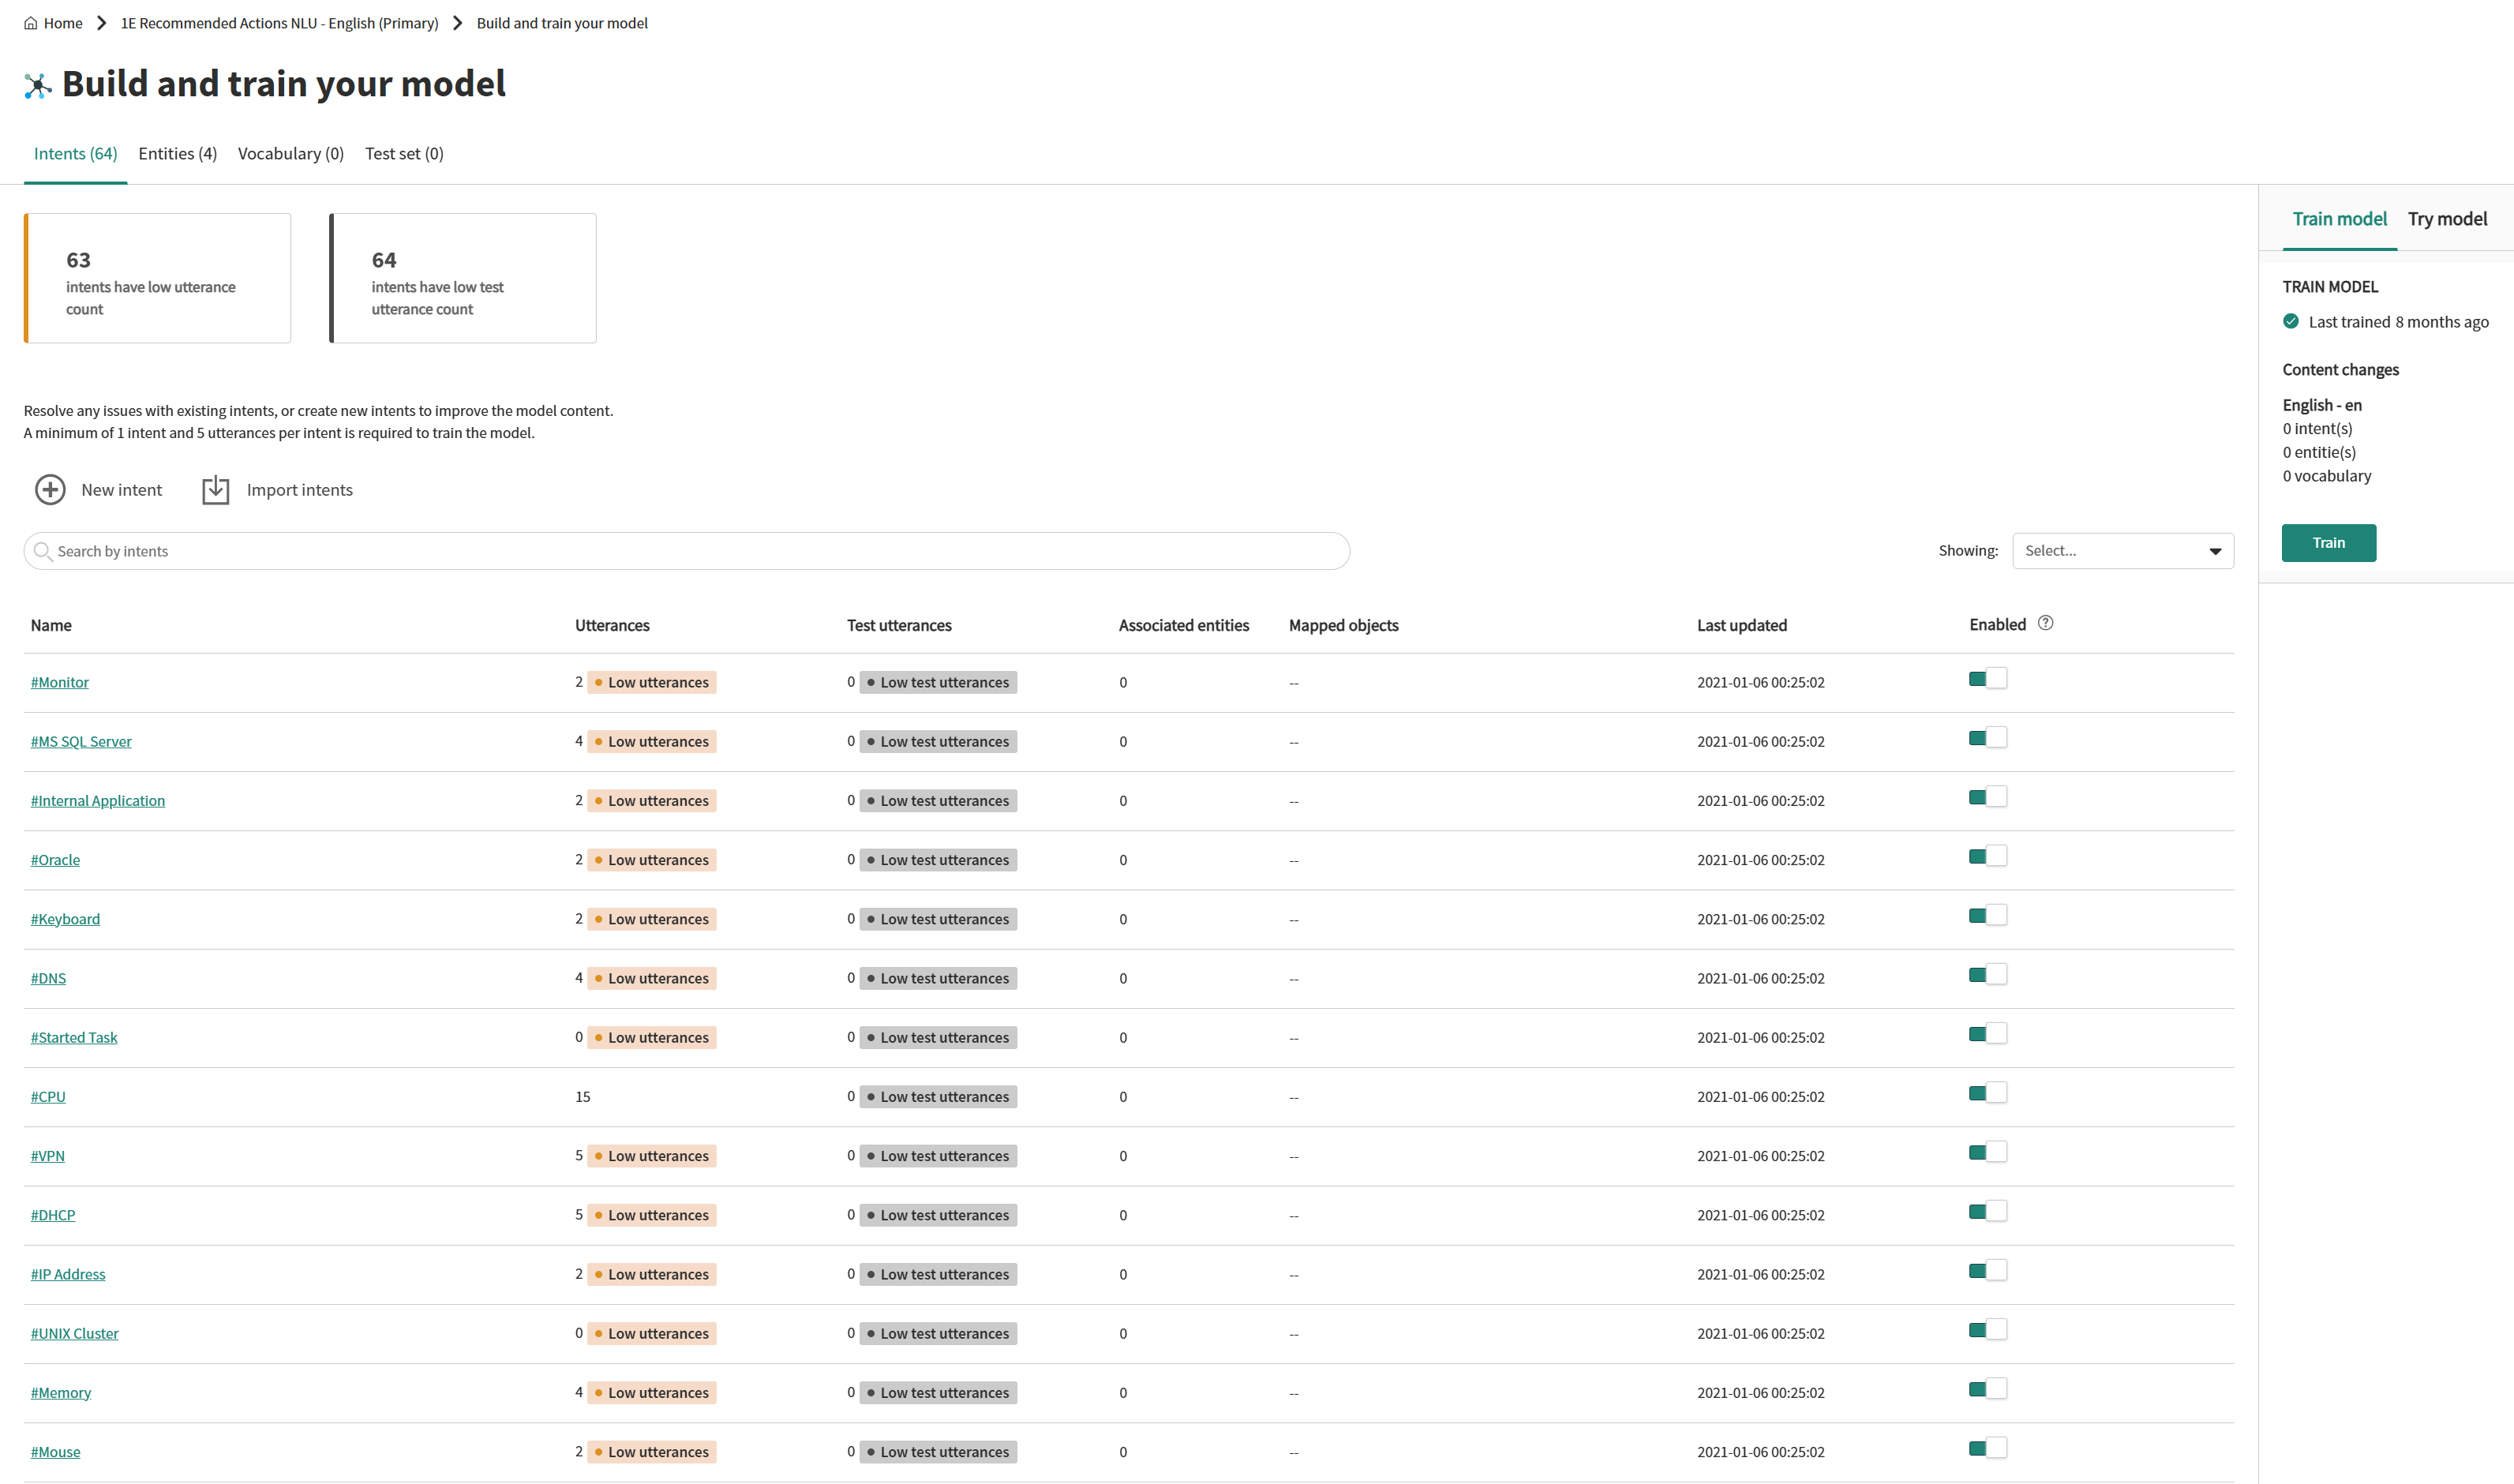
Click the Intents card or click View phase on the Build and train your model section, to open the Build and train your model page, as shown below. This page has a list of all the built-up intents and their details. Click Train model on the right.
-
A short summary panel appears on the right side of the window, outlining the content changes that will take place.
Click Train to begin the process of training the model. This may take a few minutes to complete. When the model is trained successfully, it displays a success message to the user.
-
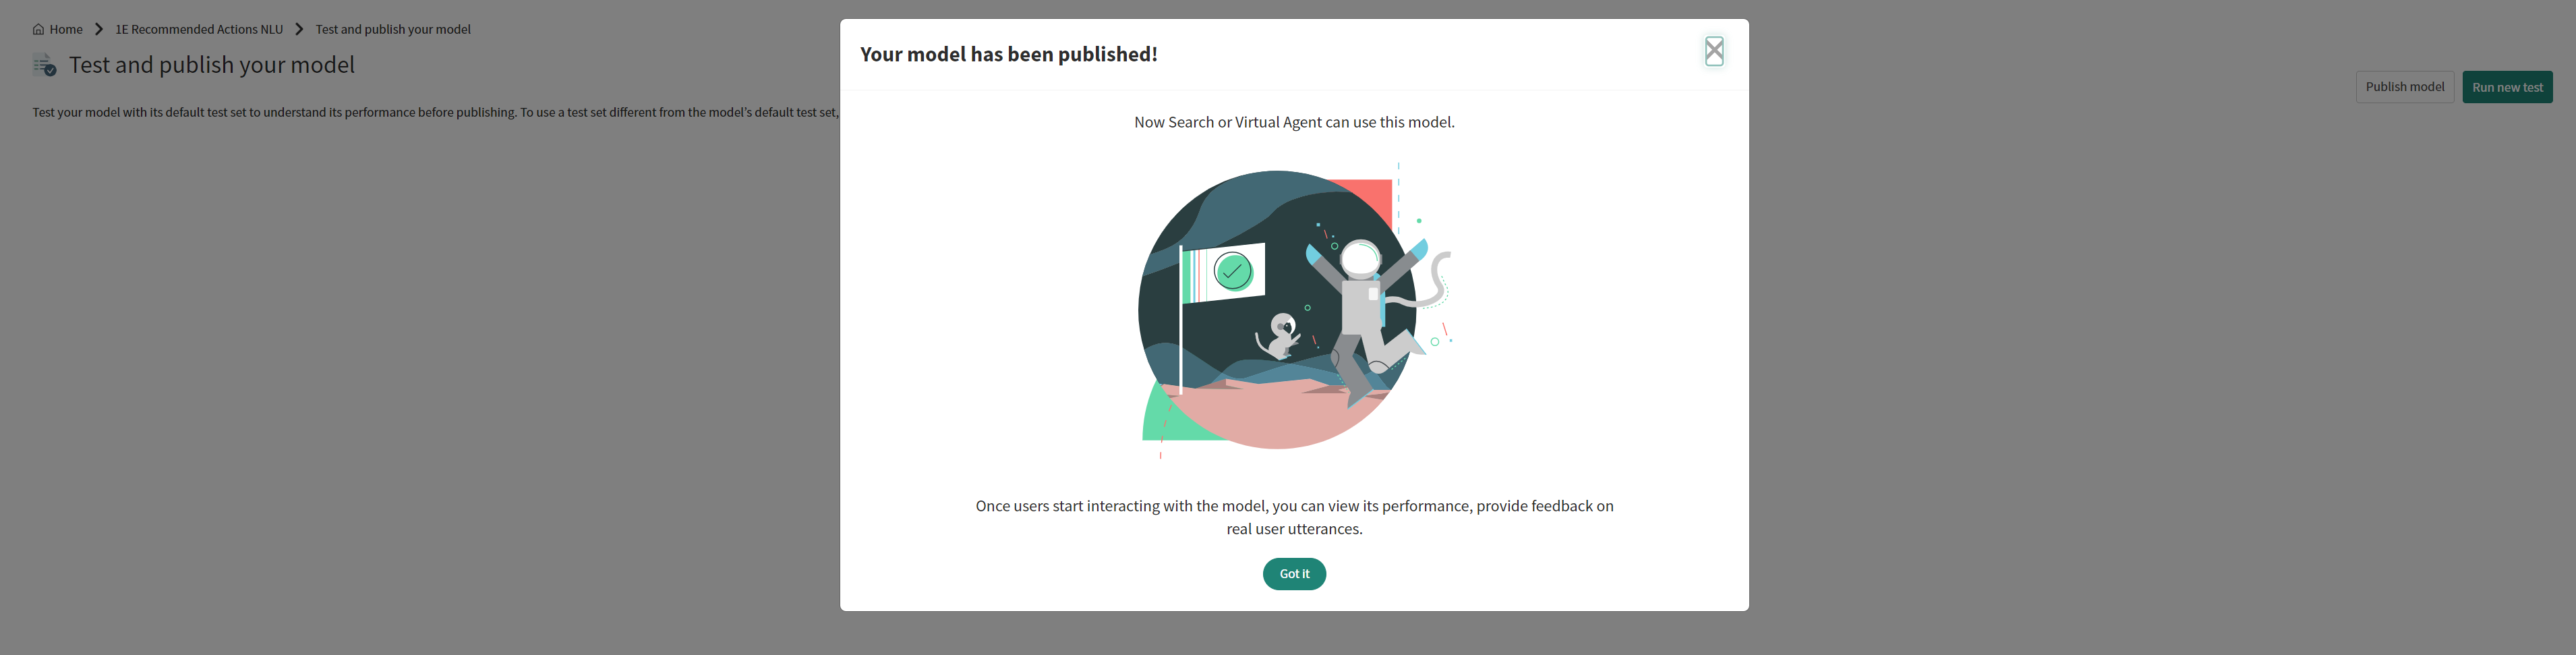
Go back to the 1E Recommended Actions NLU model details page and click View phase under the Test and publish your model section.
-
This opens the Test and publish your model page as shown in the picture below. On this page, click Run new Test, if you want to add more details to your intents.
This may take a few minutes to complete. When the model is published successfully, it displays a success message to the user as shown below.
-
Once the model is trained and published successfully, you must now map instructions with intents. For mapping instructions to intents, refer to Mapping intents with 1E instructions guide.
Intents refer to the goal or purpose behind a user's input or query. Intents can be an action that a user wants to take or wants an application to handle. ServiceNow provides a predefined list of Natural Language Understanding (NLU) intents, as well as allowing users to add custom intents too. It is important to map these intents to instructions for them to be visible under the recommended actions list in the Agent and Service Operations Workspace. The Agent and Service Operations Workspace uses ServiceNow's NLU engine to predict intents based on the incident ticket's short description. Then, the instructions that are mapped to these predicted intents are displayed in the recommended action section.
An admin can either assign or remove intents to or from an instruction. The below steps outline the process of mapping intents with 1E instructions.
-
Login to your ServiceNow instance with admin credentials.
-
Navigate to 1E ITSM Connect > Instruction Definitions in the application navigator. The Instruction Definitions page opens up with the list of instructions available.
By default, Is Approval Required is true for all the instructions and there are no Intents assigned to any instructions. An admin can update both Is Approval Required and Intents mapping with instructions.
-
If approvals are disabled for the application in the App Configuration page, but approval is enabled for a 1E instruction, there will be no request approval during the instruction's execution.
-
An admin user can retrieve 1E Instruction from the App Configuration page.
-
-
To see the details of a specific instruction, click the instruction. A new screen opens up with the details on the instruction. On this page, click the lock icon beside the Intent field as shown below.
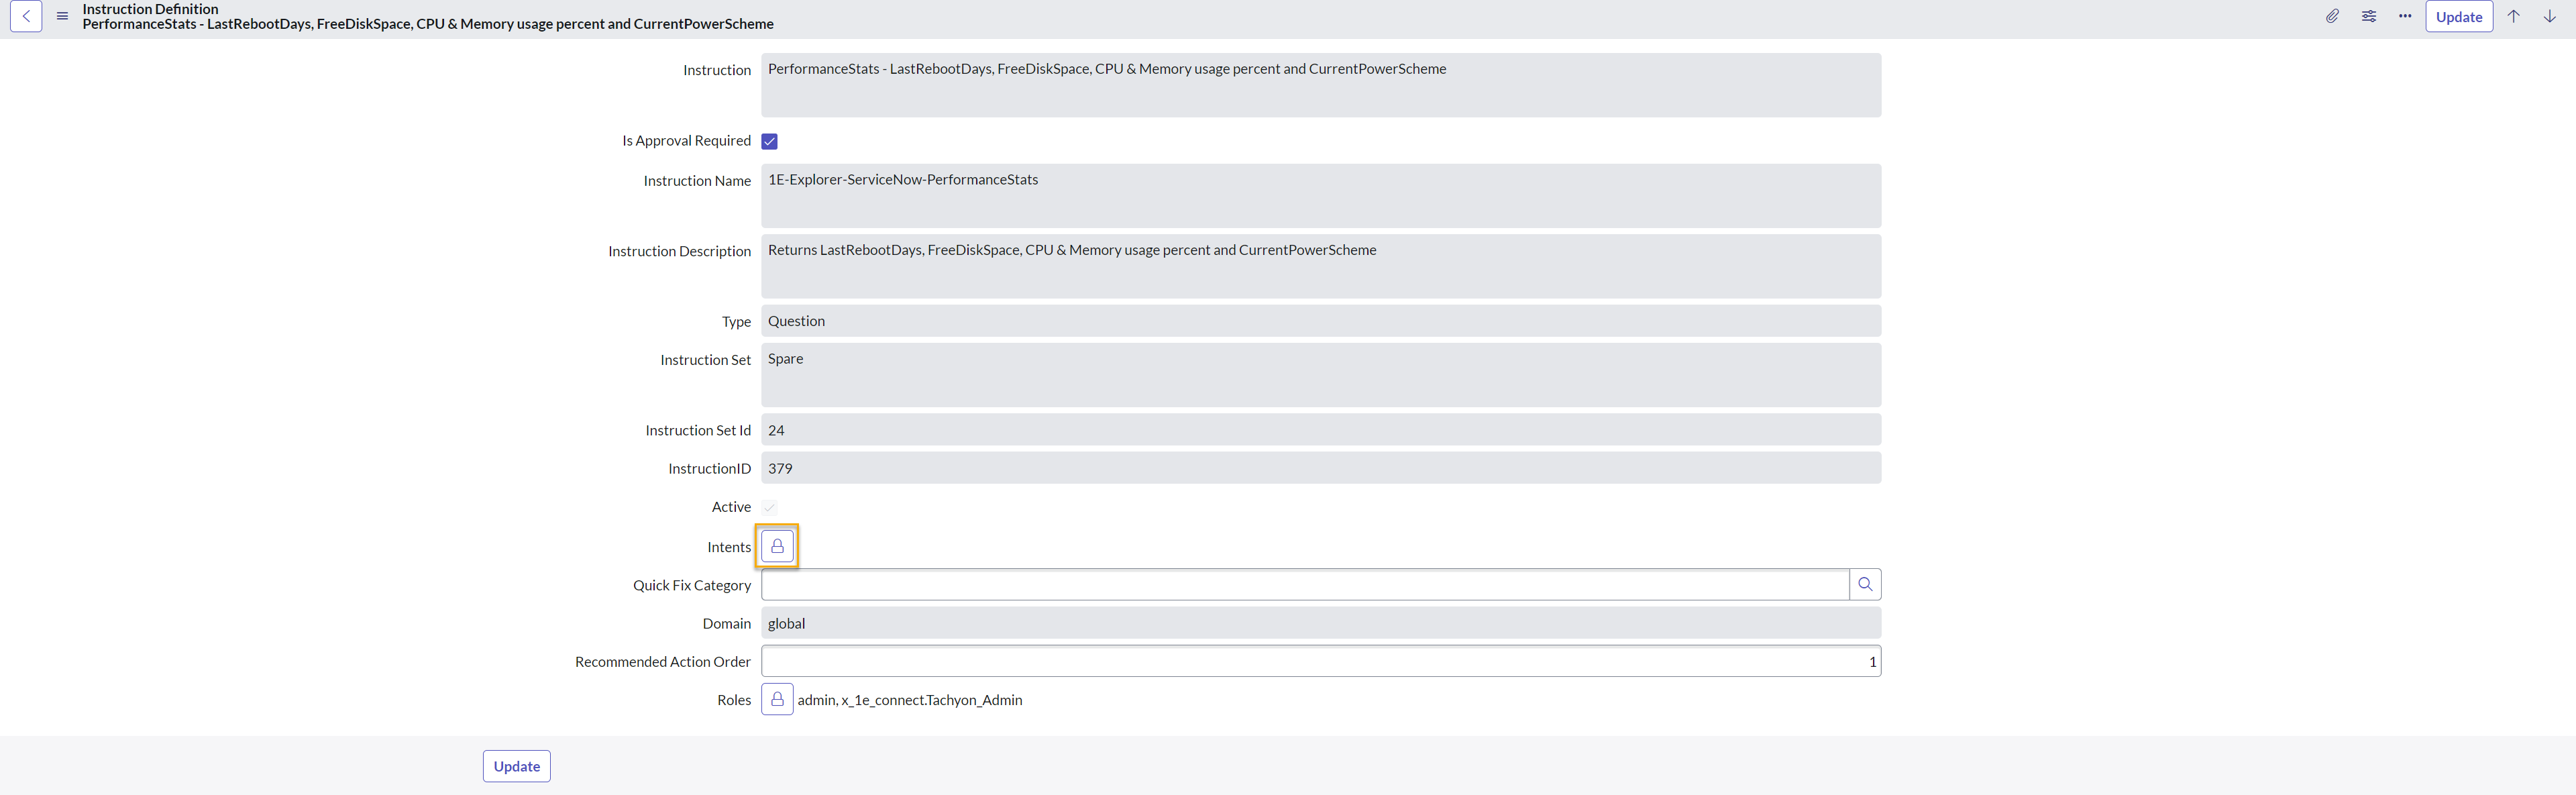
-
This unlocks the intents and allows you to add them from the pre-defined list to the selected target record.
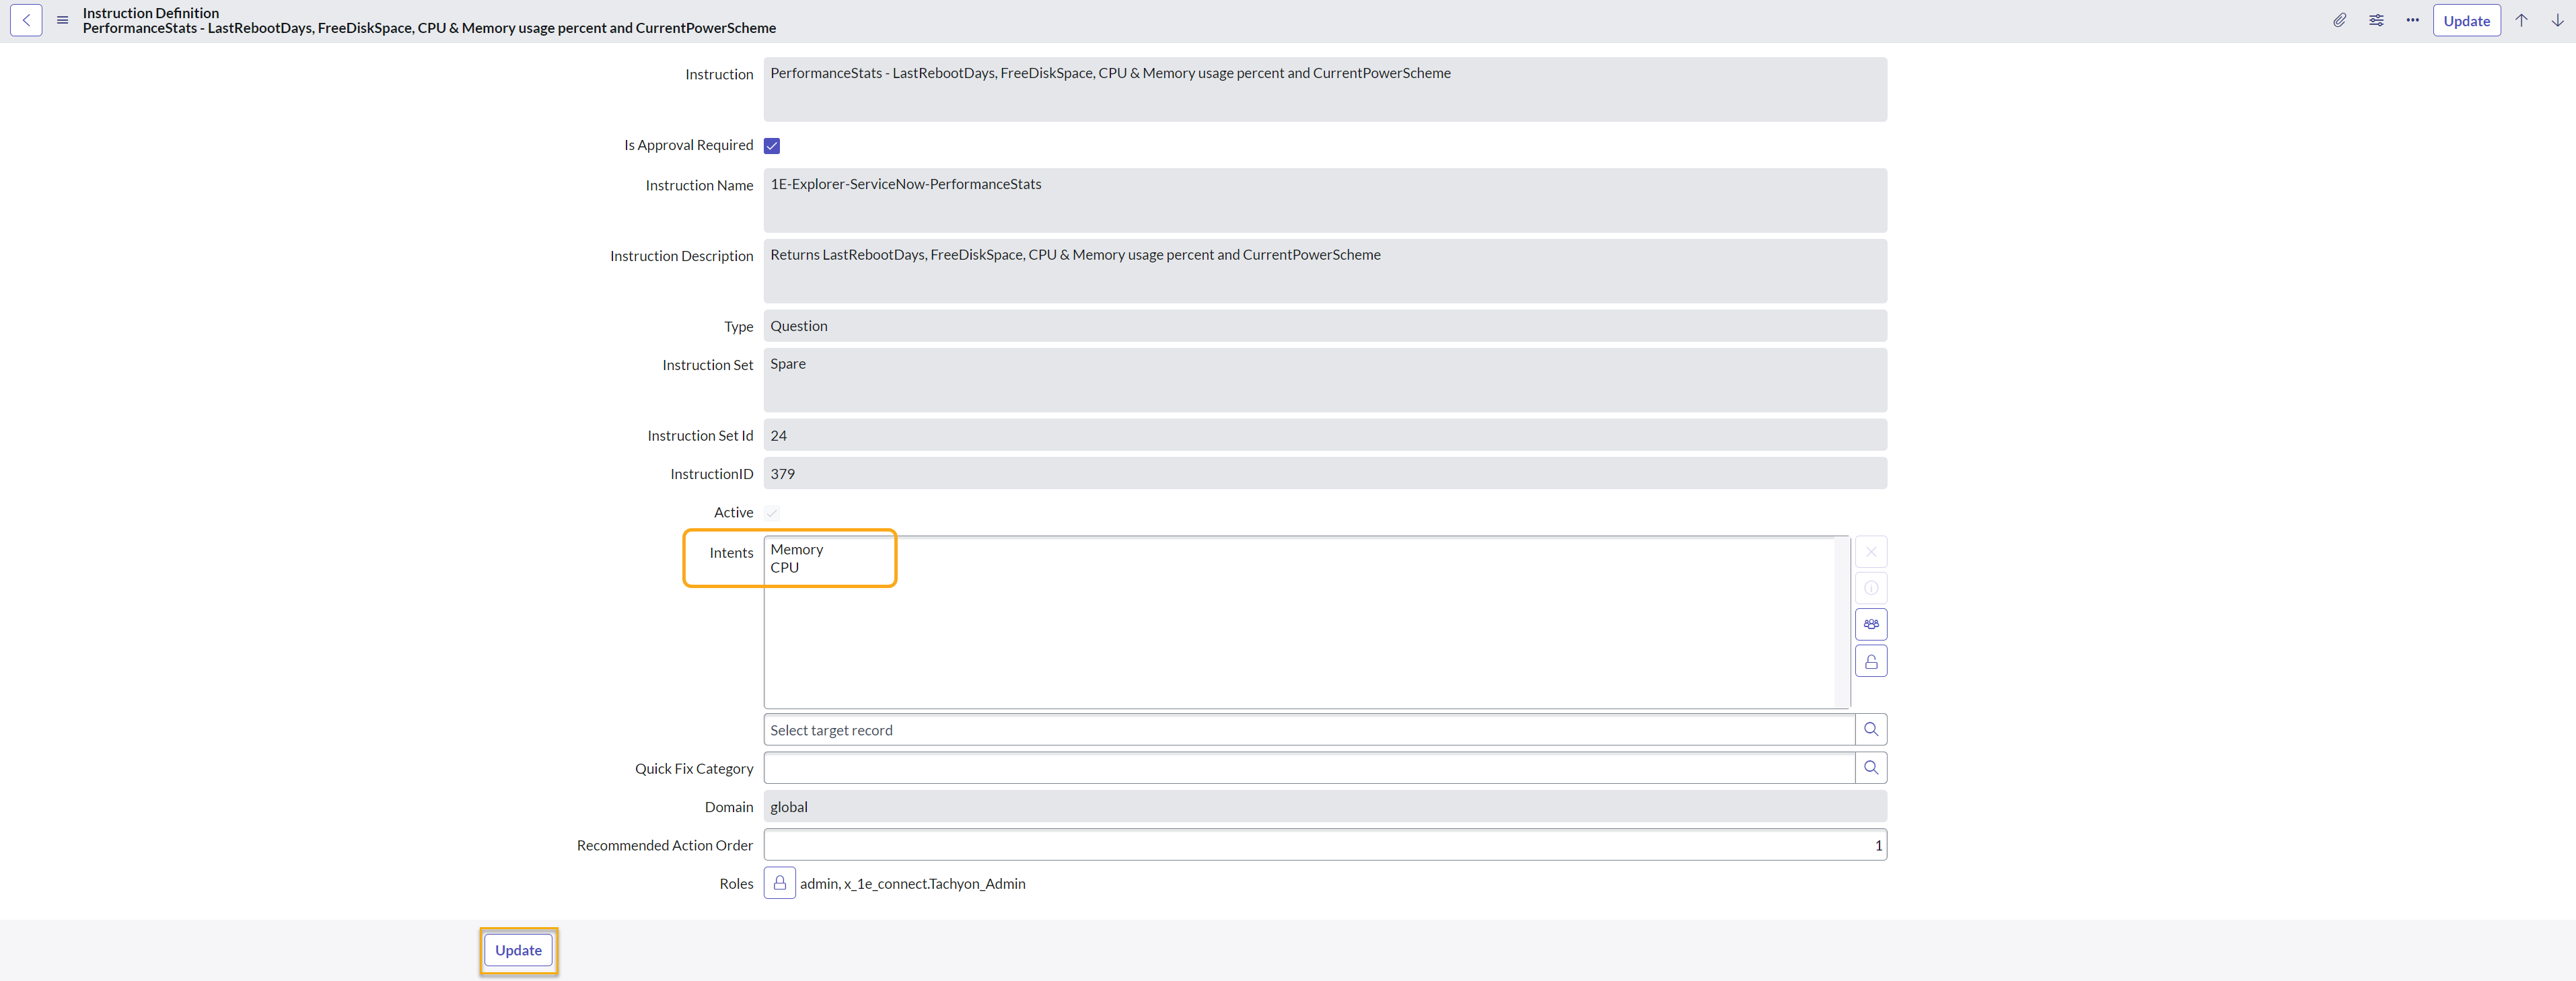
-
When you start to type, a drop-down list will appear showing any matches for the text you've typed. Select one or more intents you want to add to the target record from the pre-defined list.
-
Once you have added one or more intents, click Update to finish mapping intents to the instruction.
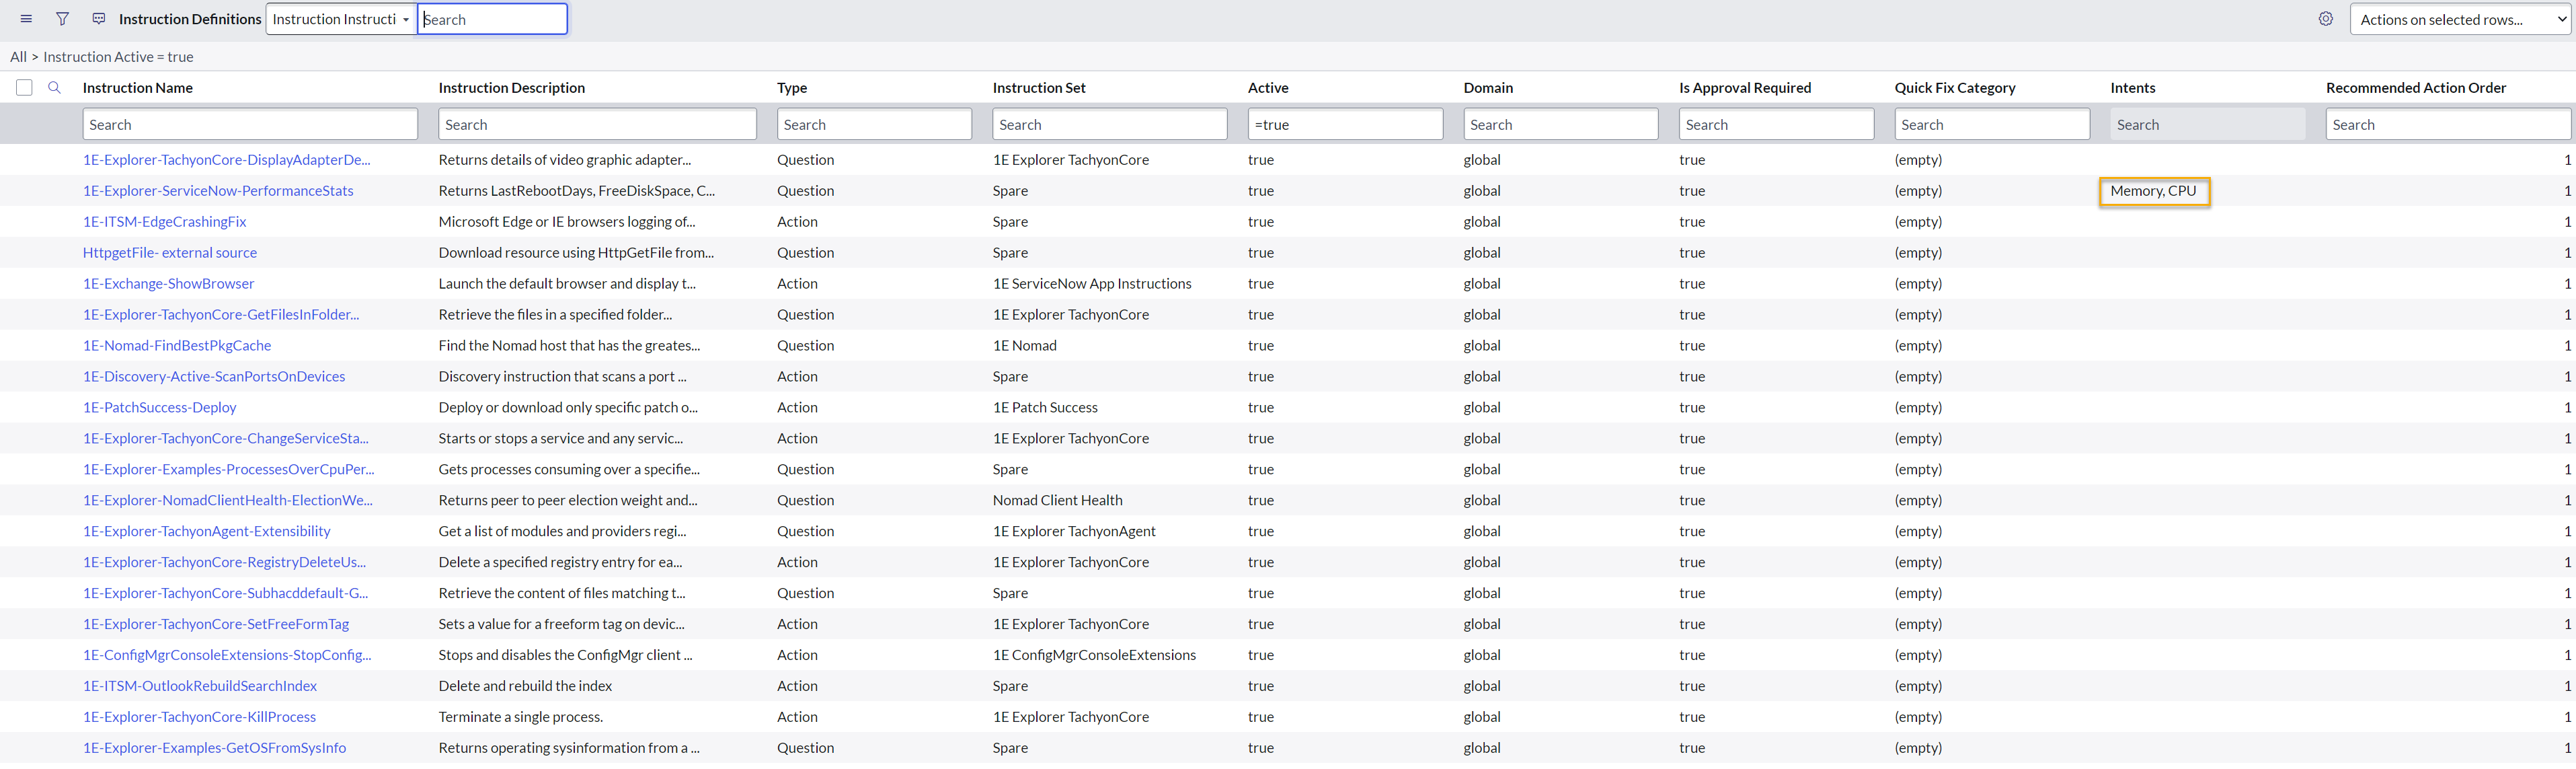
-
After successful mapping of the intent to the instruction, you can now see that it is displayed on the Instruction Definition page as shown in the picture below.
Quick fix categories allow you to run instructions instantaneously.
-
To create a category, navigate to 1E ITSM Connect > Quick Fix Categories under the Administration module.
-
Click New to create a new category as shown in the picture below. Click Submit to save the changes.

-
Once created, the new category will be added to the list of Quick Fix Categories as shown below.

-
Map the new category with instructions from the Quick Fix Category field on the Instructions Definitions page, as shown below. Begin to type, and a drop-down list will appear showing any matches for the text you've typed. Select one or more from the list and click Update to save the changes.

A list of active instructions will be shown.
The 1E ITSM Connect Dashboard has multiple dashboards available for you to report on your ROI (Return on Investment) metrics. These reports can be configured to display the data that is relevant to you.
The Potential Savings widget on 1E ITSM Connect Dashboard allows both 1E admin and 1E users to visualize the savings incurred from triggered instructions.
Each triggered instruction with the status of Completed counts for calculating the Potential Savings. For the Potential Savings to reflect in the widget, a record in the ROI Configuration (x_1e_connect_roi_configuration) table must be created first.
Navigate to 1E ITSM Connect > ROI Configurations. This opens the ROI Configurations page on the right. Click New to create new records, as shown in the picture below.

The Potential Savings is calculated using the below formula:
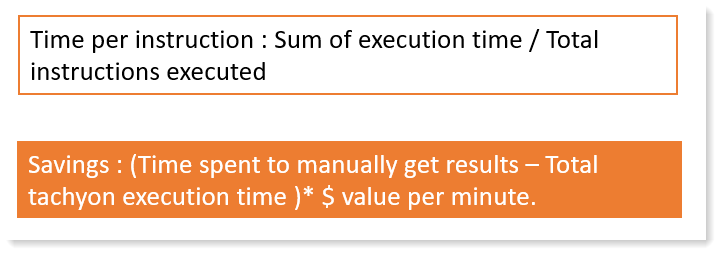
Time spent to manually get results = 2 minutes * number of executions and;
Total 1E execution time = Sum of execution time * total instructions executed
The Average Execution Time field on the Instruction History (x_1e_connect_triggered_instruction) table stores the value of Sum of execution time.
- This feature is available only for 1E Elastic SaaS customers.
- To use this feature ensure that you have enabled TeamViewer on your 1E Platform settings. Refer to Integrations.
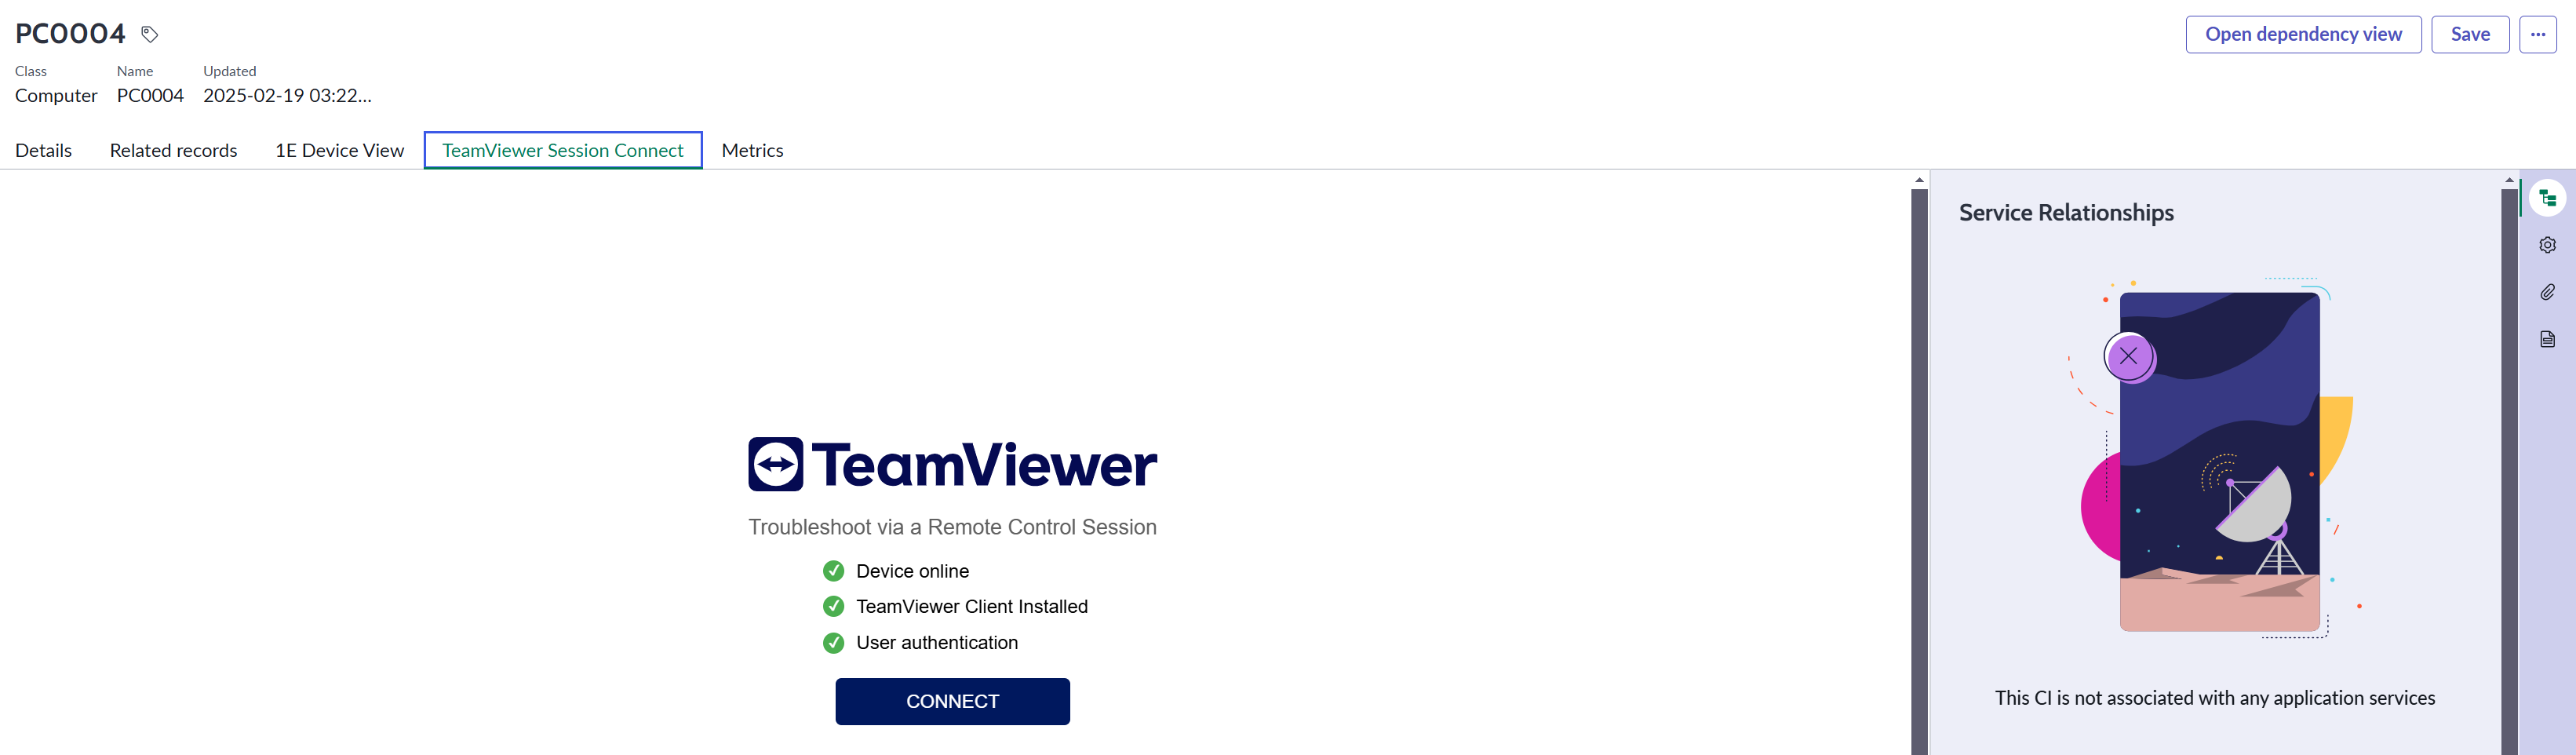
TeamViewer enables remote access and remote control that allows you to connect to remote devices and users via session links.
The integration between TeamViewer and ServiceNow agent can create a remote session with the device directly within the Service Operations Workspace, providing a seamless experience for IT support teams to resolve issues remotely.
Follow the steps below to configure this feature:
- To enable the TeamViewer Session Connect tab in the Service Operations Workspace, you need to enable the system property x_1e_connect.show_team_viewer_tab. By default, this property is set to false. To enable the TeamViewer Session Connect tab, you need to set the value of this property to true.
- The system property x_1e_connect.instruction_for_teamviewer_client_check is used to determine whether the TeamViewer client is installed on the device or not. The value of this property is set to instruction 1E-Exchange-TeamViewer-CheckClient.
- The system property x_1e_connect.download_teamviewer_client_from controls the source from which the TeamViewer client will be downloaded if it is not already installed on a device. By default, the value of this property is set to Web. Here are the possible values of this property:
- Web: The TeamViewer client will be downloaded directly from the TeamViewer website. This is the default setting.
- 1E Platform: The TeamViewer client will be downloaded from the 1E Platform.
- The x_1e_connect.teamViewerPollingInterval is a configuration parameter in TeamViewer Session Connect within the Service Operations Workspace, and it determines the polling interval for checking the user authentication status during a remote session. This parameter defines how often the system checks the authentication status of the user while a remote TeamViewer session is active. The default value of this property is set to 5000 (milliseconds).
- Team Viewer Client installation: If the TeamViewer client is not installed on the device, then the system will use QuickSupport to download and initiate TeamViewer client.
Whereas, if the TeamViewer client is already installed on the device, then the system will use FullClient as the parameter.
- To create a remote session using TeamViewer in ServiceNow, certain basic checks need to be completed before the Connect button becomes active. The Connect button will remain grayed out until the following checks are successfully done:
- The device for which the user is attempting to create a remote session needs to be online.
- The TeamViewer API must be enabled to allow the system to communicate with TeamViewer.
- The user's email needs to be authenticated for the remote session to proceed. If the user is not authenticated, a Sign-in page will appear, prompting the user to enter their credentials.
- Once all the necessary checks have been successfully completed, the Connect button will be enabled, allowing the user to initiate a remote session.