Post-Installation Tasks
The 1E Service Catalog Connect app communicates with the 1E system that is hosted in your production network. As a result, certain configuration details must be set up by a ServiceNow administrator to enable this communication with the 1E server. Additional settings must also be configured to manage how the 1E Service Catalog Connect app works.
1E Platform Settings
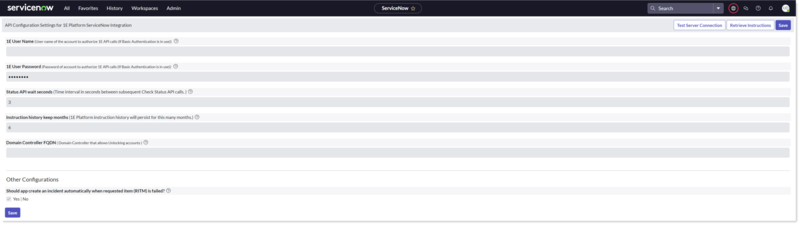
The 1E Platform Settings page contains settings for integrating 1E with ServiceNow for 1E Service Catalog Connect.
This page is accessible only to a ServiceNow user that is a member of 1E Service Catalog Connect app role x_1e_service_catal.shopping_admin. If the user is also a ServiceNow admin, the properties on the page will only be changeable after setting the scope to 1E Service Catalog Connect.
All the properties on the page, except for Domain Controller FQDN, are mandatory.
Due to the limitations of ServiceNow property pages there are no validation checks applied to the fields when you are inputting the data. You should take extra care to ensure that all the fields are filled out correctly, but see the following note.
You can click on the Test Connection button at the top-right of the console to test that the username and password are correct for Basic Authentication.
Refer to:
-
Design Considerations to understand more about app roles, users, 1E roles, instruction sets, and management groups
-
Preparation for how to set up users in 1E
-
Permissions for more detail of how to permission roles in 1E
-
User Management for how to set up users in ServiceNow
The following table describes the fields available on this page:
|
Field |
Description |
|---|---|
|
1E User Name and 1E User Password |
This is the domain user name and password of a 1E user that is assigned to an 1E ITSM Connect Actioner role in 1E. The user name must be entered in the format: domain\username. Once configured, the user acts as a proxy for any ServiceNow user that is assigned to the 1E Service Catalog Connect role x_1e_service_catal.shopping_user in order to run instructions in 1E from ServiceNow, to verify the status of executed instructions, and collect responses from the instructions that have been run. This user is also used by the API Configuration Settings page to retrieve instructions from 1E to make them available in ServiceNow. |
|
Save buttons |
There are two Save buttons on the page, one at the bottom of the screen and the other in the top-right of the screen heading, they both work identically and save any changes made to the fields on the 1E Platform Settings page. |
|
Status API wait seconds |
When an instruction is triggered from ServiceNow, there are frequent calls (polling) from ServiceNow to 1E for status updates of the instruction. 1E Service Catalog Connect asks 1E Core for the instruction status. 1E Core then asks 1E about the status of the current instruction and passes it back to 1E Service Catalog Connect. Status API wait seconds is the time duration in seconds for which 1E Service Catalog Connect waits before sending each status request. The default value is 3 seconds. |
|
Instruction history keep months |
Instruction history keep months is the number of months for which ServiceNow should preserve the 1E instruction history data. After this many months, a daily scheduled job will purge the older records. Purged instruction history can never be viewed/retrieved again. The default value is 6 months. |
|
Domain Controller FQDN |
This property defines the fully qualified domain name of the domain controller on which the Unlock domain account instruction will be triggered. This optional property is only used for the Unlock domain account catalog item. To use this feature the 1E Client MUST be installed on the domain controller, if it is not then the catalog item will be unusable. Recommendation: if it is not permitted to install the 1EClient on a Domain Controller, then a ServiceNow System administrator can make the Unlock domain account Catalog item inactive in the Maintain Item screen. Impact: After making Unlock domain account catalog item inactive, a user won’t be able to unlock the domain account from ServiceNow. |
|
Other Configurations Should Service Catalog Connect automatically create an incident when a requested item (RITM) fails? |
This property lets the admin user configure whether they want the app to open an incident automatically when a RITM fails, i.e. is in Closed Incomplete state. The default value of this property is true. |
|
Test Server Connection button |
A Test Server Connection button is enabled once the settings have been saved on the API Configuration page. Any time the settings on the page are modified the button is disabled and only re-enabled when the changes have been saved. This button is used to test whether the settings saved on the page work correctly or not. As soon as this button is hit, ServiceNow tries to establish a connection with 1E server using the provided details and shows an overlay on the screen which prevents further modifications on the page. If there was a successful connection, then a success message is displayed on the page, else an appropriate error message is displayed. |
|
Retrieve Instructions button |
The Retrieve Instructions button is enabled once the settings have been saved on the API Configuration page. Any time the settings on the page are modified, the button is disabled and only re-enabled when the changes have been saved. Clicking the Retrieve Instructions button causes the 1E Service Catalog Connect app to contact 1E using the 1E User Name and password to retrieve details about all the instructions that the 1E User account has 1E ITSM Connect Actioner permissions on. When the instructions have been successfully retrieved, a message is displayed on the page and the retrieved 1E instructions will be displayed on the 1E Core app Instruction Definitions page. If an error message is displayed, you may need to carefully check the settings on this page. |
Shopping Settings Page
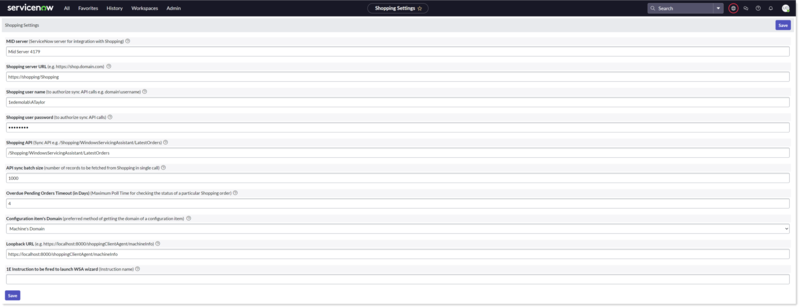
The Shopping Settings page is a sub-menu available under the Administration tab of 1E Service Catalog Connect. This page allows an admin user to set up the details required by Shopping to communicate with 1E for 1E Service Catalog Connect.
This page is accessible only to a ServiceNow user that is a member of 1E Service Catalog Connect app role x_1e_service_catal.shopping_admin. If the user is also a ServiceNow admin, the properties on the page will only be changeable after setting the scope to 1E Service Catalog Connect.
All the fields on the page are mandatory except for MID Server, which is dependent on whether 1E is accessible over the internet.
Due to the limitations of ServiceNow property pages there are no validation checks applied to any of the settings. You should take extra care to ensure that all the fields are filled out correctly.
The following table describes the fields available on this page:
|
Field |
Description |
|---|---|
|
MID server |
The name of MID server. A MID server is a software application which gets installed on any local machine with internet connectivity in the Shopping domain and is set up pointing to the desired ServiceNow instance. This is required when Shopping is set up on-premises otherwise it's an optional field. If Shopping is not on the internet, ServiceNow (which is in a cloud) will never be able to communicate with it. In this case 1E Service Catalog Connect requires a bridge between the Shopping and ServiceNow. |
|
Shopping server URL |
The URL used by the application to communicate with Shopping APIs. This is the base URL prefix for accessing the Shopping API to communicate with the Shopping Web. Typically, this is set to the host header you defined in the Web configuration during Shopping Central installation, for example |
|
Shopping user name and password |
In Shopping Console → Settings → WSA, there is a property named 'Sync WSA Orders Account'. The user which configured for this property in the Shopping Console is the same one needed to configure in ServiceNow for Shopping user name and password fields. This user is used when ServiceNow syncs data from Shopping. |
|
Shopping API |
The relative URL for the Sync API of Shopping. The value of this field is used by the ServiceNow scheduled job that syncs data from Shopping into ServiceNow. Default value: /Shopping/WindowsServicingAssistant/LatestOrders |
|
API sync batch size |
A number that limits the number of records coming from Shopping in one batch at the time of synchronization. It may happen that there is a huge number of Shopping orders available in Shopping DB to be synced in ServiceNow. Default value: 1000 |
|
Overdue Pending Orders Timeout (in Days) |
This value indicates the Maximum Poll Time in days for checking the status of a particular Shopping order. An order request is set to fail if the request time has passed the value set under Overdue Pending Orders Timeout. |
|
Configuration item's Domain |
This is the preferred method of getting the domain of a configuration item. |
|
Loopback URL |
When ordering a Windows 10 item, 1E Service Catalog Connect needs the FQDN (computer name) of the current computer where the app is running. This field is the loopback URL that used to determine the FQDN of the local/current machine. Default value: https://localhost:8000/shoppingClientAgent/machineInfo |
|
1E Instruction to be fired to launch WSA wizard |
The 'Launch WSA Wizard' button triggers this 1E instruction to launch WSA wizard on the current computer. (This field is not in use) |
Configure Shopping Applications
Follow the below steps to configure Shopping Applications
-
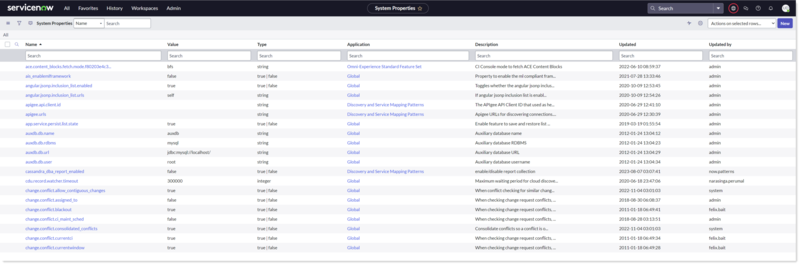
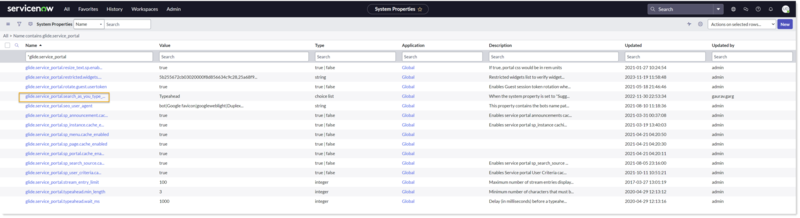
Navigate to sys_properties_list.do in the filter navigator to open the system properties table.
-
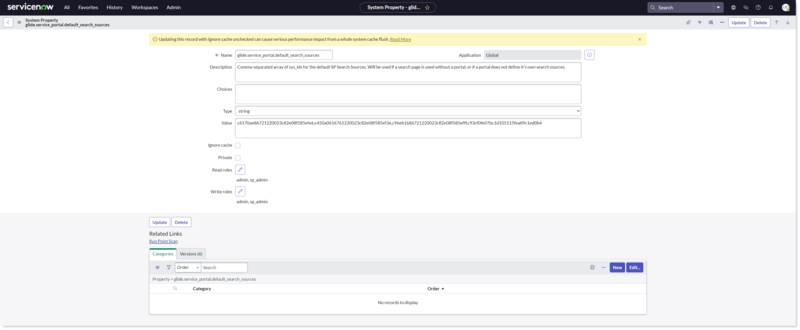
Search for glide.service_portal.default_search_sources property in the system properties table. Ensure that the Application scope is set to Global.
-
Add the Sys ID c93cf0fe07bc1d105115fea89c1ed0b4 (comma separated) for Shopping app search source in the Value field. This is to enable the search feature of Shopping Applications in the Service Portal.
-
Click Update to save the changes.
-
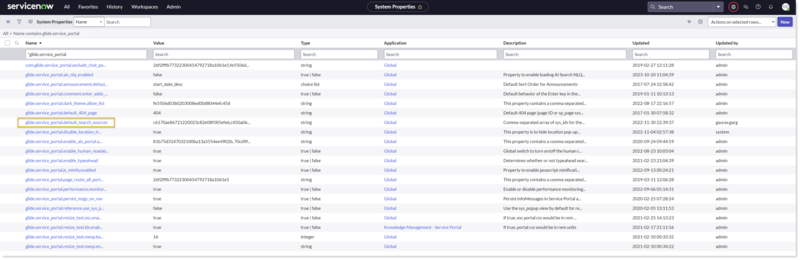
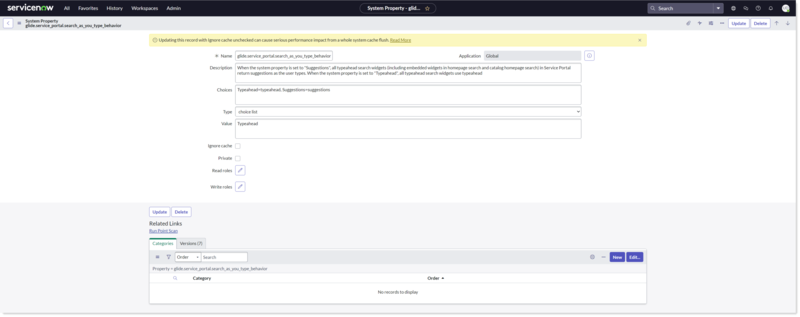
Now search for another property glide.service_portal.search_as_you_type_behavior in the system properties table. Ensure that the Application scope is set to Global.
-
Set the value field to typeahead.
-
When the Choices field for this property is set to Suggestions, then all the typeahead search widgets in Service Portal returns suggestions as the user types. Whereas, when the Choices field is set to Typeahead, all typeahead search widgets use typeahead.
-
Click Update to save the changes.
-
A default workflow Service Catalog Request is used for managing approvals. This can be replaced with any custom workflow.
-
Configure the below fields on the Shopping Settings page and save the changes.
-
Overdue Pending Orders Timeout (in Days): Maximum poll time to check the status of a particular Shopping order.
-
Configuration item's Domain: Set the domain of the configuration item.
-
MID Server: Name of the ServiceNow server for integration with Shopping.
-
-
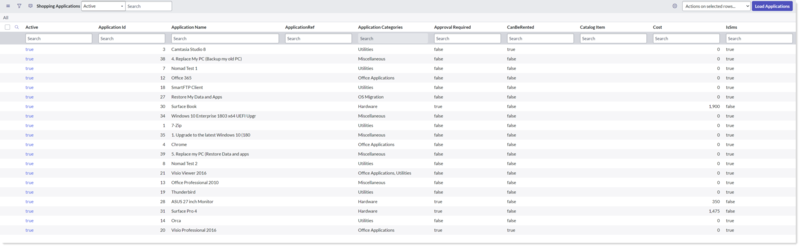
Now navigate to Shopping Applications module and click Load Applications button given on the top. By now, all the active applications from Shopping are copied into this table.
Optional post-installation configurations
The following page describe additional post-installation configurations you can make to enable certain features in your ServiceNow Service Catalog Connect implementation:
Windows 10 Catalog Item customization
This is an optional post-installation task for configuring Windows 10 catalog items.
A Windows 10 ServiceNow catalog item is added to ServiceNow as part of the 1E Service Catalog Connect installation. You can configure it according to your preferences. By default, it is included in the Windows Deployment ServiceNow category. You might want to add it to the Software category or other categories that your end users are likely to use.
How to customize the Windows 10 Catalog Item
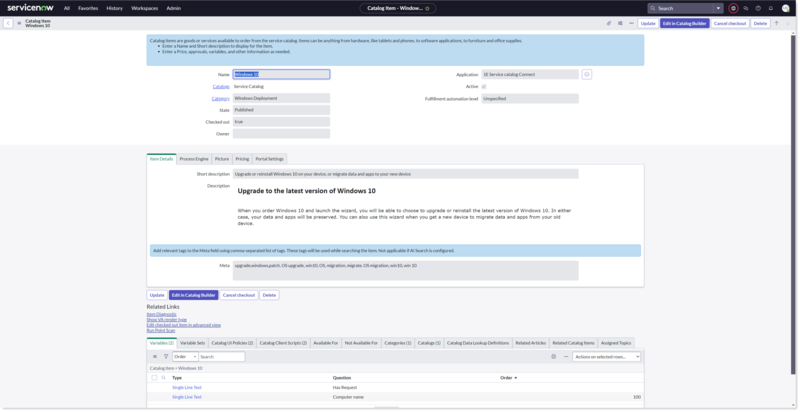
To customize the Windows 10 item, search for Maintain Items in the ServiceNow Navigator and then search for Windows 10 on the Catalog Items header.
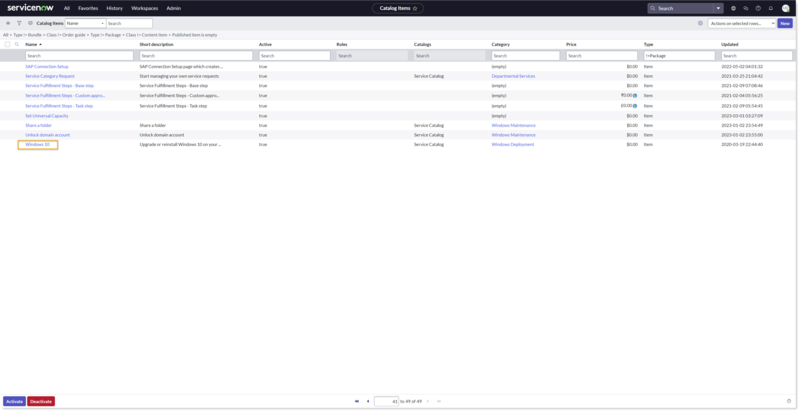
Click on Windows 10 in the catalog item list to open the Catalog Item page. You can change a variety of settings for the item, including the graphic and descriptive text. You might want to add context that will help your users to understand your Windows deployment plan, what WSA is, who to contact if they have questions, etc.
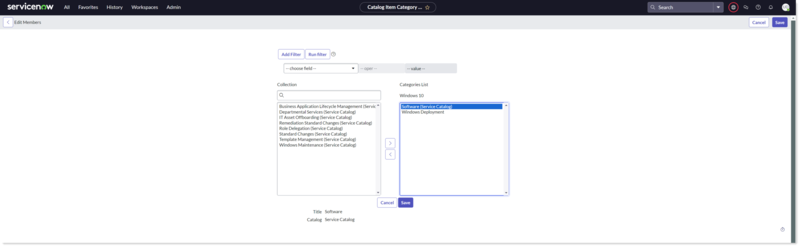
To change the Software Catalog category, scroll to the bottom of the catalog item page, and select the Categories tab. Then click on Edit... to change the categories.
If you want to add the Windows 10 item to the Software category, search for "software" and select the Software category. Click on the > button to add the Software category for the Windows 10 item, and then click Save.
Adding a new catalog item
This is an optional post-installation task for configuring a new catalog item.
One of the new features in this version is the ability for an administrator to configure any 1E instruction to be run from a Service catalog item. To do this, the user needs to configure 3 things:
-
Manage Categories.
-
Manage Catalog items.
-
Instruction Configuration.
Manage Categories
In order to add a new catalog item and relate it to a corresponding 1E instruction, we first need to create a category and a sub-category on the Manage Categories page, as shown in the picture opposite. Categories can be thought of as issue types and sub-categories as sub-issue types. Users cannot add two categories with same name, and a category cannot have two sub-categories with the same name. Every sub-category must have a parent category associated with it. But a category doesn't need to have a sub-category.
By default, the application does not provide any categories or sub-categories.

Manage Catalog items
This page lets users map a catalog item with a category. When the user orders this item, this category will be selected by default - although the user will still have an option to select a different category.
By default, the application does not provide any record in this page.

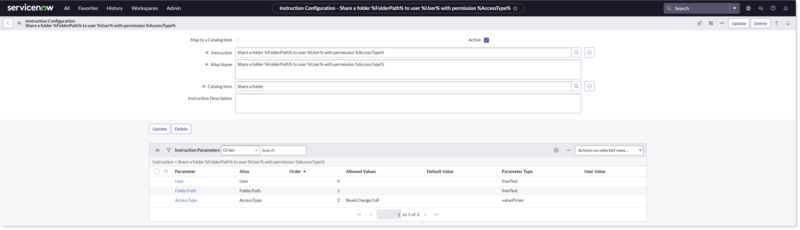
Instruction Configuration
Every catalog item (added by 1E Service Catalog Connect) must be associated with a 1E instruction. When the user orders this item then on the basis of category and subcategory the associated 1E instruction will get trigger. Here on this page, the user can configure mapping between category/subcategory and the 1E instruction. This indirectly associates an instruction with an item. To do this, go to the screen, as shown in the picture, and click on New.
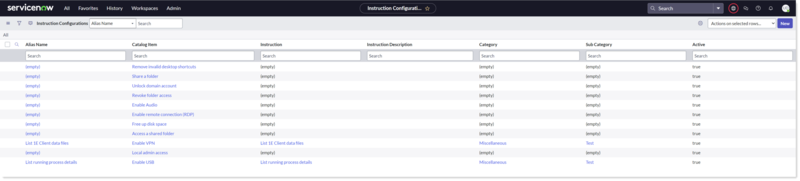

Here, we select a category, a sub category and the instruction.
Alias name - It is the user-friendly name of the instruction. This name gets displayed on catalog item detail page.

Configure built-in 1E ServiceNow Catalog items
This is an optional post-installation task for configuring the built-in 1E ServiceNow Catalog items.
One of the new features in this version is the ability for an administrator to configure six new in-built 1E ServiceNow catalog items to be run from a Service catalog item:
Built-in 1E ServiceNow Catalog items
Six new 1E catalog items are now included as part of 1E ServiceNow.
We recommend that you configure an approval process for these catalog items to prevent issues arising from accidental or malicious use.
The six catalog items are shown in the following table:
|
Built-in 1E Catalog items |
Description |
Parameters (All parameters are mandatory) |
||||||||
|---|---|---|---|---|---|---|---|---|---|---|
|
Enable USB |
Lets a user enable their USB port. In most organizations, the USB drive is disabled and one of the highly sought requests is to enable the USB port. |
|
||||||||
|
Enable Audio |
Allows users to enable Audio on their endpoint. |
|
||||||||
|
Enable VPN |
Allows users to enable their Microsoft Virtual private Network (VPN) connection. The configuration is done based on default settings. |
|
||||||||
|
Enable remote connection(RDP) |
Authorizes a user to remotely connect to endpoints using Remote Desktop protocol (RDP). |
|
||||||||
|
Unlock domain account |
Lets a user unlock their domain account. Users can also unlock a colleague’s domain account on their request. Warning Unlock domain account is only usable if the 1E Client is installed on the Domain Controller and the Domain Controller FQDN field has been set on the 1E Platform Settings page. We recommend that you configure this Catalog item so that the AccountState parameter has a default value of Unlock. This will prevent accidental or malicious attempts to lock other user's accounts. If installing the 1E Client on a Domain Controller is not permitted, a ServiceNow System administrator should set Unlock domain account to inactive on the Maintain Items screen, to prevent users from attempting to run the Catalog item. |
|
||||||||
|
Free up disk space |
Checks the disk space available on a user's computer. It then deletes the temporary files, unused log files, clears the recycle bin and finally displays the available space on device before and after running the instruction. |
|
In order to use these catalog items, a ServiceNow administrator needs to:
-
Retrieve the new instructions from 1E
-
Populate an instruction for each catalog item
-
Set any default values
-
Add the catalog item to an appropriate category (Hardware, Account Services, etc)
These tasks can only be carried out once a 1E Administrator has uploaded the 6 corresponding 1E Instructions provided by the 1E Service Catalog Connect Product Pack, and assigned to an Instruction set.
Retrieve instructions for the new catalog items
-
Go to ServiceNow, 1E Platform Settings and click Retrieve Instructions.
-
This will retrieve the 6 newly added instructions.
Setting the instruction for catalog item
-
Go to Instruction Configuration and open any one of the 6 Catalog Items by clicking on the (empty) link at the start of the row.
-
Doing this displays the Instruction Configuration page for the selected instruction. Select the instruction you want to associate from the Instruction search bar.
-
Give the instruction a unique Alias name.
-
Click Update to save the changes.
Setting User Values for the parameters
Once you have set the instruction for a Catalog Item and updated, subsequently going to the Instruction Configuration page will show you a list of parameters associated with the instruction.
Here, you can constrain the options available to users requesting the Catalog Item by setting the value for parameters. The picture below shows the list of parameters and the respective values for the instruction.
Once you've set the parameters you want to fix, click Update to save them to the Catalog Item.
This process is recommended for any Catalog Item that has a potentially hazardous option, such as the Unlock domain account Catalog Item, where the requested behavior can be fixed to only allow accounts to be enabled and not disabled.
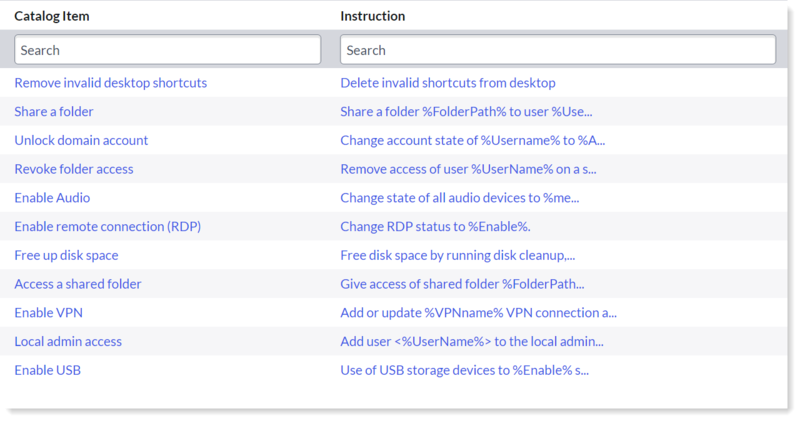
Repeat the above for all the Catalog Items. Here's a list of the catalog items and their associated Instructions.
Unlock domain account is only usable if the 1E Client is installed on the Domain Controller and the Domain Controller FQDN field has been set on the 1E Platform Settings page.
We recommend that you configure this Catalog item so that the AccountState parameter has a default value of Unlock. This will prevent accidental or malicious attempts to lock other user's accounts.
If installing the 1E Client on a Domain Controller is not permitted, a ServiceNow System administrator should set Unlock domain account to inactive on the Maintain Items screen, to prevent users from attempting to run the Catalog item.
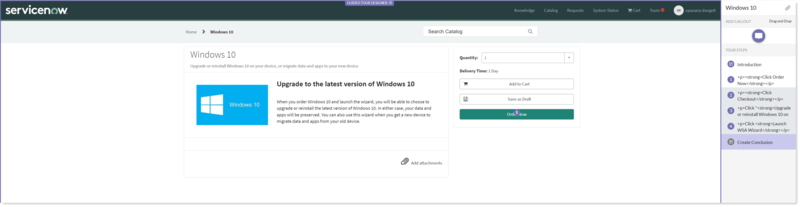
Guided Tour setup
This is an optional post-installation task for configuring the Guided Tour.
This feature helps users navigate through the various Order screens starting from within the Service Portal through to fulfillment of the Order.
The setup consists of carrying out 3 actions:
-
Position the callouts according to placement of the buttons/widgets on each of the screens.
-
Update the step Windows 10 with CSS Selector details.
-
Enable Auto Launch.
Positioning Callouts
This step is only necessary if the Request form design and workflow has been customized.
To position callouts:
-
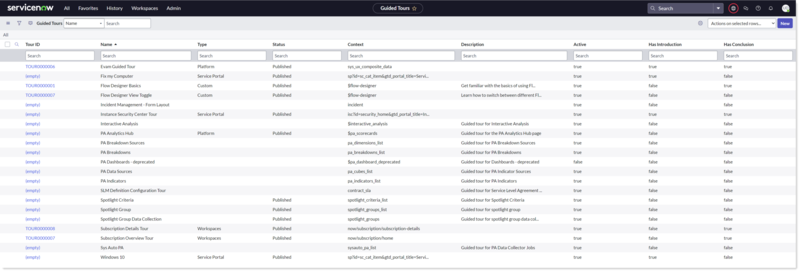
Open Guided Tours and select Windows 10.
-
Click on Edit with Designer.
-
Place the callouts according to the customized position of your buttons/widgets. For more details, refer to https://docs.servicenow.com/bundle/washingtondc-platform-user-interface/page/build/help-guided-tours/concept/guided-tours.html.
Update the Windows 10 step
This modification makes the step dynamic and independent of sys_id dependencies. Failure to complete this step will result in the Guided Tour generating the error message Tour abandoned.
-
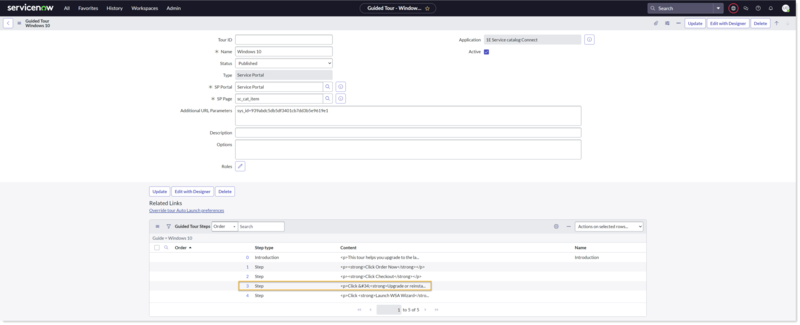
Go to Guided Tours and select Windows 10.

-
Find the step titled Click <b>Windows 10</b>.
-
Click on the information icon

to the left of the row to display the Guided Tour Element popup and then click on the Open Record button.

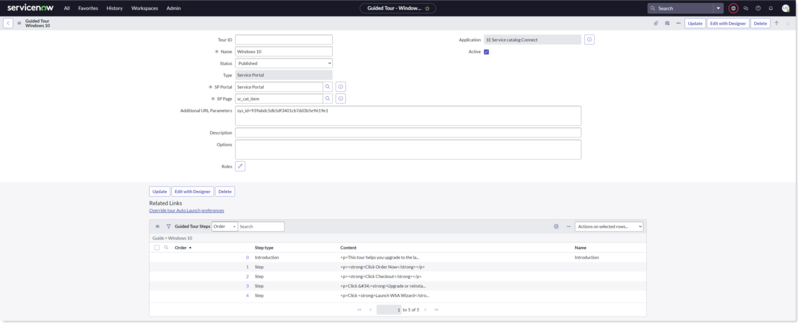
-
The Guided Tour Step page is displayed.
-
Navigate to the Actions tab
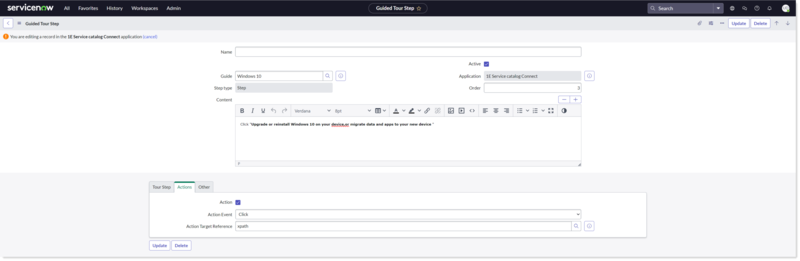
-
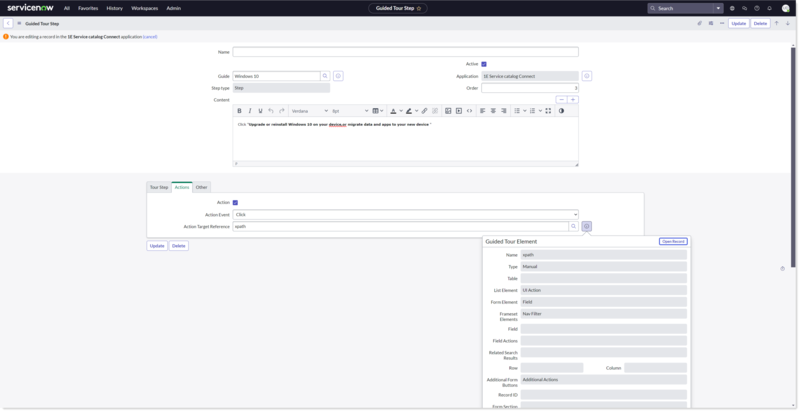
On the Actions tab to the right of the Action Target Reference field click the

-
This opens the Guided Tour Element popup, Click on Open Record
-
In the CSS Selector field, enter .table tr td a.
-
Click Update to save the changes to the step and then preview the tour.
Enable Auto Launch
By default, this property is disabled. To enable Auto Launch, once the callouts have been placed appropriately:
-
Go to Configure Auto Launch and select the appropriate tile.
-
Toggle the Auto launch switch. Once it turns green, the auto launch property has been enabled.
