Configuring 1E Platform and SGC for 1E
These are the tasks you will need to perform before implementing SGC for 1E in your network. Few tasks may take some time to organize, depending on how your organization works. A more complete checklist of tasks is provided in Prerequisites.
Below, given are the steps to configure your ServiceNow instance:
-
Installing and configuring 1E Core
-
Adding a 1E user account for SGC for 1E
Installing and configuring 1E Core
Refer to 1E Platform on-premises (9.x) for more details on preparing the 1E Core application. In that documentation, you need to follow the steps given below:
-
Install 1E
-
Disable two-factor authentication
-
Check your 1E license
-
-
Enable basic authentication
-
Add the 1EServiceNowCore consumer
-
Edit the 1EServiceNowCore consumer workflow
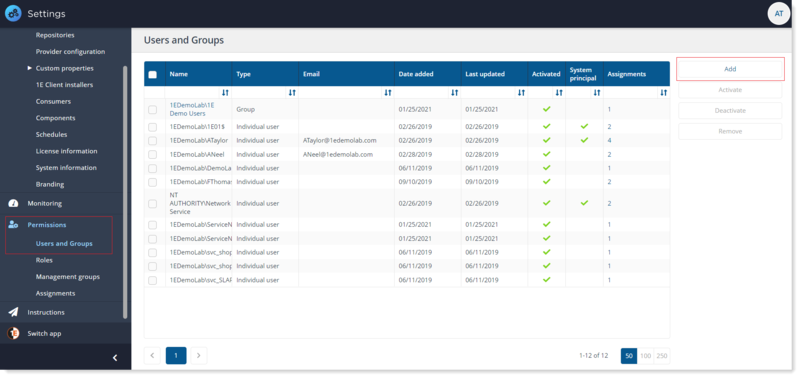
Adding a 1E user account for SGC for 1E
To add a 1E user:
-
Log on to the Settings app using a 1E user account that must have Full Administrator role.
-
Navigate to Permissions > Users.
-
Click the Add button. The Add user popup window will open.
-
In the Select AD user or security group field, type the name, or part of the name, for the AD user or security group that you want to add and click the search icon.
1E will return a list of matching users from AD.
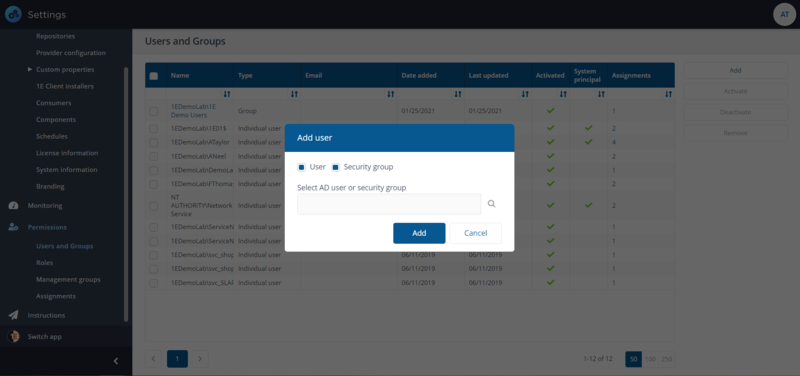
-
Select the user from the list, for example, CMDB User [LAB1\CMDBUser].
-
Once you have selected the user, click the Add button.
-
Now that the user has been added, you have to assign role(s) to the user.
-
To assign a role, select the user on the Users and Groups page and click on Assignments link for the user or group you want to add the role to. This displays the Assignment page focused on the selected user.
-
On the Assignments page, the focus is on Users and Groups.
-
Click the plus sign button to add a Role i.e. All Instructions Actioner and required associated Management Group i.e. All Devices.
-
Now click Save button to save the changes made. You can add as many roles as per your requirement.
Refer to 1E Platform SaaS for more details on preparing the 1E Core application for your ServiceNow instance.
Follow the below steps:
-
Prepare your ServiceNow instance using either of the below external IdP:
-
Settings for OAuth
Settings for OAuth
The following system properties have to be configured as SGC for 1E application works only on a single tenant mode.
|
System property |
Value |
|---|---|
|
x_1e_cmdb_connect.pem_certificate |
The SysID of the PEM Certificate record created in the sys_certificate table. |
|
x_1e_cmdb_connect.jwt_provider |
The SysID of the JWT Provider record created in the jwt_provider table. |
|
x_1e_cmdb_connect.key_id |
The App ID of the non-interactive client assertion App and is used to sign the JWT token. |
|
x_1e_cmdb_connect.oauth_access_token |
A two-way encrypted access token received from IdP. This value is auto-populated. |
|
x_1e_cmdb_connect.access_token_expiry_time |
It is the minimum time left against the total lifespan of the access token to get renewed. The default value assigned is 100 (in seconds). |
|
x_1e_cmdb_connect.is_1E_version_24.1_or_newer |
This property facilitates data synchronization from 1E to ServiceNow. Once enabled and all configurations are completed, data from the 1E Platform is transferred to ServiceNow tables. |
To view and configure the values of the system properties, follow the below steps:
-
Log in to your ServiceNow instance.
-
To open System Properties table, type sys_properties.LIST in the filter navigator and press enter.
-
The System Properties table opens up into a new page, and now look for the details of the above listed properties in the table.
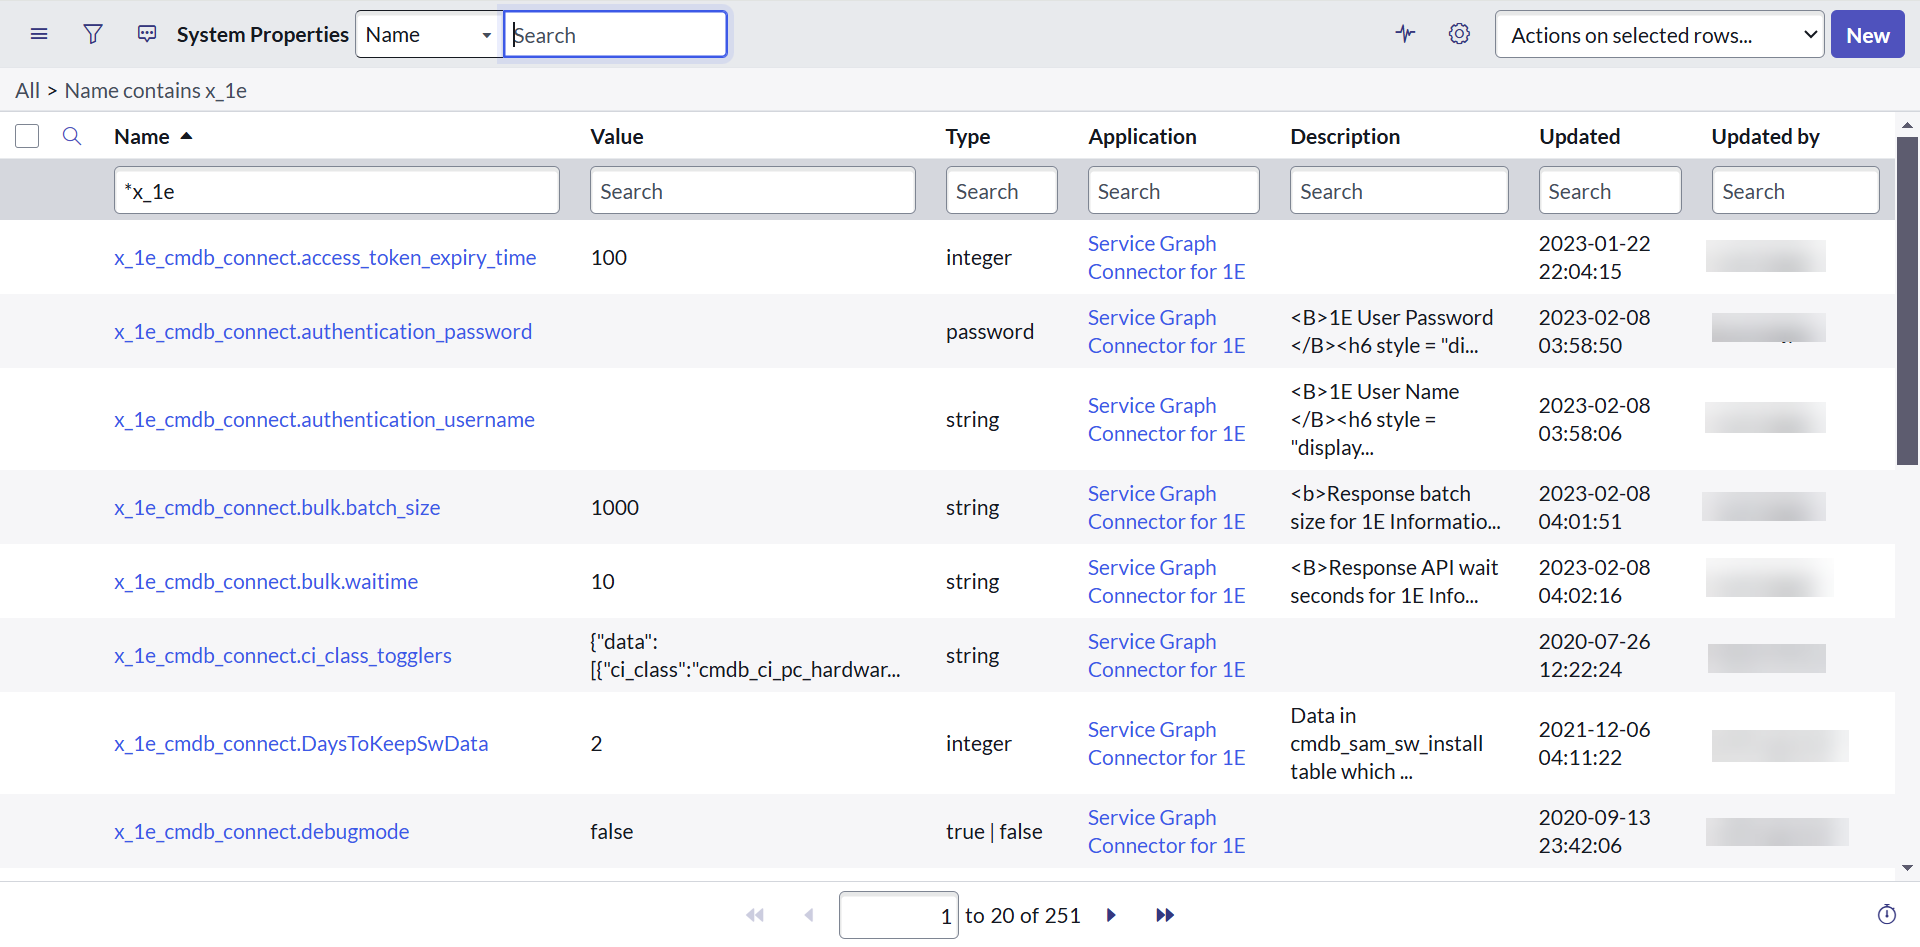
-
You can edit the values of the required system property as per the details given in the above table.