AppClarity page reference
A reference for the fields and tables on the pages in the AppClarity application.
Entitlements
A reference for the fields and tables on the pages under the Entitlements node in the AppClarity application.
A description of the fields on the Summary Report page.
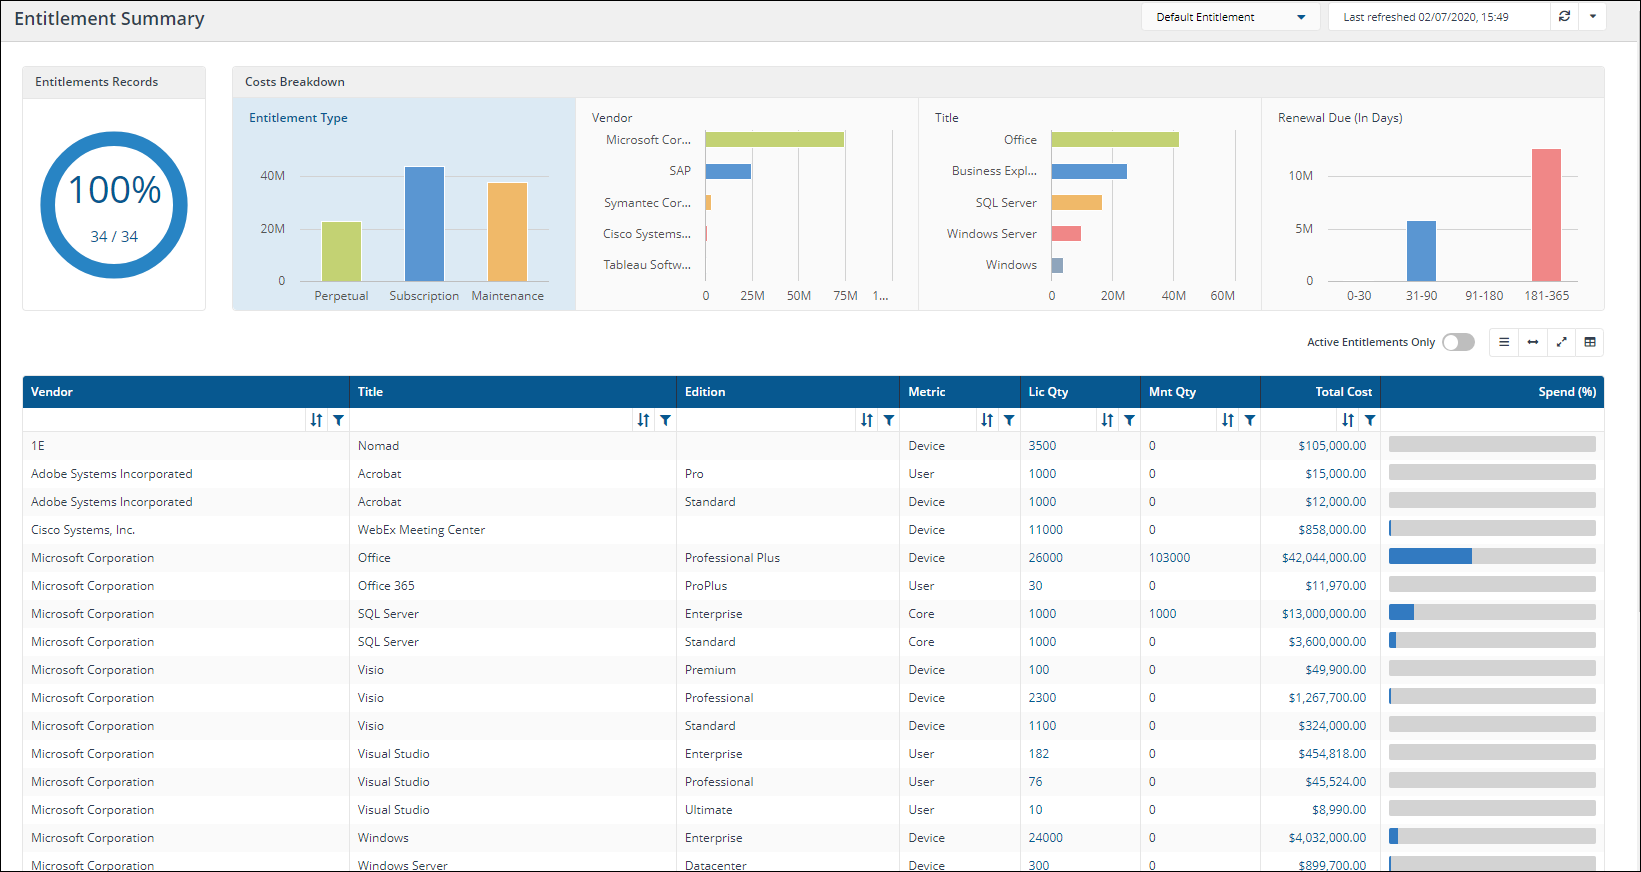
Here you can view the entitlements for a selected entitlements repository. You get to this page by clicking the AppClarity > Entitlements > Summary Report node in the navigation panel.
|
Field |
Description |
||||||||||||||||||||||||||||||||||||||
|---|---|---|---|---|---|---|---|---|---|---|---|---|---|---|---|---|---|---|---|---|---|---|---|---|---|---|---|---|---|---|---|---|---|---|---|---|---|---|---|
| Entitlements Repository selector |
This field lets you select the repository where the entitlements data displayed on the page comes from. By default this is set to Default Entitlements. If you have created your own entitlements repositories, click on the name to select any of these from the drop-down list. |
||||||||||||||||||||||||||||||||||||||
|
Entitlements Records |
This chart shows the percentage of the total number of Entitlements Records in the selected Entitlements repository that are currently being displayed on this page as a result of the applied filters. The figures below the chart show the number of Entitlements Records being displayed over the total number of Entitlements Records in the selected Entitlements repository. |
||||||||||||||||||||||||||||||||||||||
|
Costs Breakdown |
These charts show the costs breakdown for various aspects of the Entitlements in the currently selected Entitlements repository.
|
||||||||||||||||||||||||||||||||||||||
|
Active Engagements Only toggle |
The Active Entitlements only toggle adds a filter when it's turned on that filters the table to only display the entitlements that have been published and not the ones that are in draft. |
||||||||||||||||||||||||||||||||||||||
|
Action Buttons |
The following table describes the action buttons displayed on theSummary Reportpage.
|
||||||||||||||||||||||||||||||||||||||
|
Entitlements Table |
The following table describes the columns displayed in the Entitlements table:
The following column actions are available on some columns in the table.
|


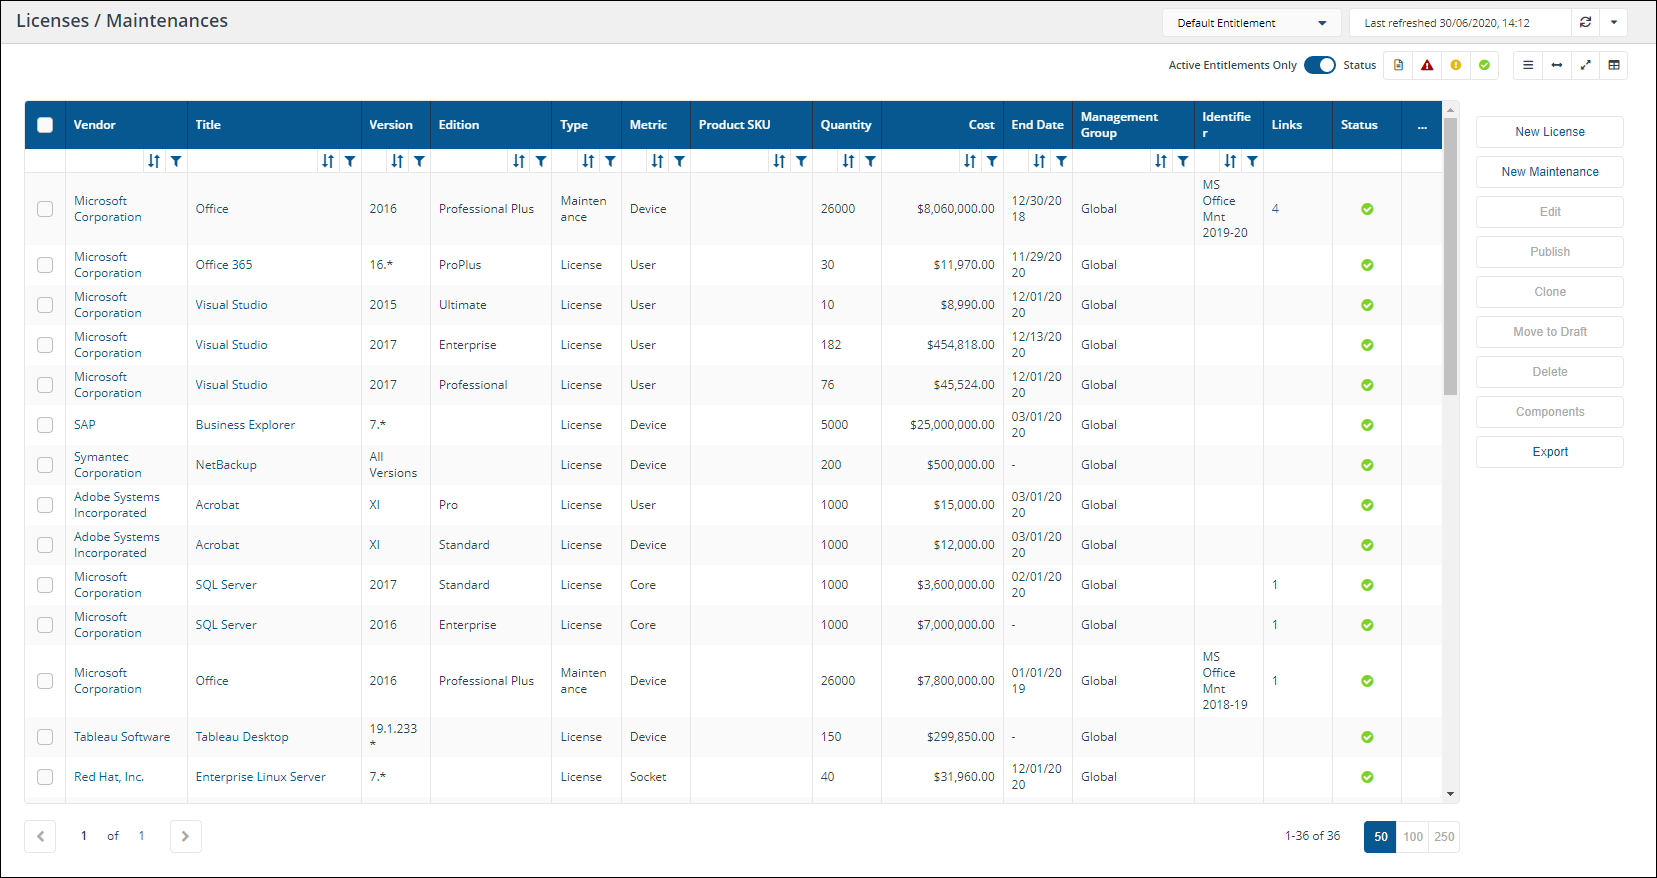
A description of the fields on the Licenses/Maintenances page.
Here you can view, edit, copy, create, publish and delete License and Maintenance entitlements. You can also view any components related to a License or Maintenance and export all the entitlements in the selected repository to a TSV file. You get to this page by clicking the AppClarity > Entitlements > Licenses/Maintenances node in the navigation panel.
|
Field |
Description |
||||||||||||||||||||||||||||||||||||||||||||||||||||||||||||||
|---|---|---|---|---|---|---|---|---|---|---|---|---|---|---|---|---|---|---|---|---|---|---|---|---|---|---|---|---|---|---|---|---|---|---|---|---|---|---|---|---|---|---|---|---|---|---|---|---|---|---|---|---|---|---|---|---|---|---|---|---|---|---|---|
|
Entitlement Repository selector |
This field lets you select the repository where the entitlements data displayed on the page comes from. By default this is set to Default Entitlements. If you have created your own entitlements repositories, click on the name to select any of these from the drop-down list. |
||||||||||||||||||||||||||||||||||||||||||||||||||||||||||||||
|
Report Refresh |
You can refresh reports from individual AppClarity screens as well as using the Settings App. Where this is available you can do this by using the refresh icon next to the Last Refreshed box:
|
||||||||||||||||||||||||||||||||||||||||||||||||||||||||||||||
|
Active Entitlements Only toggle |
The Active Entitlements only toggle adds a filter when it's turned on that filters the table to only display the entitlements that have been published and not the ones that are in draft. |
||||||||||||||||||||||||||||||||||||||||||||||||||||||||||||||
|
Status filters |
The Status filters are displayed in the top-right of the page and let you filter the table according to the status of the items in the table.
Clicking on an icon filters the table to display only items with that status, as described in the following table.
|
||||||||||||||||||||||||||||||||||||||||||||||||||||||||||||||
|
Action Buttons |
The following table describes the action buttons displayed on the Licenses/Maintenances page.
|
||||||||||||||||||||||||||||||||||||||||||||||||||||||||||||||
|
Column Picker |
Where the column picker control is shown To pick the displayed columns:
|
||||||||||||||||||||||||||||||||||||||||||||||||||||||||||||||
|
Licenses/Maintenances table |
The following table describes the columns displayed in the Licenses/Maintenances table:
The following column actions are available on some table columns.
|


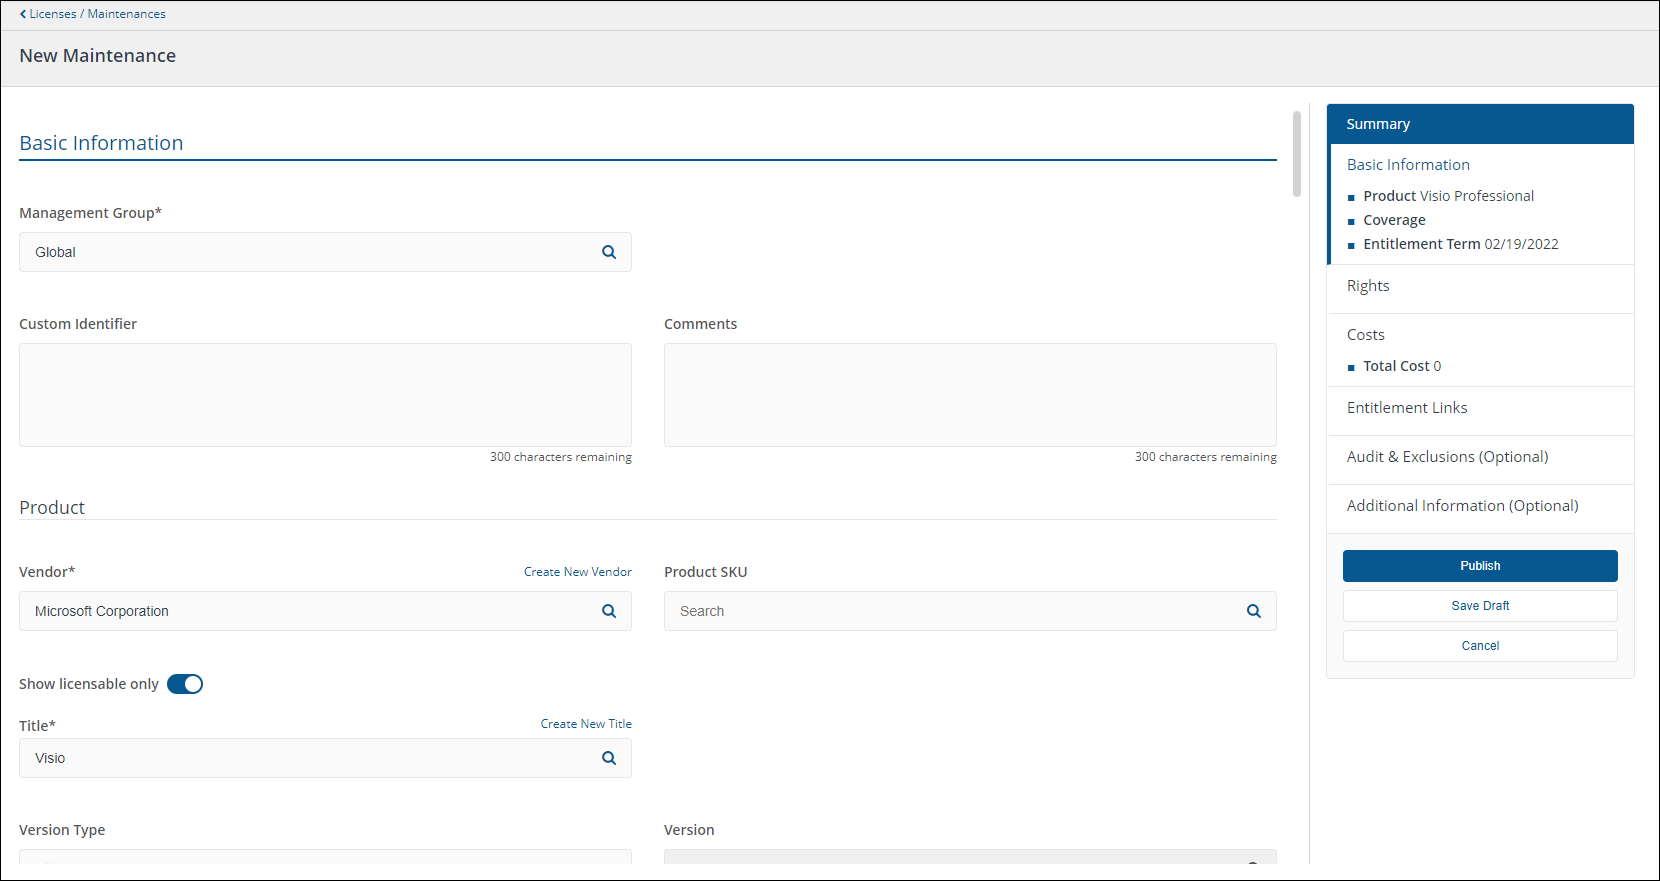
A description of the fields in each section of the New License page. This also covers the Edit License page.
A license entitlement type in AppClarity specifies the rights and limitations of software and/or services that may be installed and/or used on an organizations computing devices. For example you could specify a license for Microsoft Visio 2016 and enable version downgrade rights to ensure that the license covers all versions up to 2016.
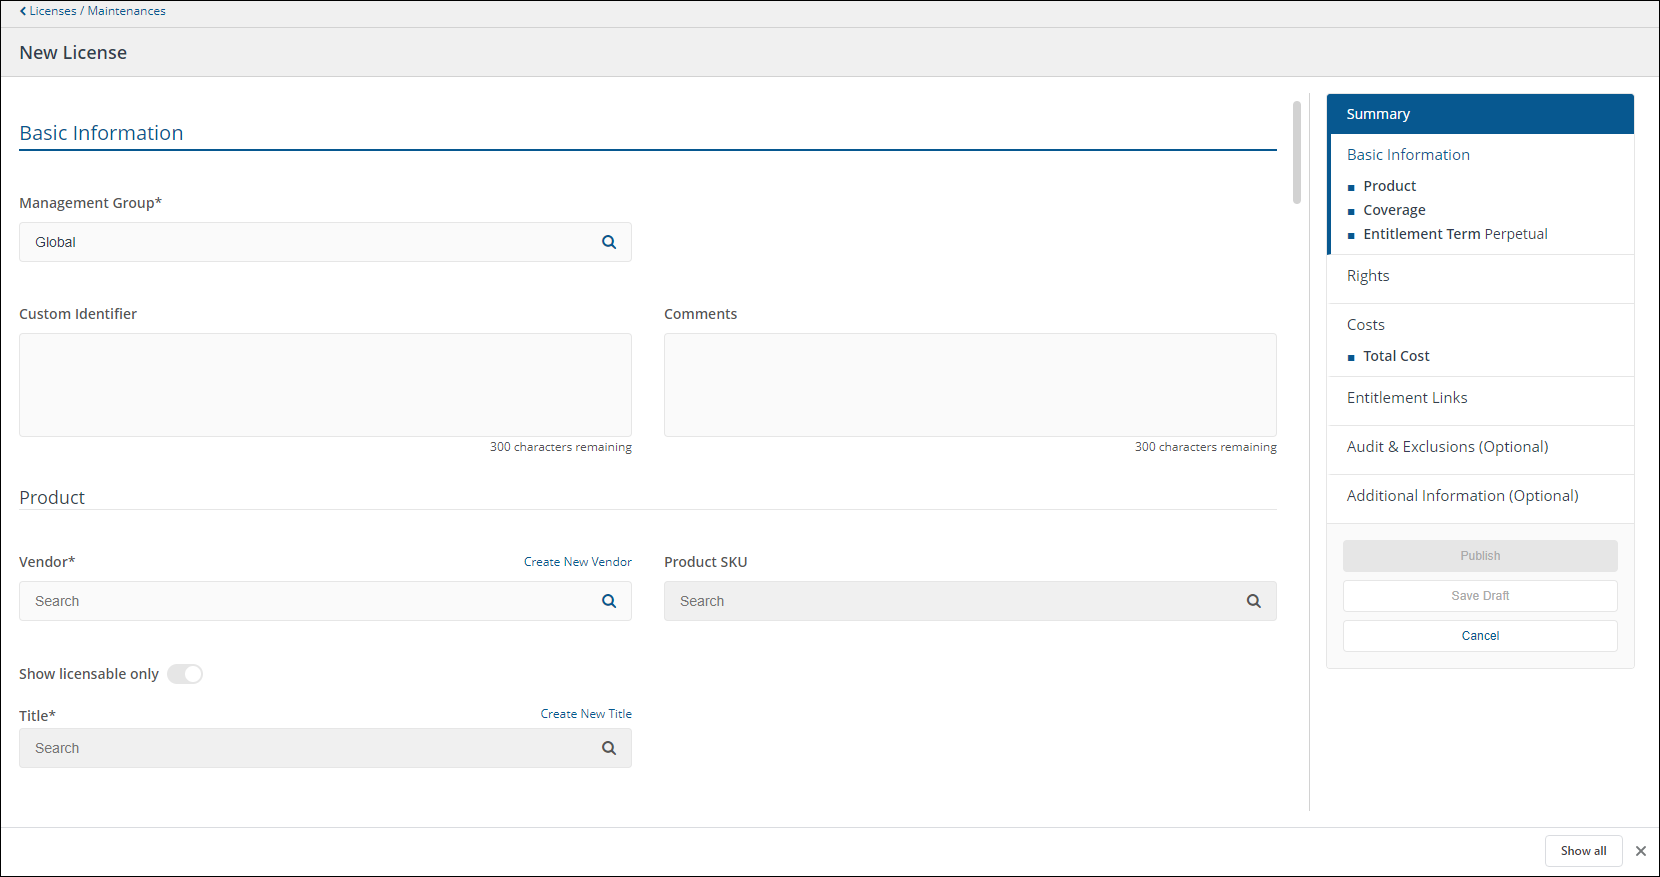
The Summary panel
The Summary panel on the right-hand side of the entitlement displays a summary of the settings that have been made in the entitlement so far. It's always visible on screen and can be used to navigate between the various sections of the entitlement.
The panel also contains the following buttons:
|
Button |
Description |
|---|---|
|
Publish |
Publishes the entitlement so it becomes active. |
|
Save Draft |
Saves the current settings in the entitlement to a draft. This can be used to save edits if you are part way through creating or making changes to the entitlement. It can also be used to inactivate an entitlement by removing its published status. |
|
Cancel |
Cancels the current edits and closes the page. |
Basic Information
This section deals with the basic information for the entitlement, such as details of the product, the coverage and term of the entitlement.
|
Field |
Details |
|---|---|
|
Management Group* |
Here you can associate the entitlement with Management Group of your choice. |
|
Custom Identifier |
An optional field. You can specify any alpha-numeric value to help identify the entitlement in theDraftandPublishedpages and when linking to other entitlements. |
|
Comments |
Enter text here to store any comments you have related to the entitlement. |
Product
This sub-section defines the product covered by the entitlement.
|
Field |
Details |
|---|---|
|
Vendor* |
Defines the vendor of the product the license will apply to. The vendor part of the vendor, title, version and edition for a product. This must be filled out before any other fields. Suggested suitable vendors that match your text are displayed as you type into the field, which you can select to auto-complete the entry. |
|
Product SKU |
Suggested matching SKU are displayed as you type into the field, which you can select to auto-complete the entry. When you select a SKU other fields in the license will be automatically prefilled. For example, selecting the SKU for a particular edition of Microsoft Office 365 may set the License Type to Subscription, the Product title to Office 365 and the Edition to ProPlus. These fields will then be fixed as they are derived from the SKU and not entered by hand. |
|
Show licensable only |
This toggle, which is on by default, sets whether the matches from 1E Catalog are filtered to show only products that are marked as licensable - and therefore appropriate for entitlements. You can flip this to off, if the product you are looking for is not visible and you're not sure if it's licensable or not, to see the unfiltered list of product related information from 1E Catalog. |
|
Title* |
Defines the title of the product the license will apply to. This is a mandatory field. The title part of the vendor, title, version and edition for a product. Suggested suitable titles from the selected vendor that match your text are displayed as you type into the field, which you can select to auto-complete the entry. |
|
Version Type |
All Versions, Dot Format,or Colloquial. By default this is set toAll Versions. |
|
Version |
Defines the version of the product the license will apply to. The version part of the vendor, title, version and edition for a product. The Version format is dependent on the chosen Version Type. This field is disabled for a Version Type of All Versions. |
|
Edition |
Defines the edition of the product the license will apply to. The edition part of the vendor, title, version and edition for a product. Suggested suitable editions for the selected vendor and title that match your text are displayed as you type into the field, which you can select to auto-complete the entry. |
Coverage
This sub-section defines the coverage details for the entitlement, such as: the metric that will be used for the entitlement and the number of installations the entitlement covers, i.e. whether the entitlement is unlimited or defined by a specific quantity of units.
|
Field |
Details |
||||||||||||||
|---|---|---|---|---|---|---|---|---|---|---|---|---|---|---|---|
|
Metric |
The metric type for a license or maintenance entitlement. This may be one of:
The Metric works with the Quantity field to determine how licenses are applied. |
||||||||||||||
|
Other metric |
This field is enabled if the Metric field is set to Other and allows you to specify an entitlement metric that is not covered by default in AppClarity. This field is only enabled if Other is selected in the Metric Type for entitlements and allows you to enter a metric that is not covered by the basic Metric Type options. |
||||||||||||||
|
Unlimited |
If you set theUnlimitedtoggle to on, this entitlement will cover all installations and theQuantityand Units fields will be disabled. |
||||||||||||||
|
Quantity |
Sets the number of licenses bought for this entitlement. Only enabled if the Unlimited toggle is set to off, in which case this field is also mandatory. |
||||||||||||||
|
Units |
Sets the number of units per licenses purchased. Only enabled if theUnlimitedtoggle is set to off, in which case this field is also mandatory. |
||||||||||||||
|
Total |
The total number of licenses, which is the Quantity value times the Units value. AppClarity will count each unit in the Total field against a single unit of the given Metric type. So if the Metric type is Device and the Total calculates to 50 this will count against 50 devices. For an SQL Server Enterprise example the Metric type would be Core so this will count against 50 cores. |
Entitlement Term
This sub-section defines the type and length details for the entitlement, such as: the type (perpetual or subscription), the start date and, if the type is subscription, the duration and end date.
|
Field |
Details |
|---|---|
|
Entitlement Type |
For License entitlements this can be set to Perpetual or Subscription. By default this is set to Perpetual. For Maintenance entitlements this can only be set to Subscription. |
|
Start Date* |
When the entitlement starts applying. This defaults to the date the entitlement was created. |
|
Duration |
The Duration and End Date fields are only enabled for Subscription entitlements. If you set the Duration the End Date is calculated. If you set the End Date the Duration is calculated. These fields determine how long the entitlement is applicable for after start date. The Duration is set in terms of months and determines the number of months the entitlement will be valid for. |
|
End Date* |
The Duration and End Date fields are only enabled for Subscription entitlements. If you set the Duration the End Date is calculated. If you set the End Date the Duration is calculated. These fields determine how long the entitlement is applicable for after start date. The End Date indicates the last date the entitlement will be valid until and is set using a date picker. |
Rights
This section lets you control how the entitlement applies to existing versions of the product it's related to.
|
Field |
Details |
|---|---|
|
Version Upgrade |
Rights to check if the entitlement is also applicable on higher versions of selected version |
|
Version Downgrade |
Rights to check if the entitlement is also applicable on lower versions of selected version. By default it is true |
|
Edition Downgrade |
Rights to check if the entitlement is also applicable on lower editions of selected edition |
|
Multi Instance |
Rights to check if the same license is also applicable on multiple installations on same device |
|
Secondary use counter right |
The available count of secondary uses |
|
Versions covered |
The table below the fields shows the overall versions and editions covered by the entitlement based on the selected rights. |
Costs
This section lets you control how the entitlement is costed and how it can be considered within the overall spend.
|
Field |
Details |
|---|---|
|
Currency |
The currency applied to the entitlement. Clicking on the Currency field displays a list of currencies to choose from. |
|
Payment Frequency |
OnceOff, Monthly, Quarterly, Yearly. The default is OnceOff. |
|
Unit Cost |
The cost of the licence per unit, combined with the Quantity and Unit Cost Type values to calculate the license cost. |
|
License Cost |
This is calculated based on value filed in the Quantity, Unit Cost and Payment Frequency. This value only displays the cost and cannot be edited directly. |
Entitlement Links
This section lets you create links between your entitlements. If you are creating a new entitlement this section will initially look like this:

After you have saved the entitlement this section provides an interface for linking it to other entitlements:
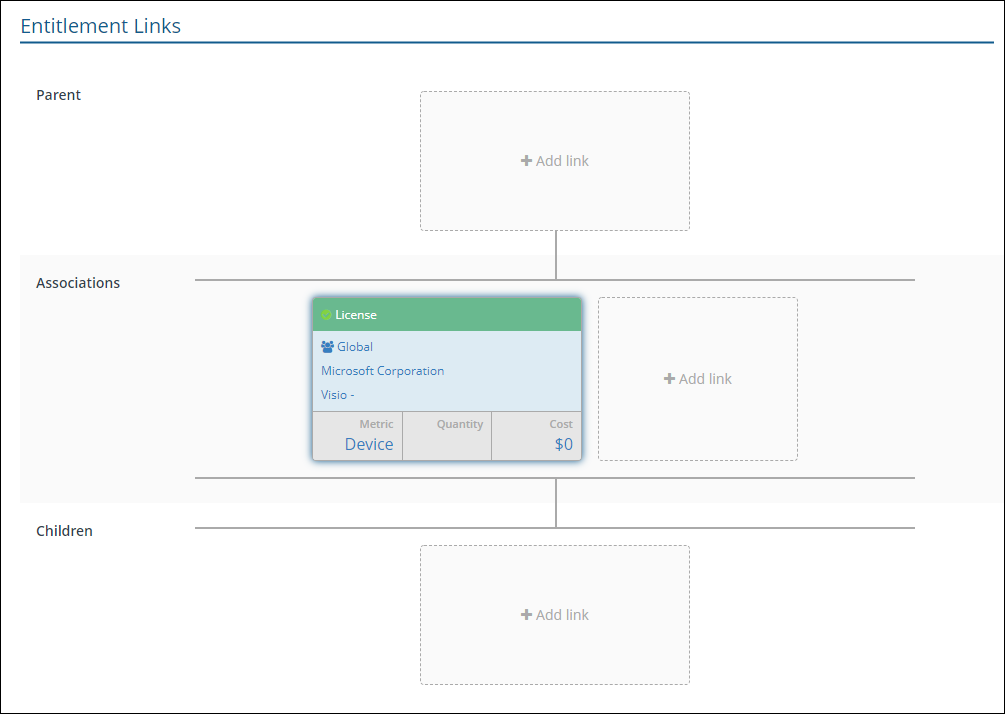
There are three sub-sections:
Parent
Here you can link parent licenses or agreements. Clicking on the +Add link area displays the Add Parent popup.
Select License or Agreement to add that type of link, a list of entitlements of the selected type will be displayed. Click on any of these and a green check mark will appear to indicate the selected parent, you can only select one. Once you've made your choice click the Add button to link the checked parent.
Associations
Here you can link contracts. Clicking on the +Add link area displays the Add Contract popup.
A list of contracts will be displayed. Click on any of these and a green check mark will appear to indicate the selected contract, you can select more than one contract to link. Once you've made your choice click the Add button to link the checked contract(s).
Children
Here you can link child licenses or maintenances. Clicking on the +Add link area displays the Add Child popup.
Select License or Agreement to add that type of link, a list of entitlements of the selected type will be displayed. Click on any of these and a green check mark will appear to indicate the selected child - you can select more than one. Once you've made your choice click the Add button to link the checked children.
Audit & Exclusions (Optional)
This section lets you control how the entitlement is audited.
|
Field |
Details |
|---|---|
|
Auditor Details |
Organizations that are allowed to perform the audit including (if appropriate), the licensor organization and any third-party organizations, according to what was agreed in the contract. |
|
Audit Scope |
Defines what part of the software customer organization is allowed to be audited. |
|
Audit Clause |
Provides additional information on what could trigger the audit. |
|
Auditor Frequency |
Definition of the highest agreed frequency of the audit expressed in months. |
|
Auditor Notice period |
Notice period in days. |
|
Audit Tool |
Name of the tool(s) which are approved for use in the audit. |
Additional information (Optional)
This section lets you enter additional information related to the entitlement that may come from a Vendor agreement or contract.
|
Sub-Section |
Field |
Field Details |
|---|---|---|
|
|
Business Unit |
Specifies the Business Unit the agreement will be applied to. This may correspond to your management groups, depending on how you have those configured. |
|
Sponsor |
Name of the person who manages the budget associated with an agreement (this field is likely to be used only on agreements, but could be extended to other entitlements) |
|
|
Invoice |
Number |
The invoice number, usually specified in the customer contract. |
|
Line Item Number |
This optionally identifies the line number (if provided) on the customer contract that pertains to the invoice. |
|
|
Date |
The date for the invoice. |
|
|
Purchase Order |
Number |
The purchase order number, usually specified in the customer contract. |
|
Line Item Number |
This optionally identifies the line number (if provided) on the customer contract that pertains to the purchase order. |
|
|
Date |
The date for the purchase order. |
|
|
Direct Supplier |
Number |
The number that identifies the direct supplier. For example, in some organizations this may be the same as the contract number. |
|
Line Item Number |
This optionally identifies the line number (if provided) on the contract that pertains to the direct supplier. |
|
|
Date |
The date for the contract. |
|
|
Internal Order |
Number |
The ITARS or similar internal identifier for the order as specified in the customer contract. |
|
Line Item Number |
This optionally identifies the line number(if provided)on the contract that pertains to the internal order. |
|
|
Date |
The date for the contract. |
|
|
Licensor Details |
Number |
The number (or name) of the licensor, could be the vendor or a VAR. |
|
Line Item Number |
This is intended as a reference to a licensor source other than an invoice, e.g. to an on-line portal of license purchases. |
|
|
Date |
The date for the contract. |
|
|
FOSS Details |
IsFoss |
This value is true only if the granted rights fulfill the requirements of both definition of the Free software maintained by the Free Software Foundation. |
|
Copy Left |
This value provides information on whether derivative works (which are always allowed for open source software) are themselves required to be open source software. There are three allowed values: “strong” means that all kinds of derivative works are required to be open source software themselves, “no” means that for all kinds of derivative works, it is allowed to distribute the derivative work as proprietary software. The intermediate value of “weak” means that there are some restrictions and the details are to be checked in the license. |
|
|
Trademark restrictions |
FOSS trademark restrictions. |
|
A description of the fields in each section of the Create Maintenance page. This also covers the Edit Maintenance page.
A Maintenance entitlement type in AppClarity specifies the rights and limitations for an organization to install and/or use updated versions of software defined in a license. For example you could specify a maintenance entitlement for Microsoft Visio 2016 to cover all new versions from the current date for the next 3 years.
The sections on the New Maintenance or Edit Maintenance page are:
The Summary panel
The Summary panel on the right-hand side of the entitlement displays a summary of the settings that have been made in the entitlement so far. It's always visible on screen and can be used to navigate between the various sections of the entitlement.
The panel also contains the following buttons:
|
Button |
Description |
|---|---|
|
Publish |
Publishes the entitlement so it becomes active. |
|
Save Draft |
Saves the current settings in the entitlement to a draft. This can be used to save edits if you are part way through creating or making changes to the entitlement. It can also be used to inactivate an entitlement by removing its published status. |
|
Cancel |
Cancels the current edits and closes the page. |
Basic Information
This section deals with the basic information for the entitlement, such as details of the product, the coverage and term of the entitlement.
|
Field |
Details |
|---|---|
|
Management Group* |
Here you can associate the entitlement with Management Group of your choice. |
|
Custom Identifier |
An optional field. You can specify any alpha-numeric value to help identify the entitlement in theDraftandPublishedpages and when linking to other entitlements. |
|
Comments |
Enter text here to store any comments you have related to the entitlement. |
Product
This sub-section defines the product covered by the entitlement.
Refer to Product.
Coverage
This sub-section defines the coverage details for the entitlement, such as: the metric that will be used for the entitlement and the number of installations the entitlement covers, i.e. whether the entitlement is unlimited or defined by a specific quantity of units.
Refer to Coverage.
Entitlement Term
This sub-section defines the type and length details for the entitlement, such as: the start date and the duration and end date.
Refer to Entitlement Term.
Rights
This section lets you control how the entitlement applies to existing versions of the product it's related to.
Refer to Rights.
Costs
This section lets you control how the entitlement is costed and how it can be considered within the overall spend.
Refer to Costs.
Entitlement Links
Refer to Entitlement Links.
There are three sub-sections:
Parent
Refer to Parent.
Associations
Refer to Associations.
Children
Refer to Children.
Audit & Exclusions (Optional)
This section lets you control how the entitlement is audited.
|
Field |
Details |
|---|---|
|
Auditor Details |
Organizations that are allowed to perform the audit including (if appropriate), the licensor organization and any third-party organizations, according to what was agreed in the contract. |
|
Audit Scope |
Defines what part of the software customer organization is allowed to be audited. |
|
Audit Clause |
Provides additional information on what could trigger the audit. |
|
Auditor Frequency |
Definition of the highest agreed frequency of the audit expressed in months. |
|
Auditor Notice period |
Notice period in days. |
|
Audit Tool |
Name of the tool(s) which are approved for use in the audit. |
Additional information (Optional)
This section lets you enter additional information related to the entitlement that may come from a Vendor agreement or contract.
Refer to Additional information (Optional).
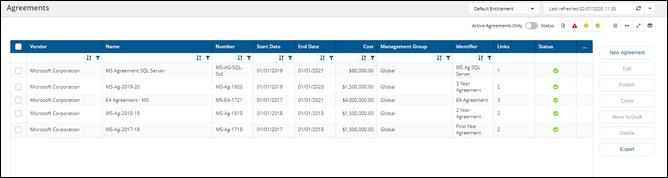
A description of the fields on the Agreements page.
Here you can view, edit, copy, create, publish and delete agreements. You can also export all the agreements in the selected repository to a TSV file. You get to this page by clicking the AppClarity >Entitlements > Agreements node in the navigation panel.
|
Field |
Description |
||||||||||||||||||||||||||||||||||||||
|---|---|---|---|---|---|---|---|---|---|---|---|---|---|---|---|---|---|---|---|---|---|---|---|---|---|---|---|---|---|---|---|---|---|---|---|---|---|---|---|
|
Report Refresh |
You can refresh reports from individual AppClarity screens as well as using the Settings App. Where this is available you can do this by using the refresh icon next to the Last Refreshed box:
|
||||||||||||||||||||||||||||||||||||||
|
Active Agreement Only Toggle |
The Active Agreements only toggle adds a filter when it's turned on that filters the table to only display the agreements that have been published and not the ones that are in draft. |
||||||||||||||||||||||||||||||||||||||
| Status Filters |
The Status filters are displayed in the top-right of the page and let you filter the table according to the status of the items in the table.
Clicking on an icon filters the table to display only items with that status, as described in the following table.
|
||||||||||||||||||||||||||||||||||||||
|
Column Picker |
Where the column picker control is shown To pick the displayed columns:
|
||||||||||||||||||||||||||||||||||||||
|
Agreement table |
The following table describes the columns displayed in the Agreements table:
The following column actions are available on some columns in the table.
|
||||||||||||||||||||||||||||||||||||||
|
Action Buttons |
The following table describes the action buttons displayed on the Agreements page.
|
A description of the fields in each section of the New Agreement page. This also covers the Edit Agreement page.
An agreement entitlement type in AppClarity provides a structure to license and maintenance entitlements. Agreements can be used to model the contractual structure an organization uses for their purchasing process, or their internal software disbursement process.
The Summary panel
The Summary panel on the right-hand side of the entitlement displays a summary of the settings that have been made in the entitlement so far. It's always visible on screen and can be used to navigate between the various sections of the entitlement.
The panel also contains the following buttons:
|
Button |
Description |
|---|---|
|
Publish |
Publishes the entitlement so it becomes active. |
|
Save Draft |
Saves the current settings in the entitlement to a draft. This can be used to save edits if you are part way through creating or making changes to the entitlement. It can also be used to inactivate an entitlement by removing its published status. |
|
Cancel |
Cancels the current edits and closes the page. |
Basic Information
This section deals with the basic information for the entitlement, such as details of the product, the coverage and term of the entitlement.
|
Field |
Details |
|---|---|
|
Management Group* |
Here you can associate the entitlement with Management Group of your choice. |
|
Custom Identifier |
An optional field. You can specify any alpha-numeric value to help identify the entitlement in theDraftandPublishedpages and when linking to other entitlements. |
|
Comments |
Enter text here to store any comments you have related to the entitlement. |
Particulars
This sub-section defines the basis of the agreement.
|
Field |
Details |
|---|---|
|
Vendor |
The vendor portion of the vendor, title, version and edition attributes that are used to identify which software products the entitlement or agreement is for. For example, Microsoft Corporation or 1E.In the New Agreement page this must be filled out before any other fields. Suggested suitable vendors that match your text are displayed as you type into the field, which you can select to auto-complete the entry. |
|
Name |
The name used for the agreement. For example, you might want to define an agreement that covers all your Microsoft Office and related products, so you could name the agreementMicrosoft Office Agreement - 2018. |
|
Number |
Corresponds to the contract number, usually supplied on the customer contract. |
Entitlement Term
|
Field |
Details |
|---|---|
|
Start Date |
When the agreement starts to be applicable. |
|
Duration |
How long in months the agreement is applicable for after the start date. Setting the Duration sets the End Date. Setting the End Date sets the Duration. |
|
End Date |
This is the last date the agreement is applicable until. Setting the Duration sets the End Date. Setting the End Date sets the Duration. |
Costs
This section lets you control how the entitlement is costed and how it can be considered within the overall spend.
|
Field |
Details |
|---|---|
|
Currency |
The currency applied to the entitlement. Clicking on the Currency field displays a list of currencies to choose from. |
|
Total Cost |
The cost of the agreement as arranged with the Vendor.Here you enter the total cost of the agreement corresponding with the currency field. |
Entitlement Links
This section lets you create links between your entitlements. If you are creating a new entitlement this section will initially look like this:
After you have saved the entitlement this section provides an interface for linking it to other entitlements:

There are three sub-sections:
Parent
Here you can link parent agreements. Clicking on the +Add link area displays the Add Parent popup.
A list of agreement entitlements is displayed. Click on any of these and a green check mark will appear to indicate the selected parent, you can only select one. Once you've made your choice click the Add button to link the checked parent.
Associations
Here you can link contracts. Clicking on the +Add link area displays the Add Contract popup.
A list of contracts will be displayed. Click on any of these and a green check mark will appear to indicate the selected contract, you can select more than one contract to link. Once you've made your choice click the Add button to link the checked contract(s).
Children
Here you can link child licenses, agreements or maintenances. Clicking on the +Add link area displays the Add Child popup.
Select License, Agreement or Maintenance to add that type of link, a list of entitlements of the selected type will be displayed. Click on any of these and a green check mark will appear to indicate the selected child - you can select more than one. Once you've made your choice click the Add button to link the checked children.
Audit & Exclusions
This section lets you control how the entitlement is audited.
|
Field |
Details |
|---|---|
|
Auditor Details |
Organizations that are allowed to perform the audit including (if appropriate), the licensor organization and any third-party organizations, according to what was agreed in the contract. |
|
Audit Clause |
Provides additional information on what could trigger the audit. |
|
Auditor Frequency |
Definition of the highest agreed frequency of the audit expressed in months. |
|
Auditor Notice period |
Notice period in days. |
|
Audit Tool |
Name of the tool(s) which are approved for use in the audit. |
|
Audit Scope |
Defines what part of the software customer organization is allowed to be audited. |
Additional information (Optional)
This section lets you enter additional information related to the entitlement that may come from a Vendor agreement or contract.
|
Sub-Section |
Field |
Field Details |
|---|---|---|
|
|
Business Unit |
Specifies the Business Unit the agreement will be applied to. This may correspond to your management groups, depending on how you have those configured. |
|
Sponsor |
Name of the person who manages the budget associated with an agreement (this field is likely to be used only on agreements, but could be extended to other entitlements) |
|
|
Invoice |
Number |
The invoice number, usually specified in the customer contract. |
|
Line Item Number |
This optionally identifies the line number (if provided) on the customer contract that pertains to the invoice. |
|
|
Date |
The date for the invoice. |
|
|
Purchase Order |
Number |
The purchase order number, usually specified in the customer contract. |
|
Line Item Number |
This optionally identifies the line number (if provided) on the customer contract that pertains to the purchase order. |
|
|
Date |
The date for the purchase order. |
|
|
Direct Supplier |
Number |
The number that identifies the direct supplier. For example, in some organizations this may be the same as the contract number. |
|
Line Item Number |
This optionally identifies the line number (if provided) on the contract that pertains to the direct supplier. |
|
|
Date |
The date for the contract. |
|
|
Internal Order |
Number |
The ITARS or similar internal identifier for the order as specified in the customer contract. |
|
Line Item Number |
This optionally identifies the line number(if provided)on the contract that pertains to the internal order. |
|
|
Date |
The date for the contract. |
|
|
Licensor Details |
Number |
The number (or name) of the licensor, could be the vendor or a VAR. |
|
Line Item Number |
This is intended as a reference to a licensor source other than an invoice, e.g. to an on-line portal of license purchases. |
|
|
Date |
The date for the contract. |
|
|
FOSS Details |
IsFoss |
This value is true only if the granted rights fulfill the requirements of both definition of the Free software maintained by the Free Software Foundation. |
|
Copy Left |
This value provides information on whether derivative works (which are always allowed for open source software) are themselves required to be open source software. There are three allowed values: “strong” means that all kinds of derivative works are required to be open source software themselves, “no” means that for all kinds of derivative works, it is allowed to distribute the derivative work as proprietary software. The intermediate value of “weak” means that there are some restrictions and the details are to be checked in the license. |
|
|
Trademark restrictions |
FOSS trademark restrictions. |
A description of the fields on the Contracts page.
Here you can view, edit, and delete contracts. You can also export all the contracts in the selected repository to a TSV file. You get to this page by clicking the AppClarity > Entitlements >Contracts node in the navigation panel.

|
Field |
Description |
||||||||||||||||||||
|---|---|---|---|---|---|---|---|---|---|---|---|---|---|---|---|---|---|---|---|---|---|
|
Report Refresh |
You can refresh reports from individual AppClarity screens as well as using the Settings App. Where this is available you can do this by using the refresh icon next to the Last Refreshed box:
|
||||||||||||||||||||
|
Contracts table |
The following table describes the columns displayed in the Contracts table:
The following column actions are available on some columns in the table.
|
||||||||||||||||||||
|
Column Picker |
Where the column picker control is shown To pick the displayed columns:
|
||||||||||||||||||||
|
Action Buttons |
The following table describes the action buttons displayed on the Contracts page.
|
A description of the fields on theCreate Contractpage. This also covers the Edit Contract page.
A contract entitlement type in AppClarity represents the evidence or proof that the license exists and is genuine. It is an artifact that can be virtually anything - it may be a scan of the signed contract for an enterprise agreement, for example, or it could be a PDF of the use rights for the software. Essentially the contract is where you will link file details that describe the specifics of an agreement.
The Summary panel
The Summary panel on the right-hand side displays a summary of the settings that have been made in the contract so far.
The panel also contains the following buttons:
|
Button |
Description |
|---|---|
|
Save |
Saves the contract so it becomes available for linking to entitlements. |
|
Cancel |
Cancels the current edits and closes the page. |
Basic Information
The following fields are available on the New Contract page.
|
Field |
Details |
|---|---|
|
Name |
Name of the contract. For example: Microsoft O365 Contract. |
|
Number |
An alpha-numeric string that identifies the contract. For example: 8877621-B could be used to identify a particular contract, perhaps taken from a paper or emailed copy of the contract.You should ensure that the combination of the Name and Number is unique. |
|
Link |
A link to an online contract. |
|
Resource |
Name of the person who manages the agreement This would likely be used only on agreements, but could be extended to individual entitlements. |
|
Technical Resource |
The name of the person who knows the technical details behind licensing, or product information for an agreement (optional) This would likely be used only on agreements, but could be extended to individual entitlements. |
|
Start Date |
The date when the contracts starts.You can select the date using the date picker. |
|
Add File |
The file attachment. This field displays the attachment after it has been selected using the Choose File button. |
|
Choose File |
Clicking this button displays a file Open dialog where you can browse to find any attachment that you want to add to the contract. |
Compliance
A reference for the fields and tables on the pages under the Compliance node in the AppClarity section of the SLA Platform.
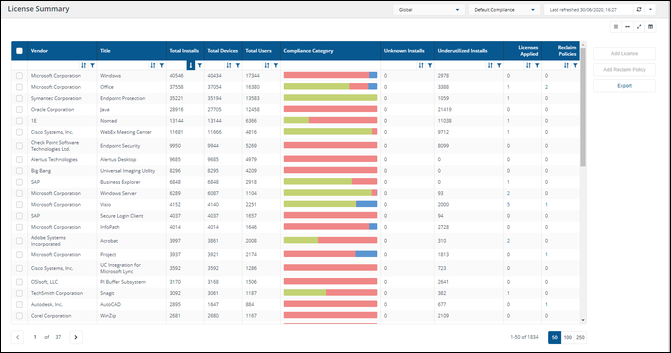
A description of the fields on the License Summary page.
Here you can view your License Summary. You get to this page by clicking the AppClarity > Compliance > License Summary node in the navigation panel.
|
Field |
Description |
||||||||||||||||||||||||||||
|---|---|---|---|---|---|---|---|---|---|---|---|---|---|---|---|---|---|---|---|---|---|---|---|---|---|---|---|---|---|
|
Management Group selector |
Certain pages in AppClarity have a management groups selector. This drop-down lets you select the management group you are interested in. By default this is set to Global. |
||||||||||||||||||||||||||||
|
Compliance repository selector |
This field lets you select the repository where the compliance data displayed on the page comes from. By default this is set to Default Compliance. If you have created your own compliance repositories, click on the name to select these from the drop-down list. |
||||||||||||||||||||||||||||
|
Report Refresh |
You can refresh reports from individual AppClarity screens as well as using the Settings App. Where this is available you can do this by using the refresh icon next to the Last Refreshed box:
|
||||||||||||||||||||||||||||
|
Column Picker |
Where the column picker control is shown To pick the displayed columns:
|
||||||||||||||||||||||||||||
|
Action Buttons |
The following table describes the action buttons displayed on the License Summary page:
|
||||||||||||||||||||||||||||
|
License Summary table |
The following table describes the columns displayed in the License Summary table:
The following column actions are available on some columns in the table.
|
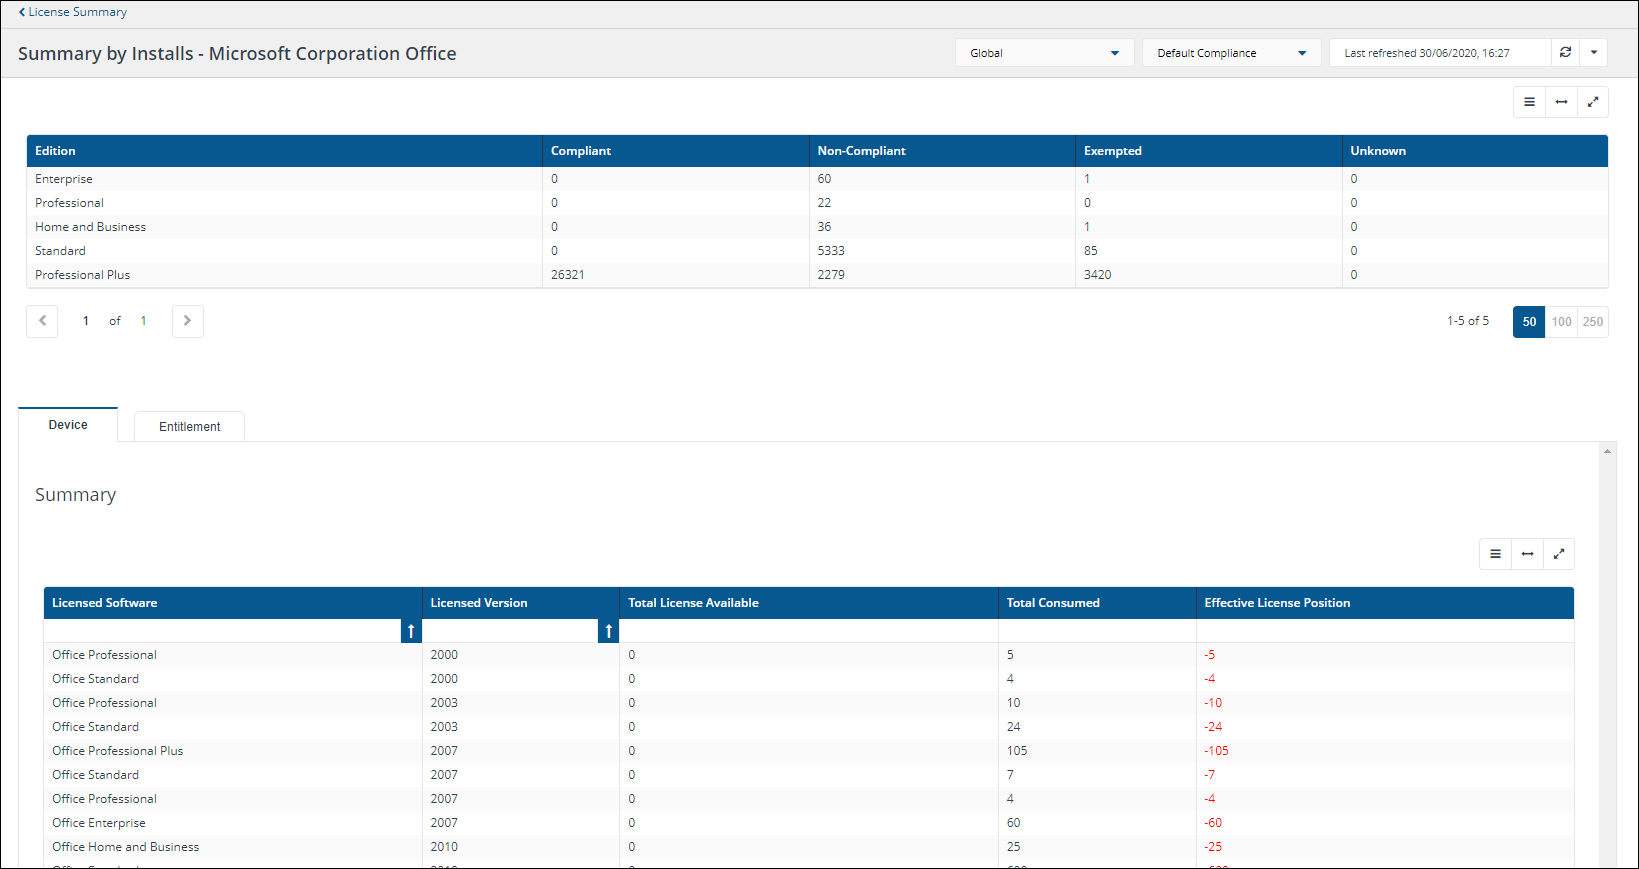
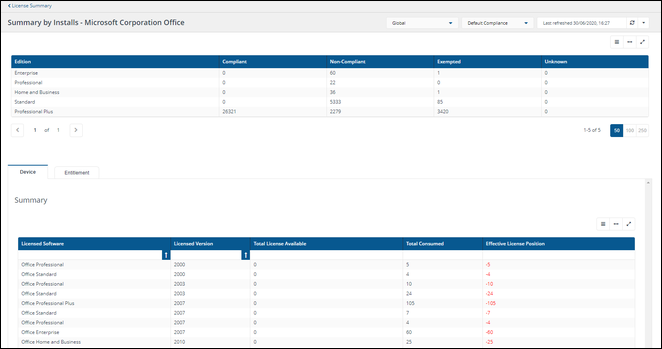
A description of the fields on the Summary by Installs page.
Here you can view summary and detailed information for the installations of a selected product. You get to this page by clicking the Compliance Category bar for a product on the License Summary page.
|
Field |
Description |
||||||||||||||||||||||||||||||||
|---|---|---|---|---|---|---|---|---|---|---|---|---|---|---|---|---|---|---|---|---|---|---|---|---|---|---|---|---|---|---|---|---|---|
|
Management Group selector |
Certain pages in AppClarity have a management groups selector. This drop-down lets you select the management group you are interested in. By default this is set to Global. |
||||||||||||||||||||||||||||||||
|
Repository Selector |
This field lets you select the repository where the compliance data displayed on the page comes from. By default this is set to Default Compliance. If you have created your own compliance repositories, click on the name to select these from the drop-down list. |
||||||||||||||||||||||||||||||||
|
Report Refresh |
You can refresh reports from individual AppClarity screens as well as using the Settings App. Where this is available you can do this by using the refresh icon next to the Last Refreshed box:
|
||||||||||||||||||||||||||||||||
|
Edition Table |
The following table shows the column headings in the Edition table:
|
||||||||||||||||||||||||||||||||
|
Device Summary Table |
The following table shows the column headings in the Device Summary table:
|
||||||||||||||||||||||||||||||||
|
Device Detailed Table |
The following table shows the column headings in the Detailed table:
This table also has the following action buttons:
|
||||||||||||||||||||||||||||||||
|
Entitlement Summary Table |
The following table shows the column headings in theEntitlement Summarytable:
|
||||||||||||||||||||||||||||||||
|
Column Actions |
Column actions
The following column actions are available on some columns in the table.
|
A description of the fields on the License Position page.
Here you can view your License Summary. You get to this page by clicking the AppClarity > Compliance > License Position node in the navigation panel.
|
Field |
Description |
||||||||||||||||||||||||||||||||||||||
|---|---|---|---|---|---|---|---|---|---|---|---|---|---|---|---|---|---|---|---|---|---|---|---|---|---|---|---|---|---|---|---|---|---|---|---|---|---|---|---|
|
Management Group |
Certain pages in AppClarity have a management groups selector. This drop-down lets you select the management group you are interested in. By default this is set to Global. |
||||||||||||||||||||||||||||||||||||||
|
Compliance Repository |
This field lets you select the repository where the compliance data displayed on the page comes from. By default this is set to Default Compliance. If you have created your own compliance repositories, click on the name to select these from the drop-down list. |
||||||||||||||||||||||||||||||||||||||
|
Report Refresh |
You can refresh reports from individual AppClarity screens as well as using the Settings App. Where this is available you can do this by using the refresh icon next to the Last Refreshed box:
|
||||||||||||||||||||||||||||||||||||||
|
Action buttons |
The following table describes the action buttons displayed on the License Position page.
|
||||||||||||||||||||||||||||||||||||||
|
License Position table |
The following table describes the columns displayed in the License Position table:
The following column actions are available on some columns in the table.
|
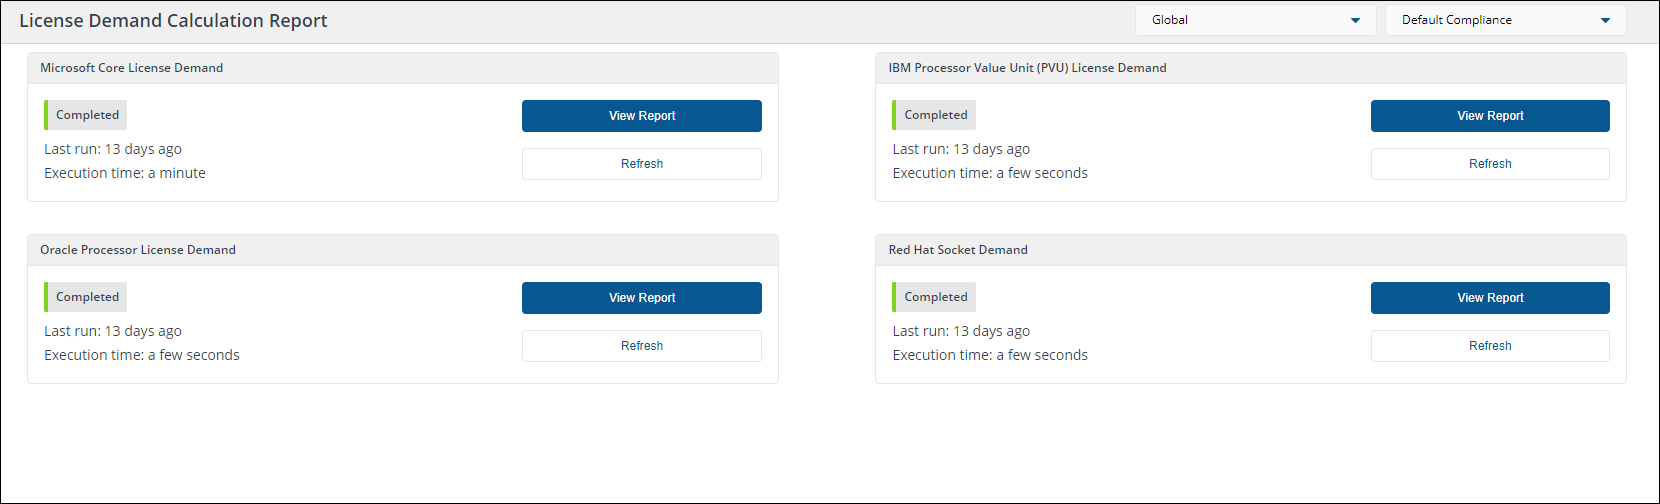
A description of the fields on the License Demand page.
Here you can view the License Demand reports. You get to this page by clicking the AppClarity > License Demand node in the navigation panel.
|
Field |
Description |
||||||||
|---|---|---|---|---|---|---|---|---|---|
|
Management Group selector |
Certain pages in AppClarity have a management groups selector. This drop-down lets you select the management group you are interested in. By default this is set to Global. |
||||||||
|
Compliance Repository selector |
This field lets you select the repository where the compliance data displayed on the page comes from. By default this is set to Default Compliance. If you have created your own compliance repositories, click on the name to select these from the drop-down list. |
||||||||
|
Microsoft Core License Demand |
|
||||||||
|
IBM Processor Value Unit (PVU) License Demand |
|
||||||||
|
Oracle Processor License Demand |
|
||||||||
|
Red Hat Socket Demand |
|
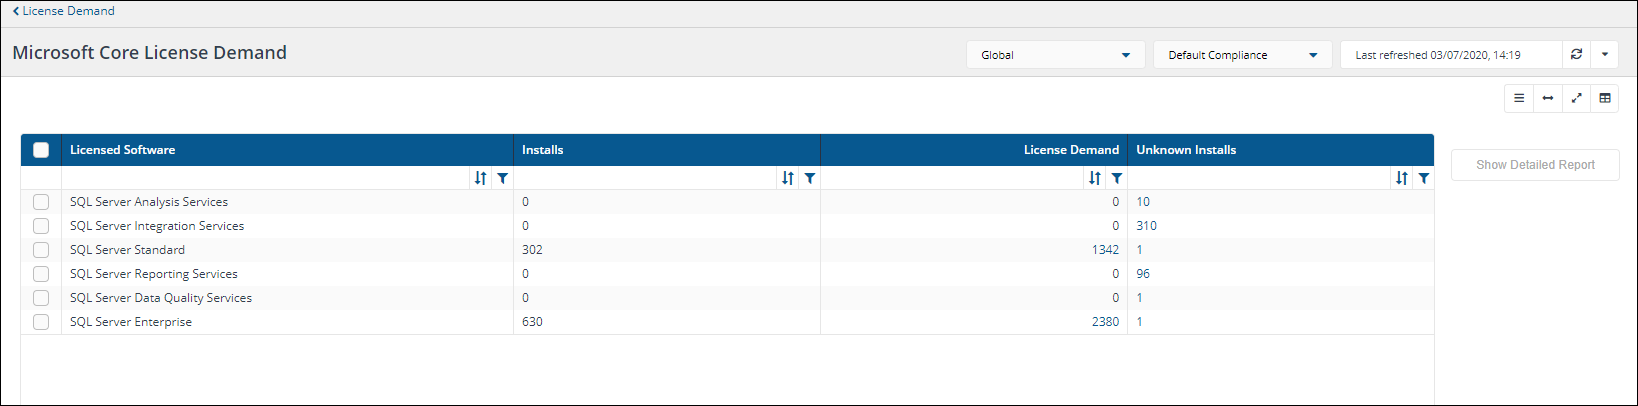
A description of the fields on the Microsoft Core License Demand page.
This page provides an overview of the data in the Microsoft Core License Demand report. You get to this page by navigating to the AppClarity > Licence Demand node in the navigation panel and then clicking on the View Report button for the Microsoft Core License Demand report.
|
Field |
Description |
||||||||||||||||
|---|---|---|---|---|---|---|---|---|---|---|---|---|---|---|---|---|---|
|
Management Group selector |
Certain pages in AppClarity have a management groups selector. This drop-down lets you select the management group you are interested in. By default this is set to Global. |
||||||||||||||||
|
Compliance Repository selector |
This field lets you select the repository where the compliance data displayed on the page comes from. By default this is set to Default Compliance. If you have created your own compliance repositories, click on the name to select these from the drop-down list. |
||||||||||||||||
|
Report Refresh |
You can refresh reports from individual AppClarity screens as well as using the Settings App. Where this is available you can do this by using the refresh icon next to the Last Refreshed box: |
||||||||||||||||
|
Action buttons |
The following table describes the action buttons displayed on the Microsoft Core License Demand page:
|
||||||||||||||||
|
Column Picker |
Where the column picker control is shown To pick the displayed columns:
|
||||||||||||||||
|
Microsoft Core License Demand table |
The following table describes the columns displayed in the Microsoft Core License Demand table:
The following column actions are available on some columns in the table.
|
A description of the fields on the Microsoft Core License Demand - Detailed Report page.
This page displays the data for a selected software title on the Microsoft Core License Demand page. You get to this page by navigating to the AppClarity > Licence Demand node in the navigation panel, selecting a row in the table and then clicking on the Show Detailed Report button.
|
Field |
Description |
||||||||||||||||||||||||||||||||||||||||
|---|---|---|---|---|---|---|---|---|---|---|---|---|---|---|---|---|---|---|---|---|---|---|---|---|---|---|---|---|---|---|---|---|---|---|---|---|---|---|---|---|---|
|
Management Group selector |
Certain pages in AppClarity have a management groups selector. This drop-down lets you select the management group you are interested in. By default this is set to Global. |
||||||||||||||||||||||||||||||||||||||||
|
Compliance Repository selector |
This field lets you select the repository where the compliance data displayed on the page comes from. By default this is set to Default Compliance. If you have created your own compliance repositories, click on the name to select these from the drop-down list. |
||||||||||||||||||||||||||||||||||||||||
|
Report Refresh |
You can refresh reports from individual AppClarity screens as well as using the Settings App. Where this is available you can do this by using the refresh icon next to the Last Refreshed box:
|
||||||||||||||||||||||||||||||||||||||||
|
Column Picker |
Where the column picker control is shown To pick the displayed columns:
|
||||||||||||||||||||||||||||||||||||||||
|
Action buttons |
The following table describes the action buttons displayed on the Microsoft Core License Demand - Detailed Report page:
|
||||||||||||||||||||||||||||||||||||||||
|
Microsoft Core License Demand - Summary table |
This table displays a summary of the rows displayed in the Microsoft Core License Demand - Detailed Report table. The following table describes the columns displayed in the Microsoft Core License Demand Summary table:
|
||||||||||||||||||||||||||||||||||||||||
|
Microsoft Core License Demand - Detailed Report table |
The following table describes the columns displayed in the Microsoft Core License Demand - Detailed Report table:
|
||||||||||||||||||||||||||||||||||||||||
|
Column actions |
Column actions
The following column actions are available on some columns in the table.
|
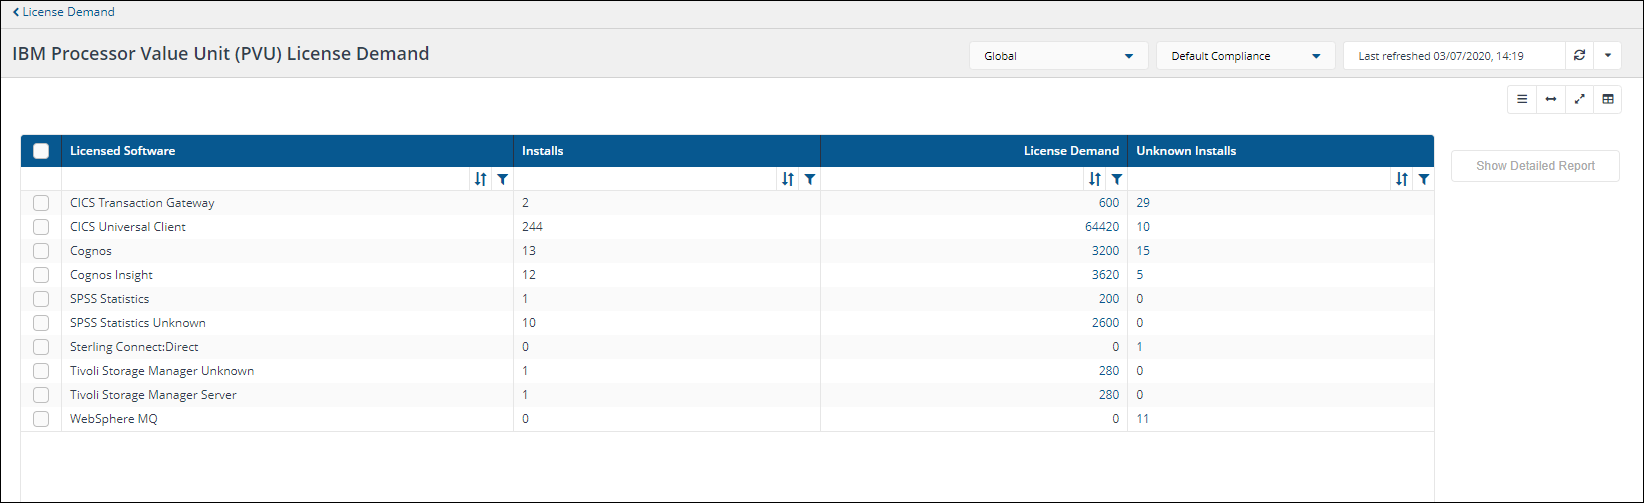
A description of the fields on the IBM Processor Value Unit (PVU) License Demand page.
This page provides an overview of the data in the IBM Processor Value Unit (PVU) License Demand report. You get to this page by navigating to the AppClarity > Licence Demand node in the navigation panel and then clicking on the View Report button for the IBM Processor Value Unit (PVU) License Demand report.
|
Field |
Description |
||||||||||
|---|---|---|---|---|---|---|---|---|---|---|---|
|
Management Group selector |
Certain pages in AppClarity have a management groups selector. This drop-down lets you select the management group you are interested in. By default this is set to Global. |
||||||||||
|
Compliance Repository selector |
This field lets you select the repository where the compliance data displayed on the page comes from. By default this is set to Default Compliance. If you have created your own compliance repositories, click on the name to select these from the drop-down list. |
||||||||||
|
Report Refresh |
You can refresh reports from individual AppClarity screens as well as using the Settings App. Where this is available you can do this by using the refresh icon next to the Last Refreshed box:
|
||||||||||
|
Column Picker |
Using column pickerWhere the column picker control is shown |
||||||||||
|
Action buttons |
The following table describes the action buttons displayed on the IBM Processor Value Unit (PVU) License Demand page:
|
||||||||||
|
IMB Processor Value Unit (PVU) License Demand table |
The following table describes the columns displayed in the IBM Processor Value Unit (PVU) License Demand table:
|

A description of the fields on the IBM Processor Value Unit (PVU) License Demand - Detailed Report page.
This page displays the data for a selected software title on the IBM Processor Value Unit (PVU) License Demand page. You get to this page by navigating to the AppClarity >License Demand node in the navigation panel, selecting a row in the table and then clicking on the Show Detailed Report button.
|
Field |
Description |
||||||||||||||||||||||||||||||||||||||||
|---|---|---|---|---|---|---|---|---|---|---|---|---|---|---|---|---|---|---|---|---|---|---|---|---|---|---|---|---|---|---|---|---|---|---|---|---|---|---|---|---|---|
|
Management Group selector |
Certain pages in AppClarity have a management groups selector. This drop-down lets you select the management group you are interested in. By default this is set to Global. |
||||||||||||||||||||||||||||||||||||||||
|
Compliance Repository selector |
This field lets you select the repository where the compliance data displayed on the page comes from. By default this is set to Default Compliance. If you have created your own compliance repositories, click on the name to select these from the drop-down list. |
||||||||||||||||||||||||||||||||||||||||
|
Report Refresh |
You can refresh reports from individual AppClarity screens as well as using the Settings App. Where this is available you can do this by using the refresh icon next to the Last Refreshed box:
|
||||||||||||||||||||||||||||||||||||||||
|
Column Picker |
Where the column picker control is shown To pick the displayed columns: Click on the Choose columns icon To exclude Unknown Installs, select the Unknown Installs row and click Exclude columns button. The Unknown Installs column is now hidden. To move the License Demand column to the top of the list, hover your mouse over License Demand and using the direction control drag it to the top of the list. The Microsoft Core License Demand page has now been automatically updated with our changes. |
||||||||||||||||||||||||||||||||||||||||
|
Action buttons |
The following table describes the action buttons displayed on the IBM Processor Value Unit (PVU) License Demand - Detailed Report page:
|
||||||||||||||||||||||||||||||||||||||||
|
IBM Processor Value Unit (PVU) License Demand - Summary table |
This table displays a summary of the rows displayed in the IBM Processor Value Unit (PVU) License Demand - Detailed Report table. The following table describes the columns displayed in the IBM Processor Value Unit (PVU) License Demand Summary table:
|
||||||||||||||||||||||||||||||||||||||||
|
IBM Processor Value Unit (PVU) License Demand - Detailed Report table |
The following table describes the columns displayed in the IBM Processor Value Unit (PVU) License Demand - Detailed Report table:
|
||||||||||||||||||||||||||||||||||||||||
|
Column actions |
The following column actions are available on some table columns:
|
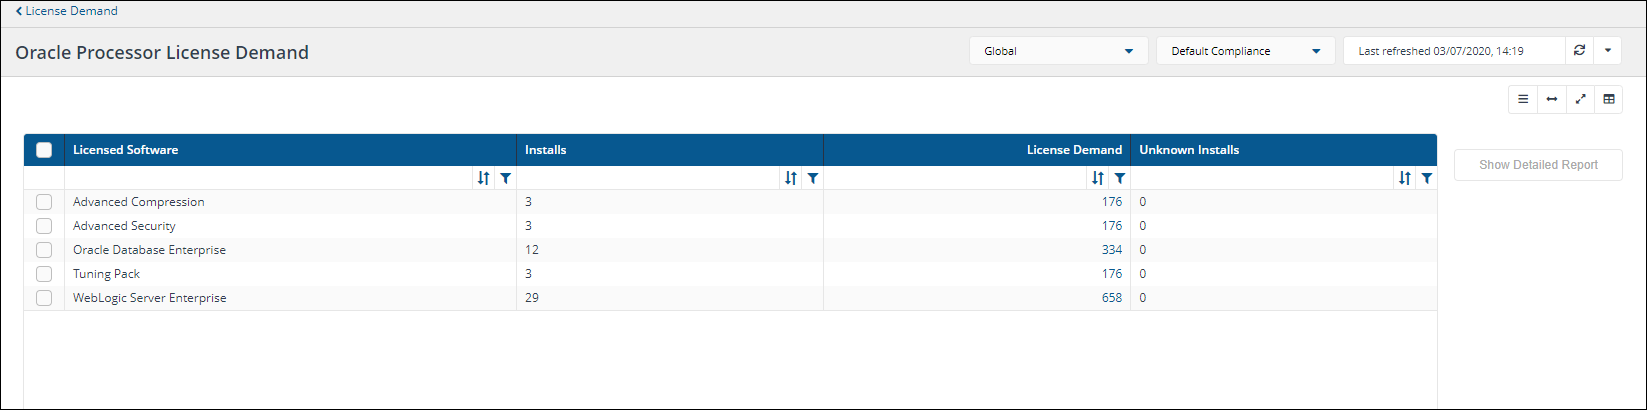
A description of the fields on the Oracle Processor License Demand page.
This page provides an overview of the data in the Oracle Processor License Demand report. You get to this page by navigating to the AppClarity > Licence Demand node in the navigation panel and then clicking on the View Report button for the Oracle Processor License Demand report.
|
Field |
Description |
||||||||||
|---|---|---|---|---|---|---|---|---|---|---|---|
|
Management Group selector |
Certain pages in AppClarity have a management groups selector. This drop-down lets you select the management group you are interested in. By default this is set to Global. |
||||||||||
|
Compliance Repository selector |
This field lets you select the repository where the compliance data displayed on the page comes from. By default this is set to Default Compliance. If you have created your own compliance repositories, click on the name to select these from the drop-down list. |
||||||||||
|
Report Refresh |
You can refresh reports from individual AppClarity screens as well as using the Settings App. Where this is available you can do this by using the refresh icon next to the Last Refreshed box:
|
||||||||||
|
Column Picker |
Where the column picker control is shown To pick the displayed columns:
|
||||||||||
|
Action buttons |
The following table describes the action buttons displayed on the Oracle Processor License Demand page:
|
||||||||||
|
Oracle Processor License Demand table |
The following table describes the columns displayed in the Oracle Processor License Demand table:
|
A description of the fields on the Oracle Processor License Demand - Detailed Report page.
This page displays the data for a selected software title on the Oracle Processor License Demand page. You get to this page by navigating to the AppClarity > Licence Demand node in the navigation panel, selecting a row in the table and then clicking on the Show Detailed Report button.
|
Field |
Description |
||||||||||||||||||||||||||||||||||||||||
|---|---|---|---|---|---|---|---|---|---|---|---|---|---|---|---|---|---|---|---|---|---|---|---|---|---|---|---|---|---|---|---|---|---|---|---|---|---|---|---|---|---|
|
Management Group selector |
Certain pages in AppClarity have a management groups selector. This drop-down lets you select the management group you are interested in. By default this is set to Global. |
||||||||||||||||||||||||||||||||||||||||
|
Compliance Repository selector |
This field lets you select the repository where the compliance data displayed on the page comes from. By default this is set to Default Compliance. If you have created your own compliance repositories, click on the name to select these from the drop-down list. |
||||||||||||||||||||||||||||||||||||||||
|
Report Refresh |
You can refresh reports from individual AppClarity screens as well as using the Settings App. Where this is available you can do this by using the refresh icon next to the Last Refreshed box:
|
||||||||||||||||||||||||||||||||||||||||
|
Column Picker |
Where the column picker control is shown To pick the displayed columns:
|
||||||||||||||||||||||||||||||||||||||||
|
Action buttons |
The following table describes the action buttons displayed on the Oracle Processor License Demand - Detailed Report page:
|
||||||||||||||||||||||||||||||||||||||||
|
Oracle Processor License Demand - Summary table |
This table displays a summary of the rows displayed in the Oracle Processor License Demand - Detailed Report table. The following table describes the columns displayed in the Oracle Processor License Demand Summary table:
|
||||||||||||||||||||||||||||||||||||||||
|
Oracle Processor License Demand - Detailed Report table |
The following table describes the columns displayed in the Oracle Processor License Demand - Detailed Report table:
|
||||||||||||||||||||||||||||||||||||||||
|
Column actions |
Column actions
The following column actions are available on some columns in the table.
|
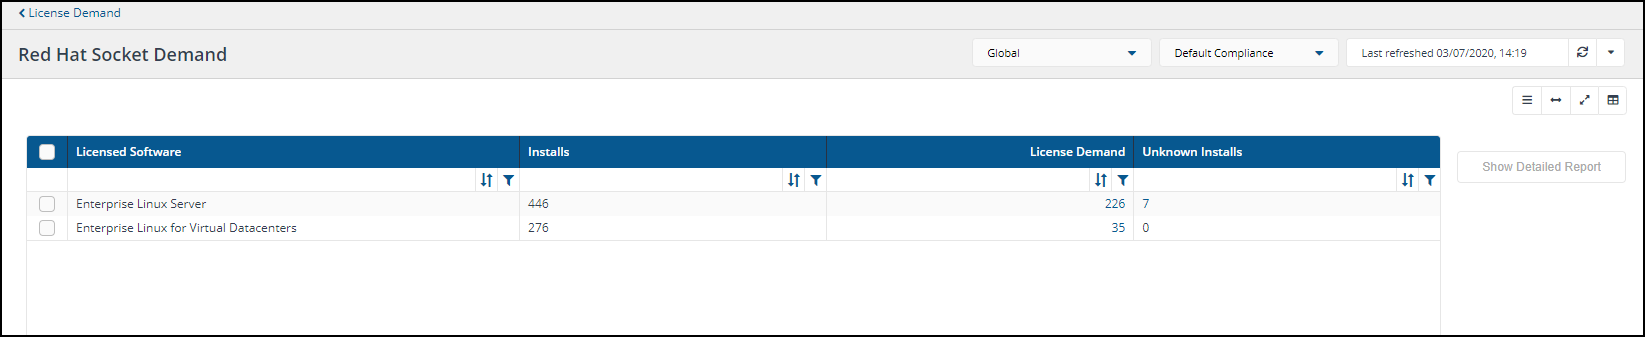
A description of the fields on the Red Hat Socket Demand page.
This page provides an overview of the data in the Red Hat Socket Demand report. You get to this page by navigating to the AppClarity >Licence Demand node in the navigation panel and then clicking on the View Report button for the Red Hat Socket Demand report.
|
Field |
Description |
||||||||||
|---|---|---|---|---|---|---|---|---|---|---|---|
| Management Group selector |
Certain pages in AppClarity have a management groups selector. This drop-down lets you select the management group you are interested in. By default this is set to Global. |
||||||||||
|
Compliance Repository selector |
This field lets you select the repository where the compliance data displayed on the page comes from. By default this is set to Default Compliance. If you have created your own compliance repositories, click on the name to select these from the drop-down list. |
||||||||||
|
Report Refresh |
You can refresh reports from individual AppClarity screens as well as using the Settings App. Where this is available you can do this by using the refresh icon next to the Last Refreshed box:
|
||||||||||
|
Column Picker |
Where the column picker control is shown To pick the displayed columns:
|
||||||||||
|
Action buttons |
The following table describes the action buttons displayed on the Red Hat Socket Demand page:
|
||||||||||
|
Red Hat Socket Demand table |
The following table describes the columns displayed in the Red Hat Socket Demand table:
|
A description of the fields on the Red Hat Socket Demand - Detailed Report page.
This page displays the data for a selected software title on the Red Hat Socket Demand page. You get to this page by navigating to the AppClarity > Licence Demand node in the navigation panel, selecting a row in the table and then clicking on the Show Detailed Report button.
|
Field |
Description |
||||||||||||||||||||||||||||||||||||||||
|---|---|---|---|---|---|---|---|---|---|---|---|---|---|---|---|---|---|---|---|---|---|---|---|---|---|---|---|---|---|---|---|---|---|---|---|---|---|---|---|---|---|
|
Management Group selector |
Certain pages in AppClarity have a management groups selector. This drop-down lets you select the management group you are interested in. By default this is set to Global. |
||||||||||||||||||||||||||||||||||||||||
|
Compliance Repository selector |
This field lets you select the repository where the compliance data displayed on the page comes from. By default this is set to Default Compliance. If you have created your own compliance repositories, click on the name to select these from the drop-down list. |
||||||||||||||||||||||||||||||||||||||||
|
Report Refresh |
You can refresh reports from individual AppClarity screens as well as using the Settings App. Where this is available you can do this by using the refresh icon next to the Last Refreshed box:
|
||||||||||||||||||||||||||||||||||||||||
|
Column Picker |
Where the column picker control is shown To pick the displayed columns:
|
||||||||||||||||||||||||||||||||||||||||
|
Action buttons |
The following table describes the action buttons displayed on the Red Hat Socket Demand - Detailed Report page:
|
||||||||||||||||||||||||||||||||||||||||
| Red Hat Socket Demand - Summary table |
This table displays a summary of the rows displayed in the Red Hat Socket Demand - Detailed Report table. The following table describes the columns displayed in the Red Hat Socket Demand Summary table:
|
||||||||||||||||||||||||||||||||||||||||
| Red Hot Socket Demand - Detailed Report table |
The following table describes the columns displayed in the Red Hat Socket Demand - Detailed Report table:
|
||||||||||||||||||||||||||||||||||||||||
|
Column actions |
Column actions
The following column actions are available on some columns in the table.
|
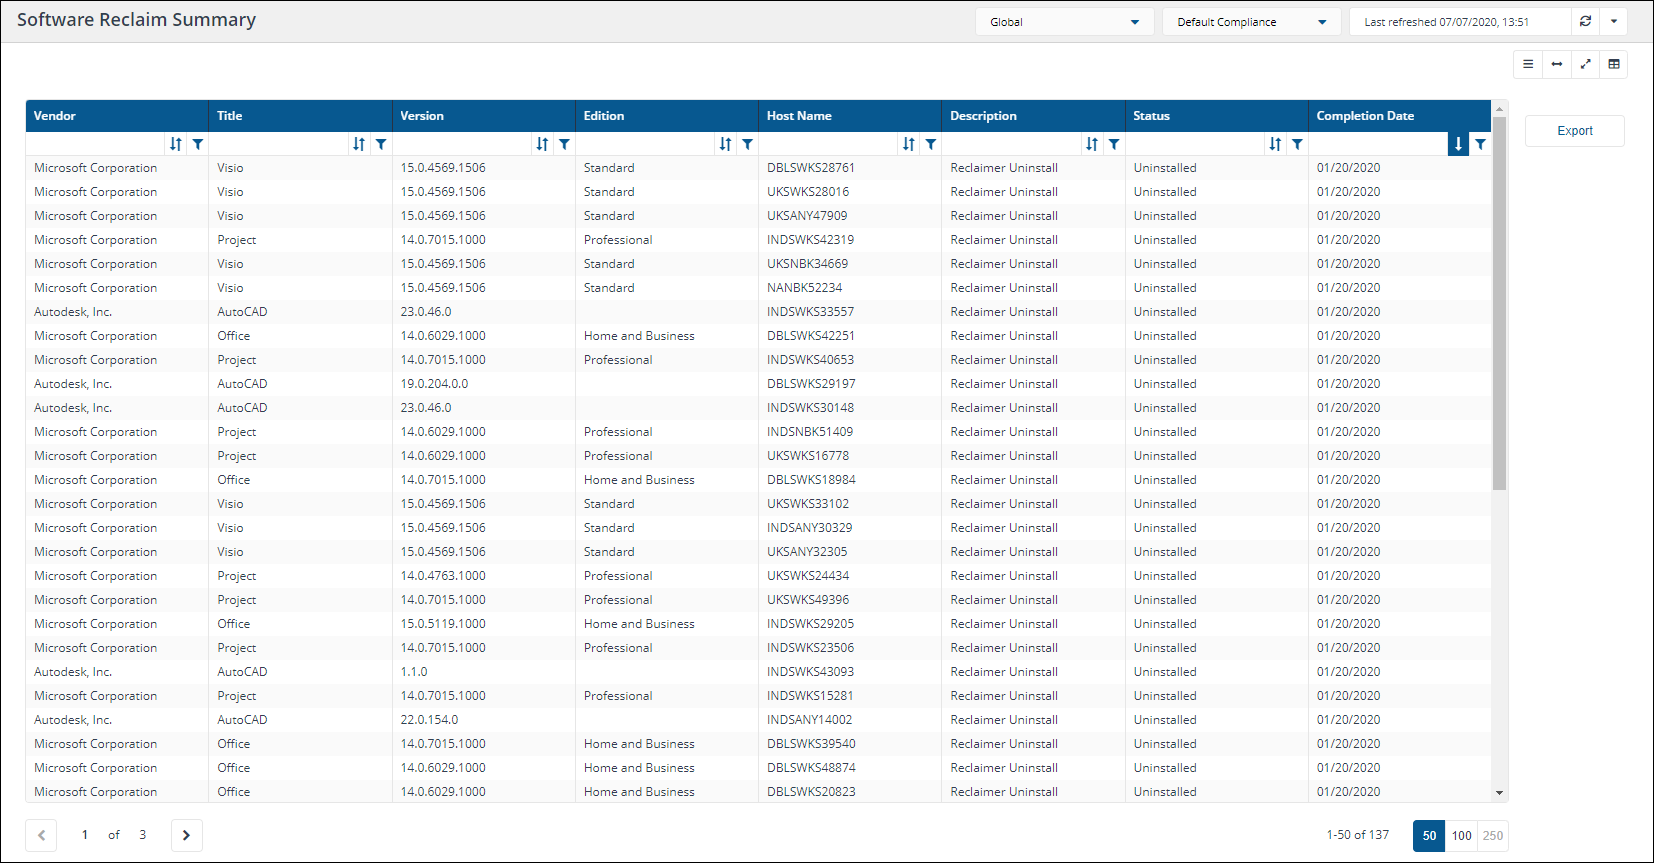
A reference for the fields and tables on the pages under the Reclaim node in the AppClarity application.
Usage Summary page
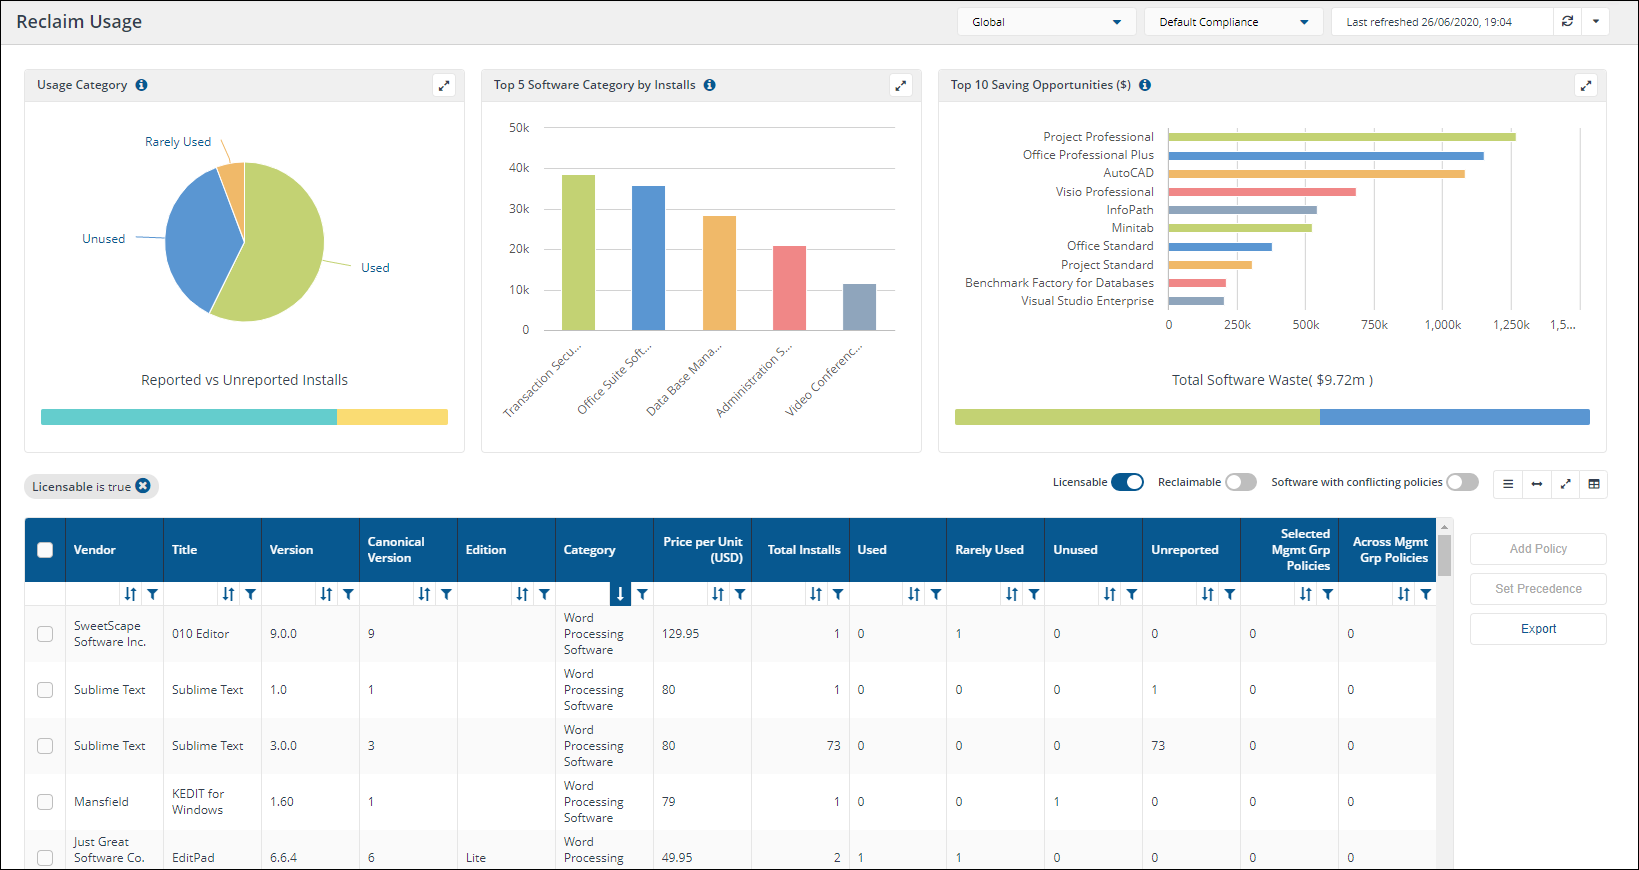
A description of the fields on the Usage Summary page.
Here you can browse reclaimable products from your inventory according to their usage. You get to this page by clicking the Reclaim >Usage Summary node in the navigation panel.
|
Field |
Description |
||||||||||||||||||||||||||||||||||||
|---|---|---|---|---|---|---|---|---|---|---|---|---|---|---|---|---|---|---|---|---|---|---|---|---|---|---|---|---|---|---|---|---|---|---|---|---|---|
|
Management Groups selector |
Certain pages in AppClarity have a management groups selector. This drop-down lets you select the management group you are interested in. By default this is set to Global. |
||||||||||||||||||||||||||||||||||||
|
Compliance repository selector |
This field lets you select the repository where the compliance data displayed on the page comes from. By default this is set to Default Compliance. If you have created your own compliance repositories, click on the name to select these from the drop-down list. |
||||||||||||||||||||||||||||||||||||
|
Report Refresh |
You can refresh reports from individual AppClarity screens as well as using the Settings App. Where this is available you can do this by using the refresh icon next to the Last Refreshed box:
|
||||||||||||||||||||||||||||||||||||
| Usage Category chart |
This chart shows the distribution of installations into the three usage categories: User, Rarely Used and Unused as a percentage of the total installations that reported usage. The bar at the bottom shows the number of installations with reported versus unreported usage as a percentage of the total number of installations. |
||||||||||||||||||||||||||||||||||||
|
Top 5 Software Category by Installs chart |
This chart shows the top five categories according to the numbers of installations. This chart disregards Operating Systems and Internet Browser categories. |
||||||||||||||||||||||||||||||||||||
|
Top 10 Saving Opportunities ($) chart |
This chart shows the top ten products that offer the best savings opportunities in USD. It is calculated by multiplying each product's unit price and the sum of unused and rarely used installations. The bar at the bottom shows the total opportunity in USD split into unused and rarely used installations. |
||||||||||||||||||||||||||||||||||||
|
Licensable toggle |
The Licensable toggle adds a filter when it's turned on that filters the table to only display the products that are licensable, according to the catalog. |
||||||||||||||||||||||||||||||||||||
|
Reclaimable toggle |
The Reclaimable toggle adds a filter when it's turned on that filters the table to only display the products that have a reclaim policy associated with them. |
||||||||||||||||||||||||||||||||||||
|
Software conflicting with policies toggle |
The Software with conflicting policies toggle adds a filter when it's turned on that filters the table to only display the products that have reclaim policies that conflict. |
||||||||||||||||||||||||||||||||||||
|
Column Picker |
Where the column picker control is shown To pick the displayed columns:
|
||||||||||||||||||||||||||||||||||||
|
Action buttons |
The following table describes the action buttons displayed on theUsage Summarypage:
|
||||||||||||||||||||||||||||||||||||
|
Usage Summary table |
The following table describes the columns displayed in theUsage Summarytable:
The following column actions are available on some columns in the table.
|
Precedence page
A description of the fields on the Precedence page.
Here you can set the precedence for overlapping reclaim policies. You get to this page by:
-
Navigate to the AppClarity > Reclaim > Usage Summary node in the navigation panel.
-
Select a product with conflicting reclaim policies.
-
Click on the Set Precedence button.
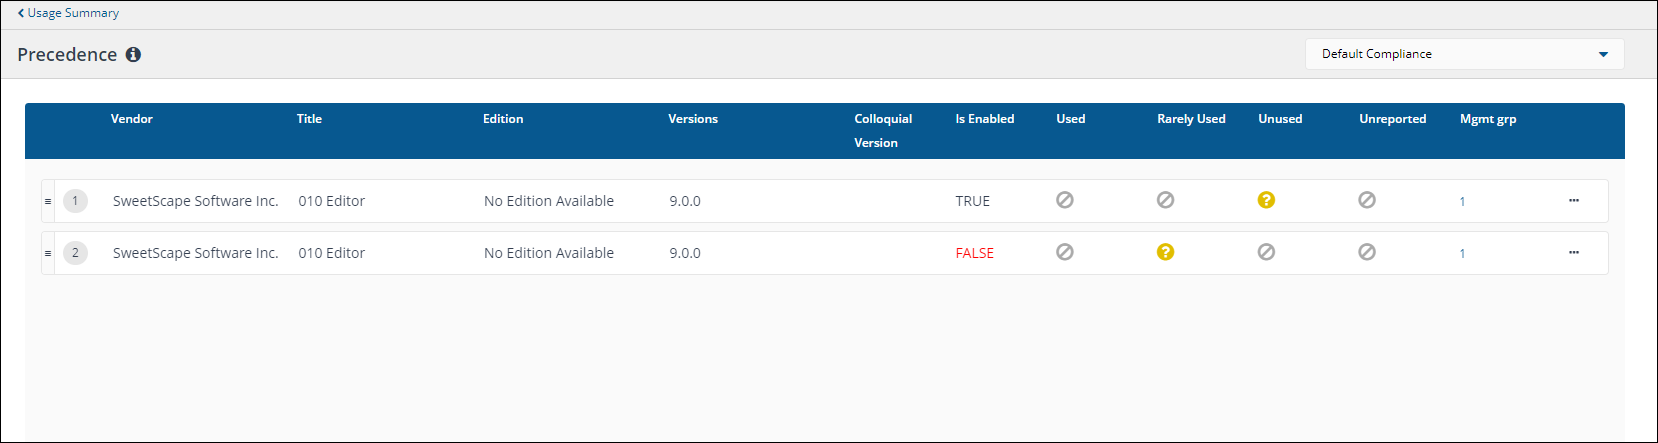
Setting the precedence
This page lets you set the precedence for multiple policies that cover the same product. Initially this page will display the overlapping reclaim policies in the order they were created, with the most recently created having the lowest precedence. Policies at the top of the page have the highest precedence. Policies are considered in order from the top of the table to the bottom, and you can reorder the rows by clicking and dragging each row up or down. The way that the policies apply to specific products on specific devices are described in the following bullet points:
-
Just one of the reclaim policies shown on this page will be applied to a product, as defined by the Matched Vendor, Matched Title, Editions and versions for the policy, on any given device.
-
Whether a particular policy displayed in the list applies to that device also depends on the management group(s) the policy is active for.
-
If a device with a matching product belongs to more than one management group it will use the first policy it comes to that is active on one of its management groups.
Once the precedence is set, it triggers a Reclaim Consolidation report to make any necessary changes. You need to ensure you have identified which policy to set at the highest precedence, you can use the Move to top option from the 3 dots on the right side of the policy to do this.
When you subsequently publish a reclaim policy this will automatically change its precedence to be the lowest. i.e. it will appear at the bottom of the precedence list. Beware that simply viewing a page and clicking Publish to exit will reset that reclaim policy's precedence.
|
Field |
Description |
||||||||||||||||||||||||
|---|---|---|---|---|---|---|---|---|---|---|---|---|---|---|---|---|---|---|---|---|---|---|---|---|---|
|
Compliance Repository selector |
This field lets you select the repository where the compliance data displayed on the page comes from. By default this is set to Default Compliance. If you have created your own compliance repositories, click on the name to select these from the drop-down list. |
||||||||||||||||||||||||
|
Conflicting reclaim policies table |
The following table describes the columns in the table that can be used to identify each conflicting policy:
|
Reclaim History page
A description of the fields on the Reclaim History page.
Here you can view the reclaim policies that have been published. You get to this page by clicking the AppClarity > Reclaim >Reclaim History node in the navigation panel.
|
Field |
Description |
||||||||||||||||||||||||
|---|---|---|---|---|---|---|---|---|---|---|---|---|---|---|---|---|---|---|---|---|---|---|---|---|---|
|
Management Group selector |
Certain pages in AppClarity have a management groups selector. This drop-down lets you select the management group you are interested in. By default this is set to Global. |
||||||||||||||||||||||||
|
Compliance Repository selector |
This field lets you select the repository where the compliance data displayed on the page comes from. By default this is set to Default Compliance. If you have created your own compliance repositories, click on the name to select these from the drop-down list. |
||||||||||||||||||||||||
|
Report Refresh |
You can refresh reports from individual AppClarity screens as well as using the Settings App. Where this is available you can do this by using the refresh icon next to the Last Refreshed box:
|
||||||||||||||||||||||||
|
Column Picker |
Where the column picker control is shown To pick the displayed columns:
|
||||||||||||||||||||||||
|
Action buttons |
The following table describes the action buttons displayed on the Policies page:
|
||||||||||||||||||||||||
|
Reclaim History table |
The following table describes the columns displayed in the Reclaim History table:
The following column actions are available on some columns in the table.
|
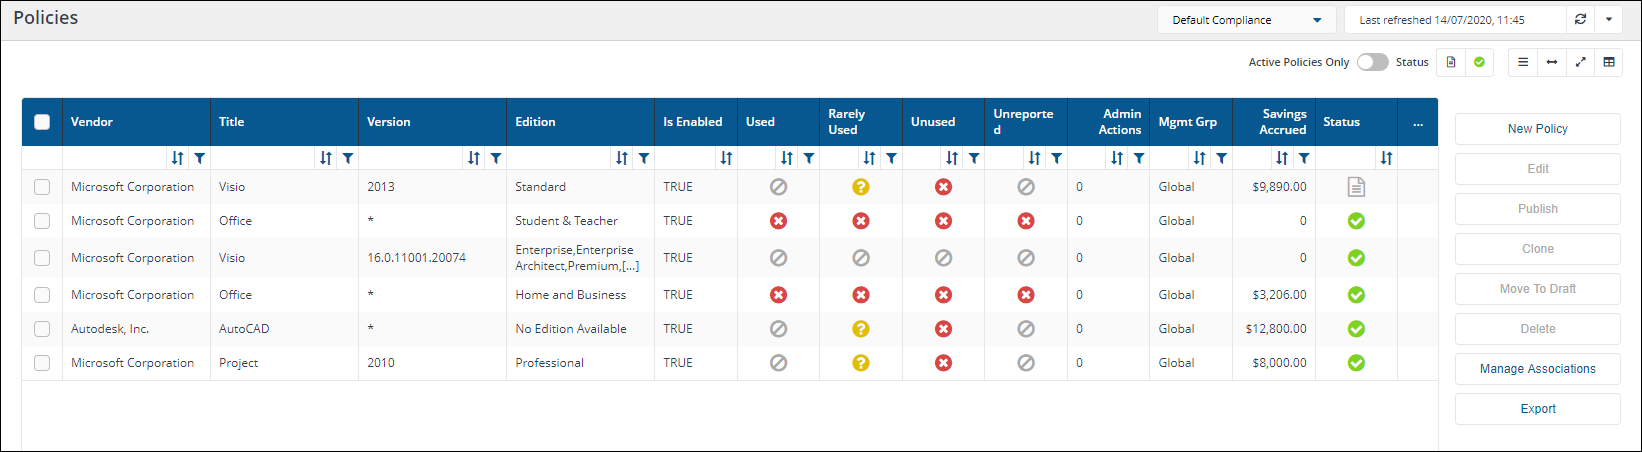
A description of the fields on the Policies page.
Here you can view the reclaim policies that have been published. You get to this page by clicking the AppClarity > Reclaim > Policies node in the navigation panel.
|
Field |
Description |
||||||||||||||||||||||||||||||||||||||
|---|---|---|---|---|---|---|---|---|---|---|---|---|---|---|---|---|---|---|---|---|---|---|---|---|---|---|---|---|---|---|---|---|---|---|---|---|---|---|---|
|
Compliance Repository selector |
This field lets you select the repository where the compliance data displayed on the page comes from. By default this is set to Default Compliance. If you have created your own compliance repositories, click on the name to select these from the drop-down list. |
||||||||||||||||||||||||||||||||||||||
|
Report Refresh |
You can refresh reports from individual AppClarity screens as well as using the Settings App. Where this is available you can do this by using the refresh icon next to the Last Refreshed box:
|
||||||||||||||||||||||||||||||||||||||
|
Active Policies Only toggle |
The Active Policies Only toggle adds a filter when it's turned on that filters the table to only display the reclaim policies that have been published and their status is set to enabled. |
||||||||||||||||||||||||||||||||||||||
|
Column Picker |
Where the column picker control is shown To pick the displayed columns:
|
||||||||||||||||||||||||||||||||||||||
|
Action buttons |
The following table describes the action buttons displayed on the Policies page:
|
||||||||||||||||||||||||||||||||||||||
|
Policies table |
The following table describes the columns displayed in the Policies table:
The following column actions are available on some columns in the table.
|
New Policy page
A description of the fields on the Reclaim Policies page.
Here you can create a Reclaim Policy for a specific product. You get to this page by any of the following ways:
-
Clicking the Reclaim > Policies node in the navigation panel, then clicking the New Policy button
-
Clicking on the Add Policy button on the side of a product entry in the Usage Summary page. If this method is selected the page will be pre-filled with the details of the product.
-
Clicking on the Edit button on the Policies page. When this is done the Reclaim Policy page will be pre-filled with the contents of the selected reclaim policy.
-
Clicking on the Clone link on the Policies page. When this is done the Reclaim Policy page will be pre-filled with the contents of the selected reclaim policy and when you subsequently click Draft or Publish a copy of the original reclaim policy will be saved including any changes you have made.
Policy Summary
This table to the right shows you the information about the policy as you are building the policy or if you are editing a policy. This is useful because the policy pane is larger than can be seen on one screen. Each of these sections are hyperlinks to that specific area of the policy page.
|
Field |
Description |
|---|---|
|
Basic Information |
Details about the Management Group, if the policy is enabled and if Over-ride is allowed |
|
Product |
Give Vendor, Title, Edition, Colloquial Version and Version for the software in the policy |
|
Version Expansion |
No details here, just a hyperlink to the Version Expansion area |
|
Uninstall Criteria |
Details each usage category and the action that Reclaimer will take |
Basic Information
|
Field |
Description |
|---|---|
|
Management Group |
This field displays a list of the current management groups, you can select all the management groups that you want this reclaim policy to apply to. You must select at least one management group or set the reclaim policy to global. |
|
Global |
This checkbox determines whether the reclaim policy will be applied to all products matching the vendor, title, version and edition information regardless of which management groups they belong to. |
|
Override Allowed |
This checkbox is only displayed when the Global checkbox has been checked. When Override Allowed is checked: Subsequent reclaim policies for the same product can be defined in global and other management groups. Those policies will be warned on publishing that a similar policy is already present. WhenOverride Allowedis unchecked: Subsequent reclaim policies for the same product can still be published in global. Those policies will be warned on publishing that a similar policy is already present. However, subsequent reclaim policies for the same product cannot be published in other management groups. Those policies will notified that a similar policy for Global is already present which cannot be overridden and the publish will not be allowed to continue. |
|
Enabled |
This checkbox determines whether the policy is enabled or not, even if it is published. You can use this to disable policies that are no longer in use, or re-enable policies that have been disabled previously. |
Product
|
Field |
Description |
|---|---|
|
Vendor |
The vendor part of the vendor, title, version and edition for a product. This must be filled out before any other fields. Suggested suitable vendors that match your text are displayed as you type into the field, which you can select to auto-complete the entry. |
|
Title |
The title part of the vendor, title, version and edition for a product. Suggested suitable titles from the selected vendor that match your text are displayed as you type into the field, which you can select to auto-complete the entry. |
|
Edition |
Sets the edition for the product to be reclaimed. This field displays a list of editions that match the selected Vendor and Title fields. You must ensure that you select at least one edition from theEditionlist. If the list showsNo edition available, then you must ensure that you select that option. |
|
Colloquial Version |
This field is optional and sets the colloquial version for the product to be reclaimed. |
When manually entering the information on the Reclaim Policy page you must enter the values in the order they are presented, as each subsequent field is dependent on the fields above it.
Version Expansion
|
Field |
Description |
||||||||||||
|---|---|---|---|---|---|---|---|---|---|---|---|---|---|
|
Versions |
Here you select the versions of the software you want the reclaim policy to apply to. Enter a value and then select one from the list of versions displayed. This is taken into account in addition to the vendor, title and edition. This field accepts the asterisk character * as a wildcard. For example. This field could be set to: * to specify all versions for the selected vendor, title and edition. 11.* to specify all sub-versions of version 11. 11.0.* to specify all sub-sub-versions of 11.0 and so on. |
||||||||||||
|
Version Expansion |
This field will expand all the individual matching versions for the vendor, title, edition and version. The expansion is done according to the wildcards in the Versions string: If that string contains no wildcards the Version Expansion field will contain a single entry for that specific version. If the Versions string contains just an asterisk * then the Version Expansion field will contain all the versions for the selected vendor, title and edition. If the Versions string contains a number followed by *, for example 11.*, then the Version Expansion field will contain all the versions starting with that number and so on. There are four fields for each matching version row displayed in the Version Expansion field, as described in the following table:
|
|
Field |
Description |
|---|---|
|
Evaluate |
Click this button to run the evaluation report for the reclaim policy to see which devices and software installations would be affected by the policy. Clicking this button creates a report that is downloaded by the browser as a TSV file. You may need to enable popups on the 1E Platform site to enable the download to proceed. |
|
Save draft |
Click this button if want to save a copy of the policy you are currently working on. Clicking this button does not close the Reclaim Policy page. |
|
Publish |
Click this button to publish the policy. When you publish the policy a check will be made to see if it overlaps with any other existing policy. If it does, you will see a popup similar to the following:
If you decide to proceed with the publishing you will subsequently need to set the precedence for the policies to decide which one should be preferred. This is done on the Precedence page but can only be done for live policies. This means that you will have to refresh the reclaim consolidation report first, which can be done from the Policies page. |
|
Cancel |
Click this button to leave without making any changes to the policy. |
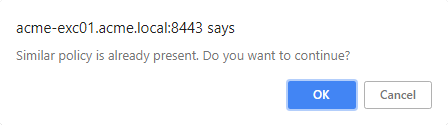
SCCM Uninstall Collection Type
When you have the SCCM Uninstall Provider configured you are presented with an additional section in your Policy Summary. This will allow the Reclaimer to use the SCCM Uninstall for the Reclaimer. The Reclaimer will create a device collection, a user collection or one of each. Based on the setting in the picture below (from the policy). When the Reclaimer runs either the device or the user or both is added to the collection. The Reclaimer also creates deployments for the Program or the Application model for the uninstallation.

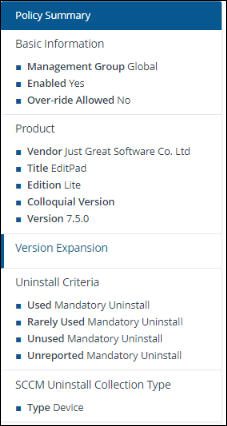
Administration page
A description of the fields on the reclaim policy Adminstration page.
Here you can view the current progress and status for the selected reclaim policy. You get to this page by clicking the AppClarity >Reclaim > Policies node in the navigation panel and then clicking on the Number link in the Admin Actions column.
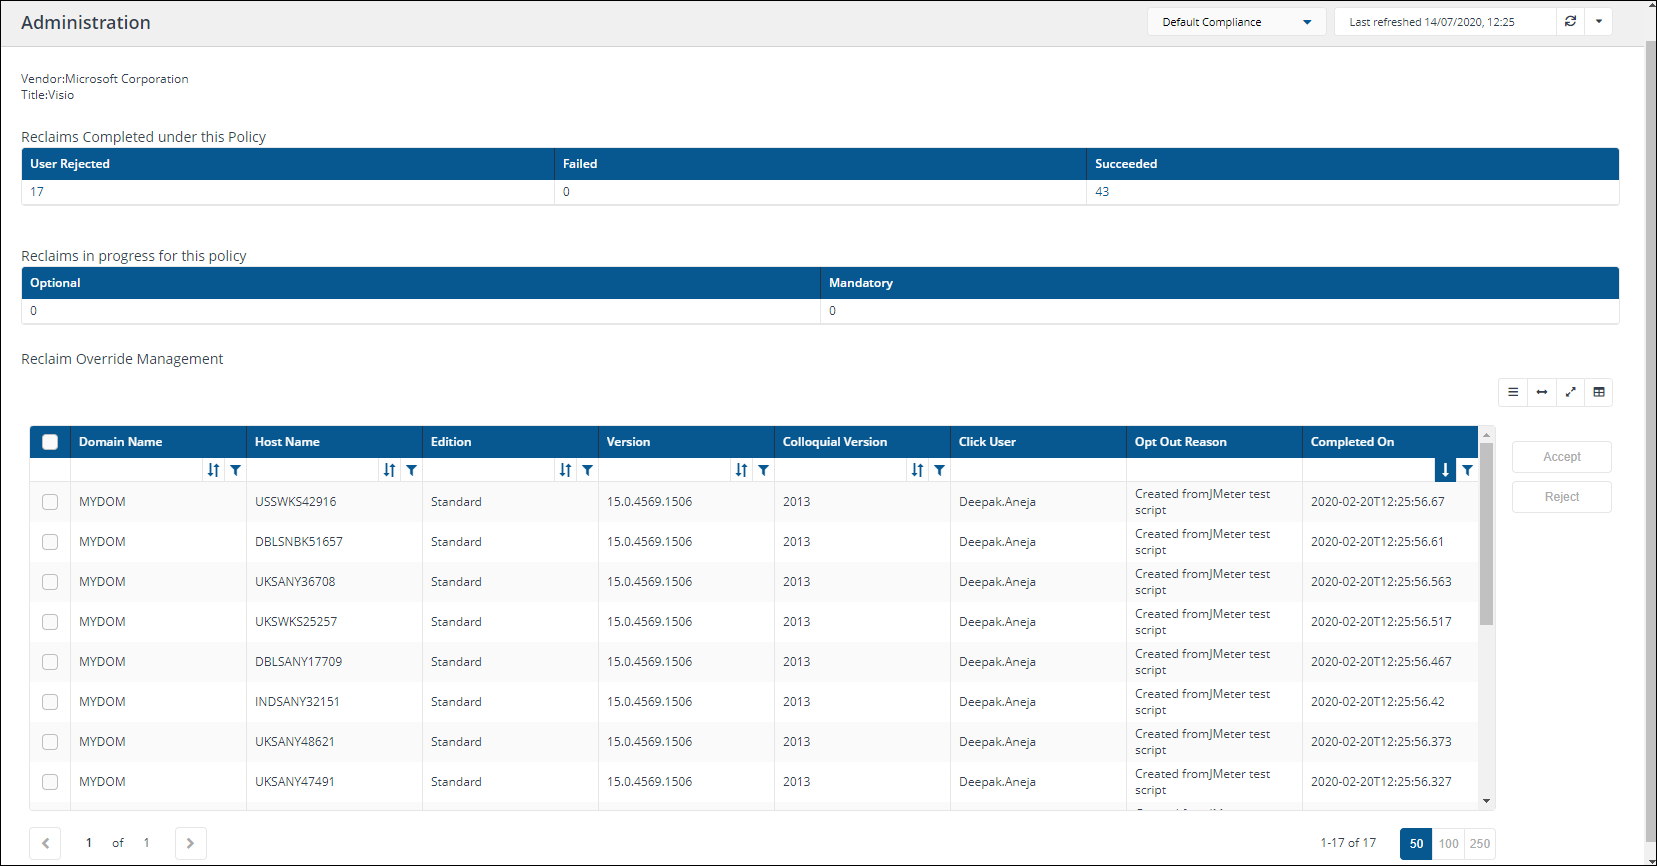
|
Field |
Description |
||||||||||||||||||||||||
|---|---|---|---|---|---|---|---|---|---|---|---|---|---|---|---|---|---|---|---|---|---|---|---|---|---|
|
Report Refresh |
You can refresh reports from individual AppClarity screens as well as using the Settings App. Where this is available you can do this by using the refresh icon next to the Last Refreshed box:
|
||||||||||||||||||||||||
|
Vendor |
Displays the vendor for the target product related to the selected reclaim policy |
||||||||||||||||||||||||
|
Title |
Displays the software title for the target product related to the selected reclaim policy |
||||||||||||||||||||||||
|
Reclaims completed under this policy |
This table shows the reclaims that have been completed by this reclaim policy. The columns of the table are as follows:
|
||||||||||||||||||||||||
|
Reclaims in progress for this policy |
This table shows the number of reclaims currently in progress for this reclaim policy. The columns of the table are as follows:
|
||||||||||||||||||||||||
|
Reclaim Override Management |
This table shows the reclaims that must be processed by the administrator. This is where the user has opted to keep the software and provided a suitable reason for it and that reason must be approved or rejected by the administrator. The columns of the table are as follows:
There are also two buttons below the table that determine the action to take on the selected rows in the table:
|
The three buttons above Accept and Reject
|
Icon |
Name |
Description |
|---|---|---|
|
|
Toggle compact rows |
Allows the rows to have slightly more space for easier viewing. |
|
|
Toggle action buttons |
Allows the action buttons (Accept and Reject) to be displayed as a hamburger menu only. This expansion of the table allows for easier viewing. |
|
|
View fullscreen |
Allows the table only to be viewed in the full browser window. Clicking the button while in fullscreen mode will collapse it back to default. |
|
|
Column picker |
Where the column picker control is shown To pick the displayed columns:
|


A description of the fields on the Savings page.
Here you can review an estimate of the cost savings made by applying particular reclaim policies, that is, on successful reclaims. You get to this page by clicking the AppClarity > Reclaim > Savings node in the navigation panel.
Please Execute a Generate Report - Reclaim Reportingaction for your compliance repository, before viewing this screen.
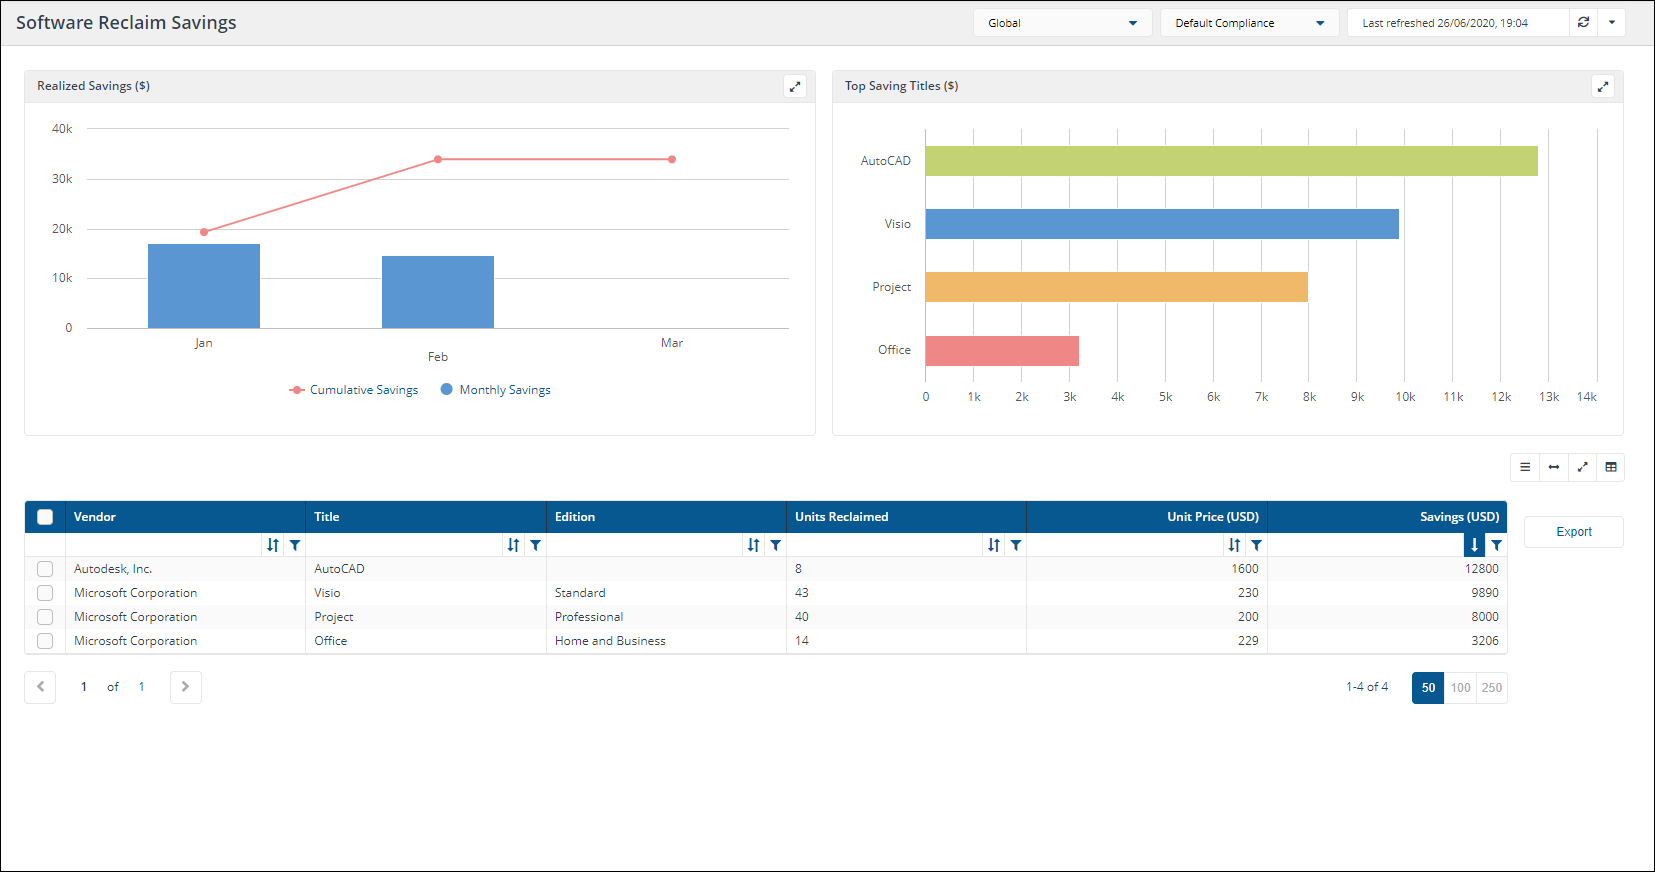
|
Field |
Description |
||||||||||||||
|---|---|---|---|---|---|---|---|---|---|---|---|---|---|---|---|
|
Management Groups |
Certain pages in AppClarity have a management groups selector. This drop-down lets you select the management group you are interested in. By default this is set to Global. |
||||||||||||||
|
Compliance repository selector |
This field lets you select the repository where the compliance data displayed on the page comes from. By default this is set to Default Compliance. If you have created your own compliance repositories, click on the name to select these from the drop-down list. |
||||||||||||||
|
Report Refresh |
You can refresh reports from individual AppClarity screens as well as using the Settings App. Where this is available you can do this by using the refresh icon next to the Last Refreshed box:
|
||||||||||||||
|
Back |
Each page in AppClarity has a back link on the page. Clicking this link takes you back to the previous page you were browsing, and works differently to the browser's back button for this application in that it takes you to the last page you were on in the application. |
||||||||||||||
|
Column Picker |
Where the column picker control is shown To pick the displayed columns:
|
||||||||||||||
|
Export All |
Pages in AppClarity that include an Export all button allow you to export all the data for any tables of information displayed on the page. This may also include columns that are not currently visible in the table display. Click this button to export all of the software reclaim summary details. |
||||||||||||||
|
Savings table |
The Savings table contains the following columns:
|