Deploying 1E Client using Jamf
To deploy the 1E Client and take full advantage of its functionality, you will need to grant it the following permissions:
-
Full Disk Access
-
AXM Web Configuration
-
Accessibility and Notifications Access (Interaction Client UI)
These permissions can be granted to the 1E Client using macOS Configuration Profiles created using Jamf. This article contains steps to create Configuration Profiles with Display Names and Descriptions to suit your organization.
Full disk access
Full disk access is needed for macOS file change trigger functionality to work, without these permission the feature will be disabled.
Refer to Sample Jamf profiles for a downloadable sample profile created using these steps, which you can upload to your JAMF Pro Portal.
To create a Configuration Profile for full disk access using Jamf:
-
Open the Jamf Pro web console.
-
Navigate to Computers > Configuration Profiles.
-
Click New.
-
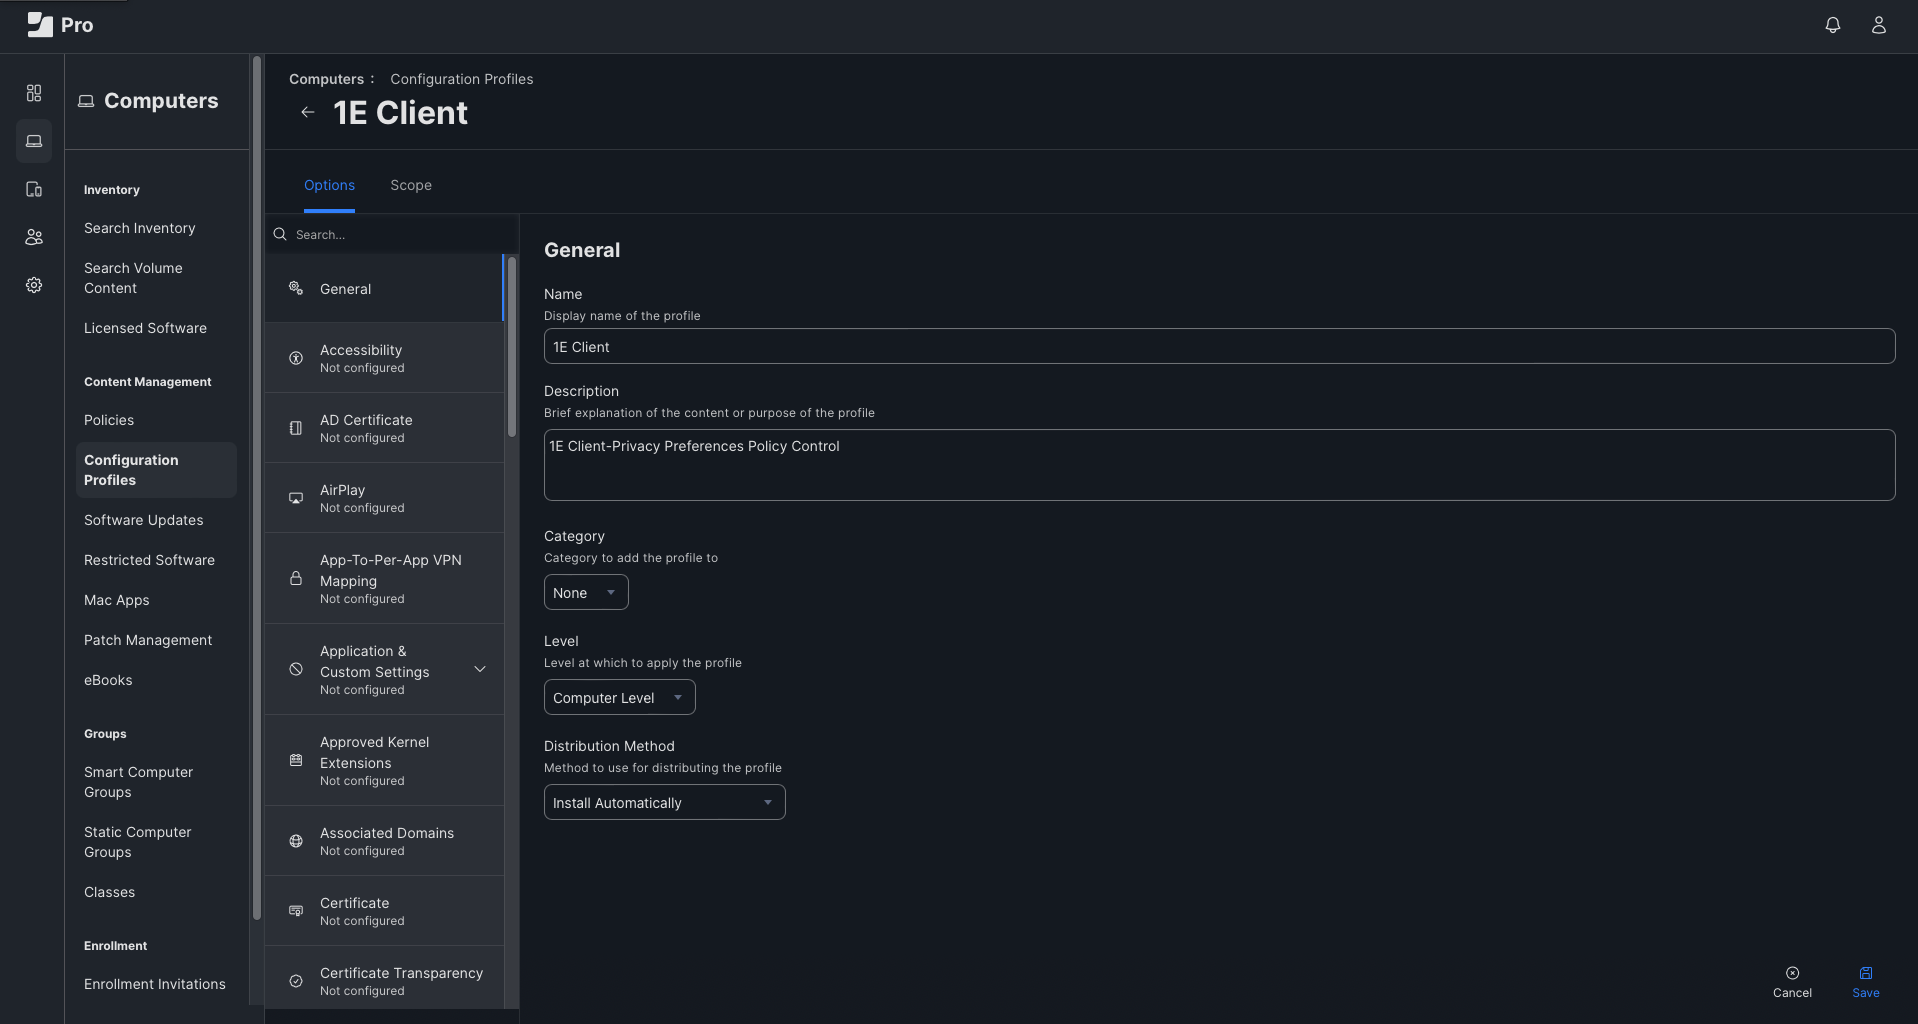
Complete these fields as shown:
-
Name: 1E Client.
-
Description: 1E Client-Privacy Preferences Policy Control.
-
-
Choose the option Privacy Preferences Policy Control from the Sidebar.
-
Configure these fields as shown:
-
Identifier: com.1e.Client
-
Identifier Type: Bundle ID
-
Code Requirement:
Copyanchor apple generic and identifier "com.1e.Client" and (certificate leaf[field.1.2.840.113635.100.6.1.9] /* exists */ or certificate 1[field.1.2.840.113635.100.6.2.6] /* exists */ and certificate leaf[field.1.2.840.113635.100.6.1.13] /* exists */ and certificate leaf[subject.OU] = C72FZX84NH)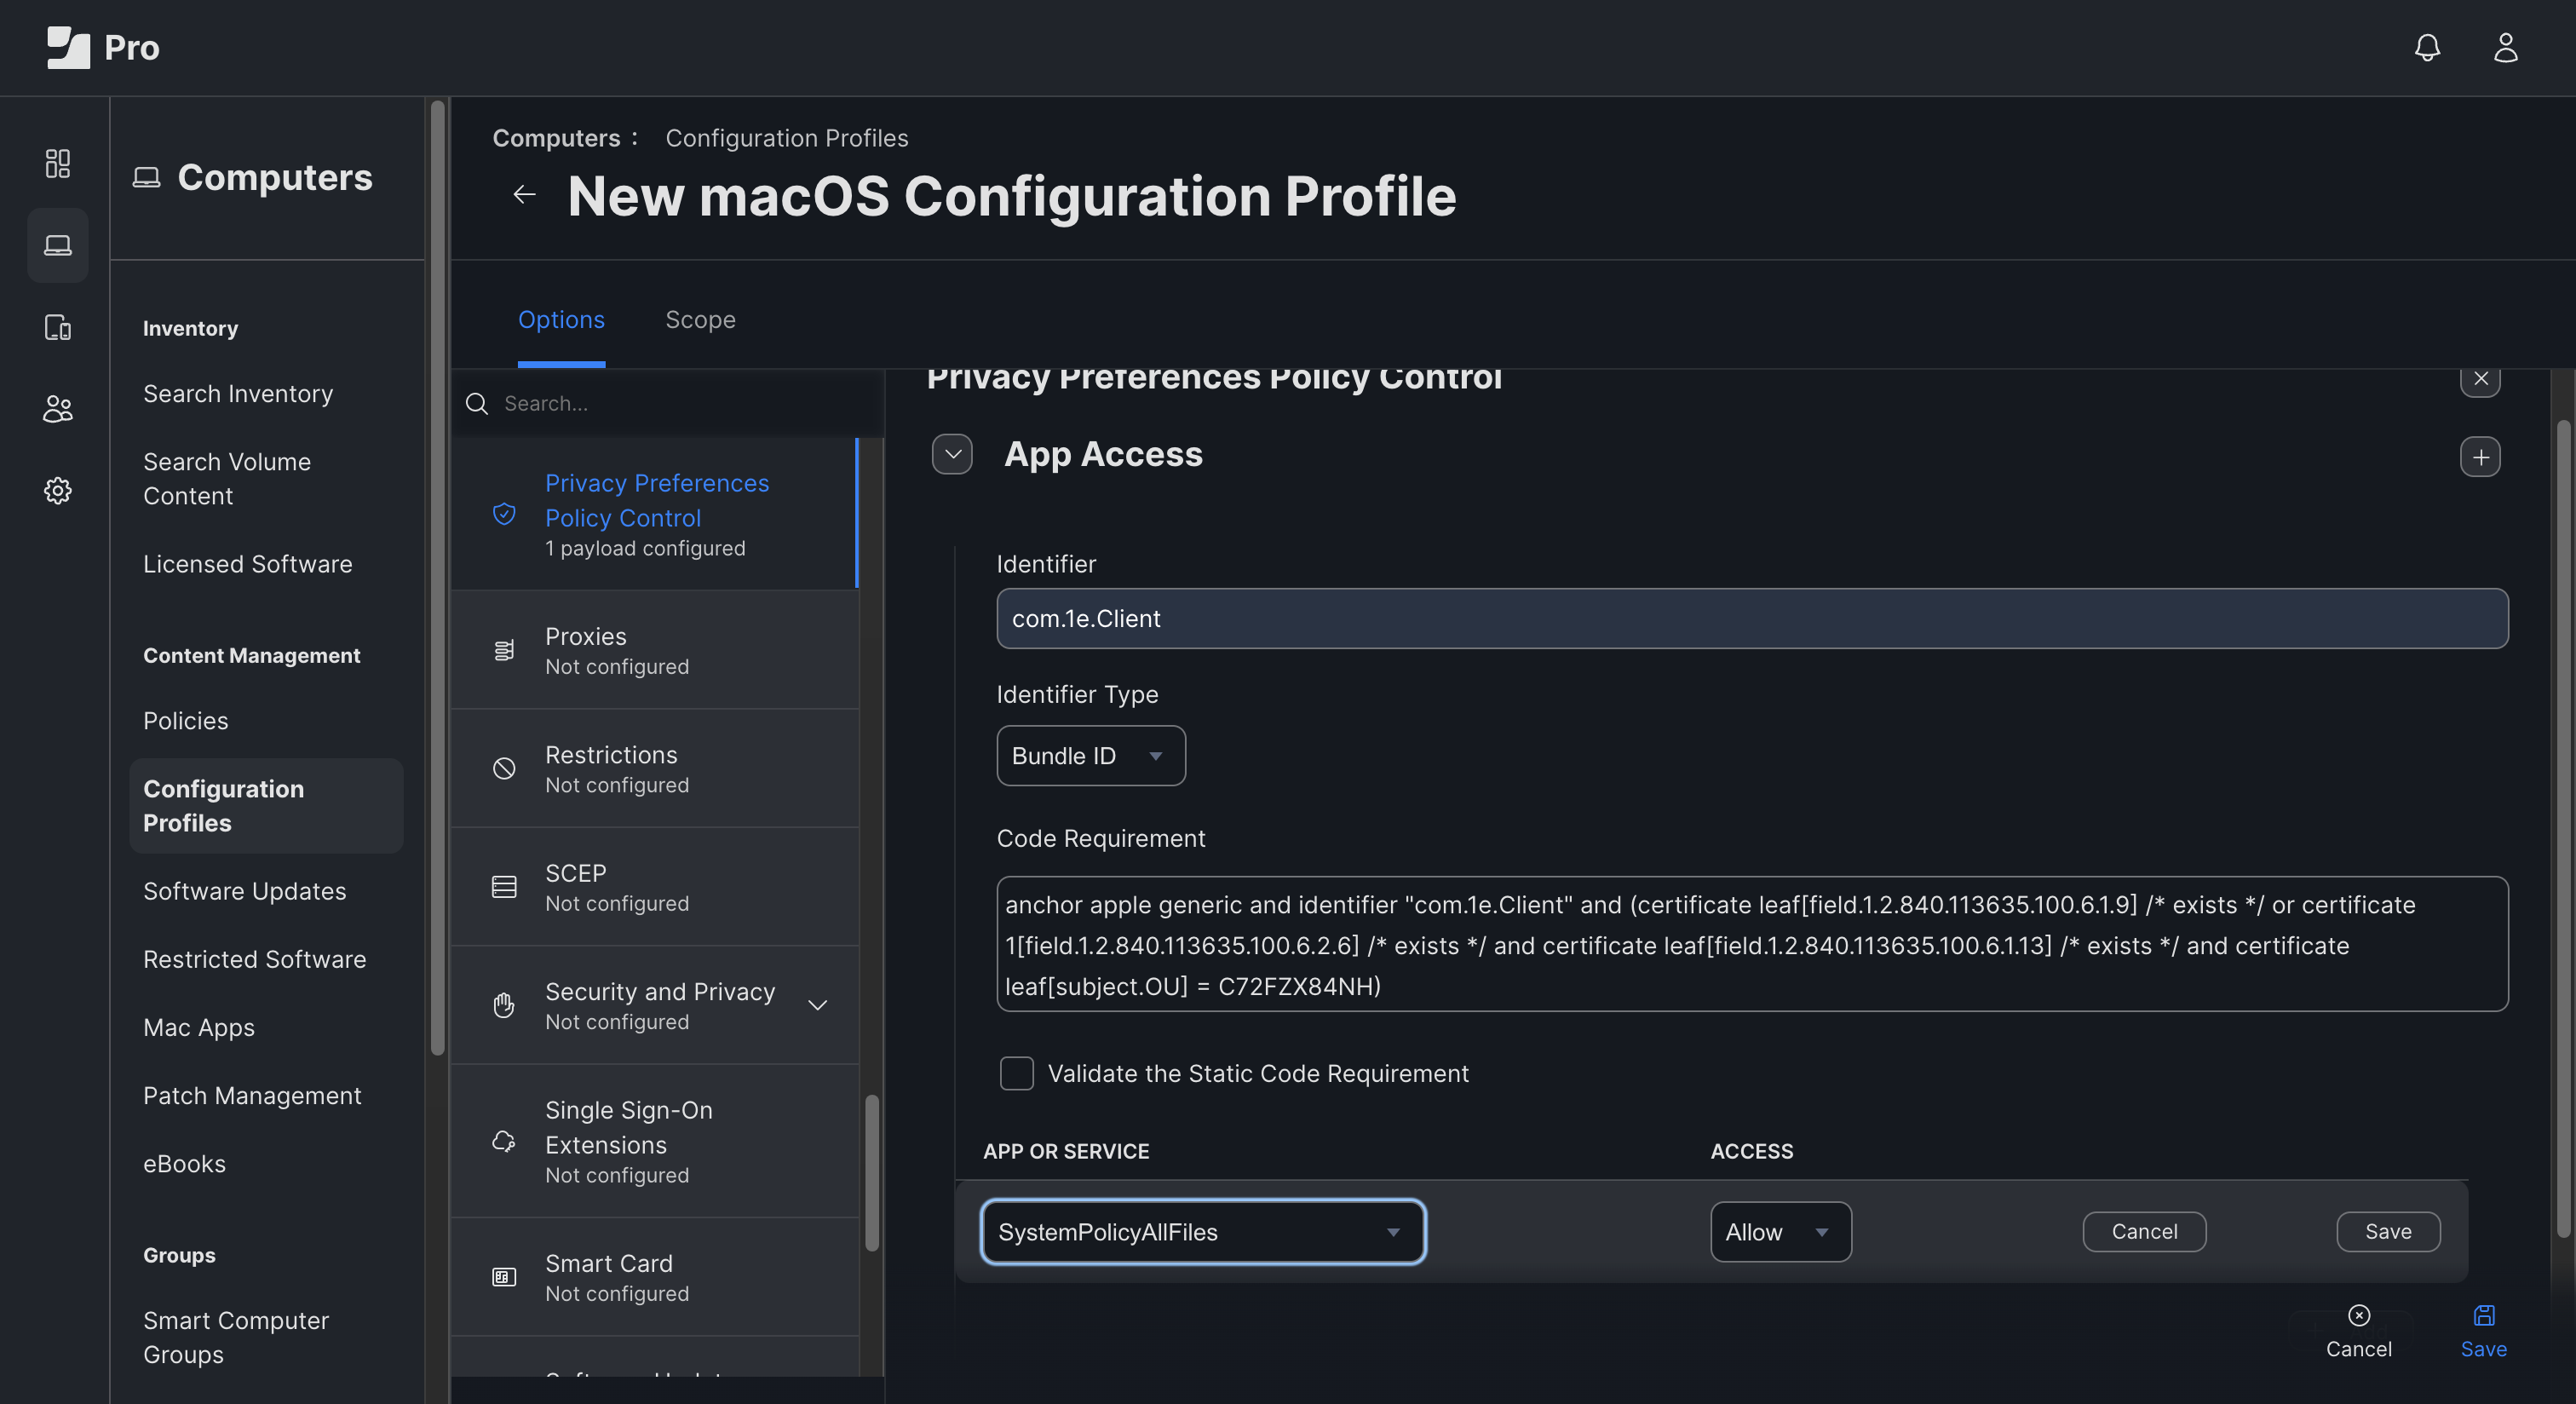
-
-
Click + Add.
-
Configure the Payload to allow SystemPolicyAllFiles.
-
Click the Add button and select SystemPolicyAllFiles from the drop down menu.
-
Set Access as Allow and click Save.
-
Save the Configuration Profile.
-
Define the scope of this profile Deployment as needed.
AXM web configuration
The following permission is needed for AXM monitoring to work.
Refer to Sample Jamf profiles for a downloadable sample profile created using these steps, which you can upload to your JAMF Pro Portal.
-
Open the JAMF Pro web console.
-
Navigate to Computers > Configuration Profiles.
-
Click New.
-
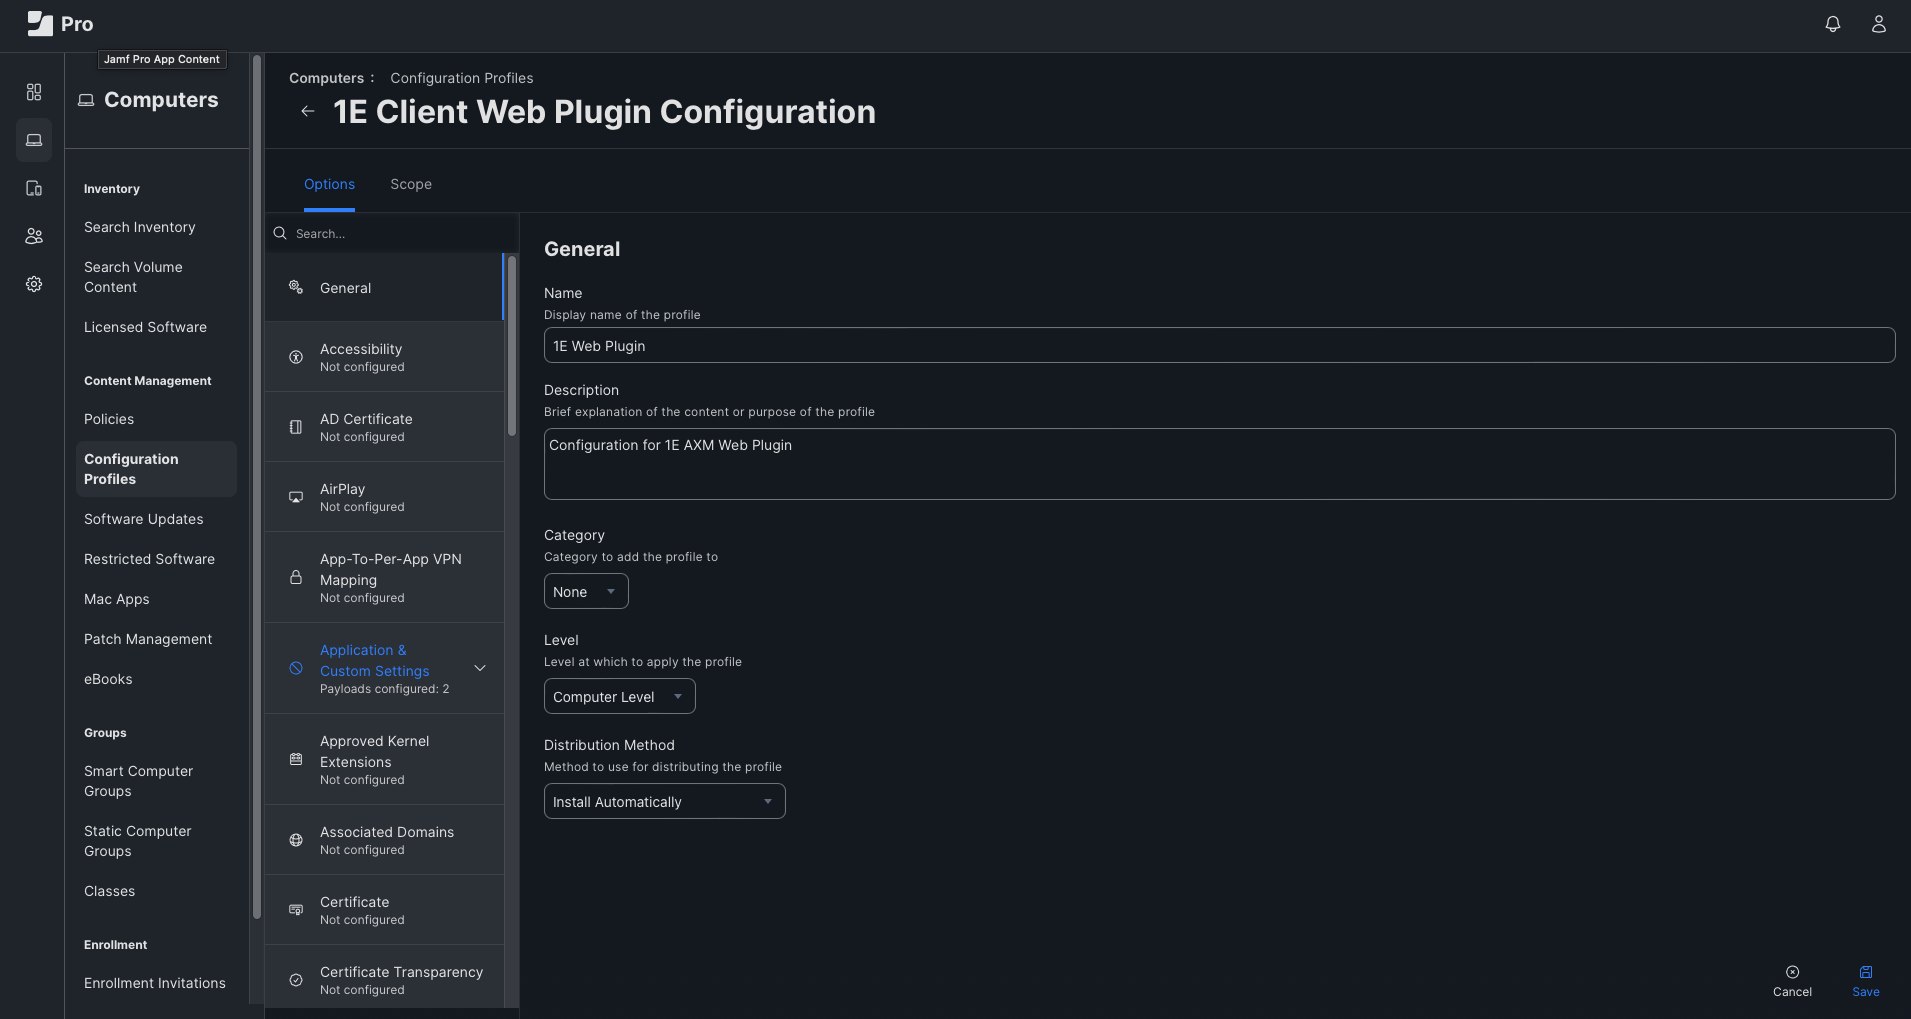
Complete these fields as shown:
-
Name: 1E Web Plugin.
-
Description: Configuration for 1E AXM Web Plugin.
-
-
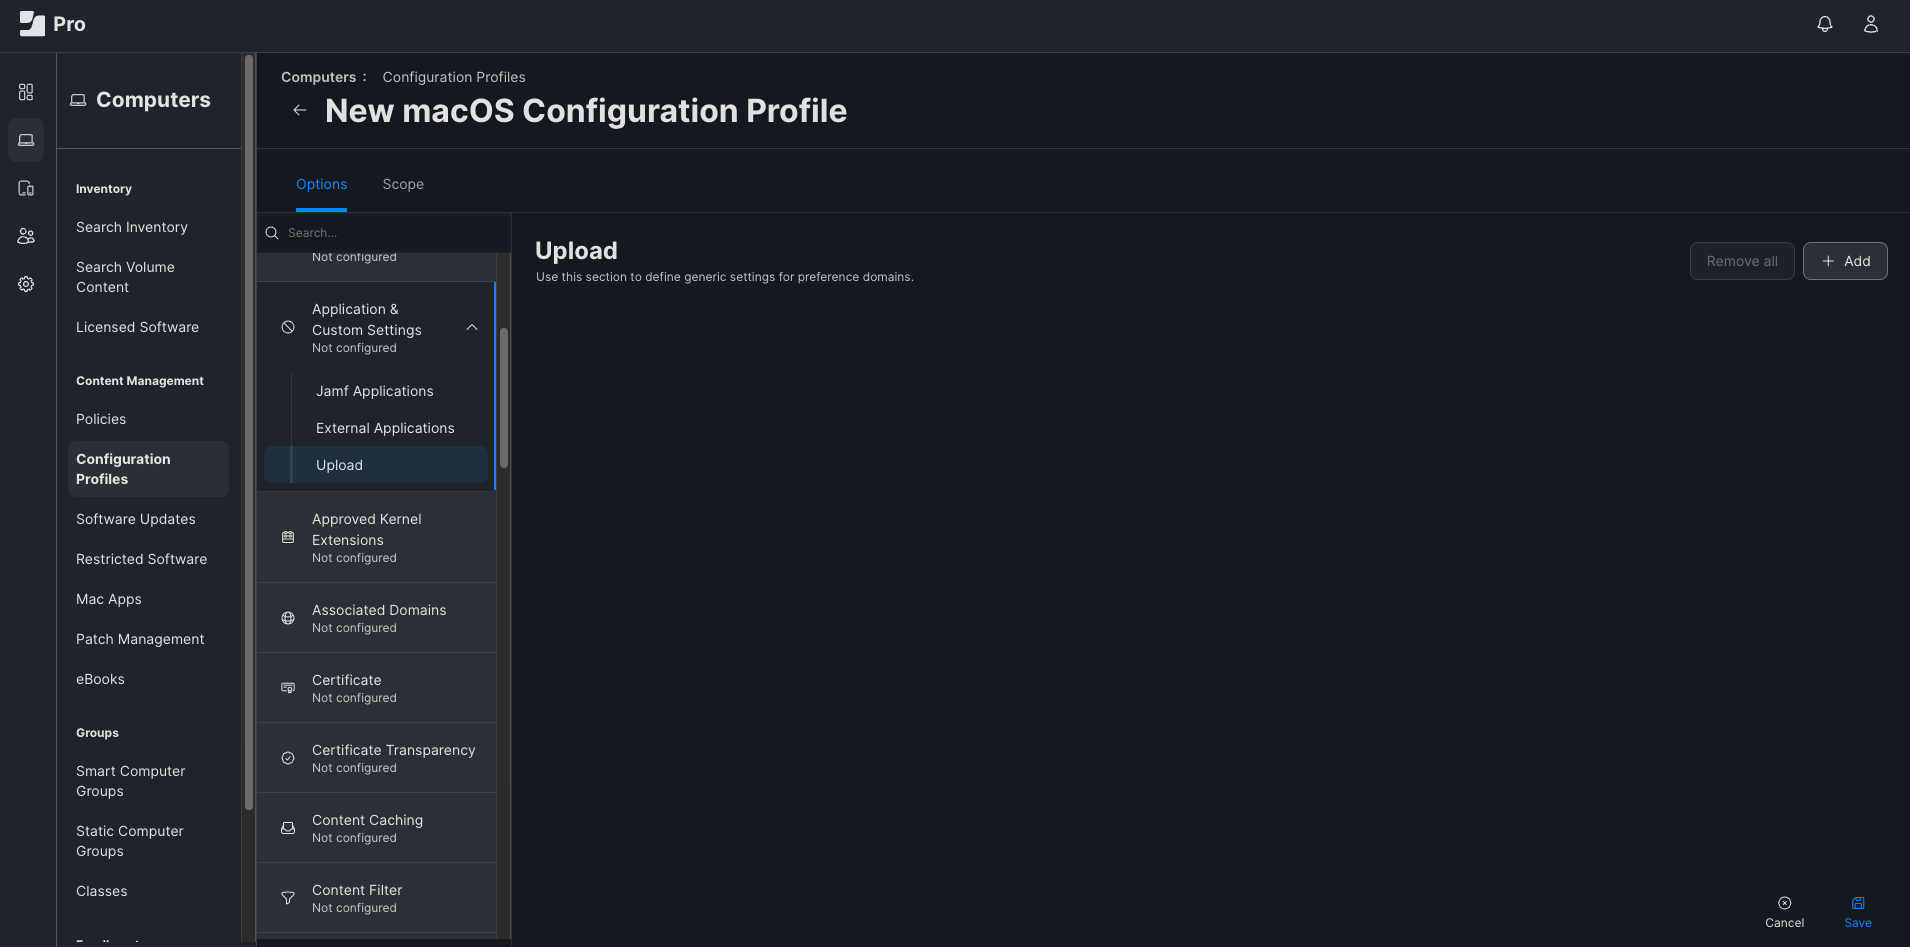
Select Payload Configuration for Application and Custom Settings > Upload
-
Click the + Add.
-
Complete these fields as shown:
-
Preference Domain: com.google.Chrome
-
Property List:
Copy<?xml version="1.0" encoding="UTF-8"?>
<!DOCTYPE plist PUBLIC "-//Apple//DTD PLIST 1.0//EN" "http://www.apple.com/DTDs/PropertyList-1.0.dtd">
<plist version="1.0">
<dict>
<key>ExtensionInstallAllowlist</key>
<array>
<string>ceiaibmchnpfjpehgahbnefnchamhgop</string>
</array>
<key>ExtensionInstallForcelist</key>
<array>
<string>ceiaibmchnpfjpehgahbnefnchamhgop;http://localhost:7781/axm/web/extension.xml</string>
</array>
<key>ExtensionInstallSources</key>
<array>
<string>http://localhost:7781/*</string>
</array>
</dict>
</plist>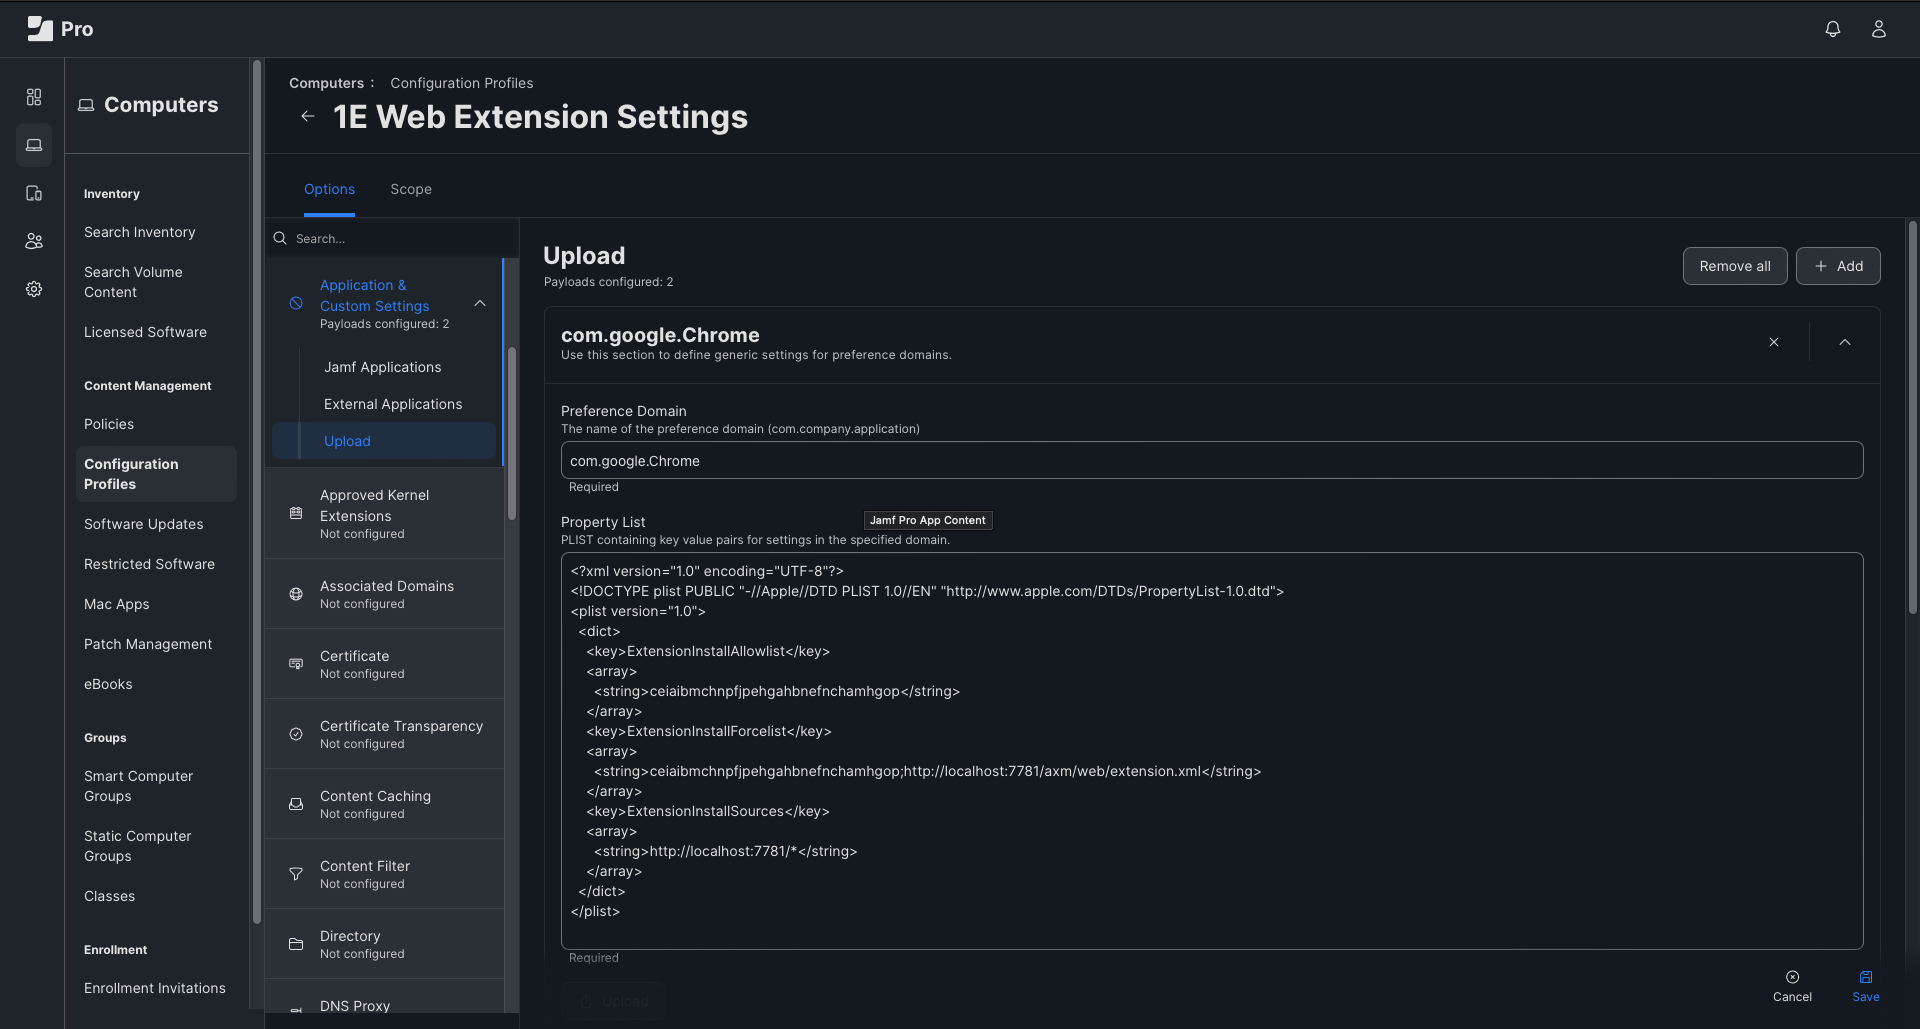
-
-
Click the + Add.
-
Complete these fields as shown:
-
Preference Domain: com.microsoft.Edge
-
Property List:
Copy<?xml version="1.0" encoding="UTF-8"?>
<!DOCTYPE plist PUBLIC "-//Apple//DTD PLIST 1.0//EN" "http://www.apple.com/DTDs/PropertyList-1.0.dtd">
<plist version="1.0">
<dict>
<key>ExtensionInstallAllowlist</key>
<array>
<string>ceiaibmchnpfjpehgahbnefnchamhgop</string>
</array>
<key>ExtensionInstallForcelist</key>
<array>
<string>ceiaibmchnpfjpehgahbnefnchamhgop;http://localhost:7781/axm/web/extension.xml</string>
</array>
<key>ExtensionInstallSources</key>
<array>
<string>http://localhost:7781/*</string>
</array>
</dict>
</plist>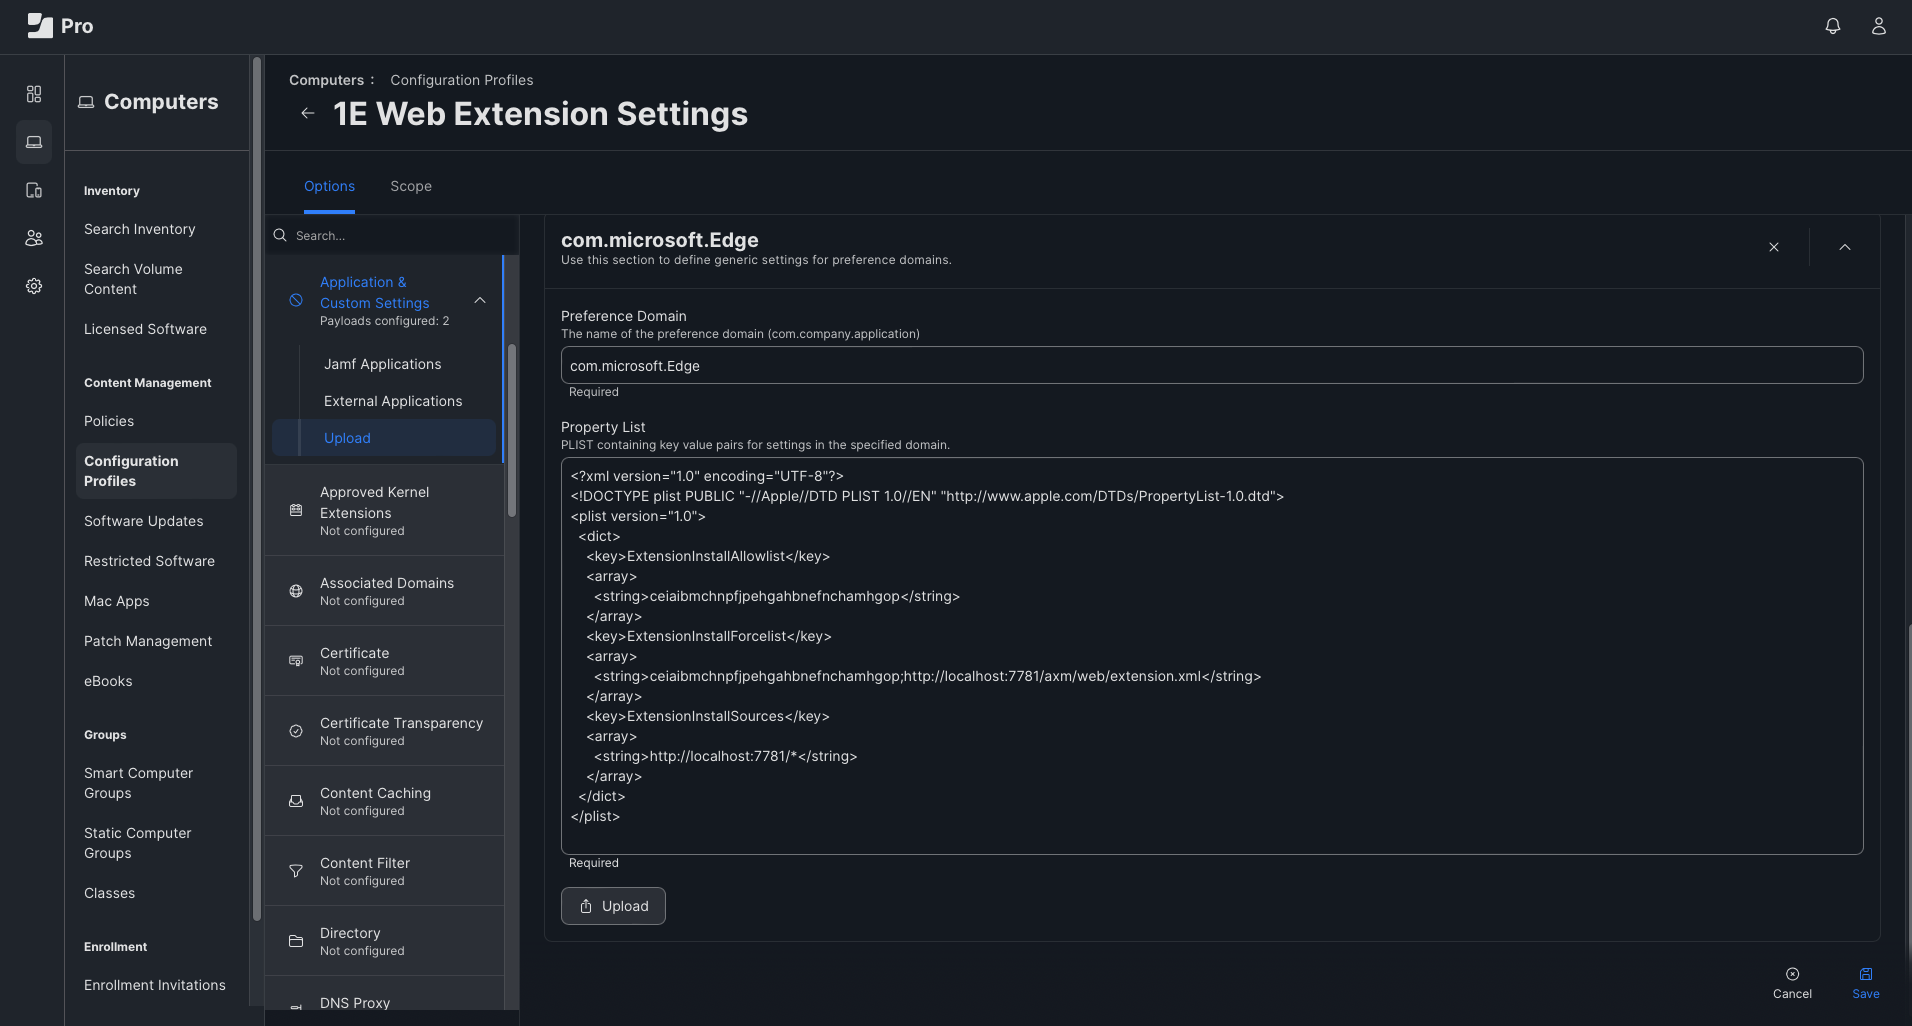
-
-
Define the scope of this profile Deployment as required.
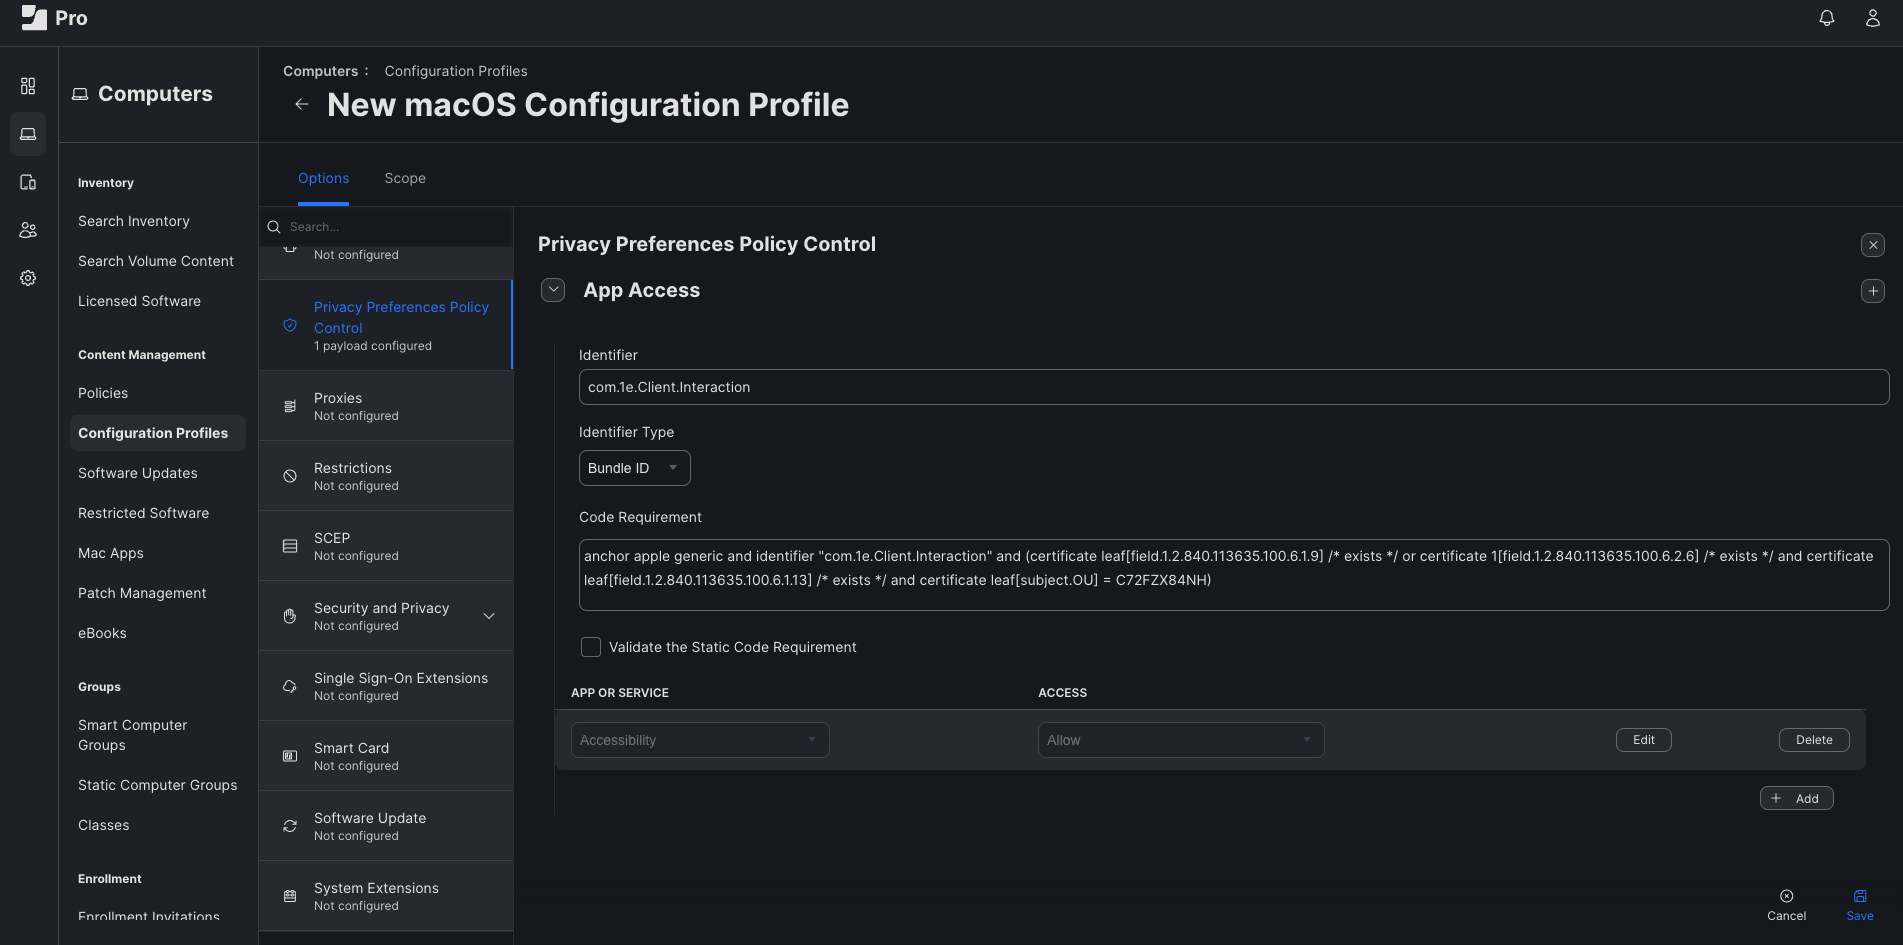
Accessibility and Notifications
This permission is needed for the Mac OS InteractionUI (engagement module) to work as expected.
For details about using, and configuring the user engagement module for macOS, refer to User engagements for macOS devices
Refer to Sample Jamf profiles for a downloadable sample profile created using these steps, which you can upload to your JAMF Pro Portal.
To create a Configuration Profile for Accessibility using Jamf, follow these steps:
-
Open the Jamf Pro web console.
-
Navigate to Computers > Configuration Profiles.
-
Click New.
-
Enter the profile creation details as shown:
-
Name: 1E Client Interaction.
-
Description: 1E Client Interaction Accessibility and Notifications Permissions.
-
-
Choose the option Privacy Preferences Policy Control from the sidebar.
-
Enter the following details:
-
Identifier: com.1e.Client.Interaction.
-
Identifier Type: Bundle ID.
-
Code Requirement:
Copyanchor apple generic and identifier "com.1e.Client.Interaction" and (certificate leaf[field.1.2.840.113635.100.6.1.9] /* exists */ or certificate 1[field.1.2.840.113635.100.6.2.6] /* exists */ and certificate leaf[field.1.2.840.113635.100.6.1.13] /* exists */ and certificate leaf[subject.OU] = C72FZX84NH)
-
-
Click the Add(+) Icon.
-
Select Accessibility from the drop-down menu.
-
Set Access as Allow and click Save.
-
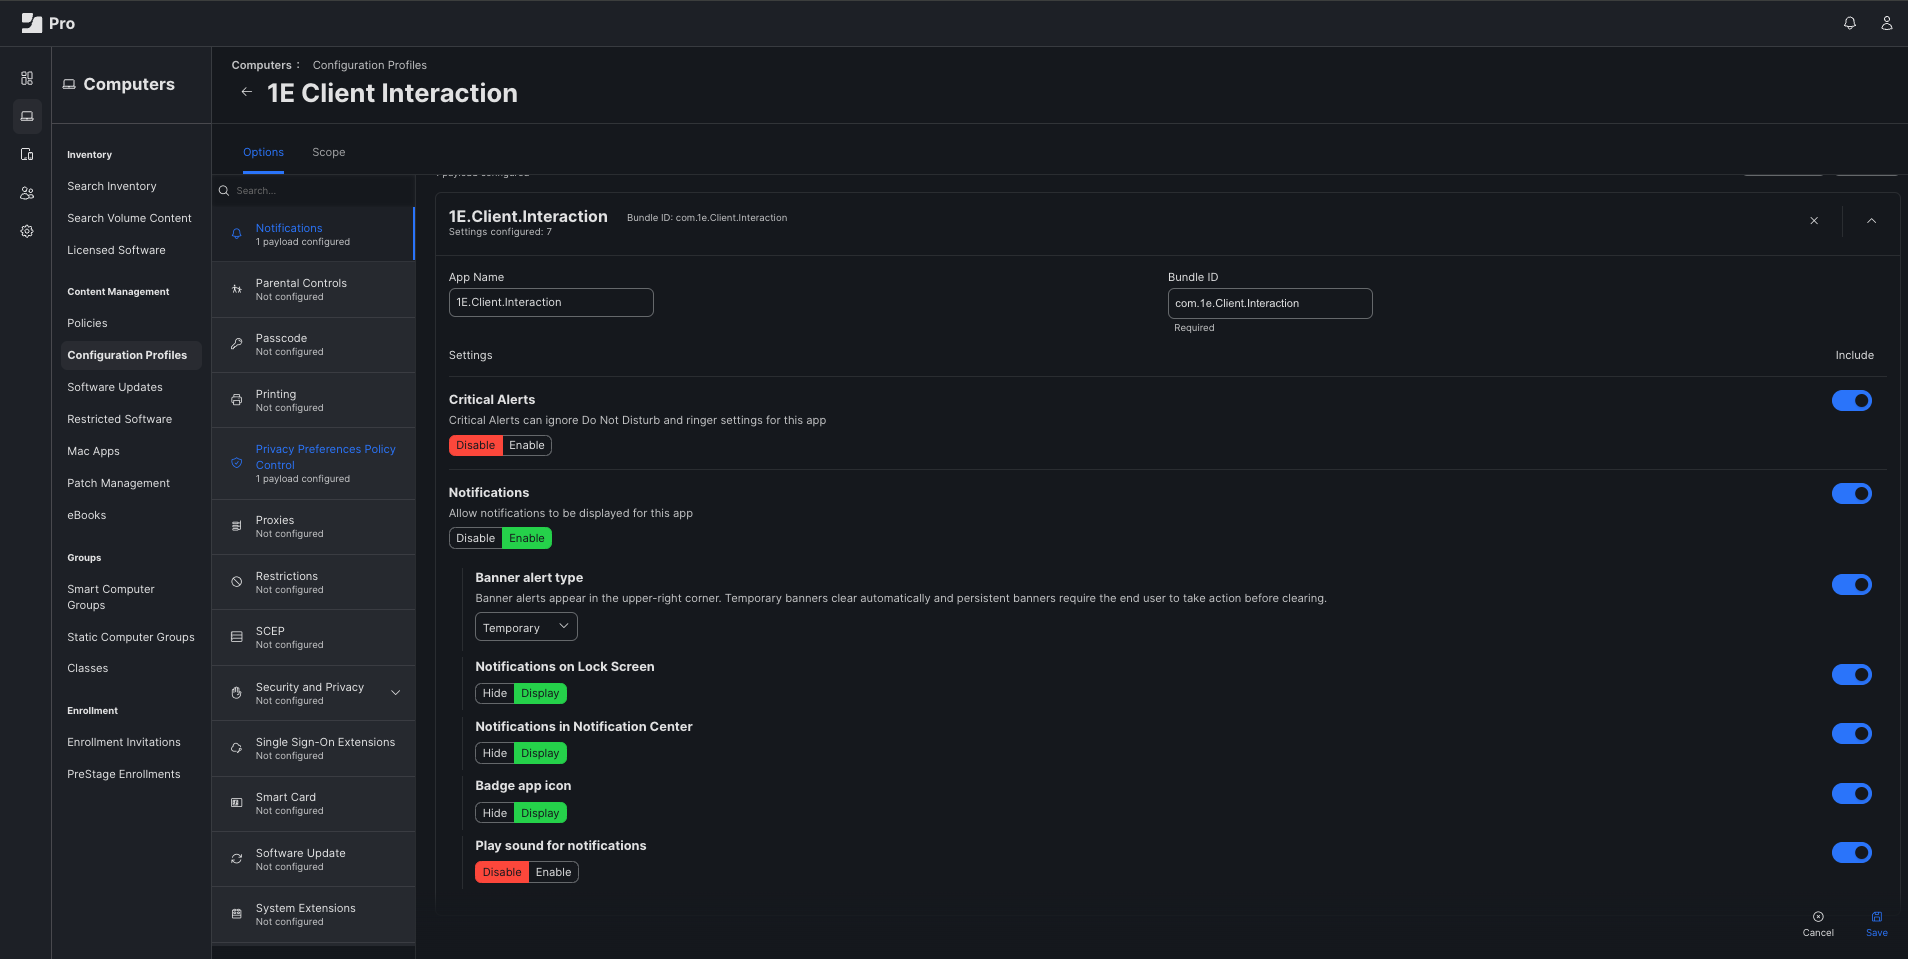
Now move to the Notifications section in the same list, in the left pane.
-
Enter the following:
-
App Name as 1E.Client.Interaction
-
Bundle Id as com.1e.Client.Interaction
-
-
Select the permissions as shown in the following image:
-
Save the Configuration Profile.
-
Define the scope of this profile deployment as needed.
Sample Jamf profiles
The following sample profiles were created using the steps outlined in this article, you can download and uploaded them in your Jamf Pro Portal.