Instructions
Learn how the TeamViewer DEX Platform Endpoint Troubleshooting Instructions section works — view instruction history, navigate tasks, schedule instructions, and run questions or actions on endpoints.
Instructions
Instructions must be loaded into 1E before it can be used to question or perform actions on your network. For more details please refer to Instructions.
Questions and actions
There are two types of instruction: questions and actions. When an instruction is run it returns a table of responses, for questions the responses are the answers to the question - for actions the responses are the results of running the action. Questions do not require approval. Actions must be approved before they can be run.
The History page
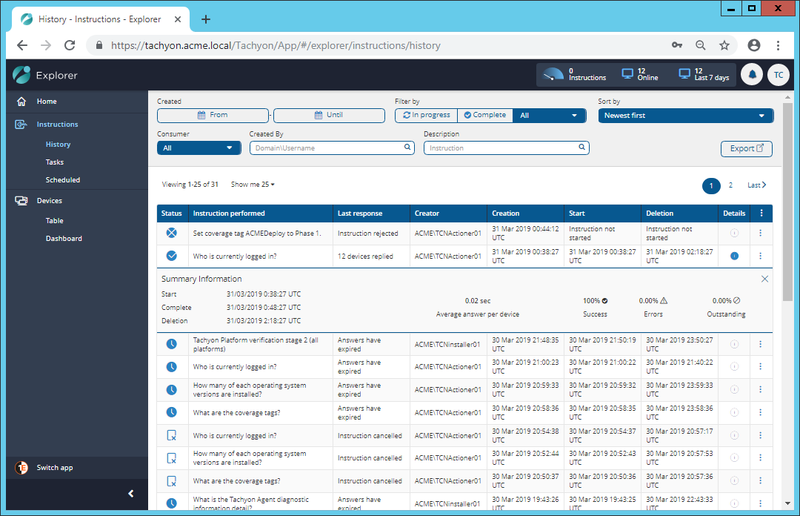
When an instruction is run an entry appears in a table on the History page. The responses for an individual question or an action can be viewed by clicking on its entry in the History page table. This page also supports search and filtering of the instruction history and interacting with the instruction entries, for example to re-run a question.
For more details please refer to History.
The Tasks page
Questions may be asked from the Home page using the edit field which presents a list of matching questions as you type text into the field, please refer to Home page, questions, and responses for more details. This is useful if you know the name of the question you want to ask. From the Home page you can also view the available questions using the All questions button, which displays a list of the questions that have been loaded into 1E and can also be organized by Instruction Set.
The Tasks page also lets you browse instructions, this time organized into a hierarchy of Task groups, where each Task group denotes a particular functional area and may be broken down into more specific functional areas. For example the Systems Management Task group could contain a Software Distribution Task group and then any instructions related to software distribution would appear there. A single instruction can also appear in more than one Task group. The last difference is that instructions may be scheduled from the Tasks page but not from the Home page.
For more details please refer to Tasks.
The Scheduling page
1E allows instructions to be scheduled from the Tasks page. This enables particular instructions to be run at some point in the future, or on a regular basis depending on your requirements. The Scheduling page lets you interact with the schedules that have been defined for instructions. For more details please refer to Scheduling instructions.
History
How the History and individual Instruction Responses pages work.
The History page
On this page you can see a table that shows all the instructions that have replies, are in progress, have expired, have been canceled and have been rejected.
The Instruction History header
Located just above the Instruction History table this section lets you sort, search and filter the instructions displayed in the table. From here you can also export the instruction data for the current page and change the view from a table to a grid.
The options available in the Instruction History header are shown in the following table:
|
Option |
Description |
||||||||||||||||||
|---|---|---|---|---|---|---|---|---|---|---|---|---|---|---|---|---|---|---|---|
|
Created |
Here you can set a filter on the date and time an instruction was created. The From date picker lets you select a time and date that filters the view to show responses that occurred after that time and date. The Until date picker lets you select a time and date that filters the view to show responses that occurred before that time and date. You can combine the two to display the responses that occurred between the From and Until filters. |
||||||||||||||||||
|
Filter by |
Here you can select to show all or just the instruction responses that are in the following states, corresponding to the Status column:
|
||||||||||||||||||
|
Sort by |
This control lets you sort the responses by the time they were created or alphabetically by their name in ascending or descending order. |
||||||||||||||||||
|
Consumer |
This control lets you filter the Instruction history according to the consumer that created the instruction. This can be one of the consumers listed in the following table:
|
||||||||||||||||||
|
Created By |
This field filters the Instruction history according to the value in the Creator column. |
||||||||||||||||||
|
Description |
This field filters the Instruction history according to the value in the Instruction performed column. |
||||||||||||||||||
|
Export |
Exports the instructions listed on the current page to a .csv file. This will be saved to your browser's download directory. |
The Instruction History table
The Instruction History table displays and lets you interact with the instructions that have been created. The columns are described in the following table:
The instruction Responses page
On this page you can see the device responses for an individual instruction, summary information about the way the instruction is running and the status of the responses. You can also select to run follow-up questions and actions.
The instruction header
Just below the status bar at the top of the Responses page is the instruction header. Here you can see what instruction was run, who ran it and what parameters were set (coverage, question filter etc...). On the right-hand side you can see the percentage of elapsed time for the question's duration and the answers that have been received from the 1E client devices currently covered by the question.
You also have an option to stop the instruction. When you click Stop you will see a confirmation dialog that gives you the option to keep the responses or not. If you continue 1E immediately stops the instruction from running and retrieving any further responses. Any subsequent responses that may come in will be disregarded.
The instruction response tabs
The tabs just below the instruction header provide various information and ways of interacting with the responses. They are described in the following table:
|
Tab |
Description |
|---|---|
|
Summary |
This tab provides summary information about the instruction. More information on this tab can be found in Checking the status of responses using the summary tab. |
|
Content |
This tab displays the actual response data. Here you can define filters that can be used as the basis for follow-up actions and questions. These follow-up actions and questions will be targeted at the devices whose responses pass the filter. This should be contrasted with the follow-up actions and questions that can be defined on the Questions and Actions tabs, which are targeted at all the same devices as the original instruction. |
|
Status |
This tab displays the status information for the responses. Here you can track down the reasons for any errors generated by devices when attempting to respond to the instruction. |
|
Questions |
This tab lets you define questions that follow-up the original instruction. Any questions defined here will be targeted at the same devices as the original instruction. |
|
Actions |
This tab lets you define actions that follow-up the original instruction. Any actions defined here will be targeted at the same devices as the original instruction. |
Tasks
How to use 1E's Task-based user interface to select and configure instructions.
The Endpoint Troubleshooting→Instructions→Tasks page in Endpoint Troubleshooting provides a structured view of the instructions defined in the product packs. It also lets you schedule the tasks so they can be run in the future or according to a particular schedule.
Using task groups
The benefit of using Tasks lies in the task group structure that is defined in the DEX Packs. It is this structure that enables you to focus in on specific task areas to find the particular instruction that you want.
For example you may be interested in instructions related to particular software vendor's products. Depending on the Instructions that you have uploaded to your 1E system you may see the following structure:
-
At the top-level there is a Software Vendors task group whose children are 1E and Microsoft.
-
Underneath the 1E task group there is a 1E group that contains Configuration, Diagnostics and Verification groups as well as a couple of Instructions.
-
Underneath the Microsoft task group is the Configuration Manager task group containing Instructions related to that product.
Navigating Tasks
The top-level is called Tasks. At this level are all the top-level task groups:
-
Clicking on a task group displays all its children in the column to the right, which also shows the name of the selected task group. A child may be a task or another task group
-
Clicking on a child task group in the next column displays all its children in a column to its right and so on
-
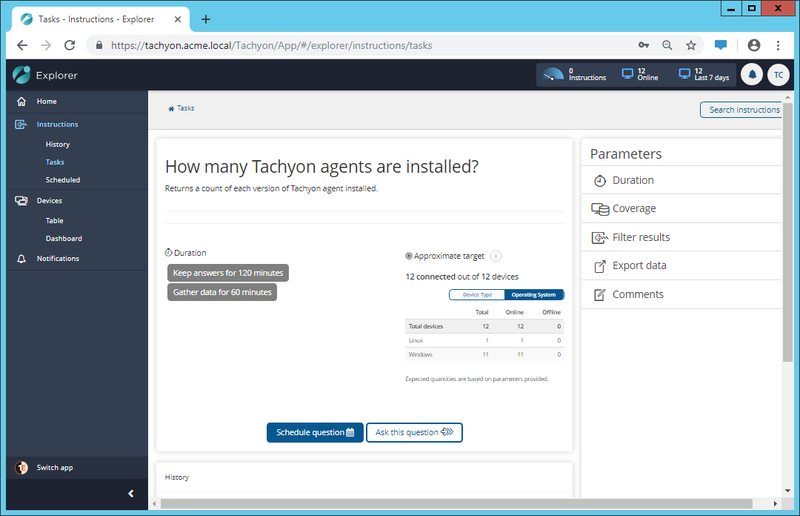
Clicking on a task displays a page that lets you set the parameters for the task before sending it to some 1E client devices
A task is a question or action that has been made part of a task group. Tasks have a grey background and are marked with a question icon
To illustrate the use of the Tasks page we provide two examples: in the first example a user asks a question to retrieve the currently running processes; in the second an actioner has to respond to an emergency situation by asking to perform an action to stop the Configuration Manager client service.
Asking a question from Tasks
In this example we'll track down and ask the What are the 1E Client settings? question.
-
Navigate to the Endpoint Troubleshooting→Instructions→Tasks page.
-
The top-level Tasks is displayed, here there are three task groups: Security, Software and Software Vendors.
-
The one we want is the Software Vendors task group. Select this to display the child task groups 1E and Microsoftin the next column.
-
Select the 1E child task group to display its child task group 1E in the next column.
-
Select 1E and a combination of groups and Instructions are shown at the next level: the Configuration, Diagnostics and Verification task groups and two Instructions. To get to the question we want select the Configuration task group.
-
Scrolling to the bottom of the list of Instructions in the Configuration Task group we see the question that we want to run. Click the What are the 1E Client settings? question to display the task page for that Instruction, which provides parameters and information for running the task and two buttons: Schedule question and Ask this question. Setting coverage is mandatory for the instruction before it is sent to the Platform for execution.
-
We click the Ask this questionbutton and in our example the question is then asked of all the 1Eclient devices.
After a moment Endpoint Troubleshooting then displays the responses from all the target devices - task done.
The Task page
Each question and action has its own Task page which provides information related to the task or action and lets you control how the task is run.
|
Section |
Description |
||||||||||||||||
|---|---|---|---|---|---|---|---|---|---|---|---|---|---|---|---|---|---|
|
Name and Description |
The title of the task and a description that tells you what the task does. |
||||||||||||||||
|
Task parameters |
This section displays the Duration, Coverage, Filter results, Export data on expiry and Comments parameter settings for the current task. To set these you can use the Parameters section of the page. |
||||||||||||||||
|
Approximate target |
This provides information about the target devices the task will be applied to. |
||||||||||||||||
|
Ask this question Perform this action |
This button, named according to whether the task is a question or an action, tells 1E to start processing the task. |
||||||||||||||||
|
History |
This section provides information from the previous times the task was processed.
Beneath these are a set of statistics related to the selected task based on this instruction's previous runs:
|
||||||||||||||||
|
Parameters |
This section provides controls for setting the duration and coverage for the task. It also lets you set a filter on the results, specify that you want to export the data and add comments. |
A Task page example
As an example of setting parameters on the Task page we'll use the What processes are running? question to filter for occurrences of running the winlogon.exe process and restrict this to a coverage of 1E client devices running Windows 10. To speed things up we'll set this to gather responses for 10 minutes and keep those responses for 20 minutes. We'll also select to export the data to a previously defined share with the appropriate permissions and add a suitable comment to the question.
On the Parameters pane we set:
-
Duration to Gather answers for 10 minutes and Duration 20 minutes
-
Coverage to check Operating system Type Windows and Version is greater than or equal to 10
-
Filter results using the Executable attribute where the value contains winlogon.exe
-
Export data to export the responses to the previously configured share \\ACME-CM01\Tachyon
-
Comments to Need to find currently running winlogon.exe on devices running the Windows 10 os
-
We then click the Ask this question button to fire the question off to the devices in the coverage.
Here we can see two responses from the two Windows 10 devices in our environment.
Complete responses can only be exported once the question has finished data gathering.
We then pick up the results from the \\ACME-TCN01\TachyonResponses share and see the complete output for the two responses we saw earlier.
Scheduling instructions
How to create, configure, authenticate and approve a scheduled instruction. A tutorial showing the steps in greater detail is provided in Scheduling instructions - a tutorial.
Scheduling an instruction from the Tasks page
Select the Instruction from any of the Task Groups it belongs to, or search for it using the Search instructions field.
-
Complete the instruction parameters.
-
Click Schedule.
-
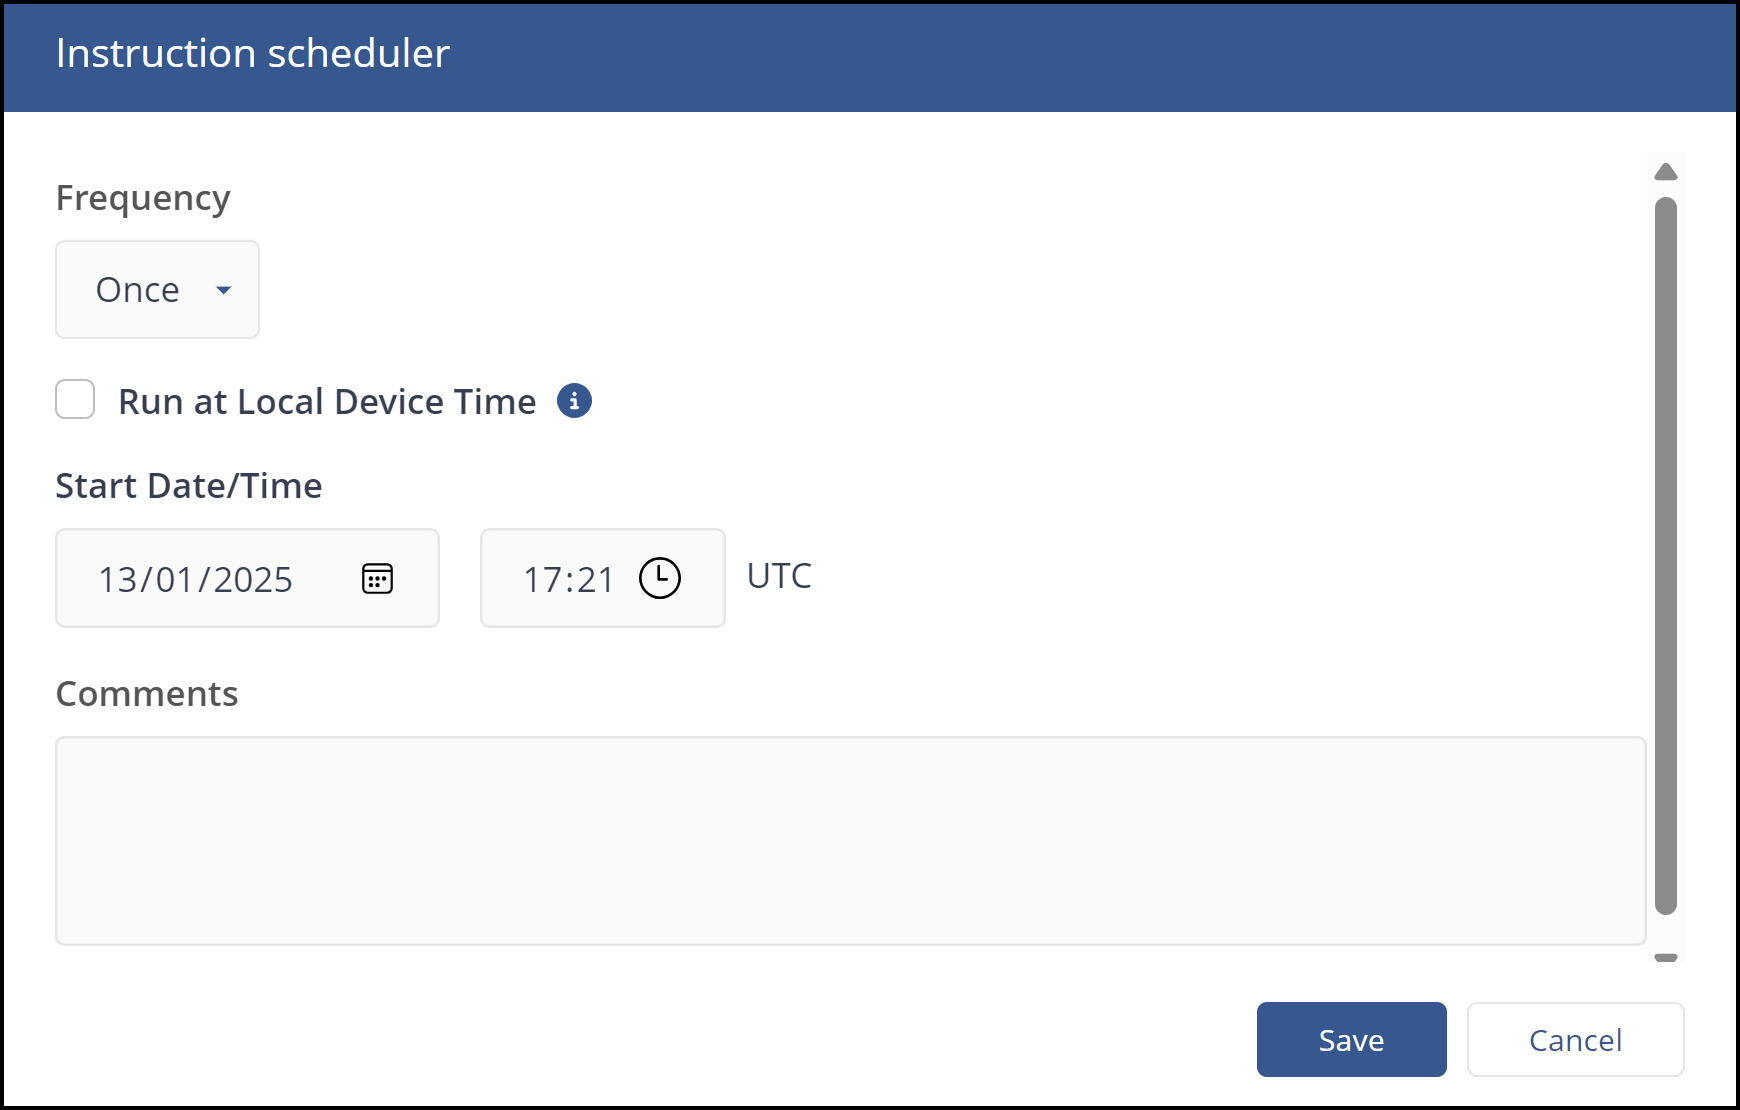
Complete the Instruction scheduler and click Save to set it. The new schedule will then appear on the Scheduled instruction page.
The Instruction scheduler includes the following:
-
Comments: That will help later to identify the reasons for the schedule.
-
Run at Local Device Time: This feature enables you to execute Instructions based on the device's local time. When toggled, it sets the Instruction execution time to local and adjusts the deployment time to UTC for the earliest possible timezone. If a device is offline, it will execute the Instruction once it comes online, provided the execution period hasn't ended.
This feature requires 1E Client 25.1 or later, devices running an older version of the client will not run the scheduled instruction.
-
Frequency: Refer to the following table:
Type
Description
Once
Specifies a one-off schedule for the selected instruction.
The Once frequency type uses the following controls:
Control
Description
Start
Set the Start date and time for when you want the instruction to run.
Daily
Specifies a daily schedule for the selected instruction between a start and end time.
The Daily frequency type uses the following controls:
Control
Description
Start
Set the Start date and time for when you want the schedule to run from.
End
Set an End date and time for when you want the schedule to end.
Every
Set how many days are left between each run of the scheduled instruction
Repeat Every
Optionally set how many hours the scheduled instruction is set to repeat on each day it is set to run
Weekly
Specifies a weekly schedule for the selected instruction between a start and end time.
The Weekly frequency type uses the following controls:
Control
Description
Start
Set the Start date and time for when you want the schedule to run from.
End
Set an End date and time for when you want the schedule to end.
Every
Set how many weeks are left between each run of the scheduled instruction
On
Check which days of the week you want the scheduled instruction on during the weeks it is set to run
Monthly
Specifies a monthly schedule for the selected instruction between a start and end time.
The Monthly frequency type uses the following controls:
Control
Description
Start
Set the Start date and time for when you want the schedule to run from.
End
Set an End date and time for when you want the schedule to end.
Every
Set how many months are left between each run of the scheduled instruction
Repeat Every
Select the day of the month when you want the scheduled instruction to run on the months it is set to run
Authentication and approval
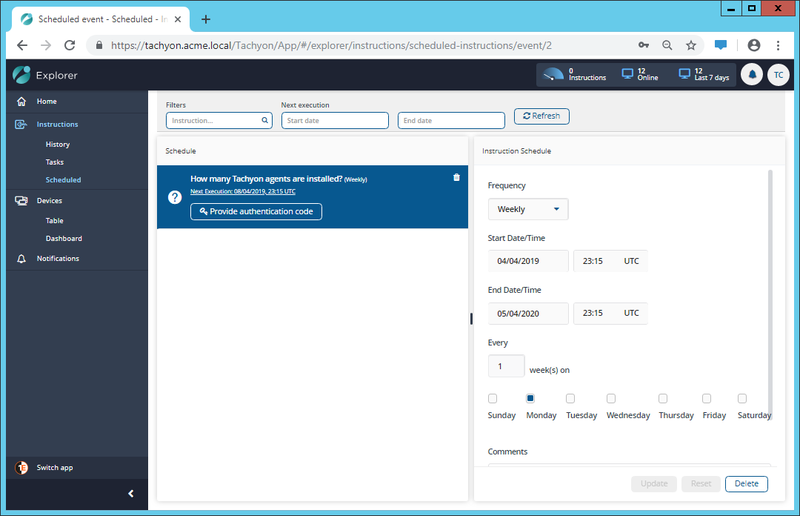
The first time the scheduled instruction appears in the Scheduled instruction page you will be notified of its authentication and approval state, as shown.
-
Before the schedule starts, regardless as to whether the instruction is a question or an action, there are two further steps:
-
The scheduled instruction must be authenticated, only required if two-factor authentication is enabled.
-
The scheduled instruction must be approved.
The next execution
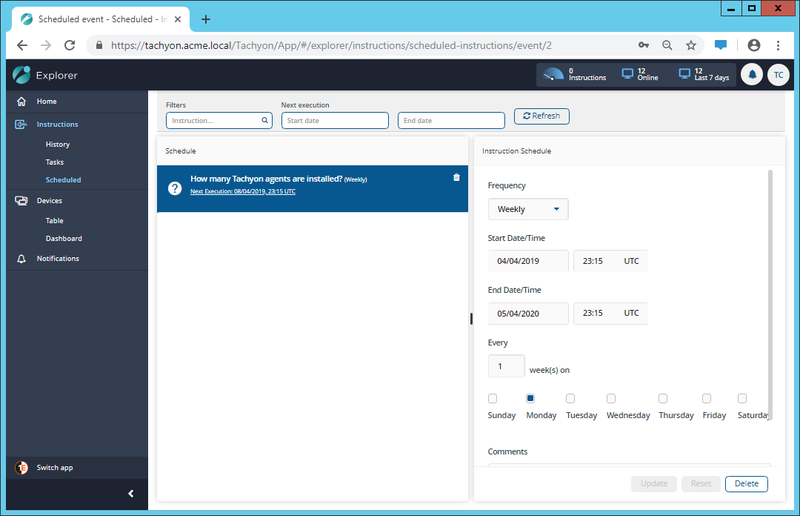
After the scheduled instruction has been authenticated and approved its entry in the Scheduled instruction page will show its next scheduled execution date and time, as shown.
Expanding the execution schedule
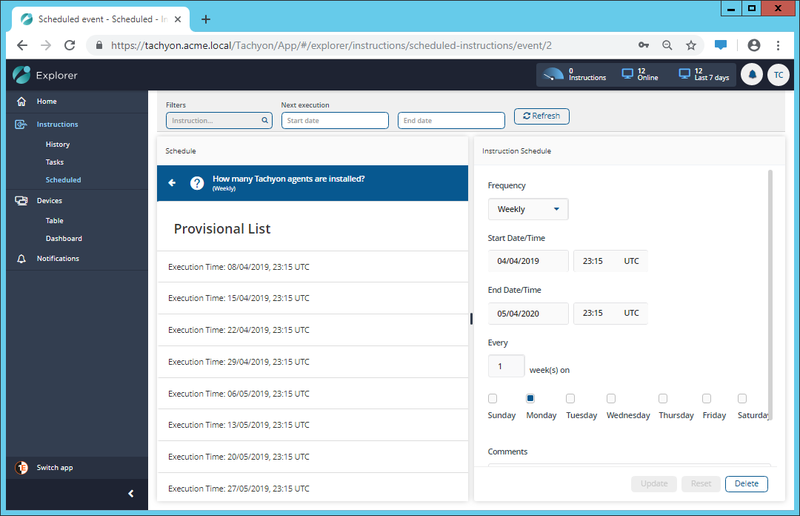
Clicking on the Next Execution link on the scheduled instruction entry expands the execution schedule, so you can see the future dates and times for the instruction execution, as shown.
Updating a scheduled instruction
You can update the configuration for a created scheduled instruction by:
-
Click on the scheduled instruction entry you want to change in the Schedule list.
-
Modify the parameters on the Instruction Schedule panel to its right.
-
Click the Update button to commit the changes.
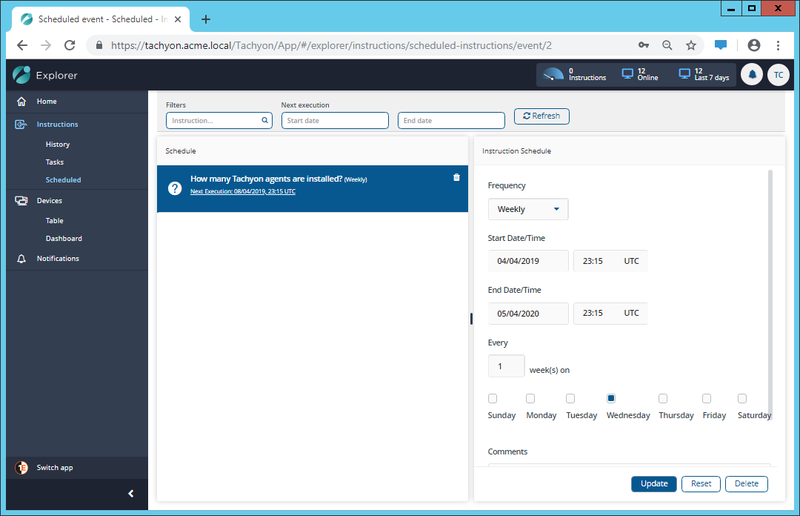
The picture shows a scheduled instruction where the day for a weekly schedule has been changed from Monday to Wednesday. The Update button is shown highlighted.
You can also click Reset to discard any changes you have made.
Deleting a scheduled instruction
You can delete a scheduled instruction by clicking on the bin icon to the right of its entry in the Schedule list.
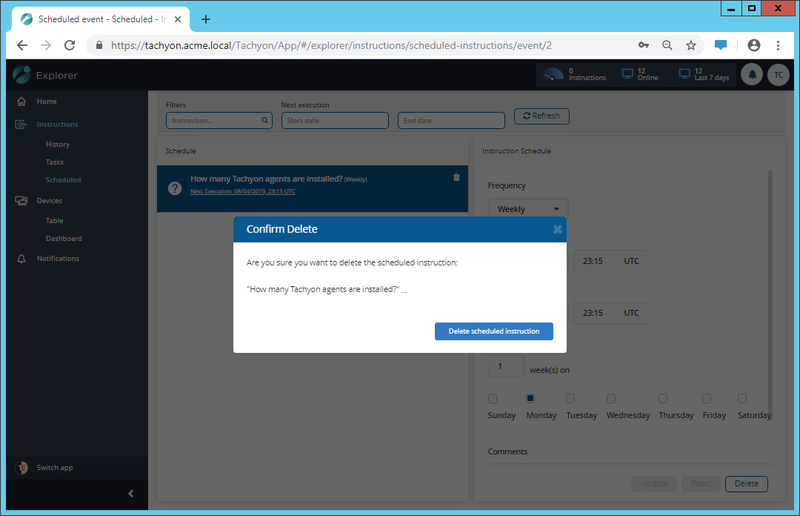
Doing this will display the Confirm Delete popup that will ask if you want to proceed. Click the Delete scheduled instruction button to continue. The schedule for the instruction will then be deleted and no further attempts will be made to run the instruction. Instructions currently in-flight will not be affected by this and will continue to completion.
Scheduling instructions - a tutorial
A tutorial on creating a daily scheduled instruction that will check for any machines that have Windows update pending reboots.
Creating a weekly instruction schedule
To illustrate this we will use a simple example where 1E will check every week to see if any Windows updates are pending a reboot.
Selecting the question for scheduling
-
Use the Tasks page to locate and select the instruction you want to schedule.
-
Set any desired Duration and Scope parameters for the instruction.
-
Click the Schedule question button.
-
The animation starts with the Which Windows updates are pending a reboot? question already selected from the Tasks page.
Filling out the Instruction scheduler dialog
-
Set the Frequency to Weekly.
-
For any schedule you have to set the Start Date/Time. We want ours to run each Sunday at 23:53 AM, so we leave the Start date at the default current time plus one hour.
-
Set the End Date/Time. We want to review the schedule on April the 14th 2020 so we set this as the End date.
-
For a weekly schedule you must select how many weeks between running the instruction. In our case we want the schedule to run on a weekly basis, so we leave the Every field at the default of 1.
-
For a weekly schedule you also select which day of the week you want the schedule to run. In our example we click the Sunday box to highlight it.
-
Add a suitable comment to the schedule. This will be stored with the schedule and can be used as a reminder for why the schedule was configured.
-
This completes the configuration of the Instruction scheduler dialog so we click Save to create the schedule.
Authenticating and approving the schedule
-
Normally questions do not require authentication and approval, however for scheduled questions this is required.
-
The scheduled instruction entry appears in the Scheduled instruction page showing that it needs an authentication code.
-
The user requesting the schedule is sent an email with the authentication code.
-
They click on the Provide authentication code button and enter the code in the dialog then click Submit.
-
The scheduled instruction entry now shows that it is Awaiting Approval.
-
The approver receives an email requesting approval for the requested scheduled instruction.
-
They log on to Endpoint Troubleshooting and fill out the approval request notification, by entering a suitable approval comment, checking the I understand the impact of this scheduled instruction and approve this request checkbox and clicking the Approve button.
-
The scheduled instruction has now been authenticated and approved.
The scheduled instruction
Once authenticated and approved, the scheduled instruction entry now displays a link which indicates the scheduled times that the selected instruction will be run. In our example the instruction will now run every Sunday at 23:53 AM until the 14th April 2020.
