Deploying policies
If you have uploaded the Product Packs provided with the 1E release using the PPDT, you will already have several Endpoint Automation policies and Instructions available in the application. Refer to 1E Product Pack Deployment Tool (PPDT).
When any policy artifacts are altered, the Policy infrastructure is marked as "dirty," prompting a Deploy Policy notification. This happens even if the modified artifacts are not utilized by any active Policy. If you are certain that none of the altered artifacts are in use, deployment is not necessary. However, if you are uncertain, you can proceed with the deployment without concern, as it will not impact anything if there are no changes. Refer to Writing instructions > Getting started with TIMS > Instructions and product packs in the PDF version of the 1E SDK documentation.
Included policies
|
Policy name |
Description |
|---|---|
|
Microsoft SCCM Client Health |
The Microsoft SCCM Client Health policy ensures that the health of the ConfigMgr client is compliant with a reference baseline. |
|
Microsoft SCCM Patch Policy |
The Microsoft SCCM Patch policy ensures that ConfigMgr based patch management of the device is compliant with a reference baseline. |
|
Nomad Client Health |
The Nomad Client Health policy ensures that the health of the Nomad client is compliant with a reference baseline. |
|
Windows Client Health |
The Windows Client Health policy ensures that the health of the Windows operating system is compliant with a reference baseline. |
|
Windows Security Profile |
The Windows Security Profile policy ensures that the security of the Windows device is compliant with a reference baseline. |
When you first open the Administration > Policies page, you'll see a popup message advising that you have policy changes that can be deployed to Agents. This refers to the new policies in the above table that can be uploaded using the PPDT.
The next steps to using these new policies is to add them to one or more Management Groups and to deploy them to clients.
For a new or updated policy to become effective, it must be deployed. Policies are deployed by clicking the Deploy button from the Endpoint Automation > Administration > Policies page. Deployment affects all visible policies that are enabled.
Assigning a policy to a management group
Before deploying a policy we must first define the devices to which the policy will be sent. We do this by assigning a policy to a management group.
-
To do this, go to Endpoint Automation > Administration > Policies select the policy and click the Assign Mgmt Grp button.
-
By default, there will always be a management group for All Devices. We select this and then click Save.
-
If you select All Devices, Endpoint Automation will apply the policy to all devices including ones that are not currently online, which may include other OS or device types.
We recommend that you define a specific Management Group for your policy to limit its scope to just the devices included in the Management Group.
-
In Endpoint Automation you can create your own custom polices and associated rules, refer to Defining your own policies for details.
-
We should now see the assigned policy.
-
The policy is now shown with its assigned management groups, in this case, the All Devices group.
Deploying policies
For a new or updated policy to become effective, it must be deployed. Policies are deployed by clicking the Deploy button from the Endpoint Automation > Administration > Policies page. Deployment affects all visible policies that are enabled.
You can enable or disable a policy from this screen by selecting it and then clicking the Disable Selection or Enable Selection button (which will change the Status as appropriate based on the current state of the policy).
|
Policy state |
Description |
|---|---|
|
Deleted policies and deployment |
If a policy is deleted, then clicking Deploy will also cause any 1E client that receives the deployment to remove the policy and to cease to enforce it. |
|
Disabled policies and deployment |
If a policy is disabled, then clicking Deploy will also cause any 1E client that receives the deployment to remove the policy and to cease to enforce it. If the policy is subsequently re-enabled, then the next time Deploy is clicked, it will be sent out again and become effective. |
Currently, you are prompted to deploy a policy as soon as you save it, after creating or editing. However, deploying a new policy where any of the following is true will not result in any action being taken by the 1E Client on devices because:
-
No rules have been assigned to the policy
-
All rules assigned to a policy are disabled
-
The policy has not been assigned to any Management Group
However, once a policy has been deployed, re-deploying the policy will always affect the devices to which the policy was previously deployed. In the case where a re-deployed policy meets any of the above criteria, it will cease to be effective on the devices. If the change removes a policy from any management groups, devices affected by this change will receive a policy update.
For example, suppose you had a policy P1 assigned to management group MG1 and you then re-target P1 to management group MG2 instead and re-deploy it. All the devices which ever received policy P1 previously will have that policy removed if they now fall outside management group MG2.
The distribution of policies to devices is staggered. The stagger period associated with this activity is designed to avoid excessive network traffic. It is not related to the DefaultStaggerRangeSeconds parameter which is defined during 1E Client installation, refer to 1E Client settings.
Rule revision and approval
This section covers rule approval. It does not include the use of fragments.
Rule Approval focuses on the visibility and the impact of rule revisions within 1E Endpoint Automation. With a clear understanding of a change's impact, you can make a well-informed decision on whether you would like to either approve or reject a request and prevent accidental deployment of rules in your environment.
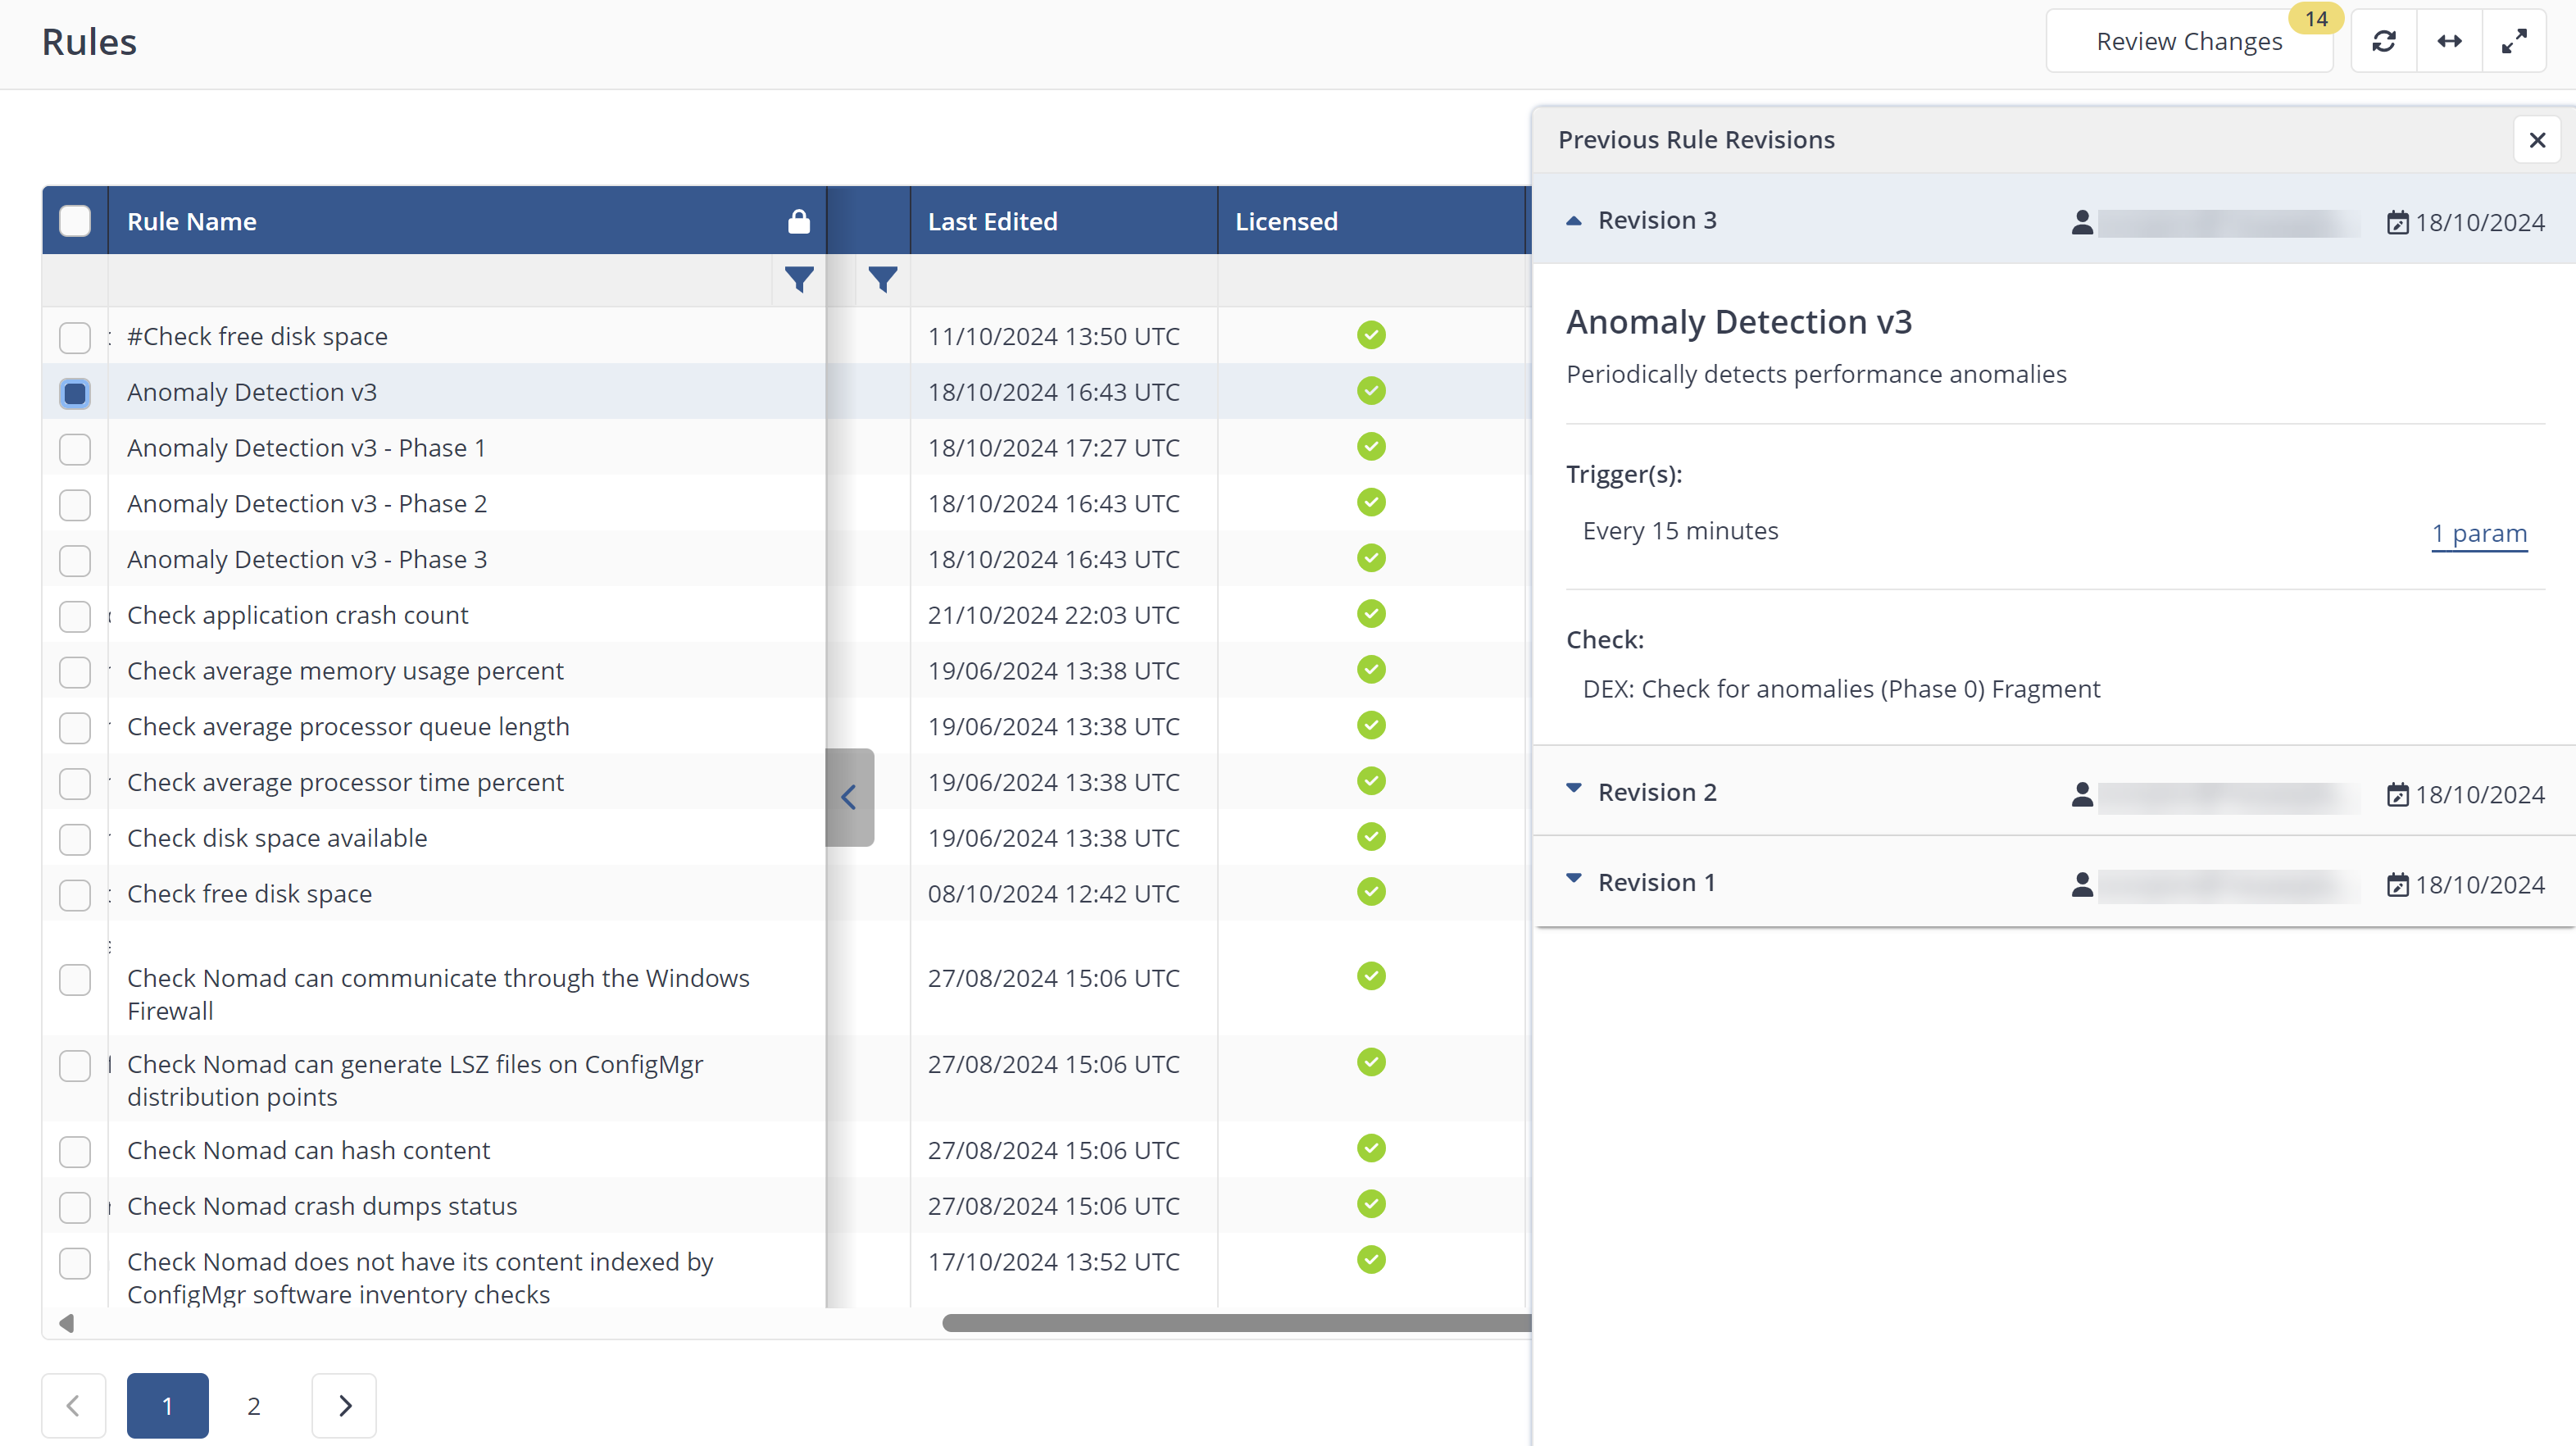
Once you have some policies deployed in your environment, you can view the Previous Rule Revisions for a rule by clicking the View details link displayed on the Administration > Rules page under the Details column where you can review the following:
-
Revision details
-
Who made the revision
-
When the revision was made
-
What the trigger is
-
The check or fix detail
Review rule revisions
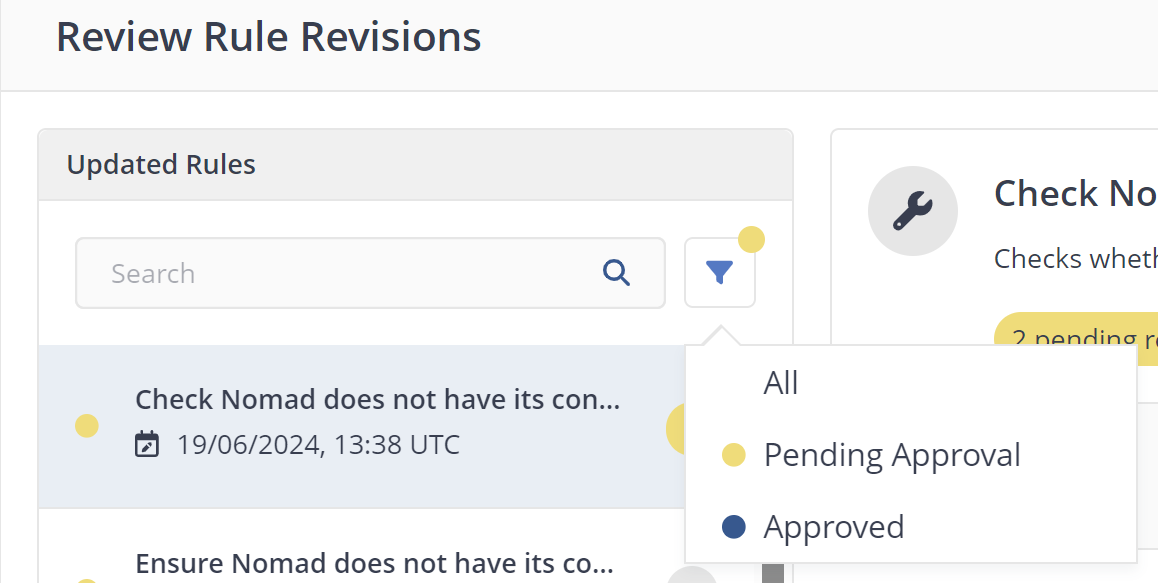
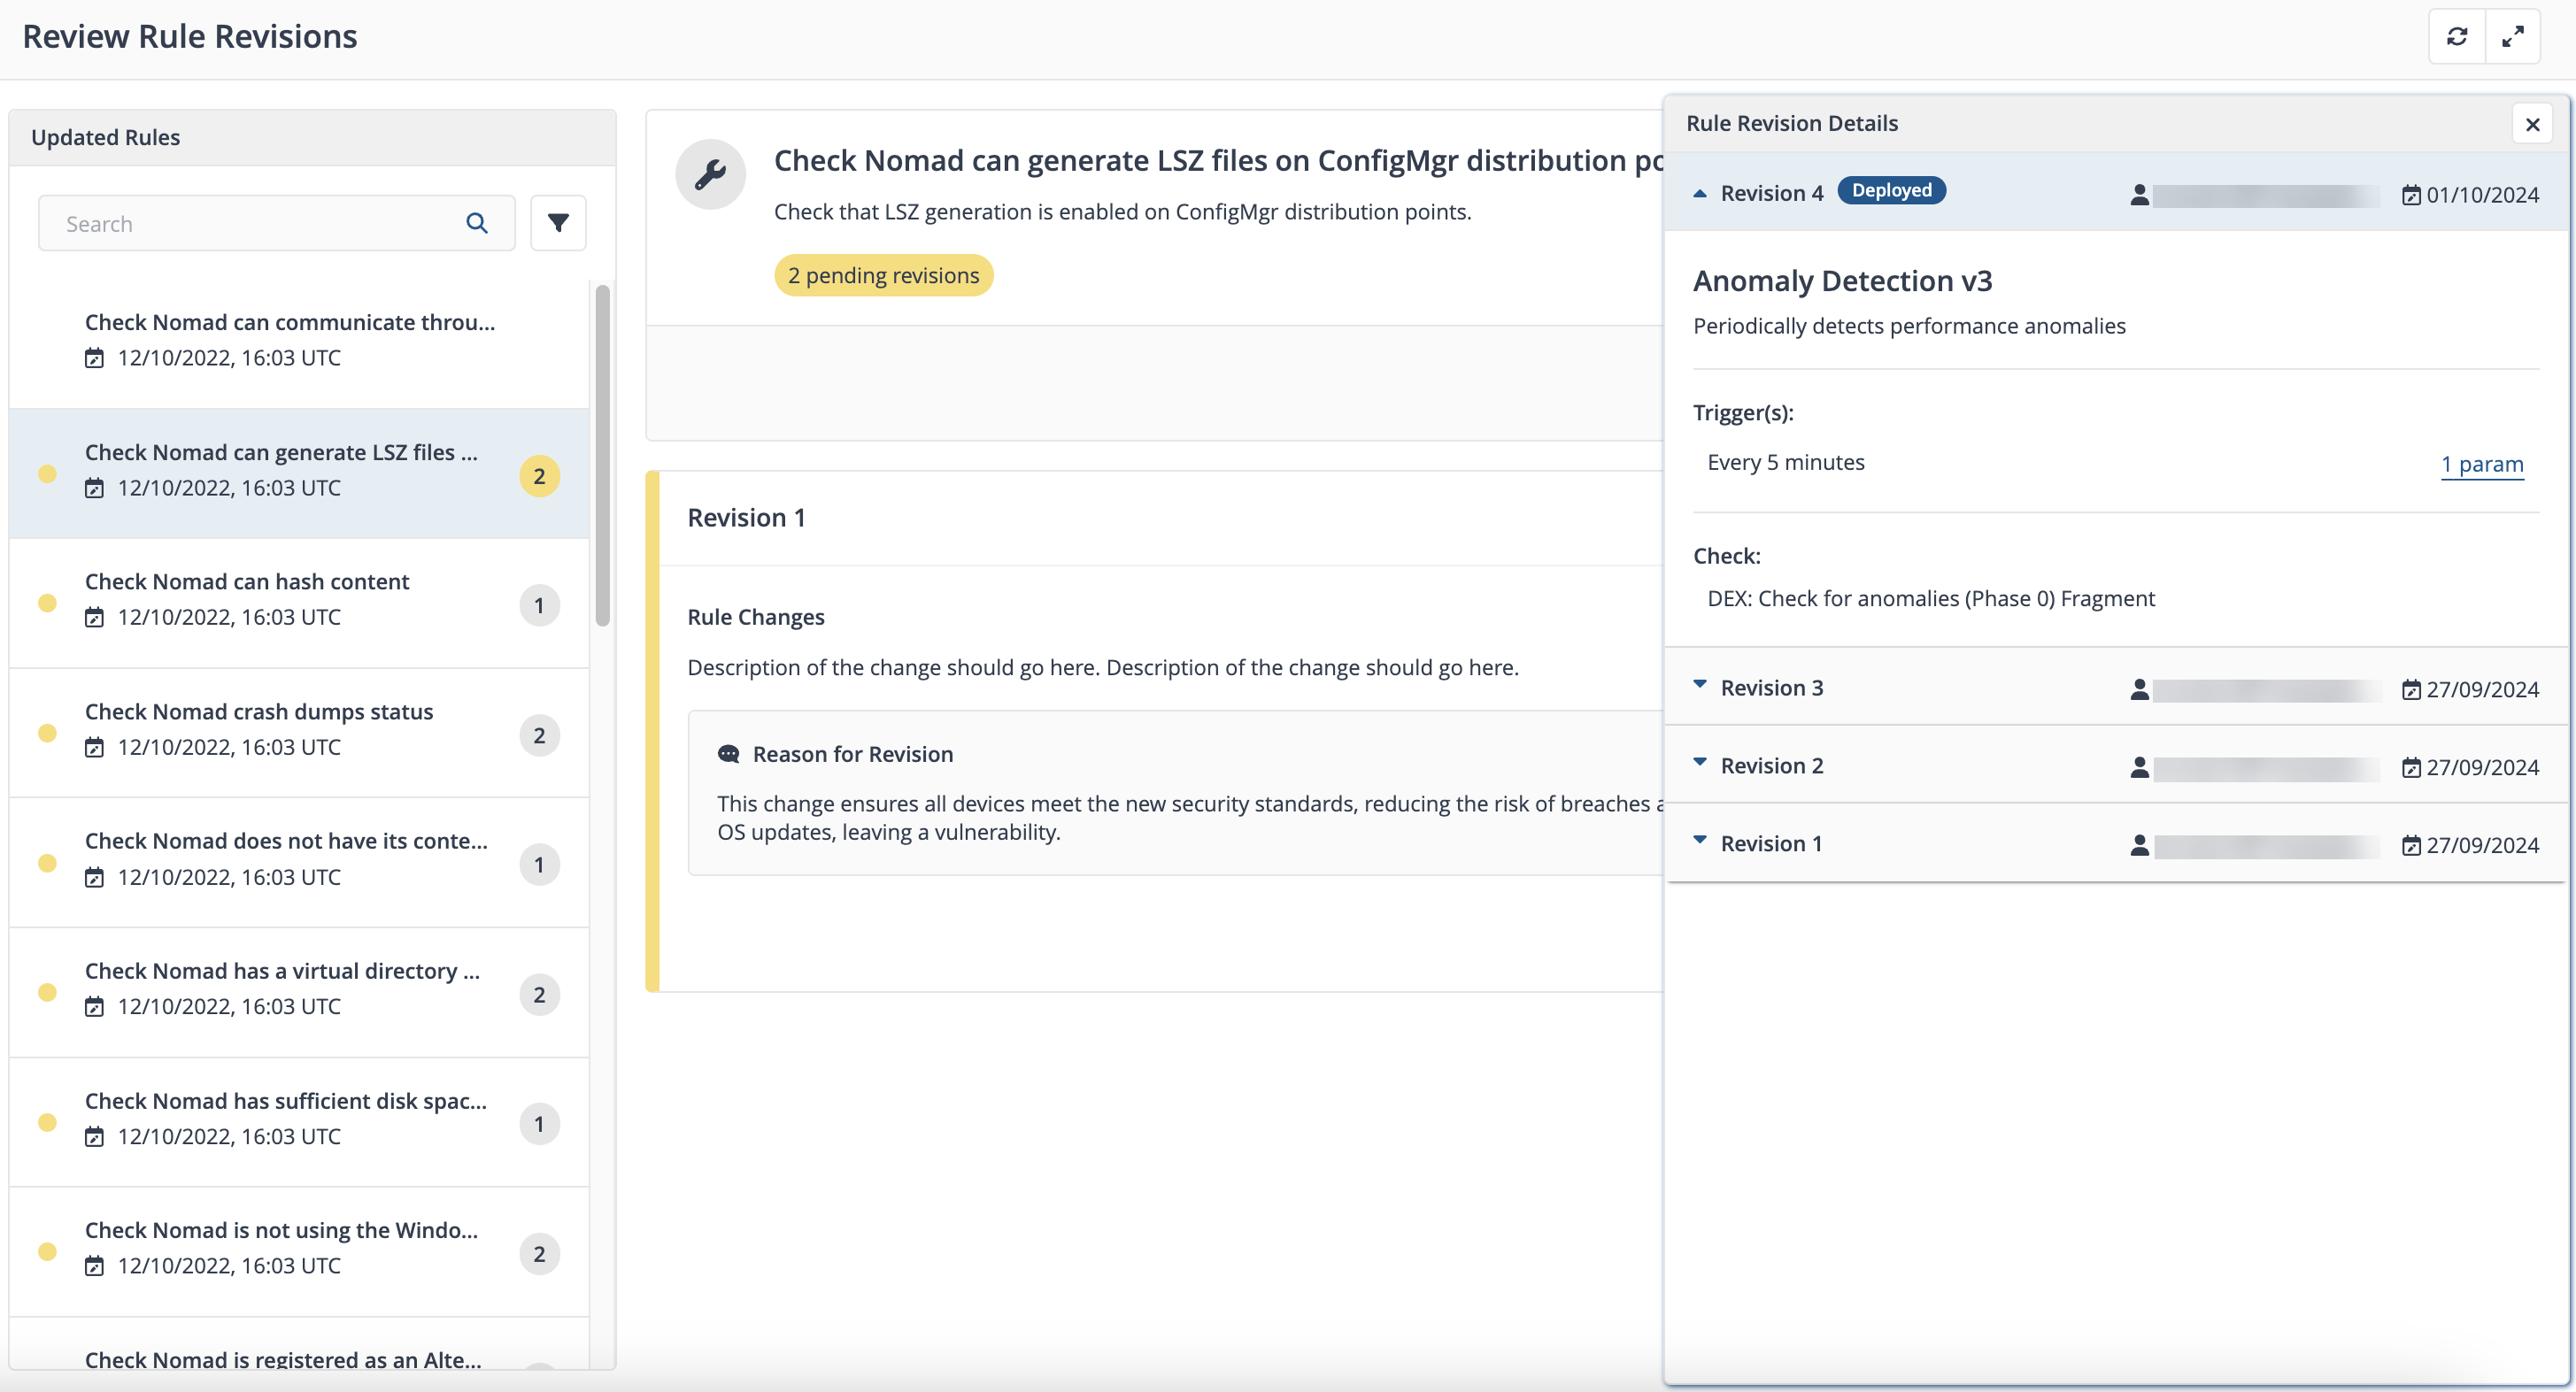
Clicking Review Changes at the top of the Rules page displays recently created rule revisions for approval on the Review Rule Revisions page. You can filter the results in the Updated Rules section, by Approved and Pending, or searching through the list of rules to refine the results.
Revisions are in either Approved, Superseded, or Pending states, you can either Approve All Revisions or Reject Approval each rule revision.
By default, the Reject Approval button is grayed out. The customer can revert the approval for a rule only after it has been approved by clicking Reject Approval.
Each revision indicates its current state along with a descriptive comment.
You can also view rule revision information logged in the Platform. Refer to Audit information log.
Updating rules
-
In Administration > Rules, select the rule using the checkbox on the left, then select Edit Rule.
-
Make your changes, and then click Save.
When you update and save a rule the following apply:
-
Each change creates a new revision.
-
Revisions must be approved before you can deploy them.
-
You can reset the approval state of a rule that has not been deployed.
-
You cannot approve your own revisions unless you have set AllowRuleSelfApproval to true, refer to Approving your own rules.
-
Only the latest rule revision is deployed, you cannot deploy different revisions of a rule to different policies, or redeploy a revision that has already gone out.
-
Only approved revisions are deployed when the Deploy button is clicked, refer to Deploying policies.
-
Rule revision status is set to Pending.
-
Any previously approved rule revision is set to Superseded.
-
Once approved the status of the rule revision is set to Approved.
-
Any rule revision that is approved is now ready for deployment.
-
An Audit Log entry is created.
Approving rule revisions
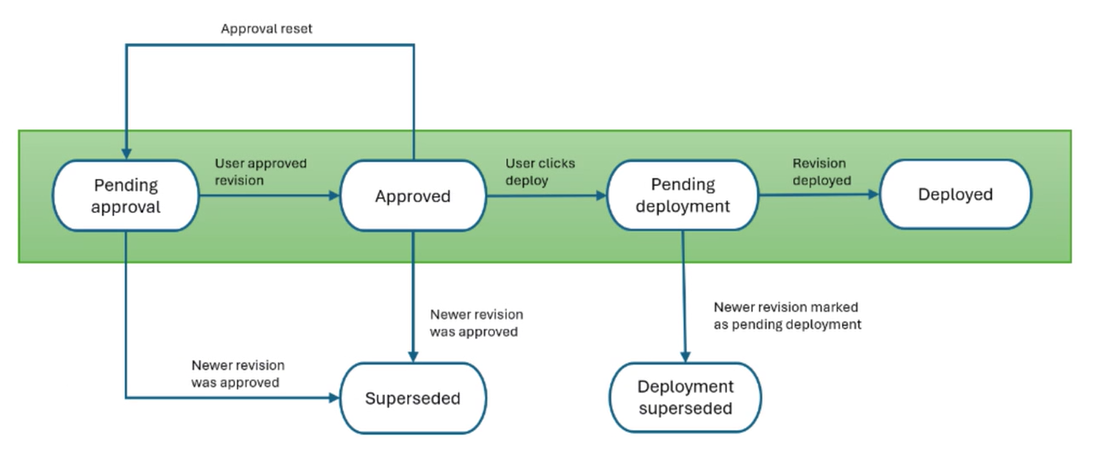
The approval flow for rule revision is summarized in the following chart.
When you create, edit, enable, or disable a rule, a new revision is created, and that rule cannot be deployed if that revision is not approved. To approve revisions, a platform user must have one of Guaranteed State Administrator, Guaranteed State Approver, or Full Administrator role to approve rule changes. Refer to Configuring Endpoint Automation, and Roles and Securables
When you approve a revision:
-
The rule revision status is set to Approved.
-
Any previously approved revisions or revisions in Pending state will be set to Superseded.
-
Any rule revision that is approved is now ready for deployment.
-
A record is added to the platform Audit Log.
-
You can only approve the latest revision.
Approving your own rules
The AllowRuleSelfApproval setting determines if users can approve their own rule revisions. By default, it is set to false. When enabled true, users can approve any new rule revisions they create or modify. If it remains disabled false, new revisions will be marked as Pending Approval and must be approved by another user.
Modifying AllowRuleSelfApproval for a Tenant using PowerShell Toolkit
Modifying AllowRuleSelfApproval can only be completed using the 1E PowerShell Toolkit.
You'll need a version of the toolkit updated after November 19, 2024. This feature will only work when connecting to a version of the Consumer API released after this date. Earlier versions might not support the AllowRuleSelfApproval setting.
Open a PowerShell prompt and import the toolkit modules using Installing the 1E PowerShell Toolkit. Then, log in to the server instance where you want to change the configuration parameters. For example:
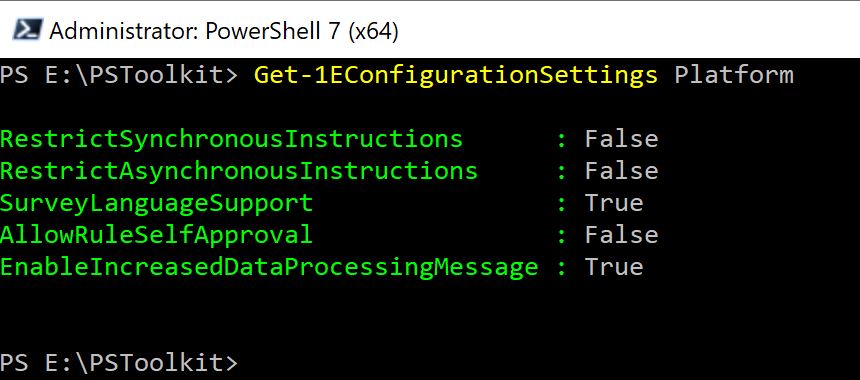
Set-1EServer acmedev.dev.preprod.1e.comOnce you've completed the login process, you can send commands to query your configuration and modify its values. In the following image, AllowRuleSelfApproval is set to the default value, False.
To query every configured setting for 1E Platform, use the following. Encrypted values are not be returned by this command:
Get-1EConfigurationSettings PlatformTo change AllowRuleSelfApproval :
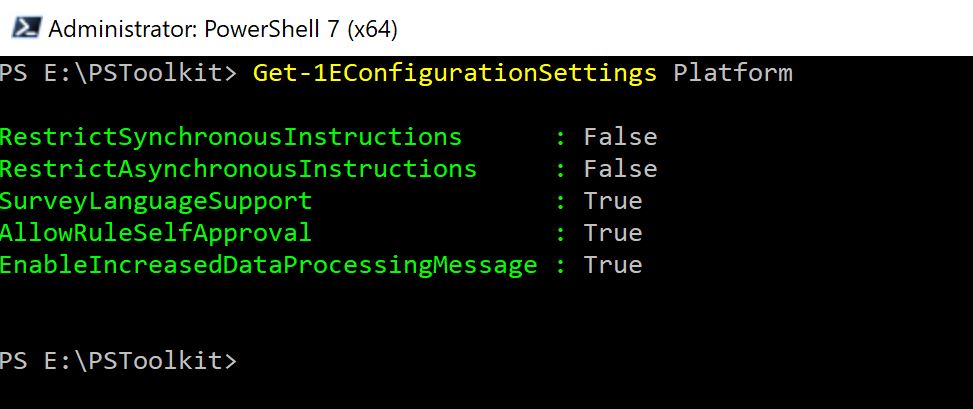
Set-1EConfigurationSetting Platform AllowRuleSelfApproval TrueIn the example, the value True, is not enclosed in single quotes because simple values of letters and numbers do not need them.
You can now read back the value of AllowRuleSelfApproval using Get-1EConfigurationSetting:
Get-1EConfigurationSetting Platform AllowRuleSelfApprovalThis example returns the value configured for AllowRuleSelfApproval, for example:
You cannot use Get to obtain settings with names end in !
For security reasons, encrypted values cannot be returned.
Modifying AllowRuleSelfApproval for a Tenant using Consumer API
You will need the following permissions:
-
Role: Infrastructure Administrator
-
SecurableType: Infrastructure
-
Operations: write
In addition you'll need a minimum API version 24.1.
Consumer API Endpoints:
-
GET Consumer/Settings/{applicationName}: Retrieve a list of settings with their values for a specific application.
CopyGET Consumer/Settings/Platform -
GET Consumer/Settings/{applicationName}/{settingName}: Retrieves the value of a specific setting for a given application.
CopyGET Consumer/Settings/Platform/AllowRuleSelfApproval -
PUT Consumer/Settings/{applicationName}/{settingName}: This is used to set or update the value of a specific setting. Validation is necessary to ensure that only certain settings can be modified, and some settings may only accept Boolean values.
CopyPUT Consumer/Settings/Platform/AllowRuleSelfApproval
Rejecting rule revisions
You can reject an approved revision, which reverts the revision state to Pending. However, the Superseded and Deployed or committed revision statuses cannot be reverted to Pending:
When you reject an approved revision:
-
The revision status returns to Pending.
-
A record is logged in the platform audit log.
Verifying policy enforcement
You can verify policy enforcement on the Endpoint Automation > Overview page and confirm policy download and applications on the devices. The Endpoint Automation overview shows you all compliant devices.
You can drill down on each chart. For example, clicking on the Device State chart allows you to see the specific devices that are associated with the chart. From there, you can examine the history of each device.
History entries are only created when the status changes state from pass to fail or vice-versa. Even though you may have a rule evaluated periodically by the 1E Client, a history entry is not created for each evaluation cycle. The 1E Client only communicates a state change when the rule status changes.
This means that if the cause of a failure changes, you may not receive a history entry with the revised cause, because no updates are received until the compliance state changes.
Verifying policy downloads with 1E Client
You can confirm a policy was downloaded and applied with the 1E Client by examining the 1E Client log on the device.
-
In this example, you can see that the policy was downloaded and successfully applied.
-
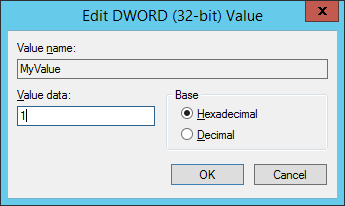
In the registry editor on the device, you can see that the Value name and Value data exist.
If you attempt to change the Value data to 1.
-
You see that, temporarily, it is out of compliance with the check rule.
-
However, after 30 seconds, it is automatically reset to be compliant.
-
If you view the device history from the Endpoint Automation Overview screen, you see that the momentary compliance failure has been logged.
Device State chart
Clicking the Device State chart on the Overview page navigates to the Devices report, which shows the status of policies and rules for each device. A device is shown as either Compliantor Noncompliant. The associated columns show more information on the status of rules on the device.
|
Column |
Description |
|---|---|
|
Rules |
The number of rules which are active for the device. If there are several active policies applicable to the device, the rules count will be the sum of all the distinct rules associated with those policies. (if the same rule is included in two active policies against the device, the count of distinct rules is 1). |
|
Compliant |
The number of rules which returned a compliance status of success (specifically each rule which returned a Boolean value of True when the rules were last evaluated). |
|
Non-compliant |
The number of rules which returned a compliance status of failure (specifically each rule which returned a Boolean value of False when the rules were last evaluated). |
|
Not applicable |
The number of rules for which the precondition for the rule meant that for this device, the rule was not regarded as applicable and hence was not evaluated. |
|
Error |
The number of rules for which an error was raised during the execution of the rule. This means that the SCALE code associated with the rule failed with an error that caused the code to be terminated, or that the code deliberately raised an error using the SCALE Error function. |
|
Unknown |
The number of rules for which no status has yet been returned from the device. |
