Management Groups
The product formerly referred to as Tachyon has been rebranded as The TeamViewer DEX Platform. Although the new name is implemented in the majority of documentation and user interfaces, references to Tachyon may still appear in specific tools, scripts, or contexts.
Manage Management Groups in the 1E Platform to control device targeting and permissions using rule-based or direct groupings. Organize devices efficiently, simulate changes, and ensure secure access across your environment.
You can access this menu by clicking your avatar and selecting Settings. By default this is only displayed for the Full Administrator role, or a role configured with the Security permission. Refer to Roles and Securables.
Management Groups are containers used to group devices and the software installed on those devices. Management Groups are defined using configurable rules that look at various properties of the devices and their installed software, which are then evaluated to determine the group membership. This means that Management Group membership adapts to changes to the devices and software in your environment.
Management Groups are used to determine the following:
-
The targets for questions, actions, and reporting
-
User permissions for targeting particular devices based on Management Group membership
In terms of permissions for determining how users interact with the devices in your network, Management Groups work alongside instruction sets.
Management Groups are created in two different ways:
-
Rule based: The page lets you add, edit, delete, and evaluate Management Groups that are based on rules
-
Direct based: These use scripts to create Management Groups by importing lists of devices using FQDN. This type of Management Group has no associated rules and cannot be edited and evaluated from the Management Groups page. we recommend using the 1E PowerShell Toolkit
Both types of Management Group have the following properties:
-
Each device known to 1E Platform can be assigned to any number of Management Groups
-
Roles can be associated with specific Management Groups so that users with those roles will only be able to target the devices in their Management Groups
-
Management Groups can only contain devices, and they are completely independent of any other Management Group, even if they contain the same devices
-
Each Management Group must have a unique name that is not case-sensitive
When working with Management Groups, be aware that:
-
Devices not assigned to any child Management Group will still be accessible as all devices are members of the default All Devices Management Group
-
Child Management Groups can only be created under the default All Devices Management Group
-
The maximum number of child Management Groups are four (five, including All Devices)
-
There is no current limit on the number of sibling Management Groups that can be created
The following roles can add Users and Groups, Roles, Management Groups, Assignments, and Delegation:
-
Full Administrator
-
Group Administrator: Cannot create roles unless they are delegated
Refer to Roles page
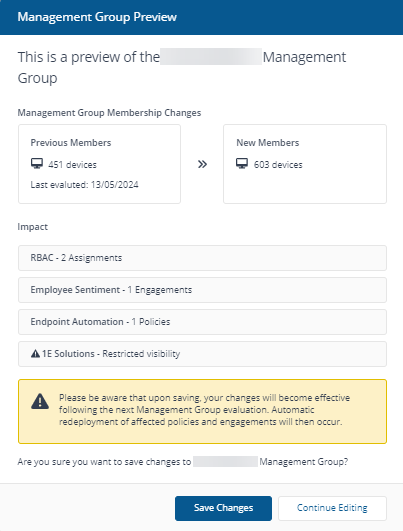
We have implemented safeguarding measures for Management Groups to ensure users are aware of the impact of any changes they make. Users have visibility of the total number of assignments, engagements, and policies associated with a Management Group and its subgroups.
-
Admins can see the potential impact of a change when implementing it. For example, an admin can see the total count of assignments, policies, and engagements being utilized by a specific Management Group
-
You can use a simulation process that allows you to evaluate the impact of a change (assignments, policies and, engagements) and see how many devices are targeted
-
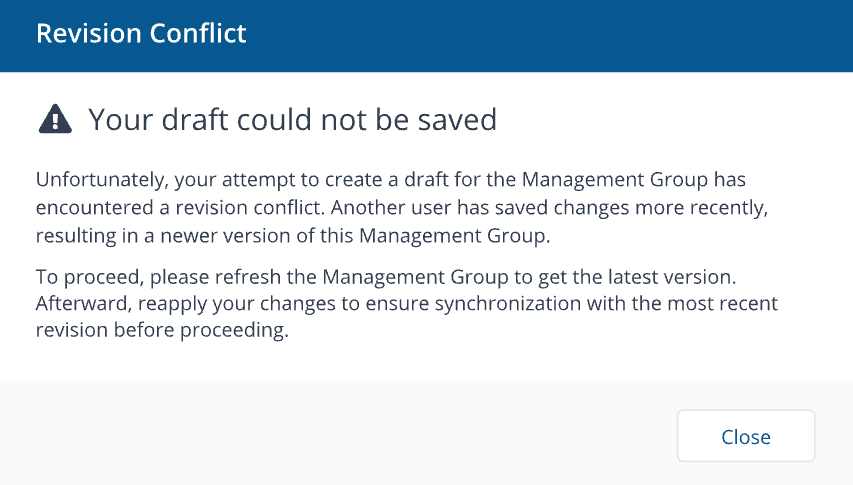
Admins will see an alert that they cannot make or save a change while a Management Group is used by another admin. Admins are emailed details about who is using that Management Group
-
If Admin A creates a Management Group draft while Admin B has committed a change, Admin A will be alerted that there is a revision conflict, and they will need to refresh Management Groups to get the latest version of Management Groups
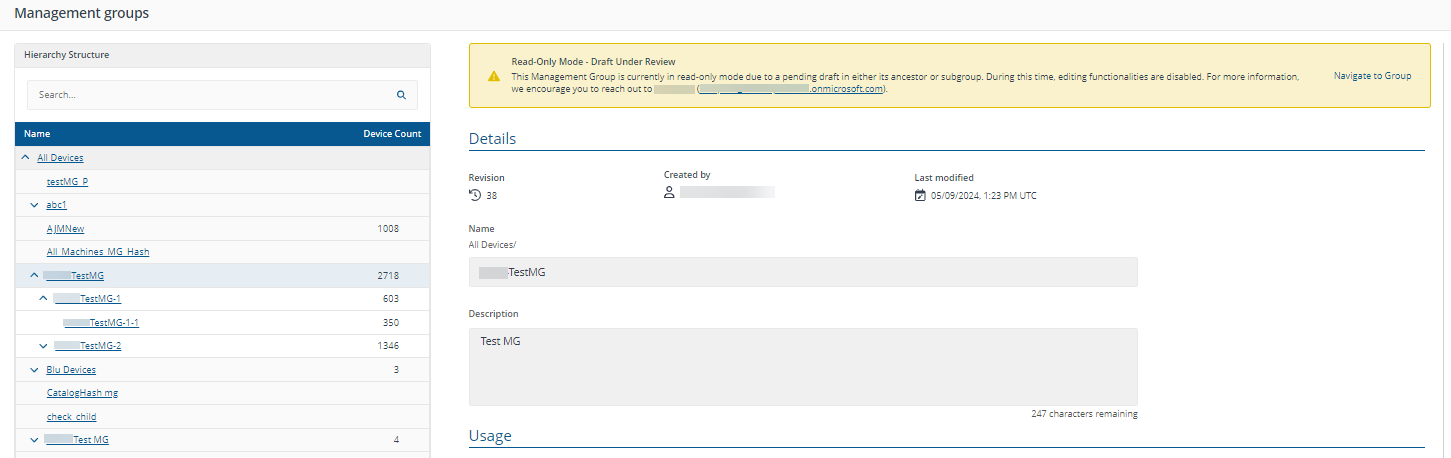
The Revisions and Usage sections
The Revisions and Usage sections support Management Group safeguards.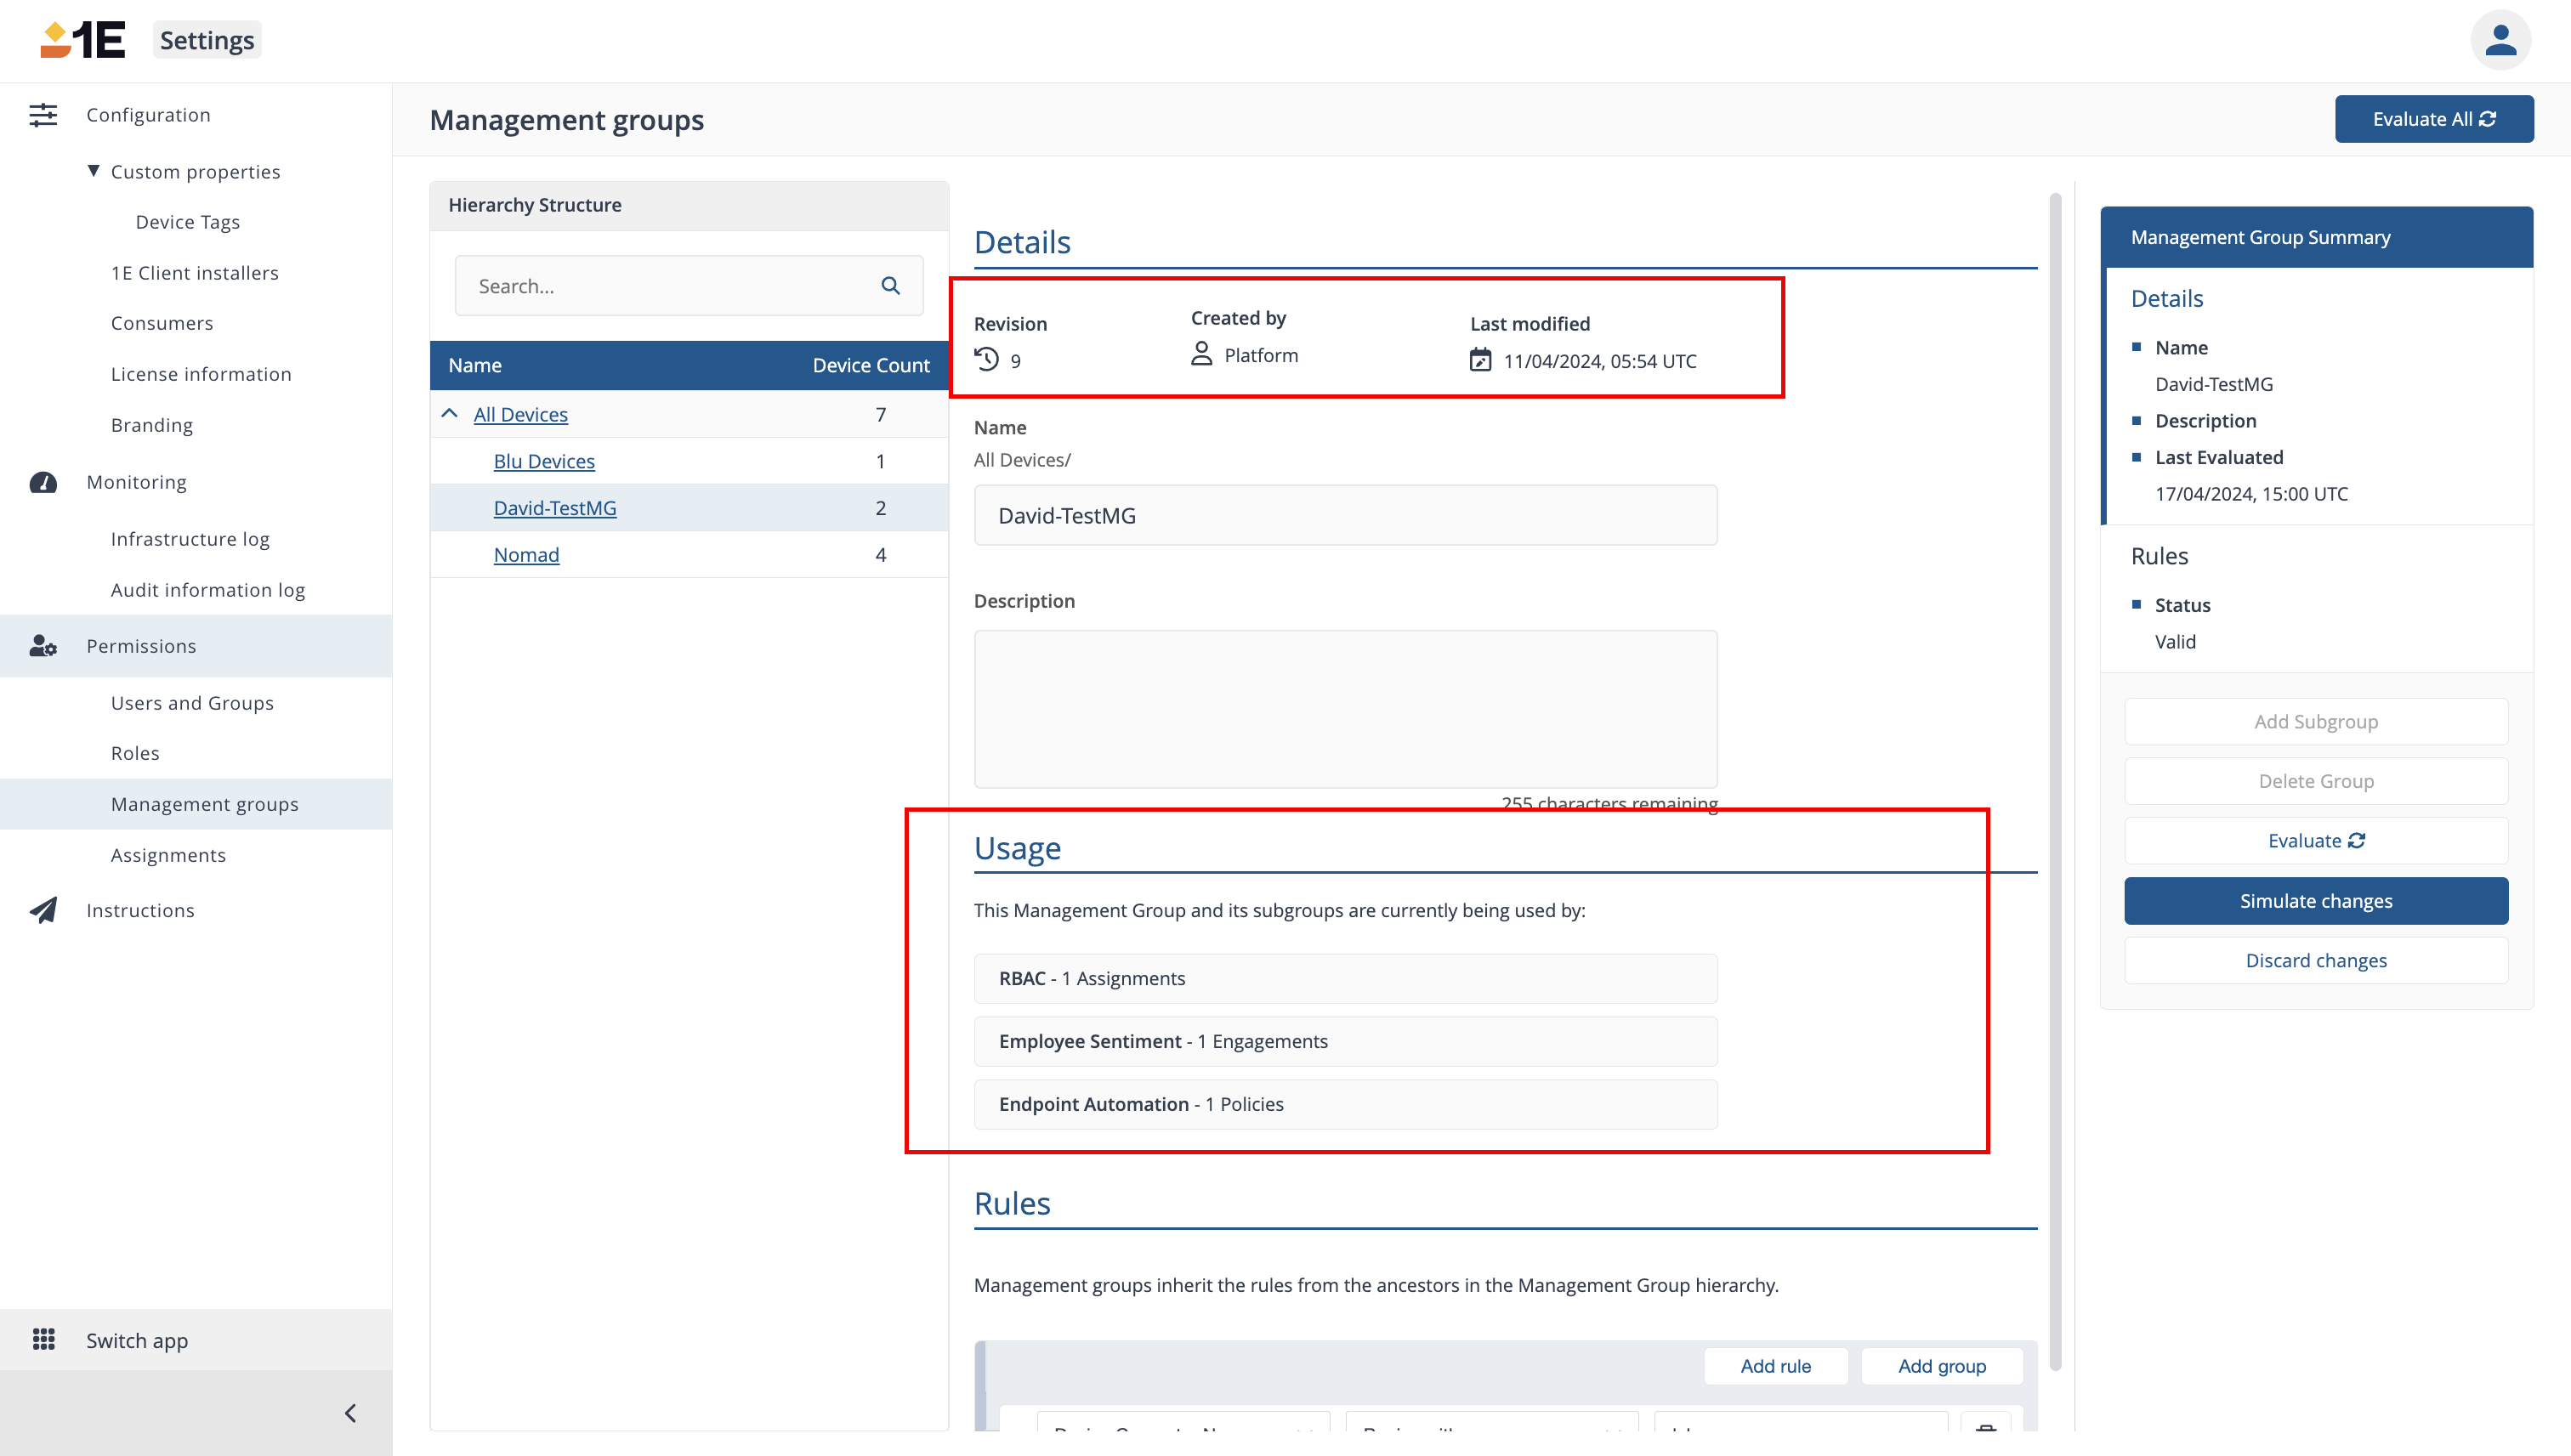
Revisions:
-
Revision: Shows the amount of Management Group revisions. When a live Management Group is updated, a new revision is created. In the screenshot above, the selected group has been updated 9 times
-
Created by: Shows who created the latest revision of the group
-
Last modified: Shows the date and time in UTC of when the latest revision was created
Usage:
The Usage section shows where this Management Group is being used so that any impact can be assessed before making any changes. For example, in the screenshot above, it shows the following:
-
There is one assignment to this Management Group in RBAC
-
There is one assignment to this Management Group in Employee Sentiment
-
Once policy is assigned to this Management Group
Creating a draft Management Group using Management Group safeguarding
To see the impact of adding or editing Management Group rules, follow these steps:
-
Make your changes to a Management Group. This will enable Simulate Changes.
-
Click Simulate changes to create a new draft Management Group. Once a draft simulation is in progress, you cannot make any revisions to it.
When using this feature, be aware that:
-
Drafts are only visible to their creators. Other users can see that a draft has been created but will be unable to view its details or edit it.
-
Only the user who created a draft or a Full Administrator can discard a draft.
-
Drafts cannot be discarded when a simulation is running.
-
Only one draft can be created at a time.
-
-
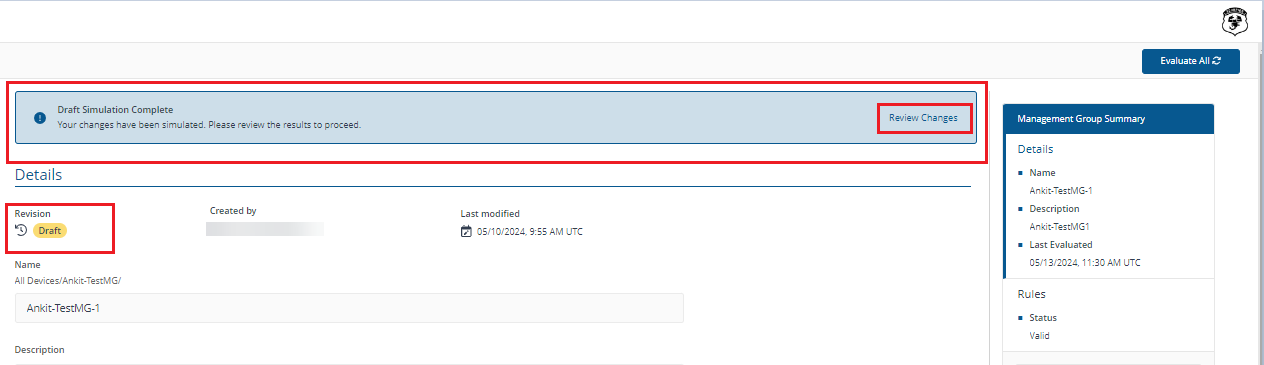
When the simulation completes, you can preview the number of devices that would be affected before applying your change.
-
If you save your changes, the Management Group will be updated, and the draft version will be deleted.
-
Clicking Continue Editing allows you to make additional changes.
-
The Revision section shows the Draft tag. This indicates the onscreen data is for a draft and not a live Management Group
-
The message at the top of the page displays the status of the simulation. Clicking Review Changes shows the Management Group Preview
-
When your revisions are complete, click Simulate Changes. This restarts the simulation
-
Click Save to update your Management Group. You will see that the Revision count and Last modified totals will be updated
-
Draft Management Group hierarchy
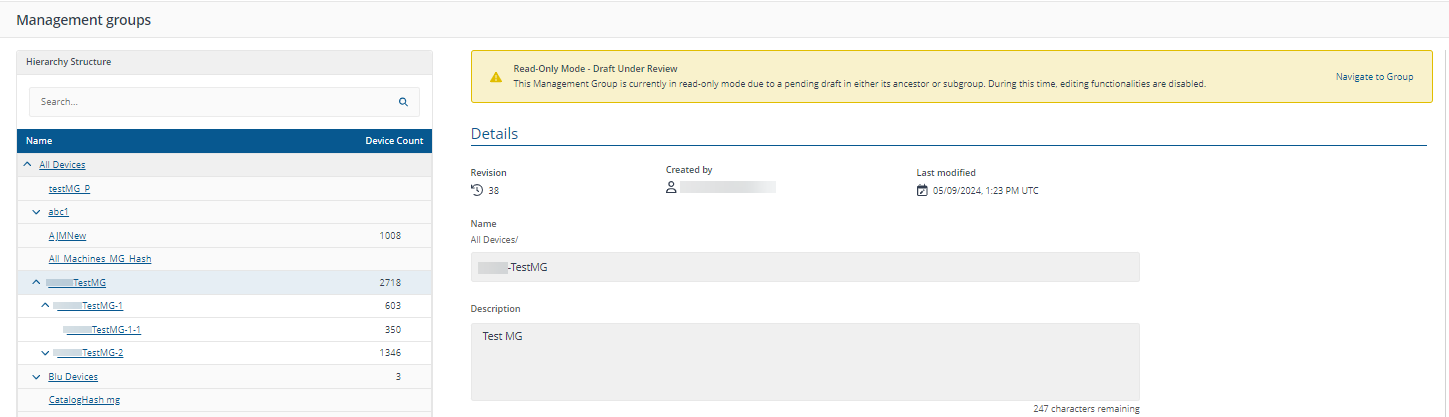
Only one draft Management Group can be created at a time in a management group hierarchy.
For example, if you have a hierarchy of ParentMg > ChildMG1 > ChildMG2 and you create a draft associated with ChildMG1, you will not be able to create another one associated with either the ParentMG or ChildMG, unless you delete the draft associated with ChildMG1, (or update ChildMG1 from the draft).
When you have a draft in a hierarchy, every Management Group in that hierarchy will be set to read-only mode. In the following examples, there is a draft Management Group for TestMG-1 and user is clicking TestMG.
-
The draft Management Group is created by the currently logged in user:
-
The draft Management Group is not created by the currently logged in user:
-
The draft Management Group is not created by the currently logged in user, but they are a Full Administrator:
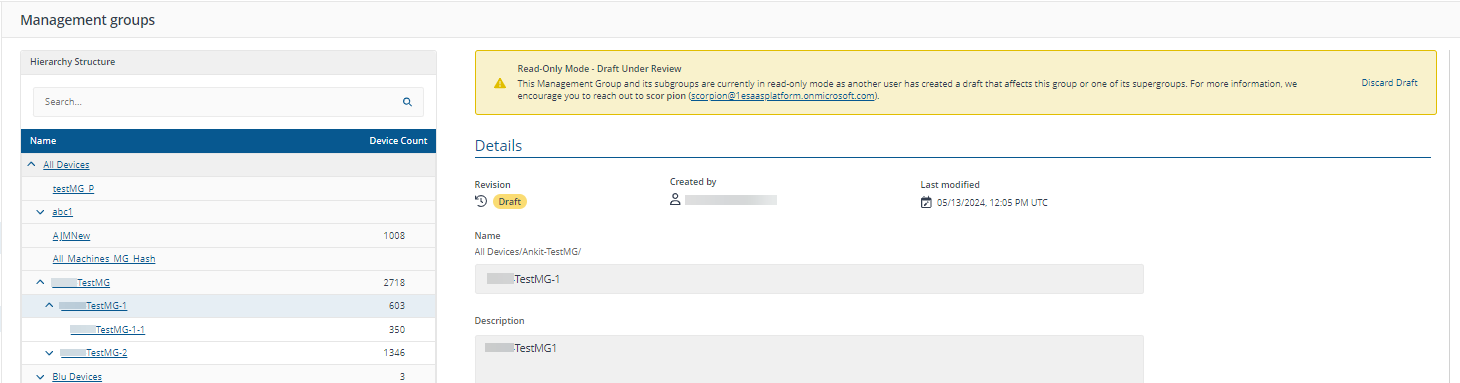
Drafts are automatically discarded after 72 hours because a draft blocks its entire Management Group tree.
Direct-based Management Groups are created using scripts:
-
Each script creates a new log file in the same folder using the format <scriptname>_<ddMMyyyyhhmmss>.log. These log files must be deleted manually.
-
If a Management Group with the same name already exists, the script deletes it and recreates it using only the newly provided devices.
-
If the file or collection includes a device that is not present in the 1E Inventory repository, the device is ignored and the omission is logged.
-
After a successful run, the script triggers a Management Group synchronisation.
Once imported into the Platform, your direct-based Management Groups will be added as child groups of the default All Devices Management Group.
Prerequisites
Ensure the following prerequisites are in place before executing this script:
-
The user that is running the script must have read/write permission in the folder where the PowerShell script is present.
-
The user that is running the script must have permission to create Management Groups.
-
If Windows Task Scheduler is used to run the script, then the scheduled task should provide the current logged-in user.
-
A minimum of version 1.2.22 of the PowerShell Toolkit must be installed, for more information refer to 1E PowerShell Toolkit
-
Identity and authentication:
-
The ClientAssertionAppId is set to the App ID of the identity provider application used for external integration.
-
You have specified either CertificateSubject or CertificateThumbprint, not both.
-
The certificate’s public key has been uploaded to the identity provider app by an identity provider administrator.
-
-
Certificate setup:
-
The full certificate, including the private key, is installed in the Local Machine\Personal, My certificate store on the device running the script.
-
The account executing the script has read access to the certificate’s private key using certlm.msc and right-clicking on the certificate, then selecting All Tasks/Manage Private Keys.
-
-
Platform configuration:
-
A Platform administrator has created a kid-to-UPN mapping for the certificate.
-
The mapped principal has sufficient permissions to create the required management group(s).
-
The certificate kid, base-64 URL-encoded thumbprint, is available if needed, retrieve using Get-1ECertificateThumbprint. For more information, refer to Principal management cmdlets.
-
-
Optional settings:
-
The UPN parameter may be used to select an alternative mapped principal, if multiple mappings exist.
-
If already authenticated using Set-1EServer, you may omit ClientAssertionAppId and certificate parameters and run the script under the authenticated principal. For more information, refer to Set-1EServer <server name> ....
-
External integration allows applications, such as the ServiceNow application suite or the PowerShell Toolkit, to authenticate with the Platform without requiring users to enter credentials interactively.
Create Direct-based Management Groups from a file
-
Create a folder that will contain text files to create Management Groups. This is the FolderPath passed as a parameter in the PowerShell script.
-
Create text files in the above folder with the name same as the Management Group (for example, ManagementGroupName.txt).
-
Enter a description of the Management Group in the first line.
-
Enter one or more Device FQDN from the second line onwards, one device per line.
-
-
Optionally, add more files if you want to create multiple Management Groups.
-
Download the Create-DirectManagementGroupUsingFile.ps1 PowerShell script and execute it.
This script reads the Device FQDN list in files and creates Direct Membership Management Groups through SLA/Tachyon APIs. If the group does not exist it is created and devices are added. If the group exists, the existing devices are deleted and new devices are added.
To download the script, use this link Create-DirectManagementGroupUsingFile.ps1
Copy.\Create-DirectManagementGroupUsingFile.ps1 `
-TachyonApiBaseUrl "tachyon.testlab.com" `
-FolderPath "C:\Temp\DeviceFolder" `
-Ps1eModulePath "C:\Temp\1epowershelltoolkit.v1.2.22.0"Parameter name
Requirement
Description
TachyonApiBaseUrl
Mandatory
Platform base URL, for example, tachyon.lab.local.
FolderPath
Mandatory
The name of the input folder which contains the files to be used in creating Direct Membership Management Groups. These files contain the list of devices to be used in creating Management Groups. The File name should be same as the name of Name of Management Group. Also, the first line of the file should contain the description of Management Group to be created, from next line onwards every line contains the Device FQDN.
Ps1eModulePath
Mandatory
Folder path where the PowerShell Toolkit is saved.
ClientAssertionAppId
Optional
The AppId of the Client Assertion application created inside the cloud which is used for Authentication. Certificate should be present in same application.
CertificateSubject
Optional
Subject name of the Certificate used for Authentication.
CertificateThumbprint
Optional
Thumbprint of the Certificate used for Authentication.
Upn
Optional
UPN of the user for which mapping is targeted. Required only for Add and Update operations.
Create Direct-based Management Groups from a Configuration Manager collection
This script is designed to be run on the Configuration Manager Site server.
-
Create a text file that will be passed as a parameter in the PowerShell script.
-
In the file, enter the following as a comma separated single line: Collection name, Management Group name, Management Group description
-
Optionally, enter more lines in the same format if you want to create multiple Management Groups.
-
Download the Create-DirectManagementGroupUsingCmCollection.ps1 PowerShell script and execute it.
To download the script, right click and select Save link as: Create-DirectManagementGroupUsingCmCollection.ps1.
Copy.\Create-DirectManagementGroupUsingCmCollection.ps1 `
-TachyonApiBaseUrl "tachyon.testlab.com" `
-FilePath "C:\Temp\Collection.txt" `
-Ps1eModulePath "C:\Temp\1epowershelltoolkit.v1.2.22.0"Parameter name
Description
TachyonApiBaseUrl
Platform base URL, for example, tachyon.lab.local.
FilePath
File path that contains details of CM Collections.
Ps1eModulePath
Folder path where the PowerShell Toolkit is saved.
Given the information provided in Creating direct-based Management Groups, we can now provide an example of how a direct-based Management Group can be added. In our example, we do not have any Management Groups except the default All Devices group. Once imported into 1E Platform, your direct-based Management Group will be added as a child group of the default All Devices Management Group.
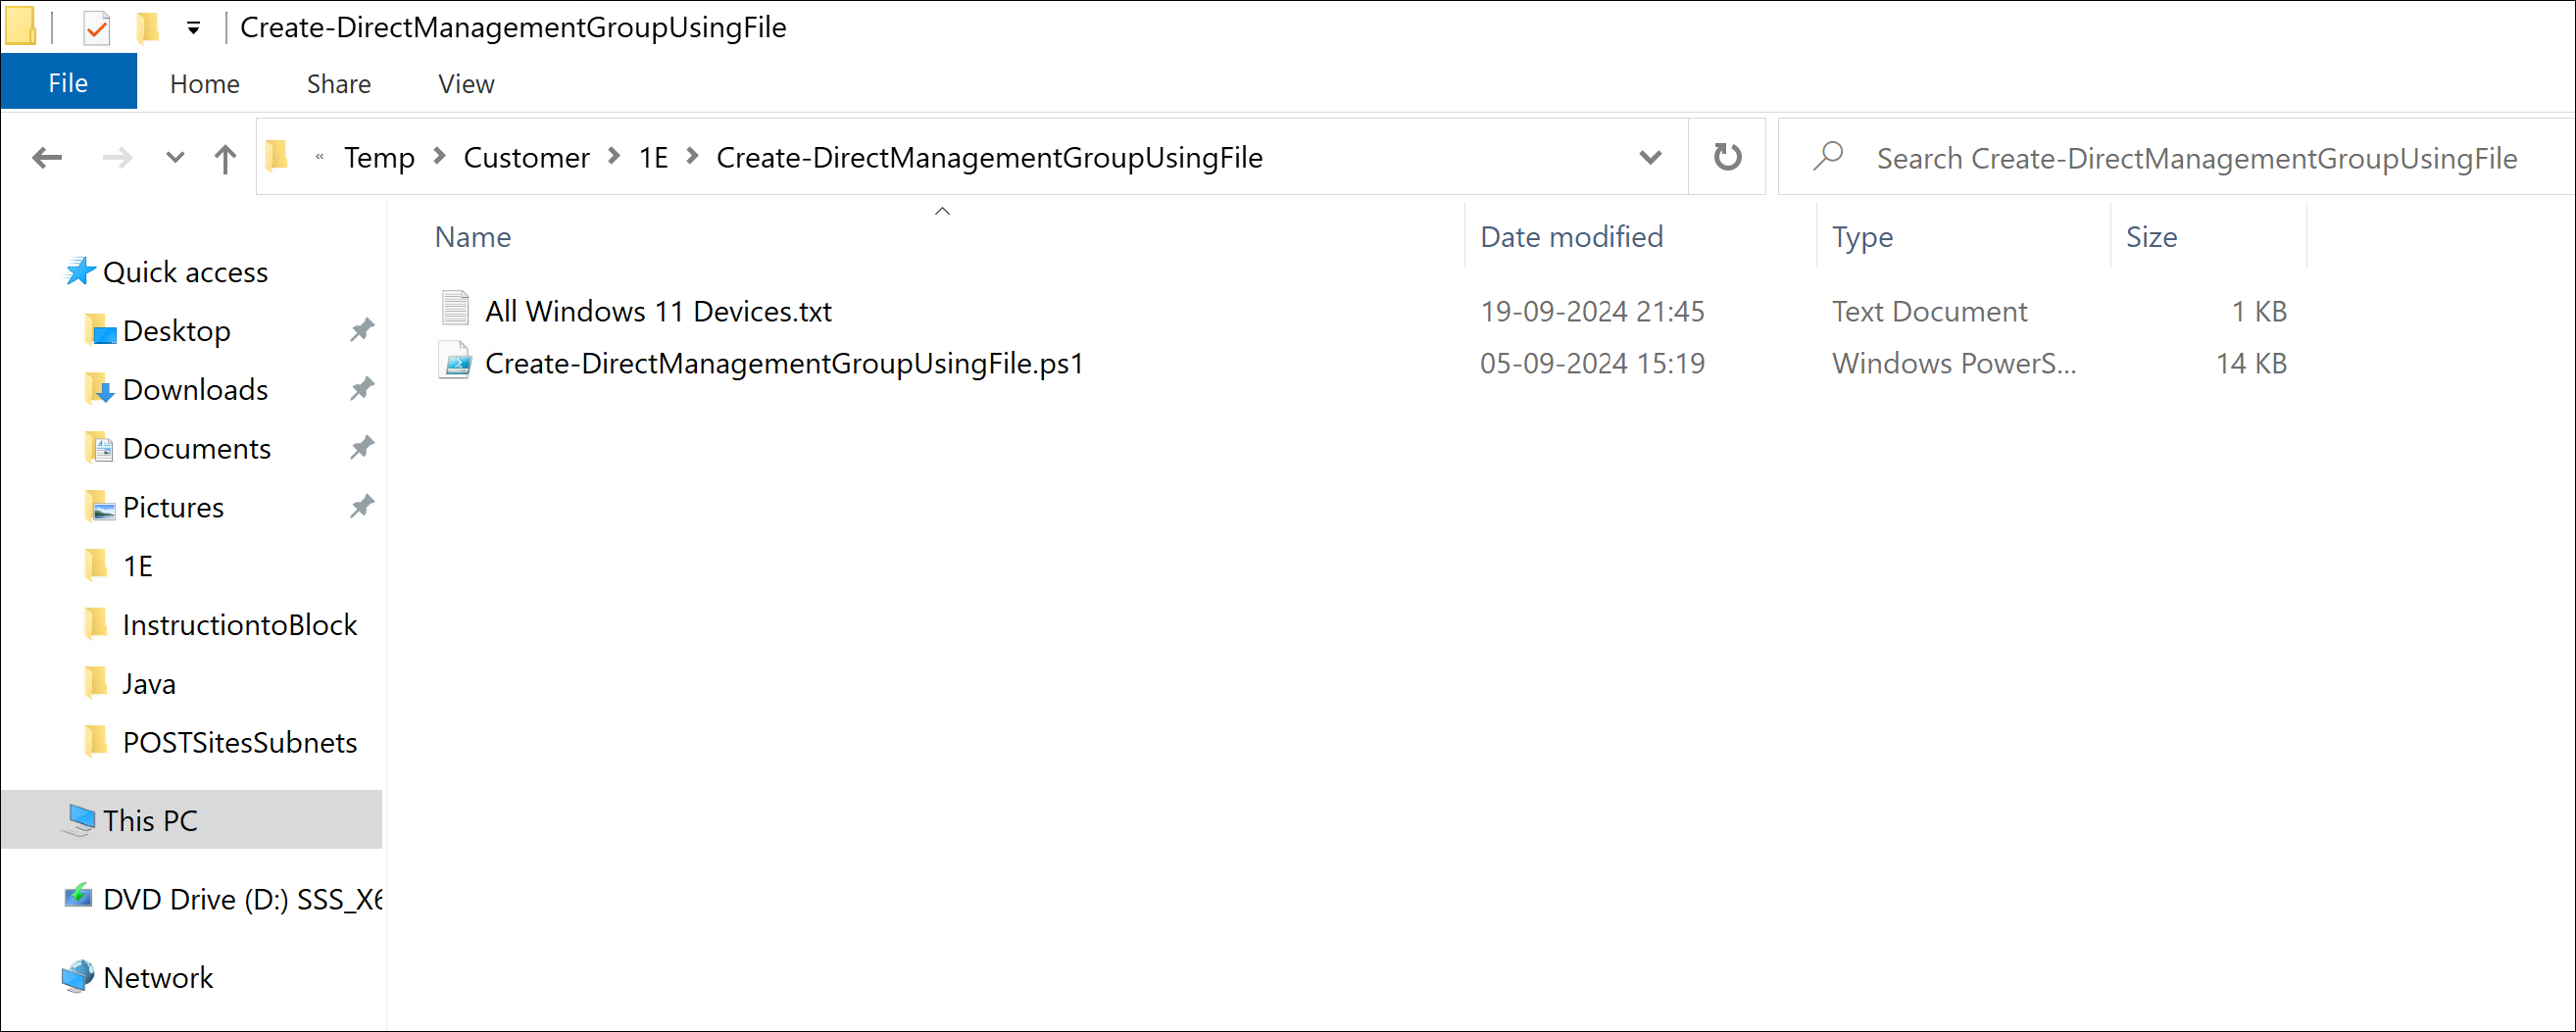
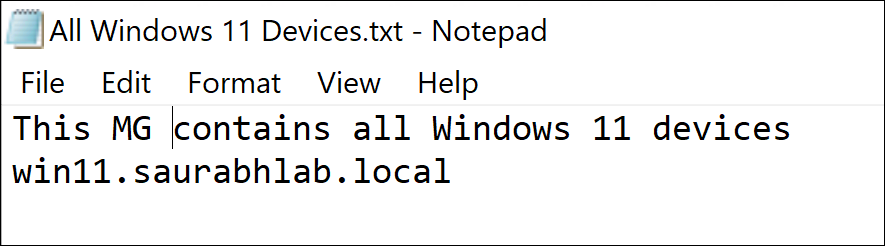
The device file
We've created an E:\Temp\Customer\1E\Create-DirectManagementGroupUsingFile folder and added two files:
-
All Windows 11 Devices.txt file containing a list of device FQDN on separate lines.
-
Create-DirectManagementGroupUsingFile.ps1 PowerShell script. In our example, we'll run the script from the same folder as the text file.
Unlike rule-based Management Groups, once a direct-based Management Group is added to 1E Platform, you cannot change the name later. To distinguish your direct-based Management Groups from your rule-based groups, you should give them a meaningful name. For the purposes of our example, we just used All Windows as a prefix.
Running the script to populate the direct-based Management Group
With the device file in place, in our example, we run the Create-DirectManagementGroupUsingFile.ps1 file with the following command-line:
.\Create-DirectManagementGroupUsingFile.ps1 `
    -TachyonApiBaseUrl "psbetastg.stg.preprod.1e.com" `
    -FolderPath "E:\Temp\Customer\1E\Create-DirectManagementGroupUsingFile" `
    -Ps1eModulePath "E:\Temp\Customer\1E\1epowershelltoolkit.v1.2.22.0"
The TachyonApiBaseUrl is set to our example instance of psbetastg.stg.preprod.1e.com, the -FolderPath is set to E:\Temp\Customer\1E\Create-DirectManagementGroupUsingFile, and the PowerShell Toolkit folder path is set to E:\Temp\Customer\1E\1epowershelltoolkit.v1.2.22.0.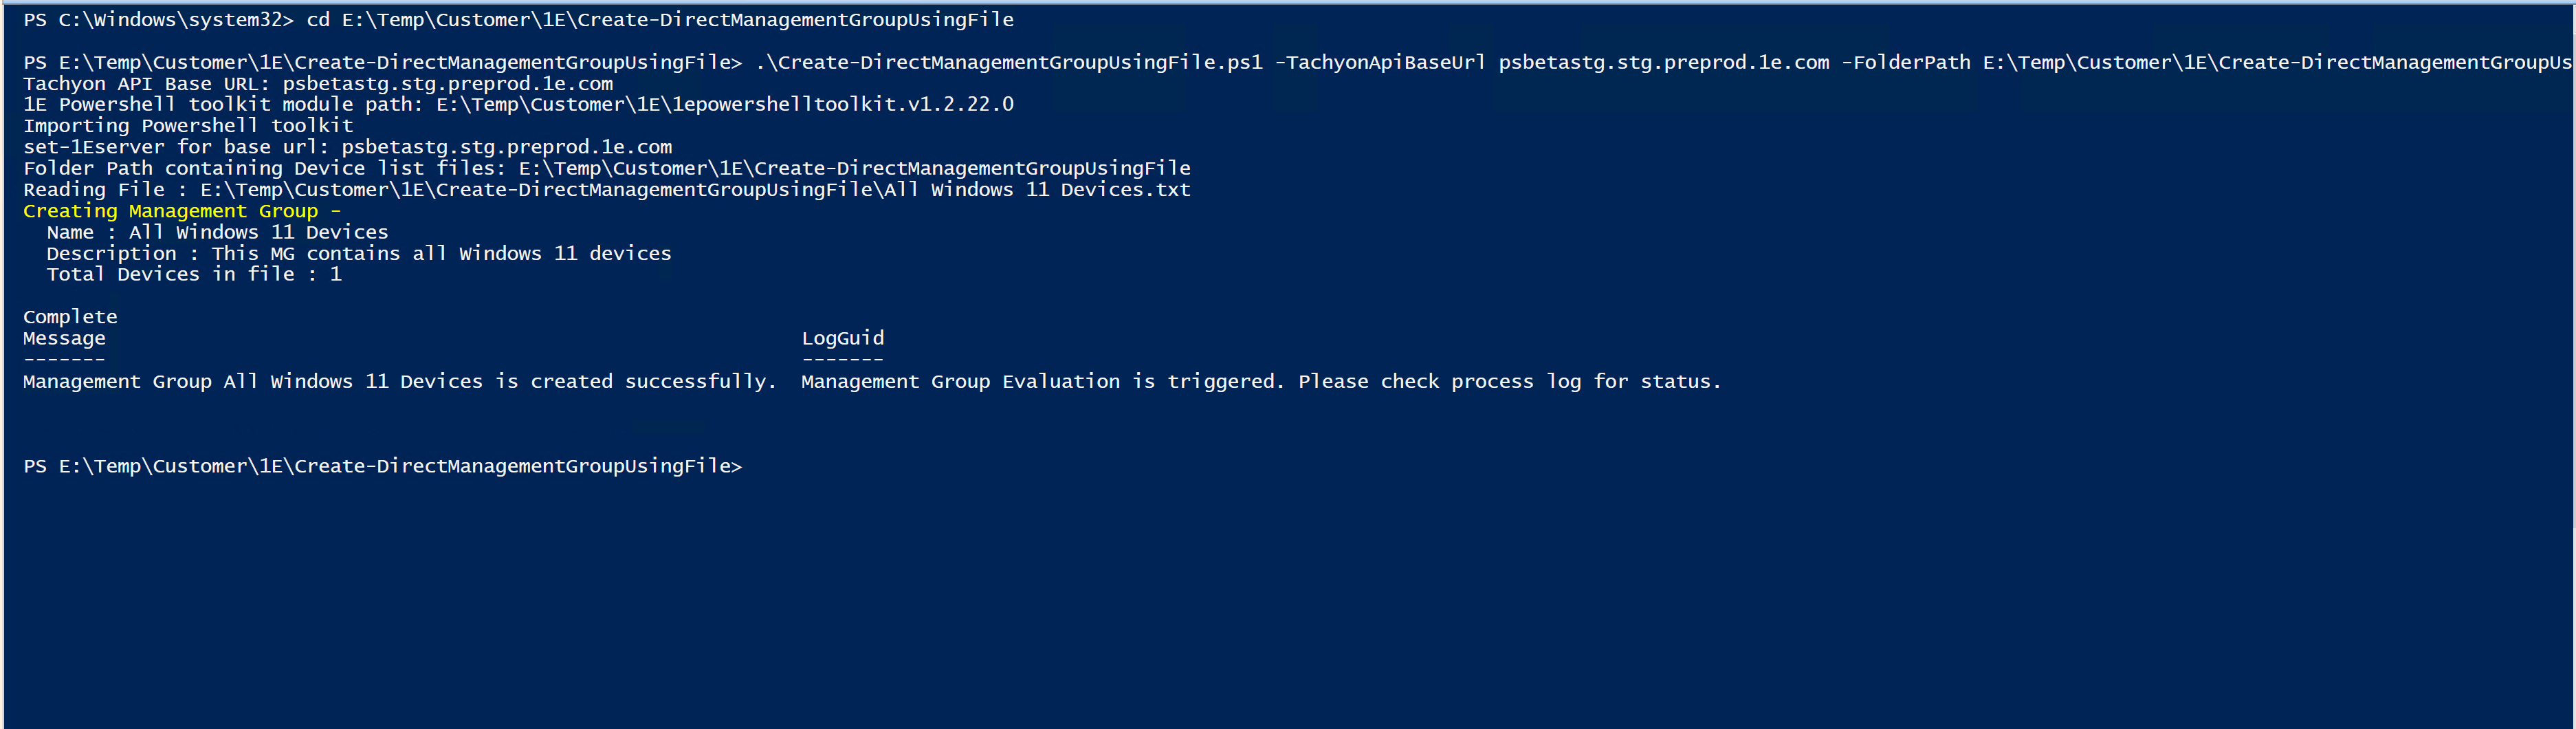
Checking the log file for Create-DirectManagementGroupUsingFile.ps1
After running the script, you will find that a log file is created in the same directory where the Create-DirectManagementGroupUsingFile.ps1 is located. In our example, we can see that the script completed without errors.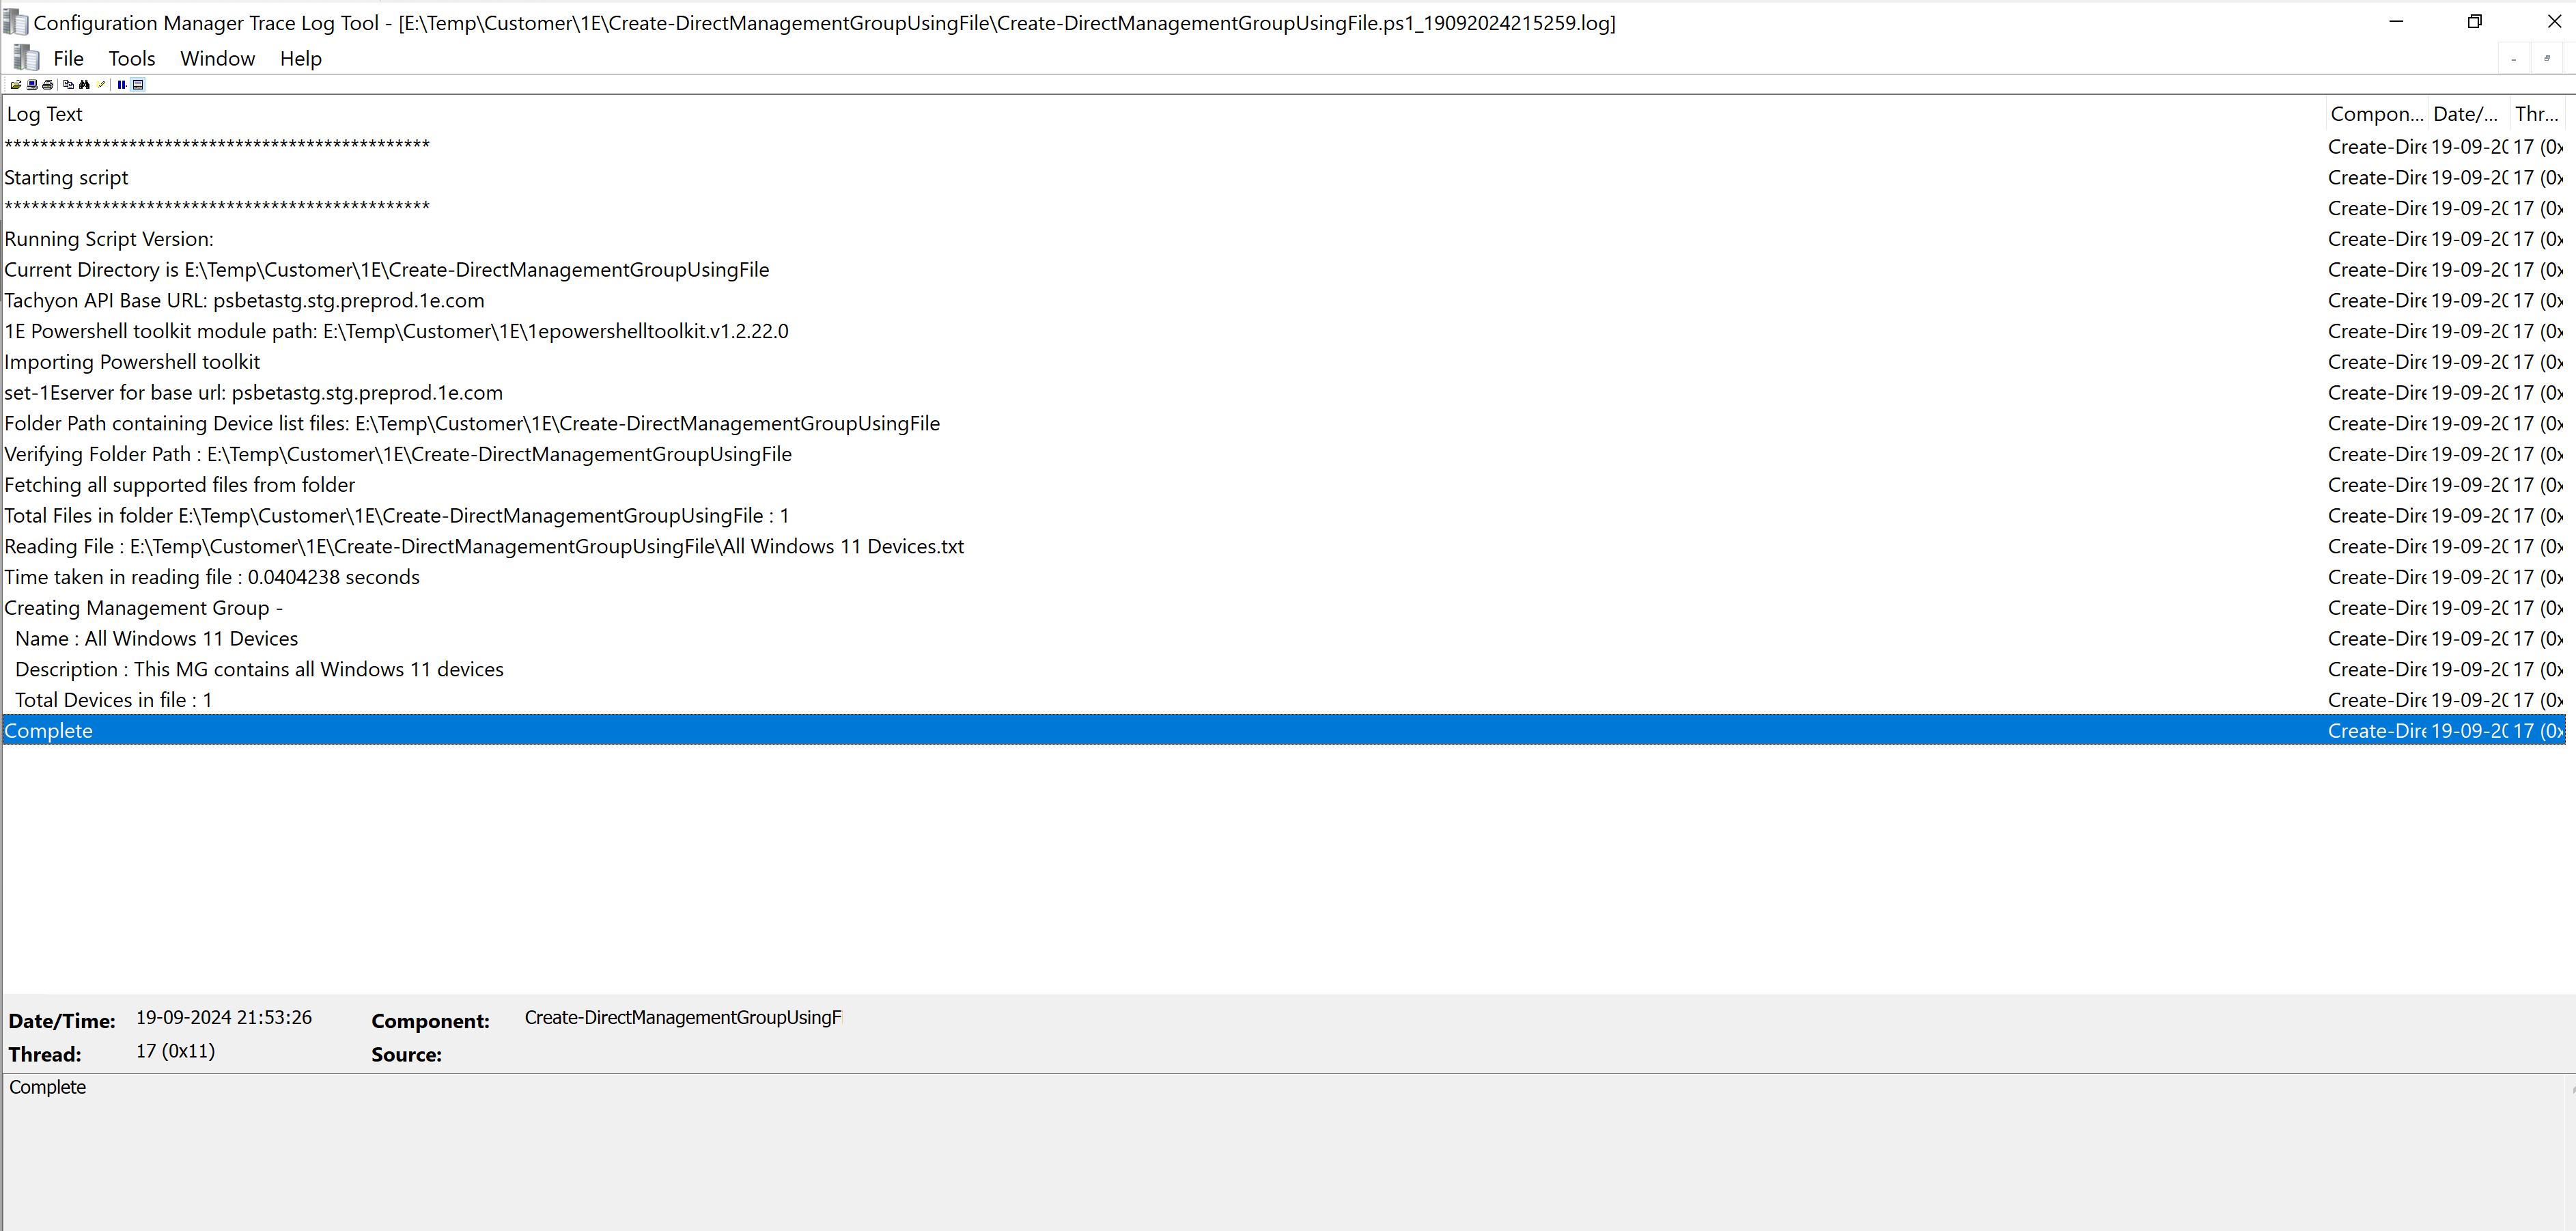
The direct-based Management Group added
After running the script, a new direct-based Management Group called All Windows 11 Devices gets added. Click the name of the Management Group to see more details including usage, exclusions, and members. You can also export the membership as a .TSV file or add subgroups as required.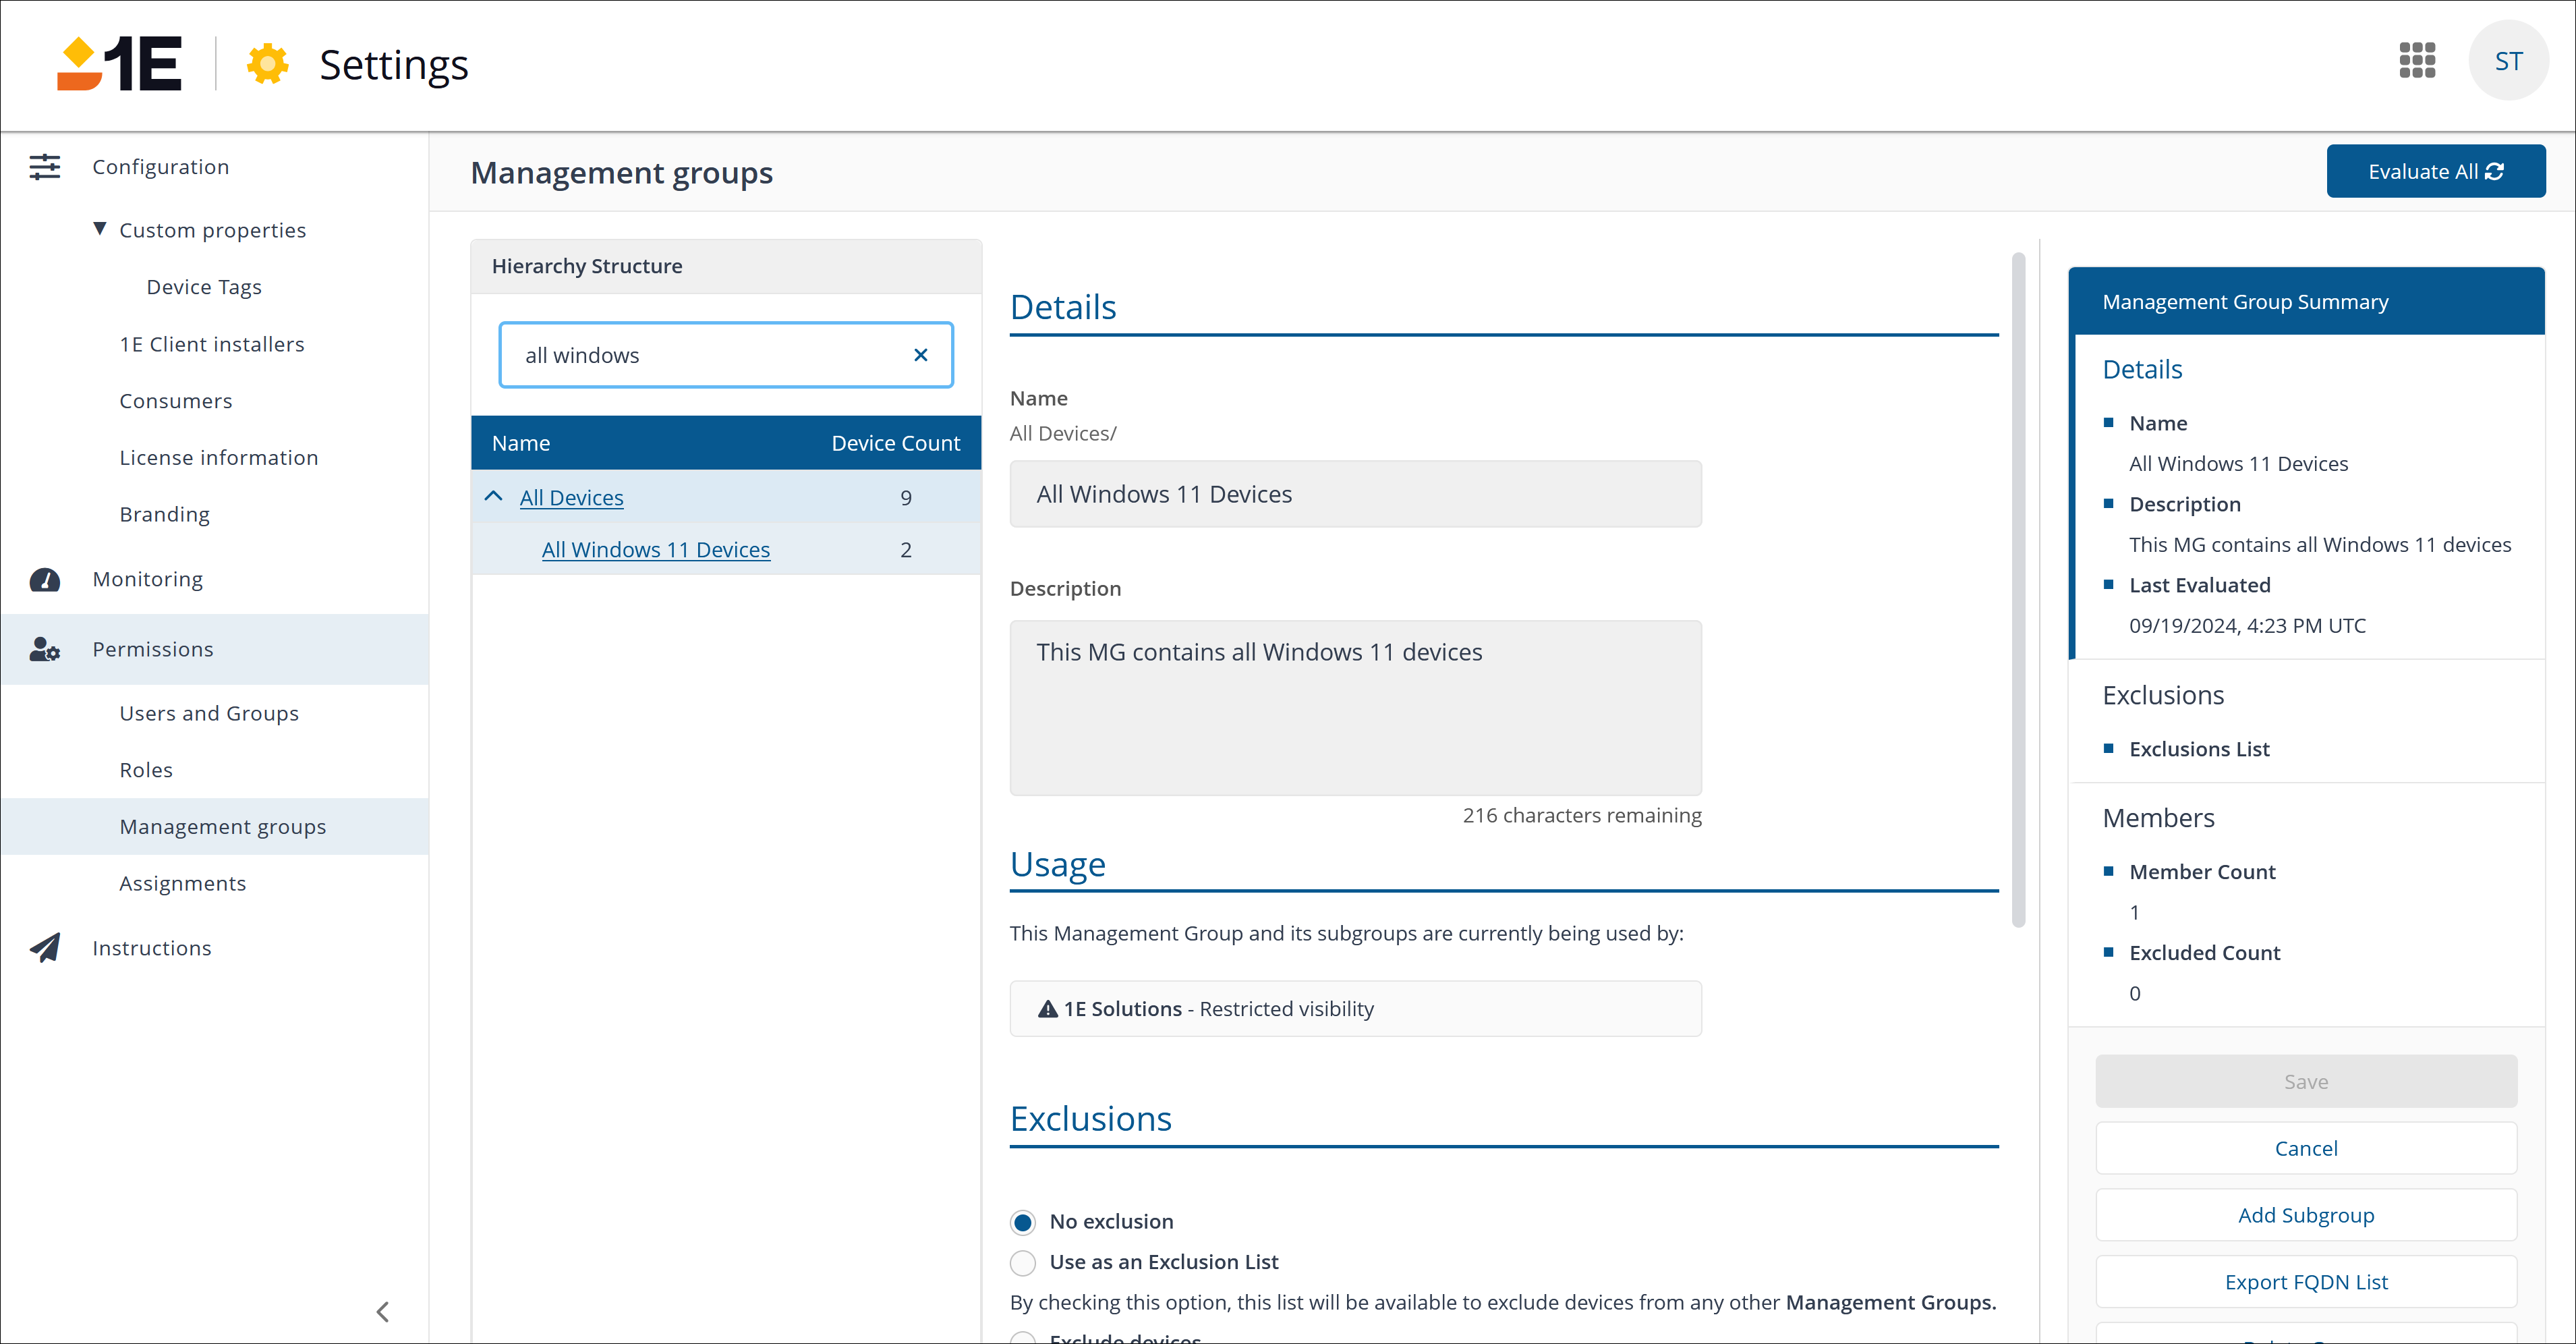
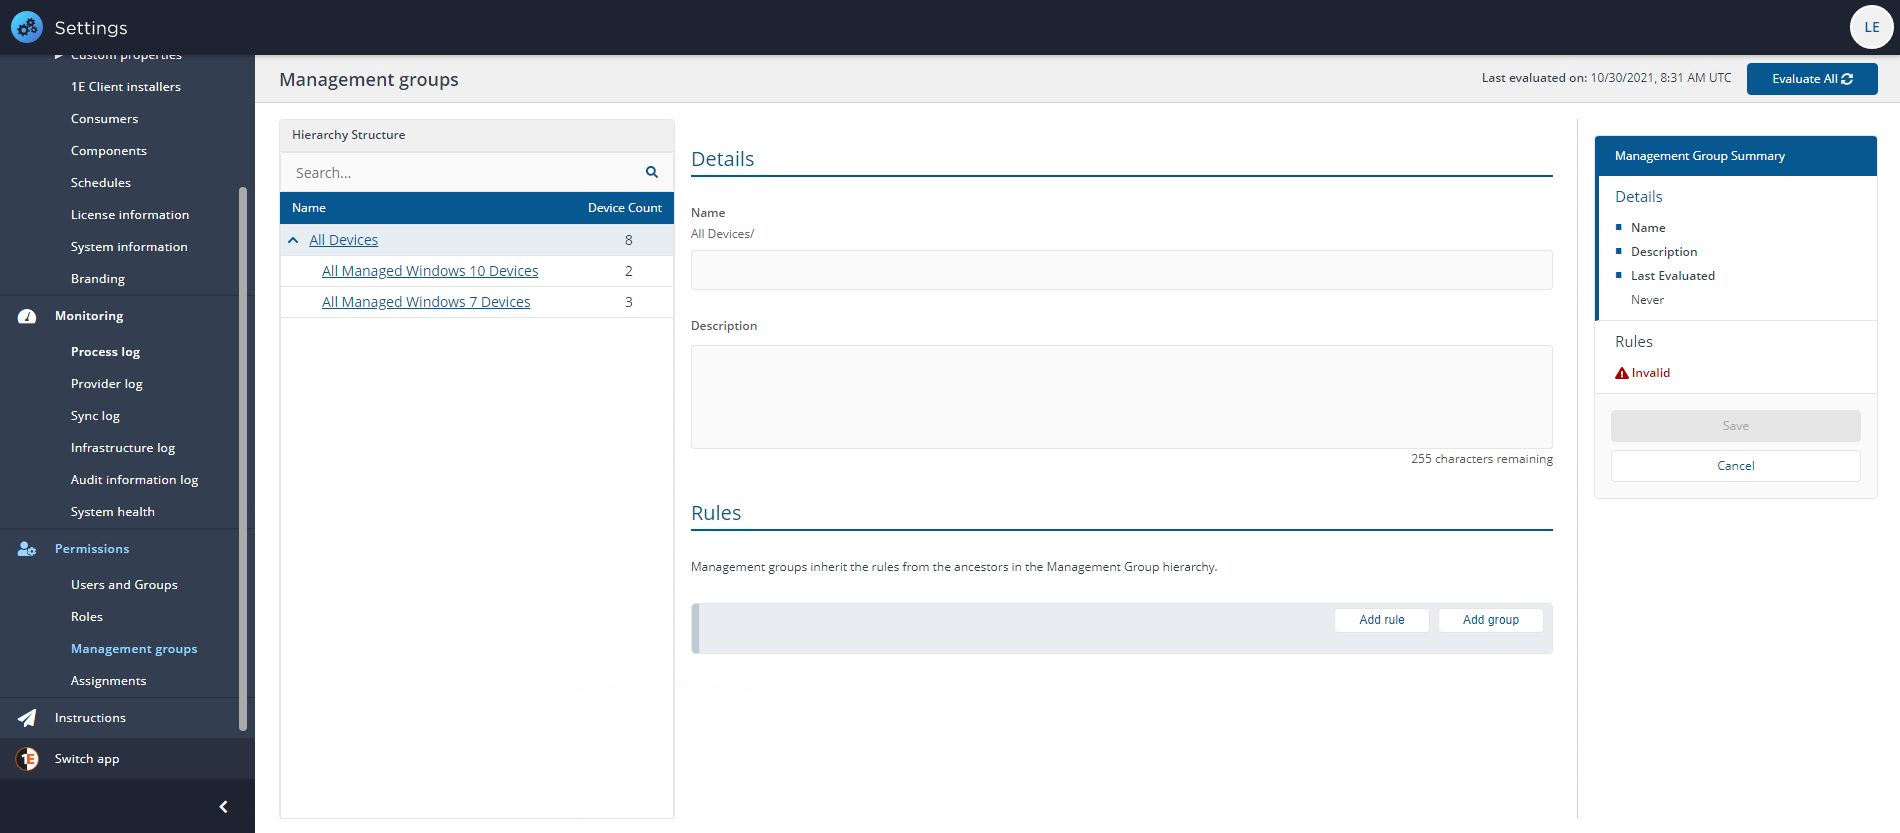
Rule-based Management Groups are defined and maintained in the Settings > Permissions > Management Groups page. They use device inventory data gathered from data sources by connectors and use Management Groups to control how instructions are applied in 1E Platform applications. All child Management Groups must be created under the default All Devices Management Group.
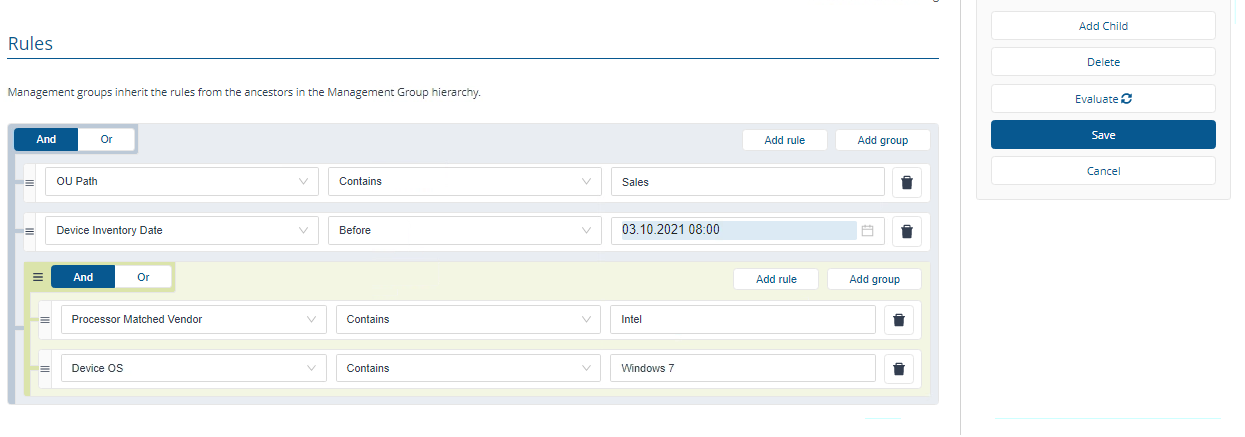
You can easily create complex Management Group definitions by building rules for them, you'll find this in the Rules section of each Management Group. In the Rules section, you can define parameters that determine what devices are members of your Management Groups. The rules you create can be as simple as defining membership according to the OU path in your AD, or as complex as adding groups of rules that narrow membership down to details like Processor Matched Threads per Core. You can also use device tags that you have created to define Management Group membership, or a combination of all these parameters.
By default, in a new instance of 1E Platform, all devices are members of the All Devices group. If you have upgraded from a previous version of 1E Platform, your previously created Management Group will be preserved and will become a child Management Group of All Devices Management Group. You can create Child Management Groups and nest them into a Hierarchy Structure where child Management Groups inherit rules from their parent groups.
Using child Management Groups you could create by hand a Management Group structure which mirrors your Configuration Manager collections, or divide your Management Groups by device type, for example into servers and workstations. You can use the delegation feature to create Management Groups that mirror your organizational structure with associated delegated roles.
To find out how to use scripts to import a Management Group structure from a file or from Configuration Manager collection, refer to Creating direct-based Management Groups.
Refer to Management Groups tutorial for a conceptual example of how you might create a Hierarchy Structure, and for details about how you can use the delegation feature.
A Management Group can be created by using an Organizational Unit (OU) path as a filter.
Organizational Units (OU) are containers in Active Directory (AD) that organize users, computers, groups, and other objects into a logical hierarchy. OUs function like folders in a file system, enabling structured grouping and management of directory objects.
OUs follow a tree-like structure:
Domain
 └── OU (Department)
      └── OU (Team)
           └── Objects (Users, Computers, Groups)
Example: Device located in an OU
CN=LGNew-Globex, OU=Workstations, OU=IT-Department, DC=Tch15, DC=localThis indicates that the device LGNew-Globex belongs to the following hierarchy:
Tch15.local
 └── OU=IT-Department
      └── OU=Workstations
           └── Device: LGNew-Globex
Example: Device not assigned to an OU
In some environments, devices may not be assigned to an OU and may instead reside in a default container.
CN=LGNew-Globex, CN=Computers, DC=Tch15, DC=localThis path can be interpreted as:
DC=local
 └── DC=Tch15        (Domain: Tch15.local)
      └── CN=Computers  (Default container)
           └── CN=LGNew-Globex (Computer object)
In this case, the device is not part of any OU.
Important considerations for creating OU-based Management Groups
Within an organization:
-
Some devices belong to specific OUs.
-
Some devices do not belong to any OU.
When creating a Management Group with a rule like “OU Path does not contain London”, the result will include:
-
Devices located in other OUs.
-
Devices not assigned to any OU.
This rule behaves like:
All Devices – Devices in OU "London"Recommended rule configuration
To ensure that all relevant devices are included, we recommended creating two rules (using OR):
-
OU Path > Not contains > London
-
OU Path > Is null
This ensures the Management Group includes:
-
Devices in other OUs.
-
Devices not assigned to any OU.
This configuration ensures that all devices outside the specified OU are included, including devices that are not assigned to any OU. On the Management Groups page, you would see the following view.

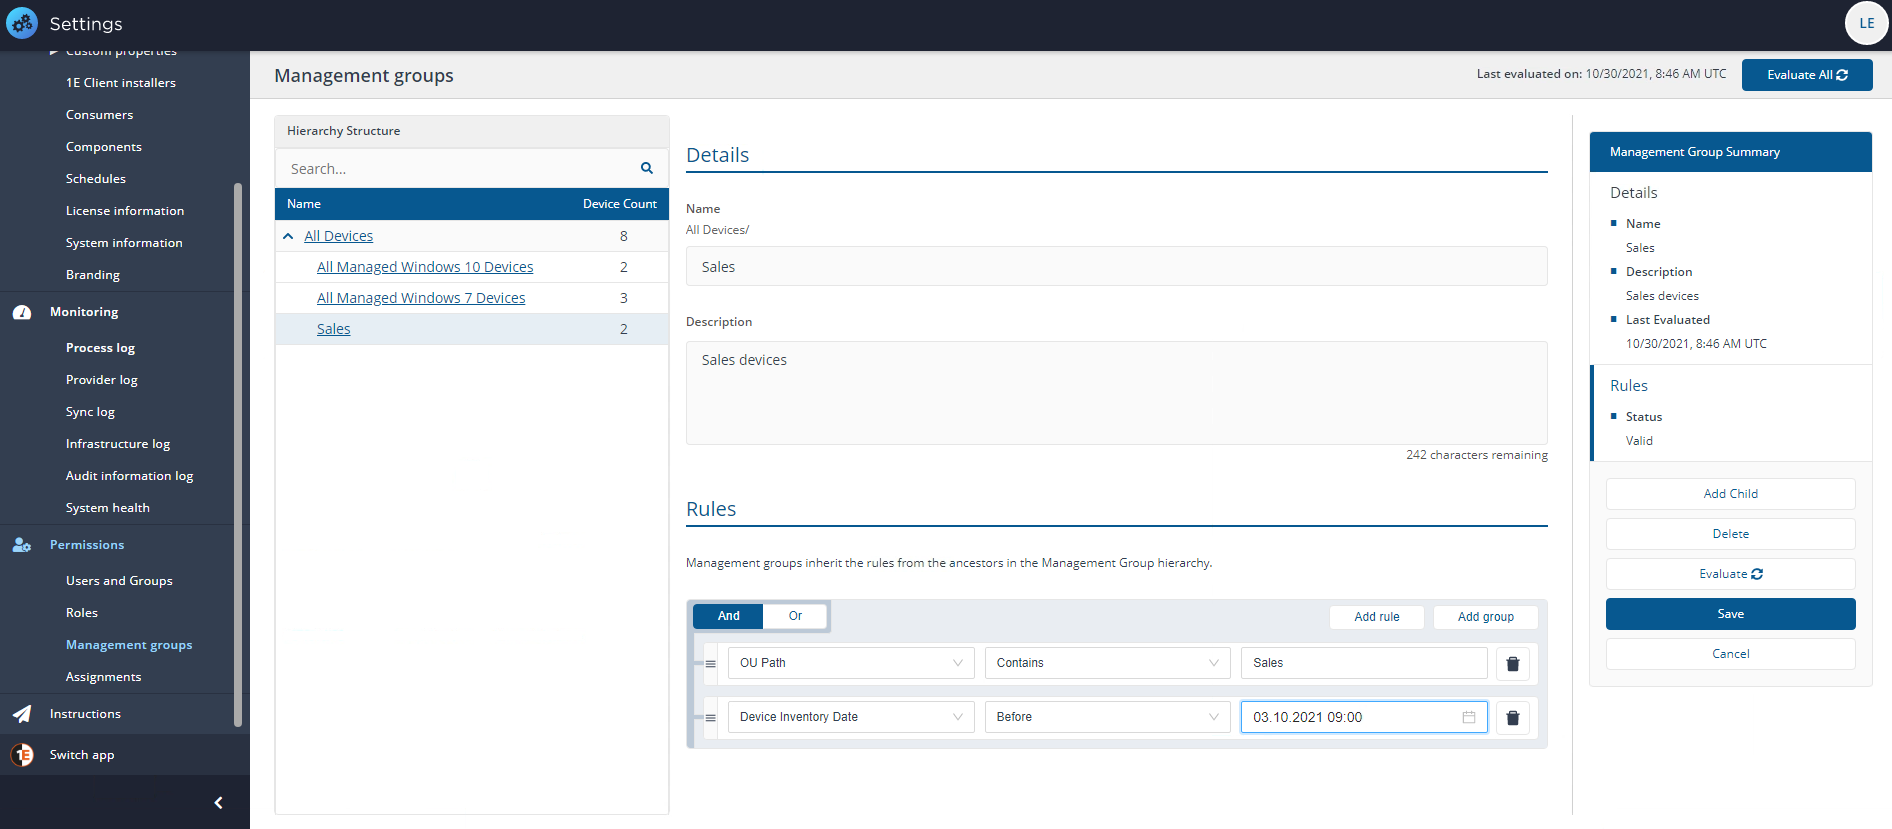
In this example we will create a Management Group for devices that are based in a different office location, this location contains Windows 7 devices and is named Sales. The new Management Group is going to be a child group of the All Devices group.
To create the rule-based Management Group:
-
Click Add Child to display the new Management Group template.
-
Enter a suitable Name for the Management Group. For example Sales.
-
Add a Description, it's a good idea to use a description that provides an outline of the rules that are used to populate the Management Group. For example OU Path Contains Sales.
-
To add each rule:
-
Click on Add rule. The first one is already added, all you need to do is fill out the parts of the rule.
-
First, you select the rule name and description, for example, OU Path.
-
You then select the condition. For example Contains.
-
To complete the rule you then set the value. For example Sales.
-
Click Save.
You cannot save changes to a Management Group if another user has just made new changes to that group. You will need to Refresh the page first.
-
-
Repeat step 5 for each rule you want to define.
-
When you have more than one rule added, you can:
-
Use the gripper icon at the right-hand end of the rule to change the order the rules are applied by dragging the rule to a new place in the list.
In version Platform 9.2, the “drag by mouse” feature has been retired. Other screen controls remain accessible using a keyboard.
-
Change the conjunction operator at the left-hand end of the rule to select between AND and OR.
-
-
When you have finished adding the rules, you need to decide whether you want the Management Group membership to be evaluated immediately on adding the Management Group. If you are just adding one Management Group, it makes sense to click Evaluate. If you are adding a number of Management Groups, it may be a good idea to leave Click Evaluate All at the top of the page.
-
If you click Evaluate All and there is more than one inventory repository an additional control will be displayed prompting you to select which repository you want to evaluate the Management Group rules against.
The Management Group will be added to the Hierarchy Structure.
You can create nested groups of rules using Add group. For example, we want to narrow the devices in the Sales group to those devices with an Intel processor and an OS of Windows 7 as we want to upgrade this legacy OS.

If you selected to evaluate rules immediately, the rules you set for the Management Group will be evaluated against the selected inventory repository. To check how many devices are in the Management Group, switch to the Inventory Insights app, select the Management Group name from the drop-down. The picture shows the details for the OU Path contains Sales Management Group, showing that it contains 2 devices.
Once the Management Group rules have been evaluated, you should then be able to check the devices in Endpoint Troubleshooting contained in the group using the Endpoint Troubleshooting > Devices > Table page. The picture shows the Devices table with the Management Group filter set to Sales.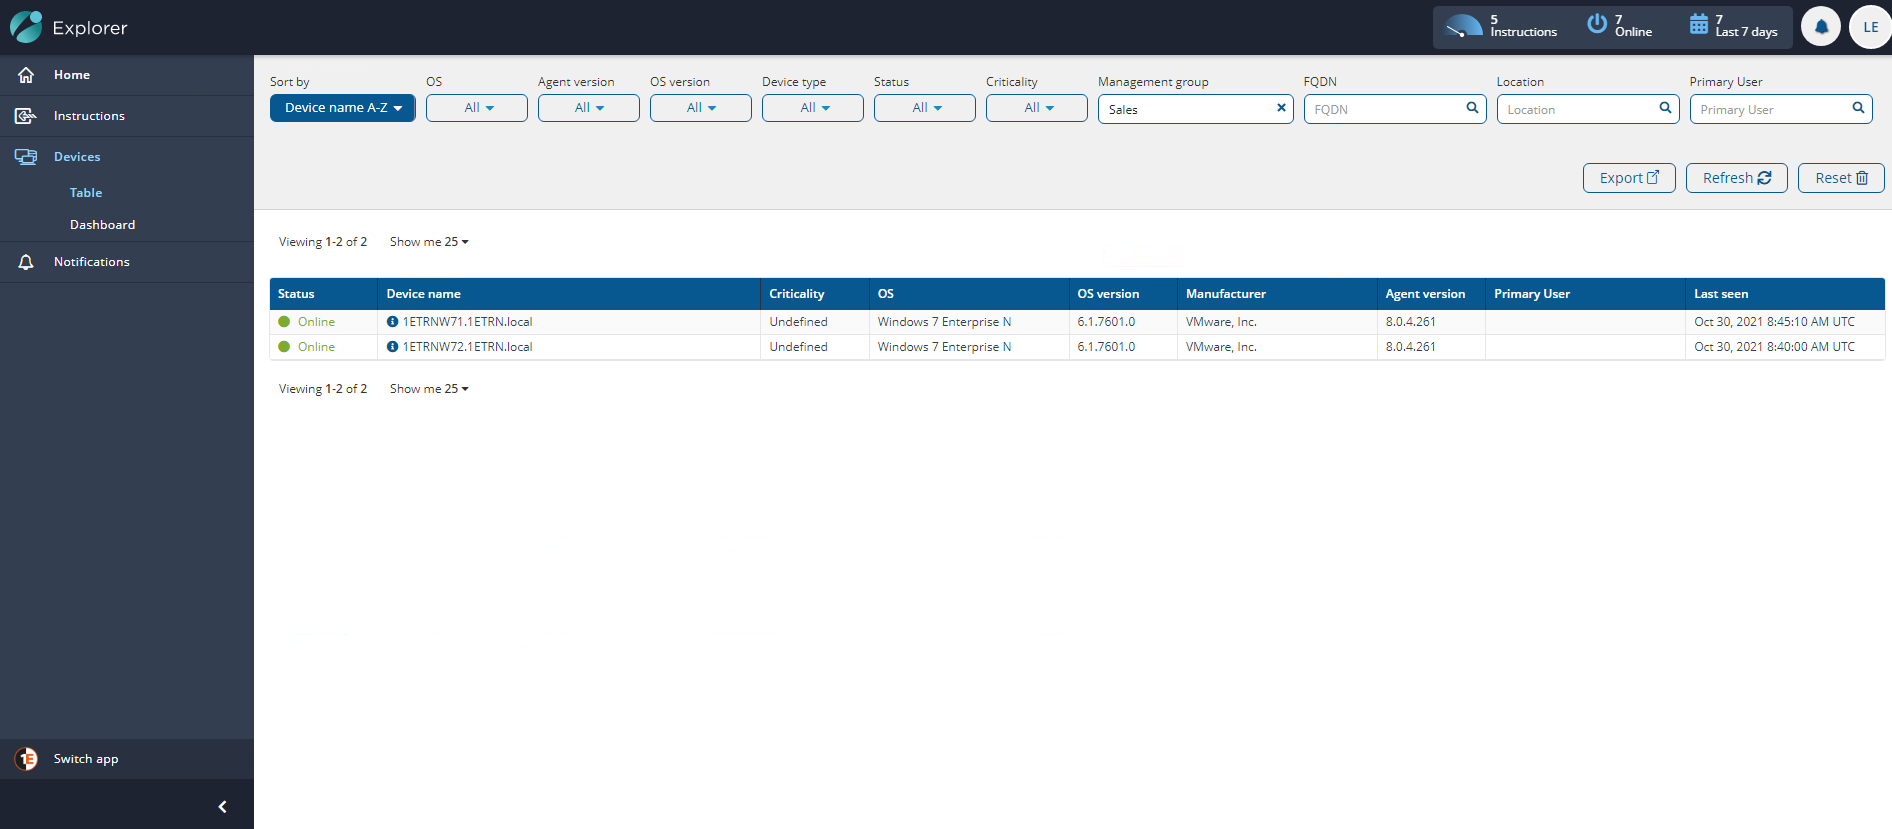
To edit an existing rule-based Management Group:
-
In the Management Groups table, locate the Management Group you want to edit and click the title at the left-hand end of its row in Hierarchy Structure.
-
Here you can edit the Name, Description and Rules that define the Management Group.
-
When you've finished editing, before you click Save you can click Evaluate, enables any modifications you've made to the rules to take effect right away. If you don't select the box, the rules won't run, but you'll be able to evaluate the Management Groups later.
You cannot save changes to a Management Group if another user has just made new changes to that group. You will need to Refresh the page first.
The following applies to rule-based and direct-based Management Groups.
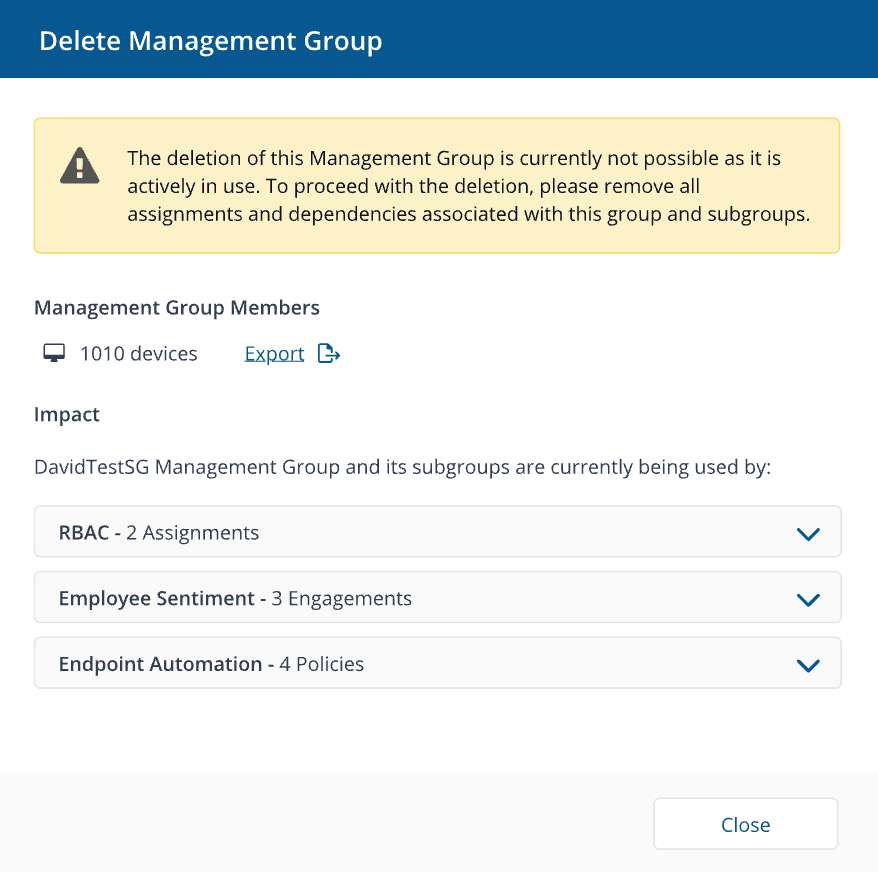
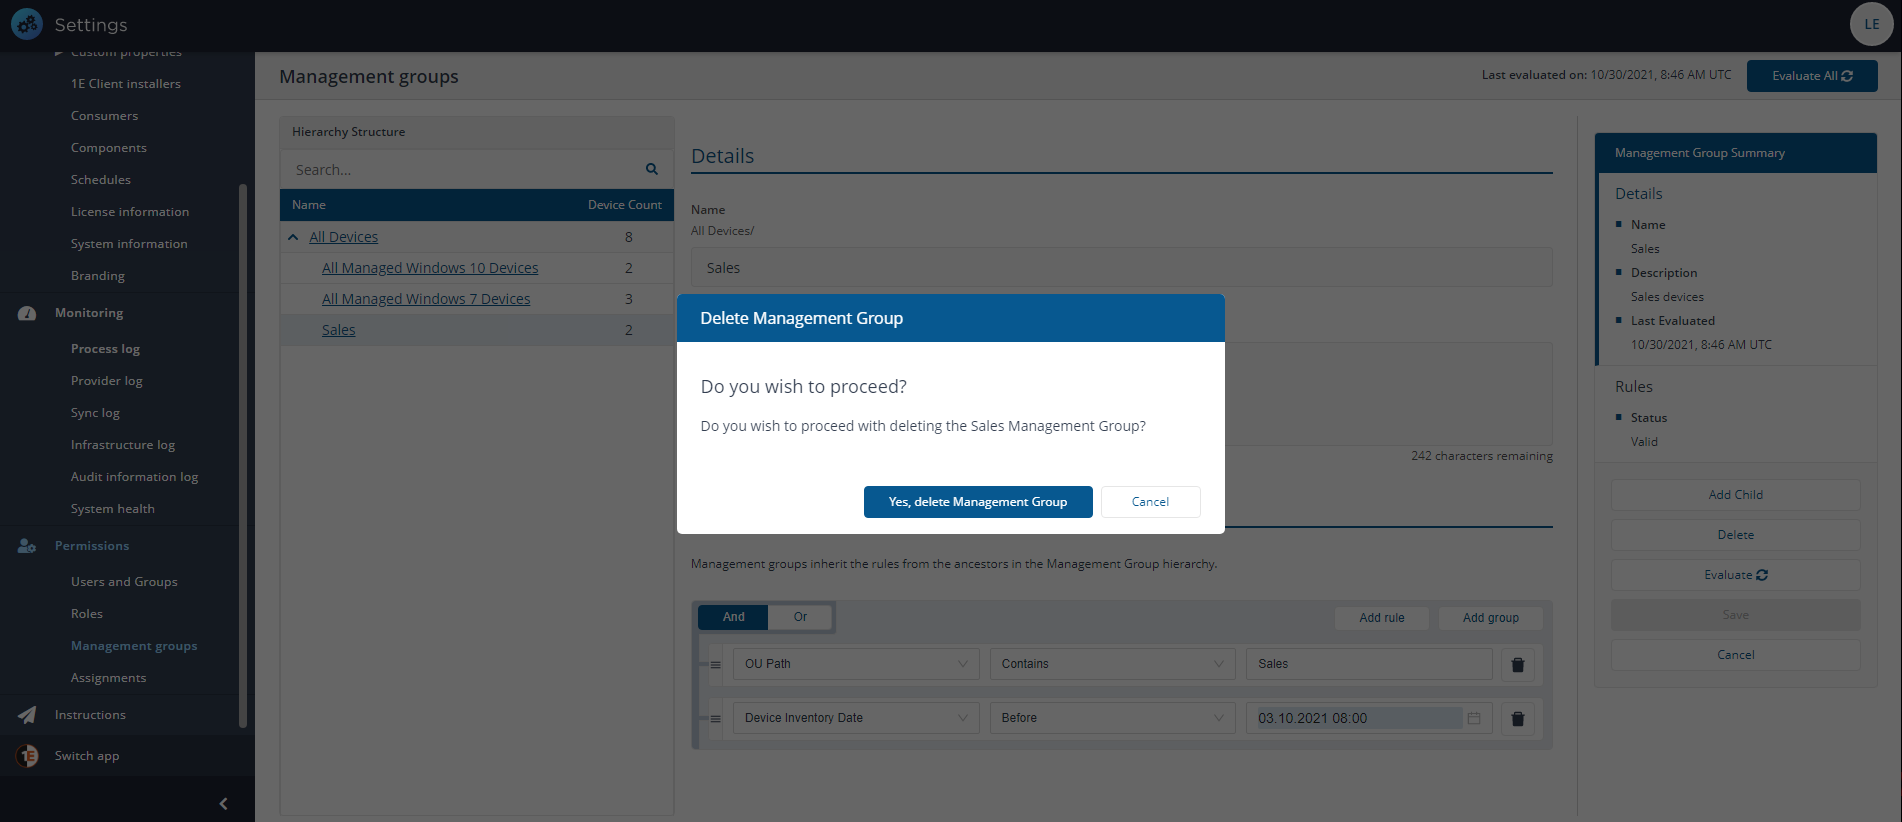
To delete an existing Management Group:
-
In the Management Groups table, locate the Management Group you want to delete and click the title at the left-hand end of its row in Hierarchy Structure.
-
Click Delete. This displays the Delete Management Group popup.
A Management group cannot deleted unless you remove its dependencies (assignments, policies, engagements) first.
-
Here you are asked if you want to proceed with the delete process. Click Yes, delete Management Group to confirm the deletion, or No to cancel.
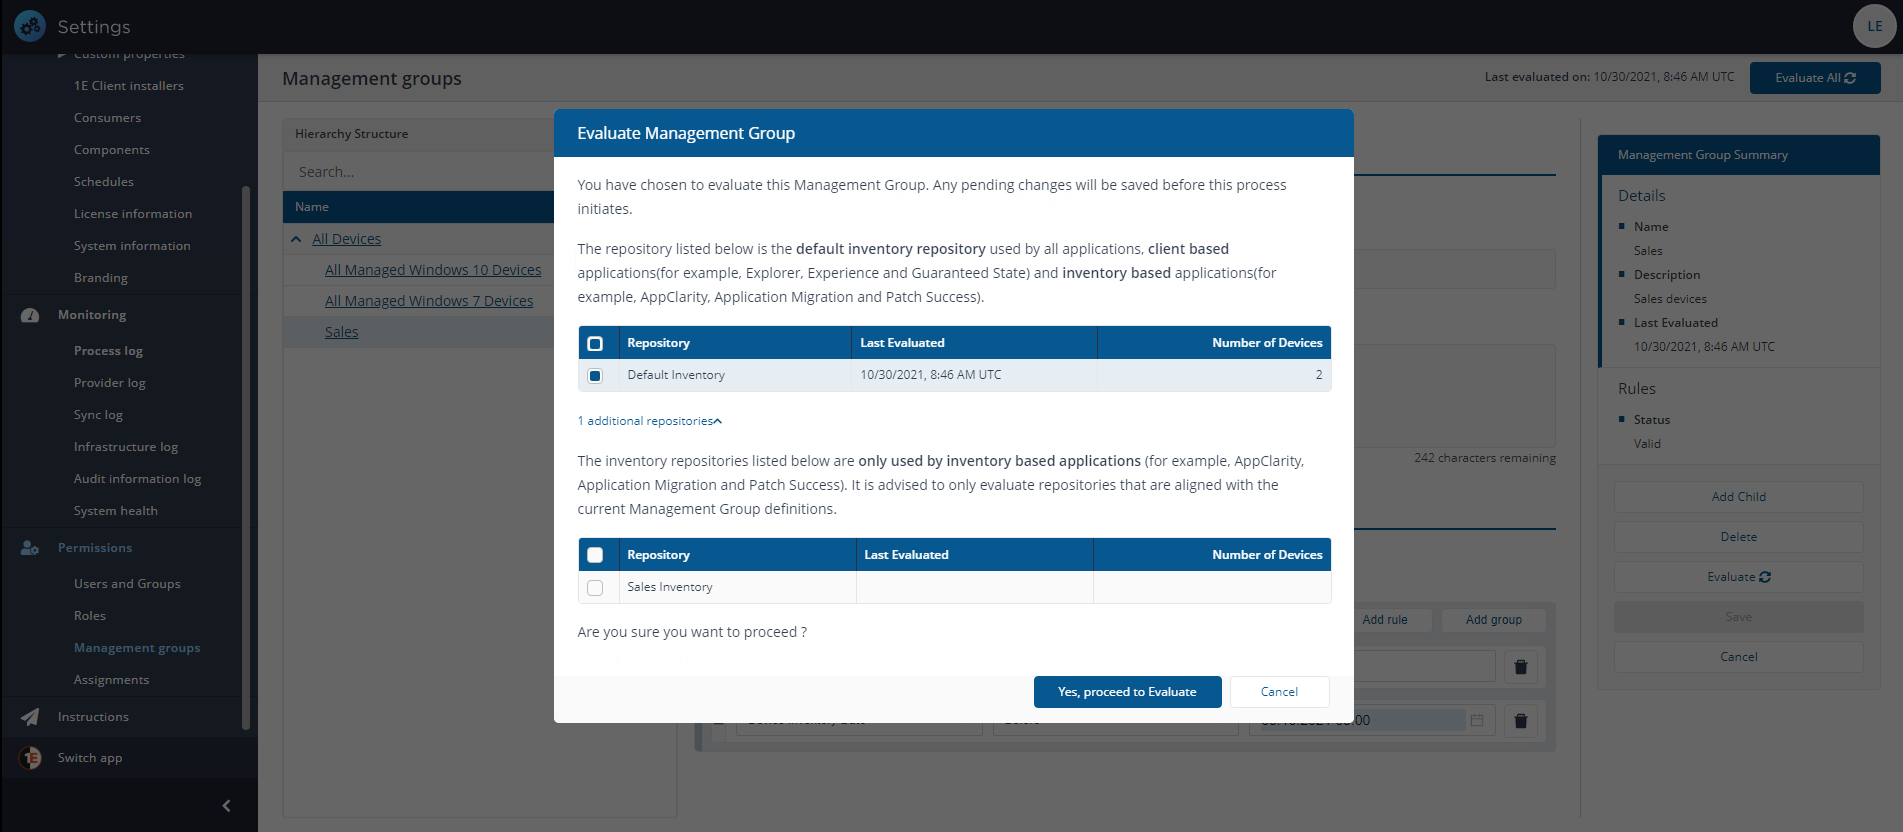
You can select to evaluate the Management Groups at any time.
When a parent Management Group gets evaluated, all child Management Groups also get evaluated.
-
Click Evaluate.
-
If there is only one inventory repository, the evaluation will be queued immediately. If there is more than one inventory repository, the Evaluate Management Groups popup will be displayed, and you will need to select a Repository then click the Evaluate before the evaluation is queued.
-
When an evaluation is queued you will see a Management Group Evaluation action appear on the Settings > Monitoring > Process log page. From there you can view the progress of the evaluation.
-
When this action has run, the Endpoint Troubleshooting application will reflect any changes that have been made to the Management Group memberships.
Delegation is, a concept where an administrator can delegate some of their own responsibility to other users and limit the area where they can use that responsibility. A Full administrator can create and modify Roles. They can also assign any Role to a 1E Platform user or group using Management Groups, there are exceptions, like the Group Administrator Role which cannot be assigned to All Devices.
For example, a local security administrator with the Group Administrator role cannot create or modify Roles, but they can assign any Role that is marked as delegatable to a Management Group they have the security permission on, or any of its child Management Groups.
The exception is that a local security administrator cannot assign a Role that has the same security permission using the same Management Group they have permissions on. Instead, they have to use a child Management Group of the one they have security permissions on.
Essentially, a local security administrator cannot create an assignment that would result in another user or group having the same security permissions as they do.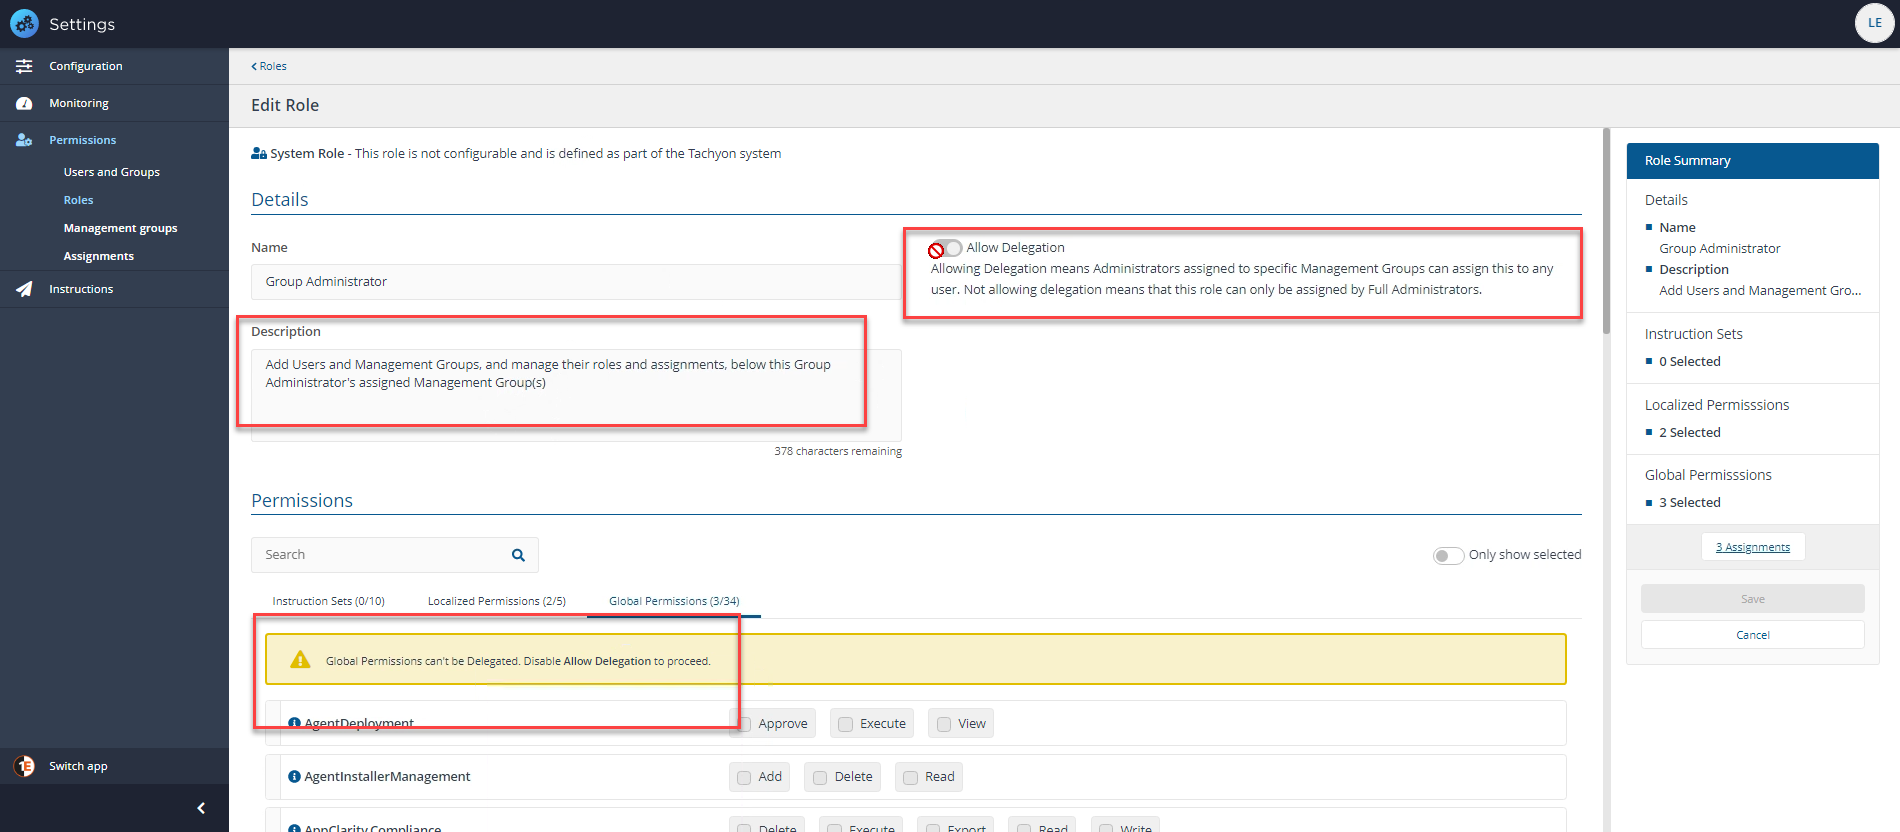
Delegation example
In our example we have a new 1E Platform installation with only a few assignments, the one shown in the picture is of the Full Administrator role which is assigned to the group All_Devices_Full_Administrator and is assigned to All Devices. We have used a group to control the assignment instead of an individual user account.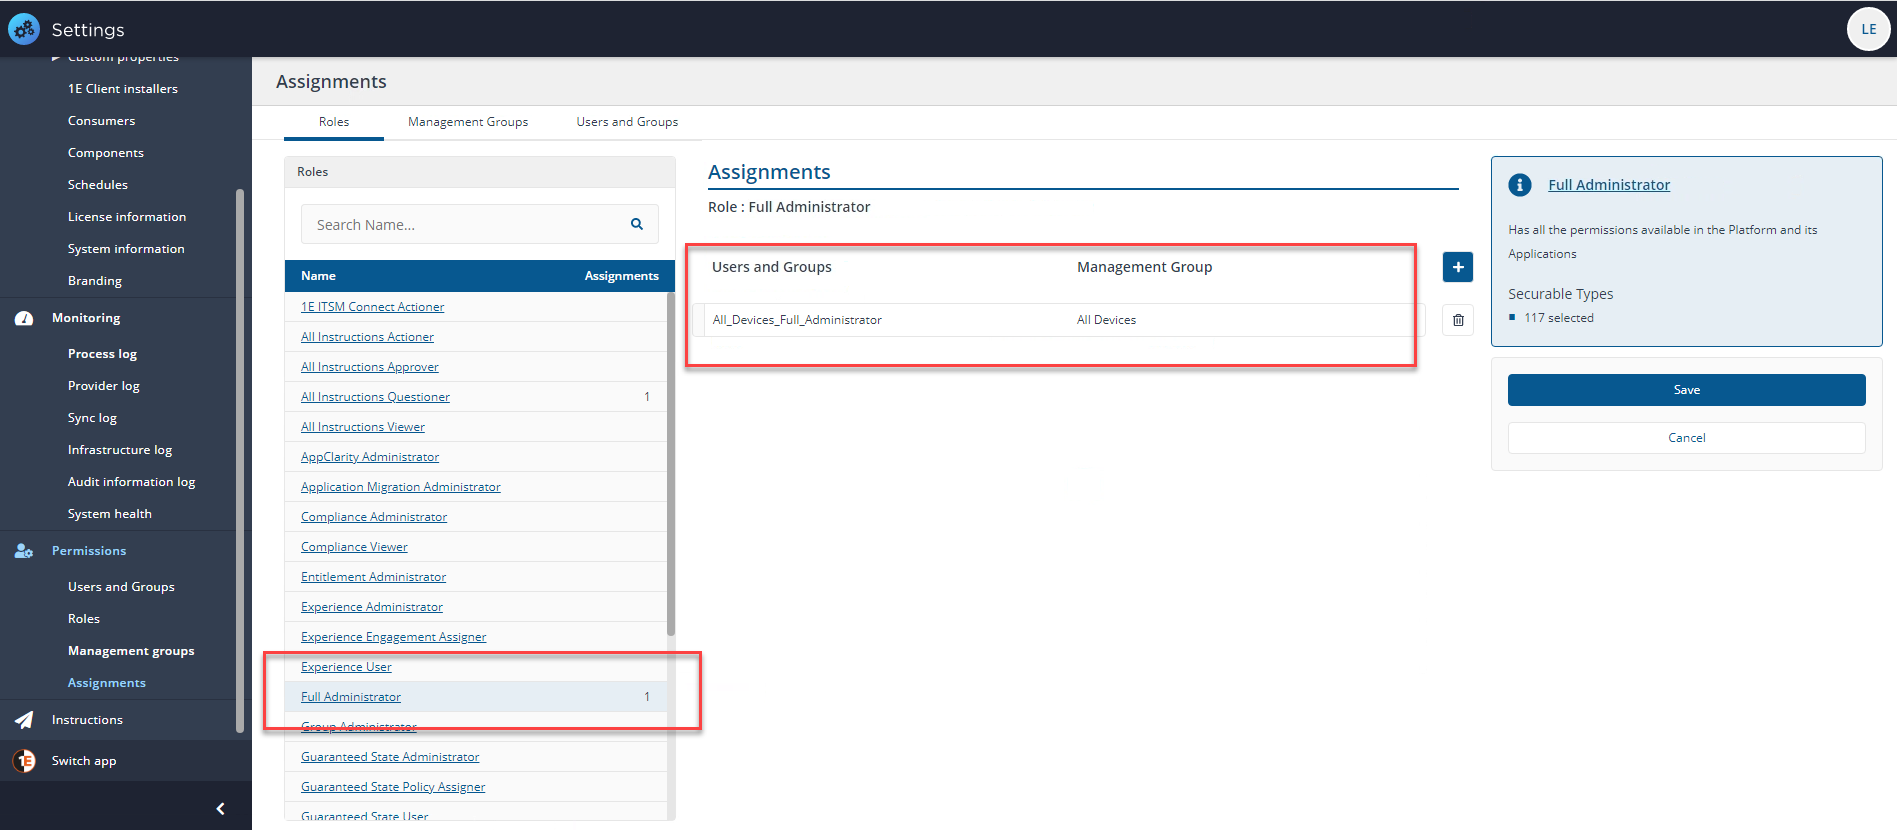
In our example, we want to use the delegation feature and use the Group Administrator role to delegate some tasks to a child Management Group of All Devices called Servers to another administrator. We'll assign the Group Administrator role to a Universal AD group called Server_Group_Administrator which we have added using Users and Groups.
To add the new assignment:
-
We click on the title of the role to configure, in this case Group Administrator this displays the Assignments page focused on that role.
-
Clicking the plus sign allows us to add our group, Server_Group_Administrator and the associated Management Group, Servers.
-
Once we've selected the group and Management Group, we click Save.

When a user in the Server_Group_Administrator group signs in to 1E Platform, they will be able to create a child Management Group. For example a subset of the Servers Management Group for application servers called App servers, other Management Groups at the same level are locked because the Server_Group_Administrator has not been applied to those Management Groups.
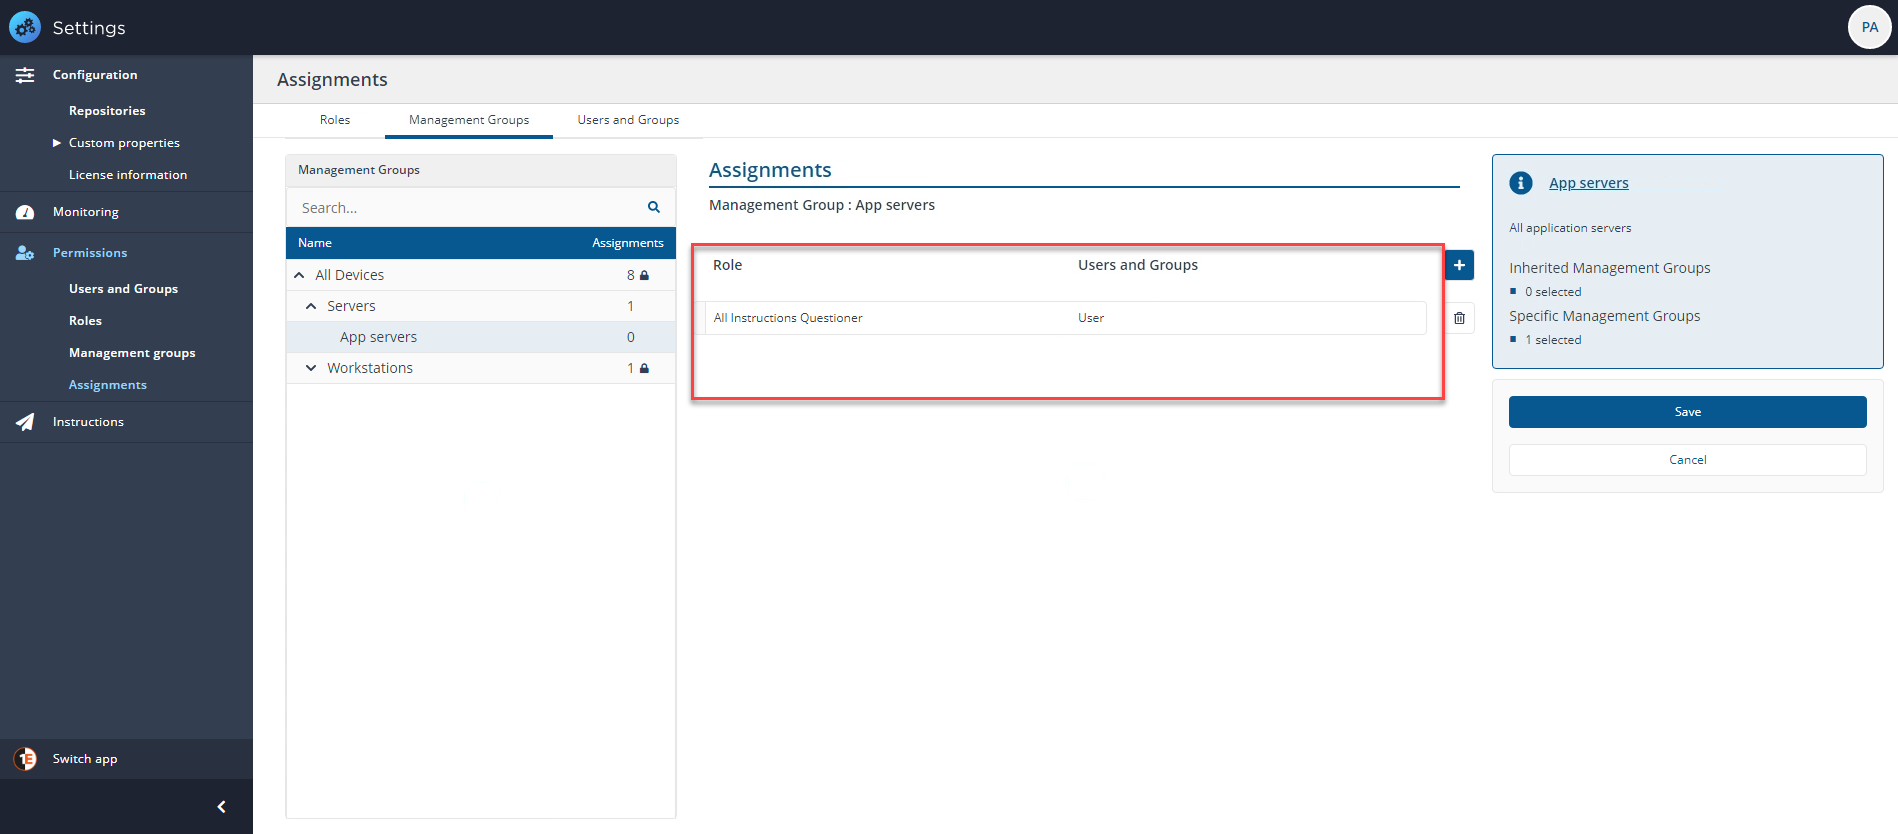
If, for example, our Server_Group_Administrator now wants to add a user with the All Instructions Questioner role to the new App servers Management Group, they can now do so.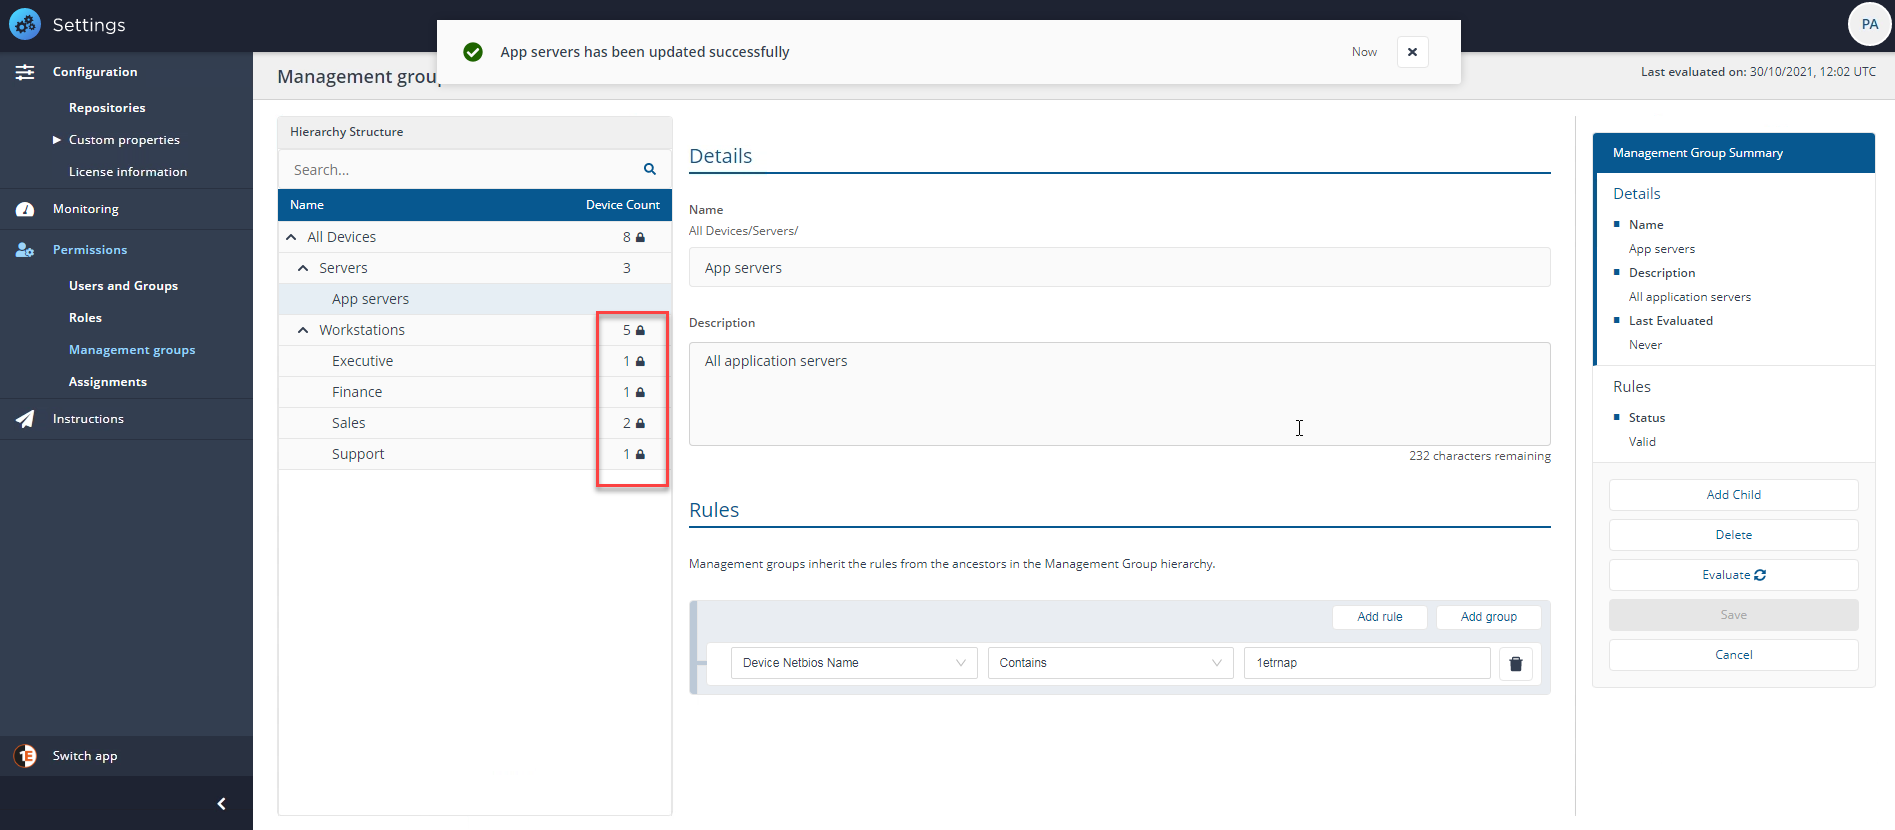
In computing, a Boolean result means an expression is either true (1) or false (0). That is, expressions such as A AND B or A OR B give you a true or false result. Boolean expressions can be much more complex, and you can use brackets (groupings) to keep the same operators together, for example A AND B AND C. You would not write an expression such as A AND B OR C because it is ambiguous. It can be interpreted as either A AND (B OR C) or (A AND B) OR C.
When you are building rules, and you get different results to the ones you expect, write down each of your rules as A, B, C etc, and put them into a simple Boolean expression, like A OR (A AND B) = A.
This is perhaps the most important point to remember when building Management Group rules, and why it helps to write down what you are trying to achieve as a Boolean expression, then simplify it. The Rule examples section has some simple examples of how Boolean expressions translates to the rules you can apply to your own Management Groups.
The rows in the Rules section are laid out as follows.
|
Conjunction |
Rule Name |
Operators |
Value |
Delete |
Gripper |
|---|---|---|---|---|---|
|
When there is more than one rule, this field determines how it is evaluated with the other rules. This may be one of:
|
Determines the type of information checked when evaluating the rule. For example, selecting Device Computer Name will specify checking the set value against the information held internally for each device's computer name using the selected operand. Refer to Management Groups rules. |
How the value compares against the type of information. This may be one of operators in the following table.
|
The value field is either a string, date, or numeric value, depending on the chosen rule name. It may also be a Device tag. For more information about Device tags, refer to Custom properties. |
This field contains an icon that lets you delete the rule. |
This field lets you grab the rule and change its order where there is more than one rule. |
Operators:
|
Operator |
Attribute type |
Comparison |
|---|---|---|
|
Equal to |
String, Date, Number, Yes/No |
Your value is exactly equal to the device’s value. |
|
Not Equal to |
String, Date, Number |
Your value is not equal to (different from) the device’s value. |
|
Before |
Date |
Your date is before the device’s date. |
|
After |
Date |
Your date is after the device’s date. |
|
Begins with |
String |
The device’s value begins with your value. |
|
Ends with |
String |
The device’s value ends with your value. |
|
Less than |
Number |
Your value is less than the device’s value. |
|
Less than or equal to |
Number |
Your value is less than or equal to the device’s value. |
|
Greater than |
Number |
Your value is greater than the device’s value. |
|
Greater than or equal to |
Number |
Your value is greater than or equal to the device’s value. |
|
Is one of |
Tag |
The specified Device tag exists on the device, and its value is one of the array of alternative values that you specified. |
|
Is not one of |
Tag |
The specified Device tag exists on the device, and its value is not one of the array of alternative values that you specified. |
|
Is Null |
String, Date, Number, Tag |
The device does not provide this information. If you have specified a Device tag, it does not exist on the device. |
|
Is not Null |
String, Date, Number, Tag |
The device provides this information, but it can be any value. If you have specified a Device tag, it exists on the device, set to any value. |
|
Contains |
String |
The device’s value contains your text string. |
|
Not Contains |
String |
The device’s value does not contain your text string. |
Rule examples
The following examples may help to illustrate the logic underpinning the rules you can build and apply to the Management Groups in your environment.
Rule example 1
"Device Netbios Name begins with 1ETRNW" OR ("Device Netbios Name begins with 1ETRNW" AND "Device Netbios Name begins with 1ETRN")
Is the same as saying:
"Device Netbios Name begins with 1ETRNW"
You could reduce this to the statement:
A OR (A AND B) = A
In our environment, this returns all five workstation devices with the NetBIOS name beginning 1ETRNW.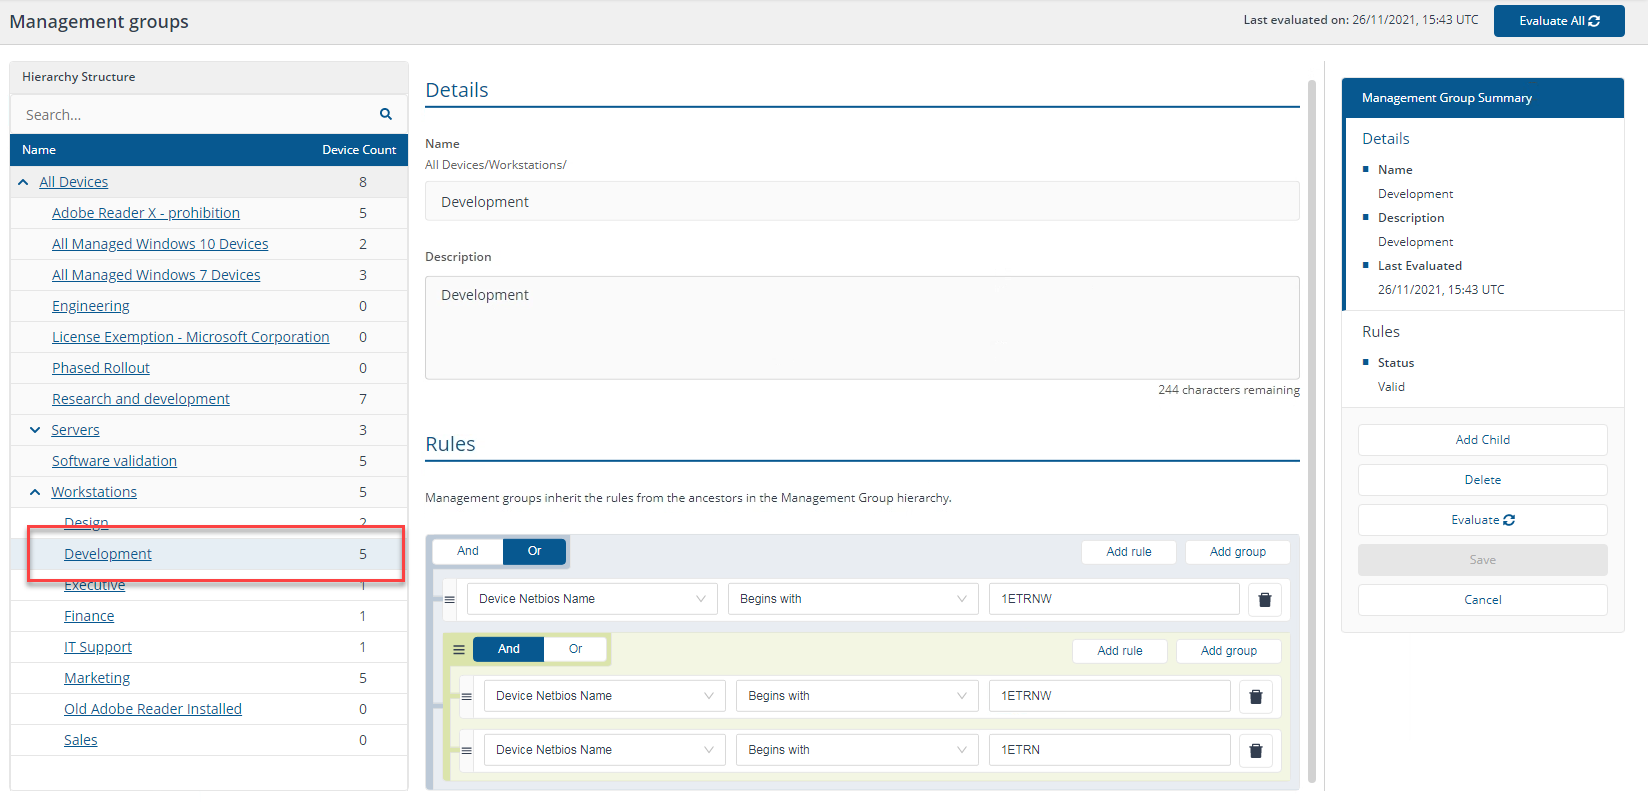
Rule example 2
"Device Netbios Name contains 101" OR ("Device Netbios Name Contains 101" AND "Device Netbios Name Contains 71")
Is the same as:
"Device Netbios Name Contains 101"
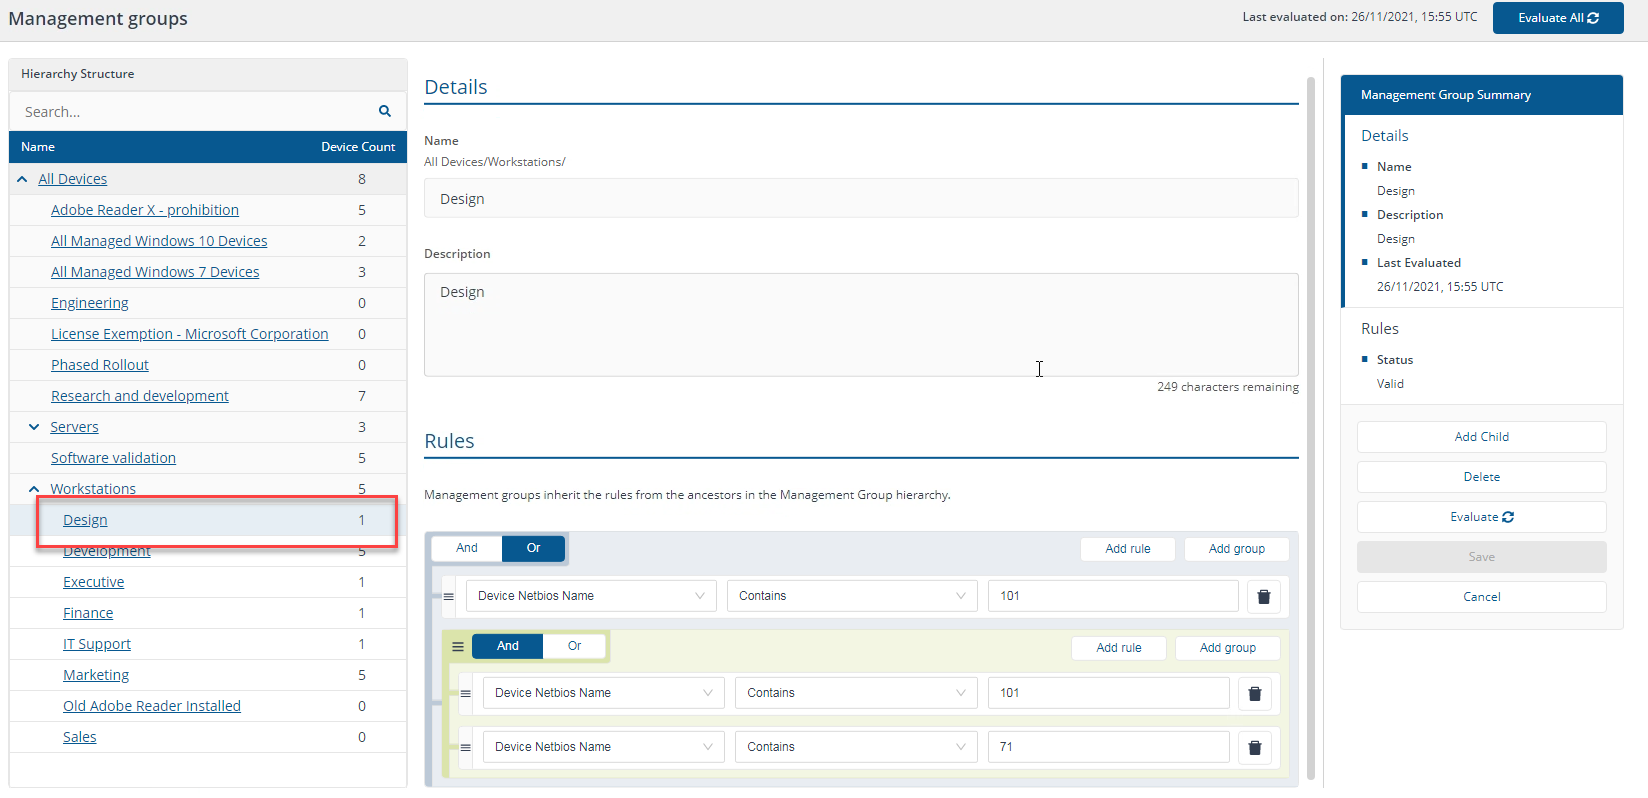
You could reverse the logic in the statement and say:
"Device Netbios name Contains 101" AND ("Device Netbios name Contains 101" OR "Device Netbios name Contains 71")
Which is the same as:
"Device Netbios Name Contains 101"
You could reduce this to the statement:
A AND (A OR B) = A
In our environment, this returns one workstation device with the NetBIOS name contains 101, which matches one device, 1ETRNW101.
Rule example 3
Management Group rules do not let you place a Boolean NOT operator around a grouping, but you can convert an expression into NOT rules, for example:
NOT ("Device Netbios Name Contains AP" OR "Device Netbios Name Contains CM")
Using rules, you can express this as:
"Device Netbios Name Not contains AP" AND "Device Netbios Name Not contains CM"
You could reduce this to the statement:
NOT (A OR B) = (NOT A) AND (NOT B)
In our environment this returns the six devices where the NetBIOS name does not contain AP or CM, which are 1ETRNAP, our application server, and 1ETRNCM, our Configuration Manager server.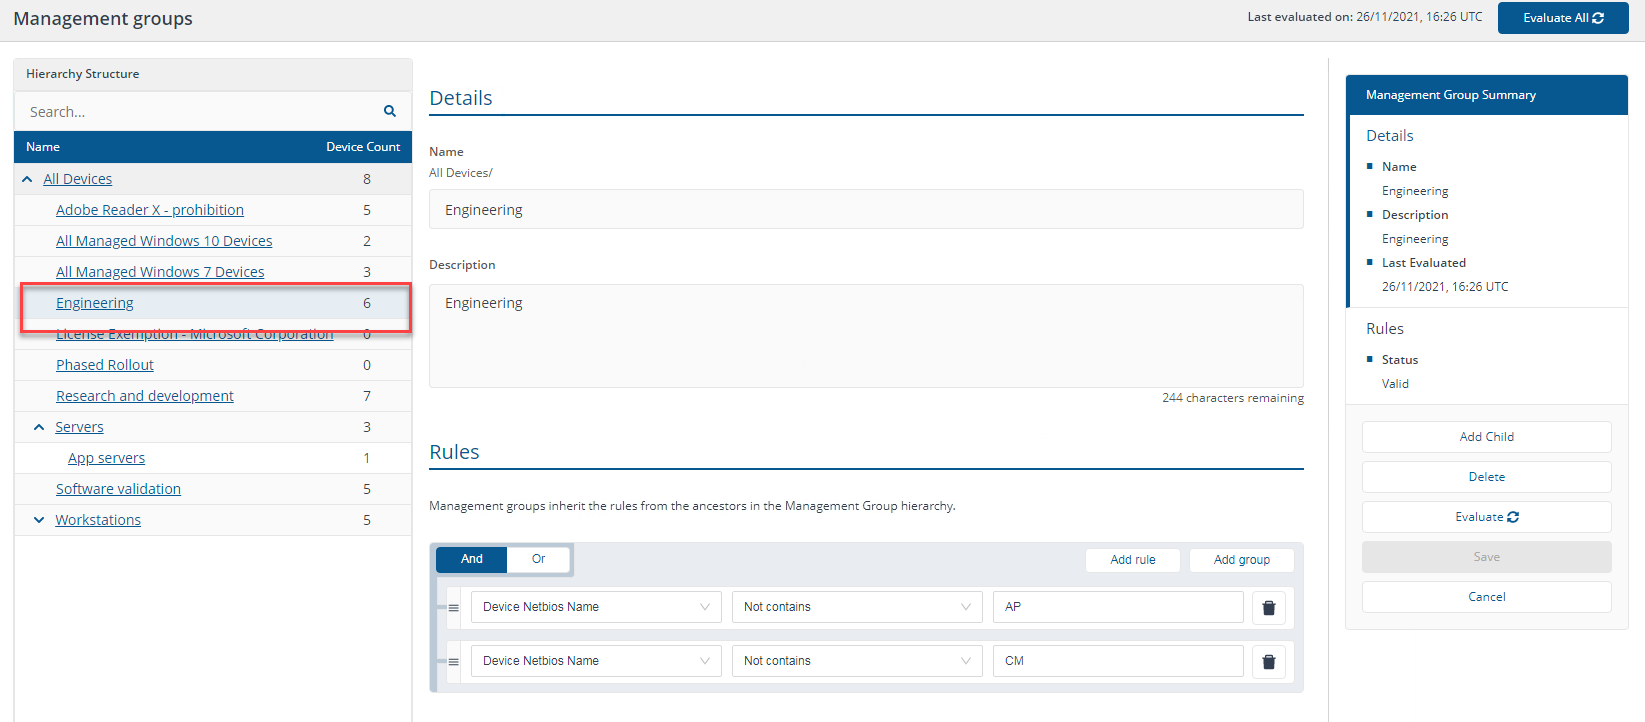
For a list of available rules refer to Management Groups rules.