1E connector
Introduction
The 1E connector connects the 1E and SLA components to support the management group and 1E Powered Inventory features. The 1E Powered Inventory feature uses instructions to fetch inventory data from clients and is a prerequisite for Patch Insights.
This configuration procedure assumes you will always use this Connector to synchronize management groups and optionally import data for the 1E Powered Inventory feature.
The following steps are always required:
-
Create a 1E user. In our examples, this user is ACME\SLATACHYON.
-
Add the 1E Connector and configure it to use the above user and password, and the correct Consumer URL.
-
Test the connector.
-
Schedule the 1E Connector Sync Data action to run every 24 hours using the Default Inventory repository.
The following steps are additionally required you intend to use the 1E Powered Inventory feature:
-
Assign the above 1E user to the All Instructions Questioner role.
-
Create an instruction set called 1E Inventory and upload its instructions.
-
Create a custom role called 1E Inventory Questioners, assign questioner permissions to the instruction set, assign it to all devices, and add the 1E user as a role member.
To understand the synchronization, refer to How management group synchronization works. For information about how to configure and use management groups, refer to Management Groups.
1E Powered Inventory is used to populate an inventory repository with inventory and usage data by using instructions that collect data from clients. It is required by the Patch Insights application. For details of how these instructions are used, refer to How 1E Powered Inventory works.
Prerequisites
Before adding the 1E connector, you will need the following:
-
A domain user account dedicated for use by the 1E connector. This account will be configured as a 1E user.
-
This is effectively like a service account. In our examples, this is ACME\SLATACHYON.
-
The account will be assigned to the role All Instructions Questioner.
-
-
A user with Full Administrator role permissions to configure the connector and related tasks.
If the connector is to be used to support the 1E Powered Inventory feature, then you will also need the following:
-
Inventory instructions used to get data from 1E Clients. Refer to Creating the 1E Inventory instruction set.
-
An appropriate license to permit using 1E connector inventory instructions. This is normally included in a standard 1E license. Refer to 1E license details.
The 1E Powered Inventory feature is a prerequisite for Patch Insights.
Creating a user
These steps create the user required by the 1E Connector and assign it to the All Instructions Questioner system role.
You need a domain user account in Active Directory. In our example, this is ACME\SLATACHYON.
-
Log in to the 1E Platform using a user account with a Full Administrator role.
-
Navigate to Settings > Permissions > Users and Groups.
-
Click Add. The Add user pop-up window opens.
-
In the Select user field, type the name, or part of the name, for the Active Directory user or security group that you want to add. A list of matching names will be retrieved from Active Directory and displayed as you type, These are filtered so that users or groups that have already been added do not appear.
-
Select the Active Directory user or security group from the list of matching names displayed in the drop-down list. In our example, this is ACME\SLATACHYON.
-
Click Add.
-
-
On the Settings > Permissions > Users and Groups page, click the user's name link for ACME\SLATACHYON.
-
On the User: SLATACHYON page click the Edit button to display the Edit roles assigned to user pop-up window.
-
Select All Instructions Questioner.
-
Click Save.
-
Adding the connector
-
Navigate to Settings > Configuration > Connectors.
-
Click Add.
-
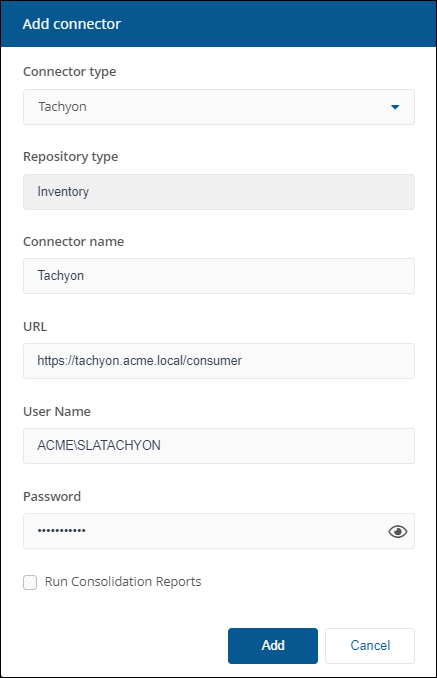
In the Add Connector pop-up window, select Tachyon as the connector type.
-
In Connector name, enter a logical name for this connector.
Use a naming convention for connector names, for example, <connector type> <scope> <RCR>. Scope describes where data is coming from or what it's being used for, for example, Demo, Test, Lab, Q2 Audit. Include RCR in the name if the Run Consolidation Reports option is available and you have enabled it.
-
In URL, enter the URL of the 1E consumer in the following format: https://<TachyonDNSAliasFQDN>/consumer. In our example, the URL is https://tachyon.acme.local/consumer.
As stated above, /consumer must be included in the URL in the same way that /Tachyon needs to be added to <TachyonDNSAliasFQDN> when a 1E user browses to the 1E Platform.
-
In User Name, enter the name of the user that has permission to run the Inventory instructions. In our example, this user is ACME\SLATACHYON.
-
In Password, enter the password for this account.
-
Leave the other fields empty.
-
Select the Run Consolidation Reports checkbox if you want consolidation actions to be processed each time the Sync Data action is executed for the connector.
If you enable this on more than one connector, it can lead to unnecessary processing. The recommended method of processing consolidation actions is to schedule the action Generate Report - Basic Inventory Consolidation to execute after the Sync Data actions have run for all connectors. This will execute the remaining consolidation actions. Alternatively, select the Run Consolidation Reports checkbox on one of your connectors. You can view action processes in Settings > Process log.
-
Click Add.
For information on how to test or delete a connector, and how to sync data into a repository, refer to Connectors page.
Creating the 1E Inventory instruction set
These steps are only required in the following scenarios:
-
You have not already loaded the 1E Inventory DEX Pack using the 1E product pack deployment tool as part of the 1E setup process.
-
You will be using 1E Powered Inventory.
The steps below show how to create an instruction set called 1E Inventory. It will contain the five instructions listed in the following table:
|
Instruction text (ReadablePayload) |
Type |
Description |
Data to Sync category |
Instruction file name |
Version |
|---|---|---|---|---|---|
|
Which processors are in the device? With a stagger of <limitSecs> seconds. |
Question |
Processor details. Uses Device.GetProcessors method. For more information, refer to Writing instructions > Functions and Methods Reference > Tachyon Agent Methods in the PDF version of the 1E SDK documentation. |
Processor |
1E-Inventory-Device-GetProcessors |
3 |
|
Inventory - what is the summary of file usage since <startDate>? With a stagger of <limitSecs> seconds. |
Question |
Process Usage data inventory for SLA. Uses the $ProcessUsage_Daily inventory table (refer to Writing instructions > SCALE User Guide > Client Activity Record > Process usage in the PDF version of the 1E SDK documentation), if Module.Inventory.ProcessUsage.Enabled setting is true (default) in the 1E Client configuration file. Refer to Settings for Platform features of the 1E Client. |
Software Usage |
1E-Inventory-FileUsageSummary |
3 |
|
Inventory - what software is installed? With a stagger of <limitSecs> seconds. |
Question |
Software inventory for SLA. Uses a combination of the following:
|
Installed Software |
1E-Inventory-Software |
3 |
|
Inventory - summary of which users have logged on since <startDate>? With a stagger of <limitSecs> seconds. |
Question |
User data inventory for SLA. Uses the $UserUsage_Daily inventory table (refer to Writing instructions > SCALE User Guide > Client Activity Record > User usage in the PDF version of the 1E SDK documentation), if Module.Inventory.UserUsage.Enabled setting is true (default) in the 1E Client configuration file. Top Console User is also calculated from this table. Refer to Capture sources. |
User |
1E-Inventory-UserUsageSummary |
3 |
|
Returns patch status for 1E Inventory consumption, staggering for <limitSecs> seconds. The 1E-PatchSuccess-PatchStatus instruction is not required if you do not intend to use the Patch Insights application, and it will not run if you do not have a license for Patch Insights. For more information about configuring Patch Insights, refer to Patch Insights. This instruction is part of this 1E Inventory instruction set used by the 1E Connector. Do not move it to the 1E Patch Insights instruction set used by the buttons visible in the Patch Insights application. |
Question |
Returns patch status for 1E Inventory consumption. |
Patch |
1E-PatchSuccess-PatchStatus |
5.0 |
You can use the Product Pack Deployment tool to simultaneously upload the instructions and create the instruction set, or you can follow the manual steps below. Refer to Uploading the instructions and Creating the instruction set. These instructions are included in the 1E Inventory product pack, available in the TeamViewer DEX Support Portal.
Uploading the instructions
-
Download the TachyonPlatform.vx.x.x.x.zip file from the TeamViewer DEX Support Portal.
-
Extract the 1E-Inventory.zip from the Classic folder.
-
Log in to the 1E Platform using a user account with a Full Administrator role.
-
Navigate to Settings > Instructions > Instruction sets .
-
Click Upload.
-
In the Open dialog, navigate to the location of the 1E-Inventory.zip file.
-
Select 1E-Inventory.zip and click Open.
Creating the instruction set
All the instructions contained in the .zip file will initially be added to the default Unassigned instruction set. Instructions in the Unassigned instruction set cannot be used, so first you will need to create a new instruction set with the verification instructions.
-
Select the five instructions you want to add to the new set by selecting the checkbox at the start of each instruction row in the list.
-
Click Add new set in the button panel to the right of the page.
-
In the Add new instruction set pop-up window, type the name 1E Inventory and the description 1E portalPowered Inventory.
-
Ensure that the Include 5 selected instructions checkbox is selected.
-
Click Add.
Configuring the 1E Connector
Follow the steps in Adding the connector and then return to Executing the 1E Connector Sync Data action.
Executing the 1E Connector Sync Data action
When you've finished setting up the connector, you will have to synchronize it to populate an inventory repository with the data from 1E.
You can execute the Connector Sync Data action in the same way as other connectors (manually or using a schedule); however, the 1E connector manages its actions differently from other connectors. It uses 1E instructions to collect data from the 1E Client once every 24 hours.
First, you should run the Sync Data action manually to confirm it works, in particular, to test the user permissions and its ability to run the instructions.
-
To manually sync data, refer to Executing a connector sync action.
-
To schedule the sync data action, refer to Schedules page.
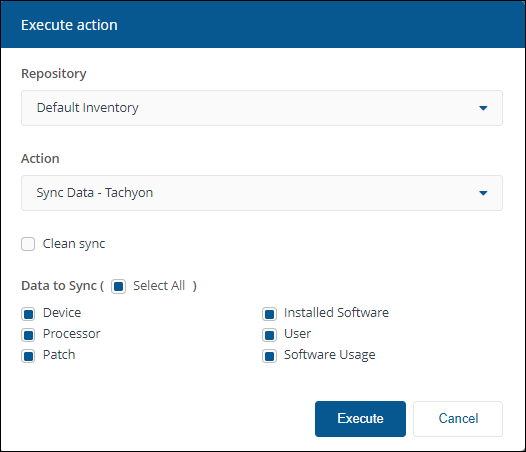
In our example, we will be running the Sync Data - 1E action on the default inventory repository called Default Inventory. You can select which data to sync. The data categories displayed are dependent on the type of connector. For 1E, you can select from the following:
-
Device
-
Installed Software
-
Processor
-
User
-
Patch
-
Software Usage
Each data category corresponds to one of the inventory instructions. Each instruction runs once every 24 hours, for 24 hours, collecting data if the device is online or comes online during that period.
The exception is the Device category, which does not run an instruction but instead gets device data directly from the TachyonMaster database. To use management groups in client-based applications (Endpoint Troubleshooting, Experience Analytics, and Endpoint Automation), you must use the Default Inventory repository and select Device data.
When you schedule the Sync Data - 1E action to run automatically instead of manually, ensure you do not schedule it to run more frequently than the duration for the 1E Inventory instructions, that is every 24 hours. To understand why, refer to How 1E Powered Inventory works.
You can review the results as they come in by checking the instruction history.
-
Switch to the Endpoint Troubleshooting application.
-
Navigate to Instructions > History.
-
Observe that all five instructions are running with a duration of 1440 minutes. Any devices coming online during that period will respond.
-
Click any of the instructions to review the response content and status.
If you want to review the data that was imported into the inventory repository in detail, navigate to the Inventory Insights pages.
-
The Inventory Insights > Hardware > Hardware Inventory page shows software details retrieved from the devices that have 1E Clients.
-
The Inventory Insights > Hardware > Device page shows hardware and OS details for devices that have 1E Clients.
-
The Inventory Insights > Software Inventory > Product Usage page shows the software product usage that has been retrieved from devices that have 1E Clients.
The above data from 1E Clients may be consolidated with data from other inventory sources using their inventory connectors.
How management group synchronization works
The SLA components are responsible for storing information about management groups, including group definitions and membership, in the SLA databases. 1E maintains a synchronized copy in the TachyonMaster database. Whenever the SLA Engine evaluates group membership, and it detects changes in the Default Inventory repository, it notifies 1E by initiating a sync. The Coordinator service receives the sync, fetches the changes, and updates the TachyonMaster database. To contact 1E, the SLA Engine uses the URL of the Consumer defined in the 1E Connector, and the Network Service account is a member of the Full Administrator role.
Membership evaluations occur whenever the Default Inventory repository is updated by a manual or scheduled Connector Sync Data action, or the Evaluate button is pressed, as described in the Management Groups.
How 1E Powered Inventory works
1E Inventory instructions
The 1E connector works differently from other connectors. Other connectors import data in a single operation, whereas a 1E connector sync issues a set of instructions and then runs a two-phase process to gather the data. The default gather period behavior is controlled using settings for the inventory repository in the SLA-Data database. These must not be changed unless otherwise instructed by 1E.
When a 1E connector sync is actioned, either manually using Create a new action, or as a scheduled sync, the following happens:
-
The SLA Engine polls 1E to retrieve the information that is routinely sent back by the connected devices.
-
The SLA Engine asks 1E to run each instruction.
-
Each instruction runs for 1440 minutes (24 hours), known as a gather period.
-
1E sends each instruction to all devices at the same time.
-
Devices respond immediately if they are online, or they catch-up shortly after coming online.
-
Each device will respond only once to each instruction during the gather period.
-
Each instruction has a short random delay before the device sends its response back to the 1E server.
-
Responses are stored in the database and only deleted at the end of the gather period plus a six-hour keep period.
-
-
The SLA Engine polls 1E.
-
The poll is every 360 minutes (six hours) after starting the instruction run for 24 hours, and it fetches all the responses gathered so far.
-
Data is stored in the inventory repository and kept after the server deletes its copy of the data.
-
Devices only appear in the inventory repository if they respond or if they have responded earlier to a previous sync.
1E has minimal impact on the network and client devices when the instructions are run and responses are sent back to the 1E server. The low impact is further reduced by the random delay used by each instruction.
During each poll, there is a small performance impact on the 1E server (master stack) and SLA components when the initial responses are processed, and when the deltas are processed for subsequent polls for other machines coming online.
How to schedule your 1E connector syncs
This is not a precise science, but here are some points you might want to consider when deciding what schedule you want to set for your 1E connector syncs:
-
As we've described under 1E Inventory instructions, the instructions run for 24 hours and poll all the devices that are connected to 1E during that time.
-
Avoid creating overlapping sync schedules for an inventory repository. Use only one 1E connector per inventory repository and sync it once every 24 hours.
-
Because of the 24-hour instruction TTL, the 1E connector sync allows time for devices in different time zones to be online and connected.
-
The information related to a device is updated just once during the sync period. Any updates will be captured during the next sync period.
1E Client configuration
Process and User usage capture is available only on Windows devices.
The 1E Client is required, with the following 1E Client features enabled:
-
Module.Inventory.Enabled=true (Default. This setting is visible in the 1E Client configuration file.)
-
Module.Inventory.ProcessUsage.Enabled=true (Default.)
-
Module.Inventory.UserUsage.Enabled=true (Default.)
For more detail about configuring these and other settings in the 1E Client, refer to 1E Client settings.
1E license details
Ensure your 1E license file has the Inventory consumer enabled and includes the pattern for 1E-Inventory-*.
You can view your 1E license details using either of the following methods:
-
In Settings > License information, look in the Products section and expand Features and the instruction items.
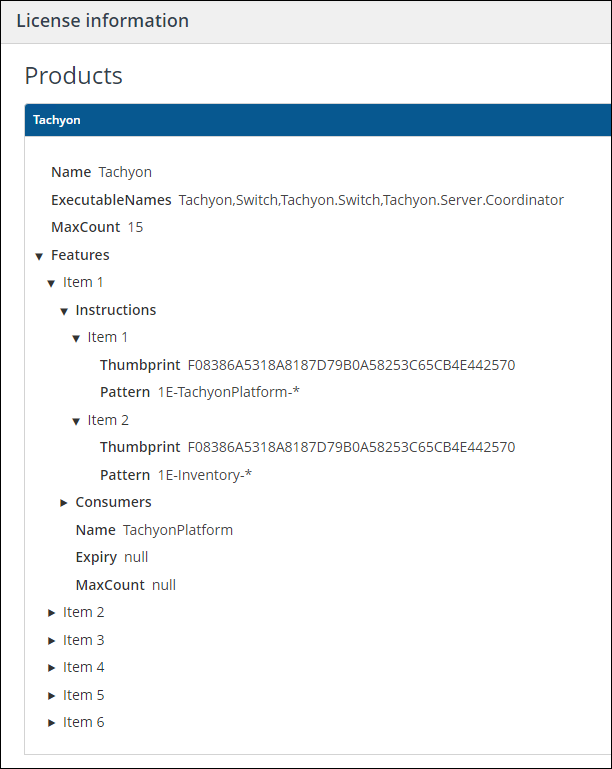
-
In the license file Tachyon.LIC found in C:\ProgramData\1E\Licensing.
Copy<Features>
<Feature name="TachyonPlatform">
<Consumer name="Inventory" enable="on"></Consumer>
<Instructions signersha="F08386A5318A8187D79B0A58253C65CB4E442570" pattern="1E-Inventory-*"> </Instructions>
...
</Feature>
...
...
...
</Features>
If the pattern does not exist, then the 1E-Inventory instructions will not run. You may have an old version of 1E, or your license needs to be updated.