Using Software Reclaim
Software Reclaim is for software administrators, security managers, financial officers and end-users. This article covers the core functionality in Software Reclaim.
You can access Software Reclaim under the Solutions tab when you log in to the 1E Platform. Platform Modules and Solutions visibility depends on your license agreement. To find out more about 1E licensing, and get the complete Digital Employee Experience Platform, contact your 1E Account Team.
If you experience issues with missing software from the software reclaim process, you will need to normalize the software using the 1E Catalog. This normalization step ensures that all software entries are standardized and accurately represented, which can help resolve discrepancies and improve overall software management. Refer to Catalog.
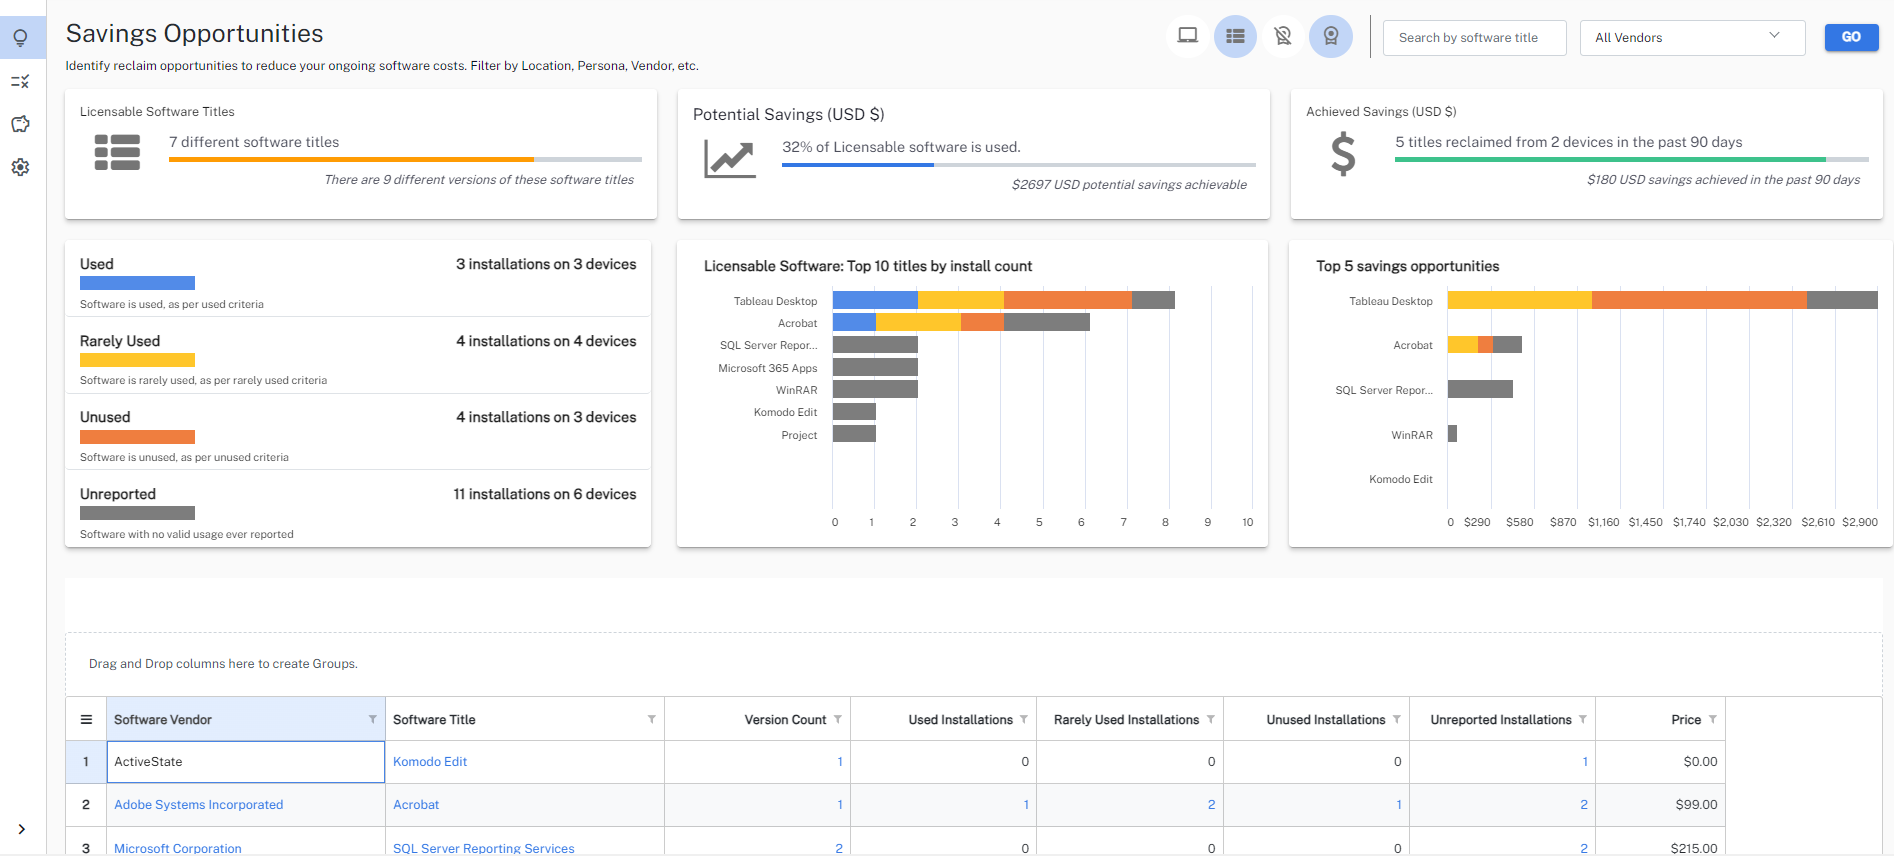
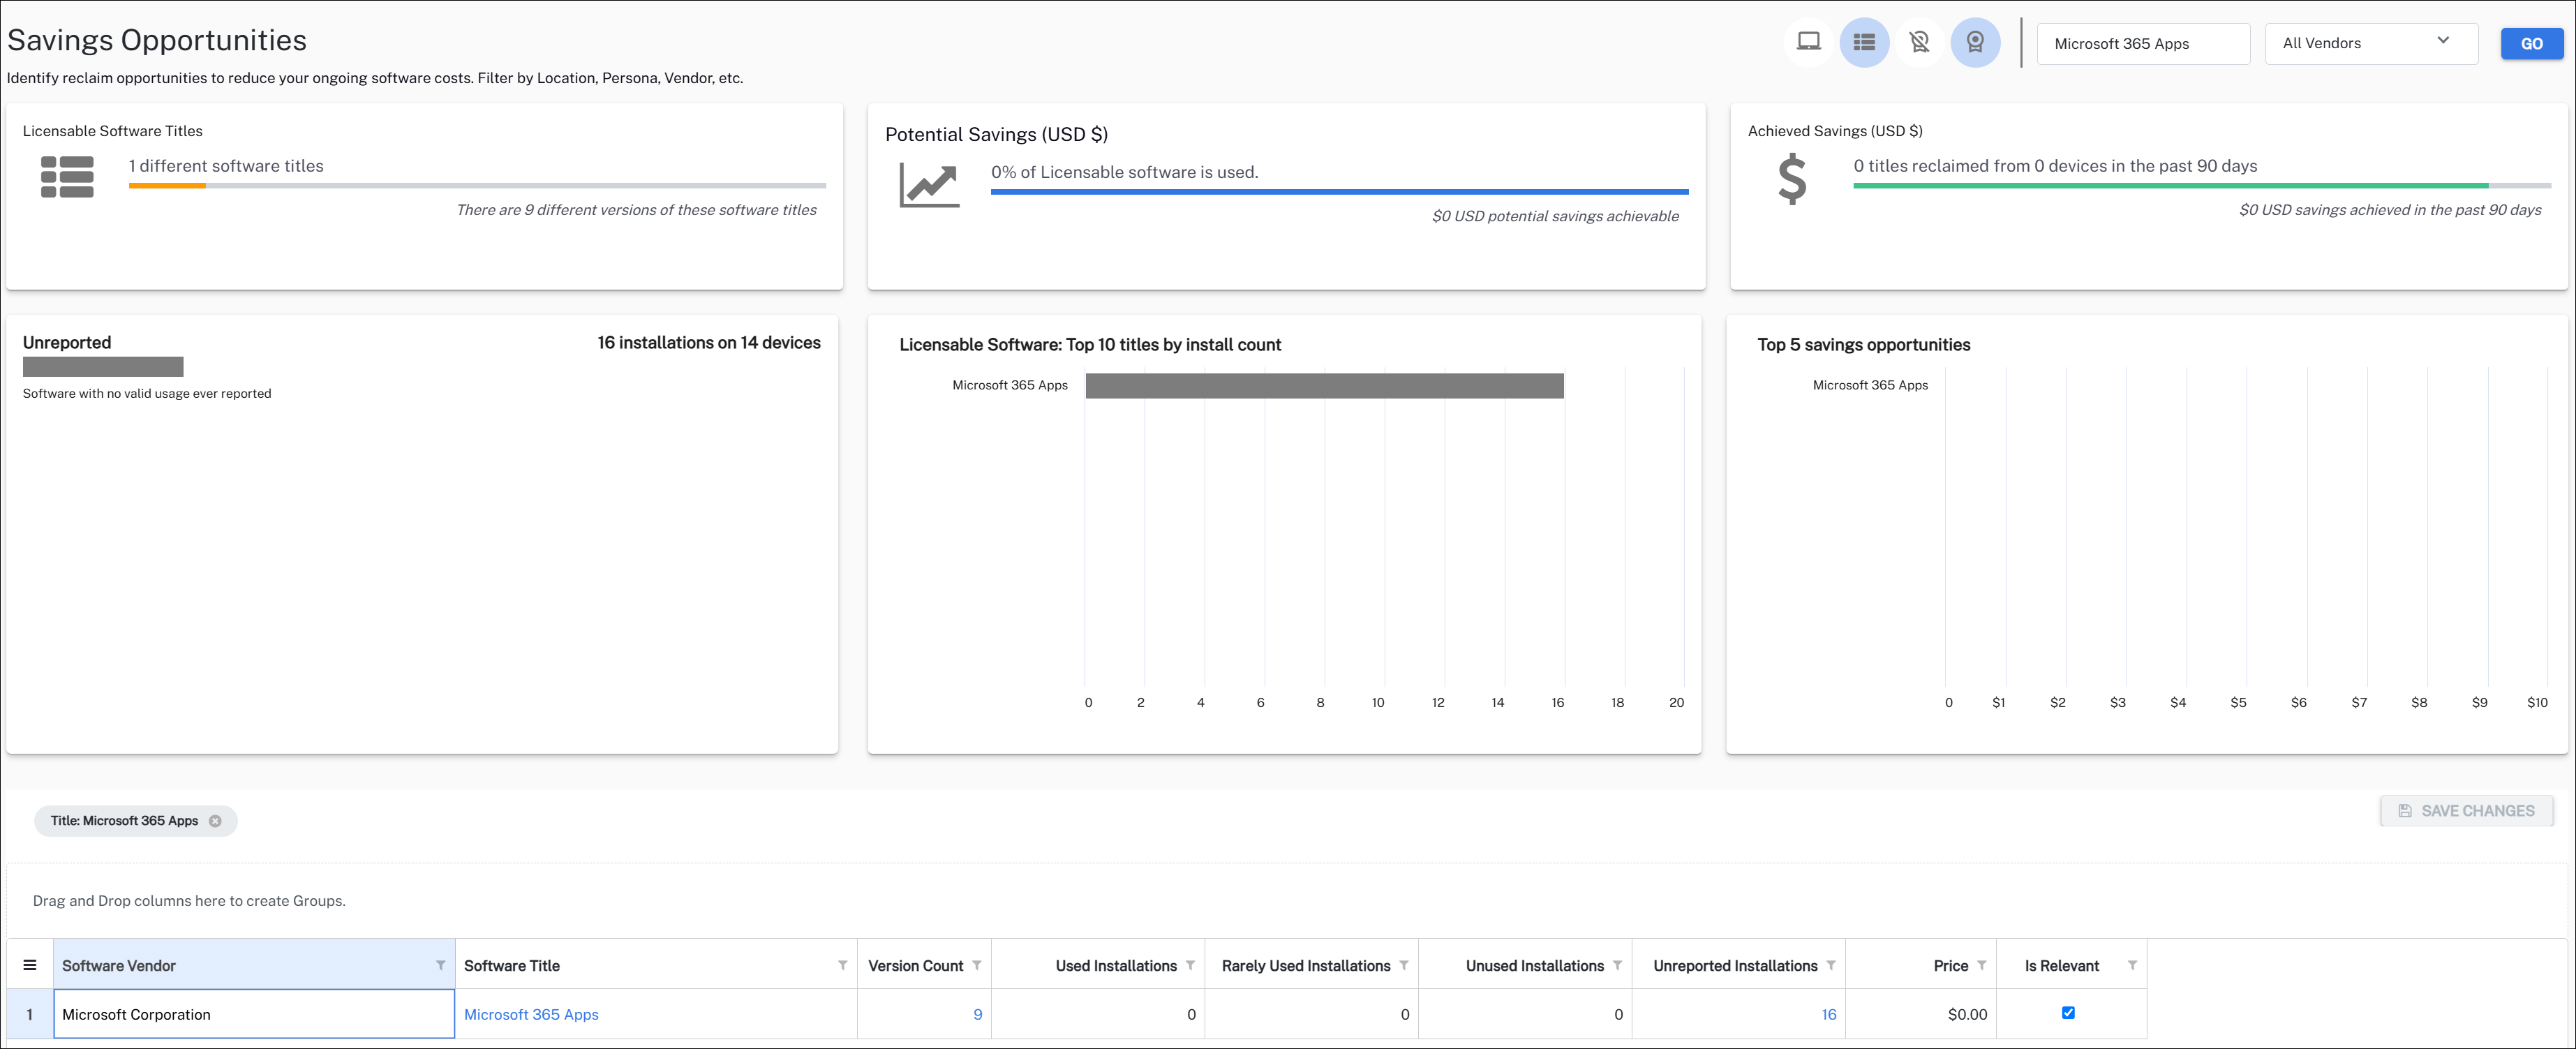
The Savings Opportunities page provides an overview of what software titles are being used and identifies reclaim opportunities that will reduce your software costs.
Page view options
The default page view is a software centric view showing you every relevant software title in your estate either licensable or non-licensable.
You can configure the Savings Opportunities page using the top toolbar to show either a device or software centric view based on either relevant licensable or non-licensable software only by clicking the following icons as indicated:
-
Device Centric View: Updates all fields to display device centric data.
-
Software Centric View: Updates all fields to display software centric data.
-
Relevant Non-Licensable Software: Focuses your software that is not licensable and is identified as relevant.
-
Relevant Licensable Software: Highlights software that is licensable and has not been manually marked as non-relevant.
-
Search by software title: A free text field to refine your view.
-
All Vendors: A drop-down list of all software vendors represented across your estate.
For example, if you filter the page on a device centric view showing you every software title in your estate, relevant licensable or non-licensable you might want to find data on a specific title. Choosing Mozilla from the All Vendors drop-down and clicking Go shows you data associated with that vendor, which can be narrowed down by using Search by Software title.
Summary tiles
The page summary tiles reflect your selected page view options.
- No License Required Software Titles or Licensable Software Titles: The total number of variations across all software titles in your environment.
-
Potential Savings (USD $): The total potential savings if you remove all software which does not have the status Used.
-
Achieved Savings (USD $): The value of software automatically removed due to Software Reclaim policies since the start of the year. Clicking this panel takes you to Savings Achieved.
Device Centric View
When you select Device Centric View you see the following tiles.
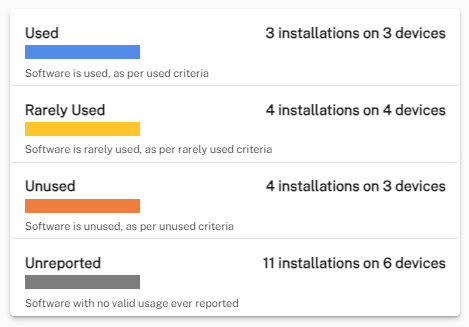
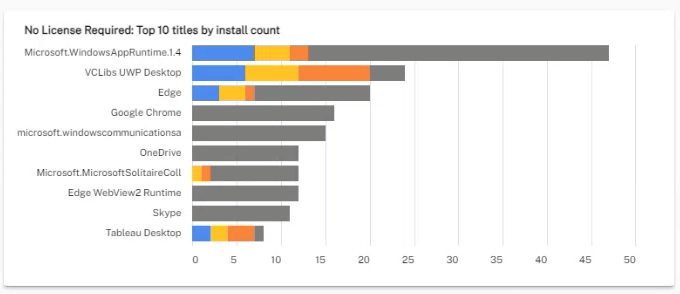
This tile shows the distribution of installations in the three usage categories, Used, Rarely Used and Unused, clicking on a category updates your page view to match your selection.
- Blue - Used: Software that has been actively utilized withing 30 days.
- Red - Unused: Software that has not been accessed in last 90 days.
- Orange - Rarely Used: Software last accessed between 30 and 90 days ago.
- Gray - Unreported: Software for which usage data is not available.
The information icon provides the possible reasons for why the software is unreported:
No Device Usage - Device not reporting software usage
No Product Usage - Catalog mapping for exe and normalized inventory missing or incorrect
No Usage Reported - No product activity detected on the device since reclaim is enabled
Administrators who want to reclaim unused software to recycle licenses can use this information to set their reclaim policies.
Location
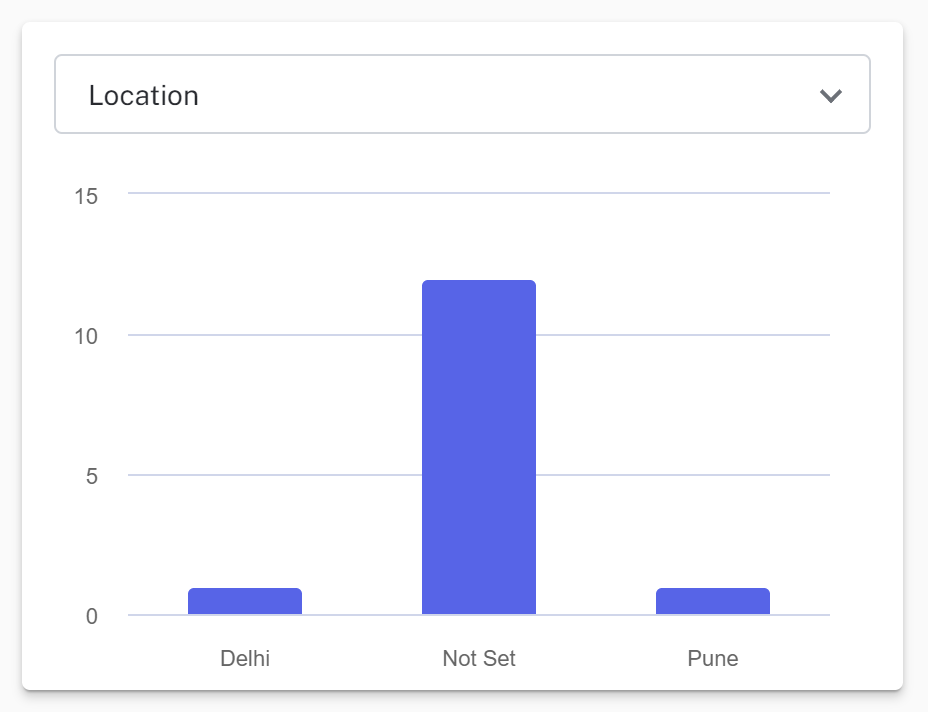
The bar chart shows software installations by location. You can filter this view by clicking the location bar, or by using the drop-down menu.
Management Groups
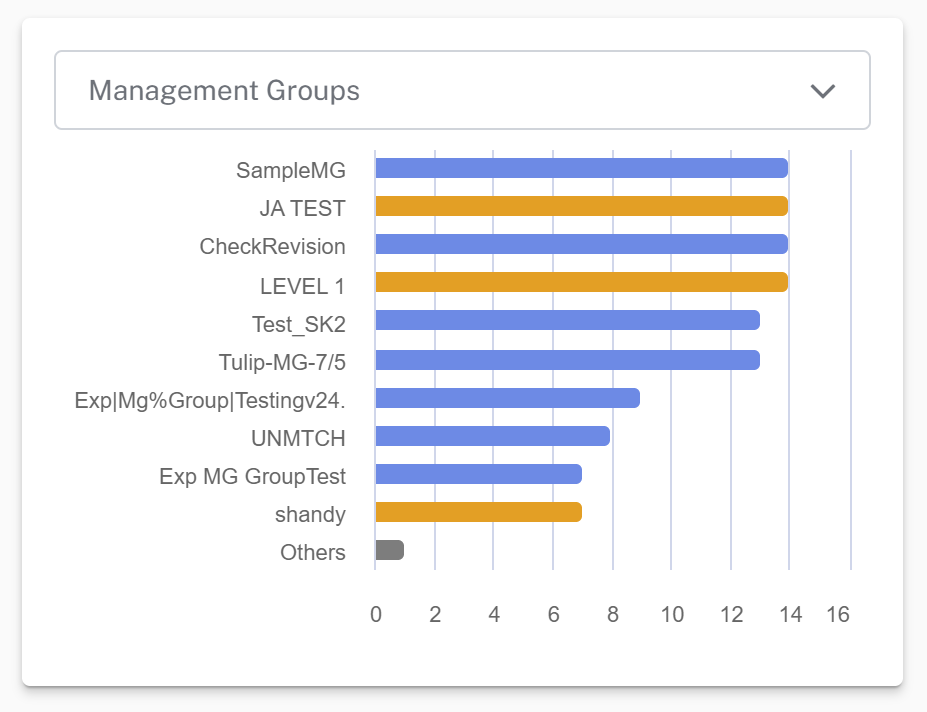
This chart displays Management Groups configured in 1E Platform in descending order according their device membership. You can focus on a specific Management Group by either choosing it from the drop-down menu, or by clicking it in the bar chart.
The bar at the bottom shows the total number of devices in each Management Group. For details about Management Groups and how to use them in 1E Platform, refer to the Management Groups
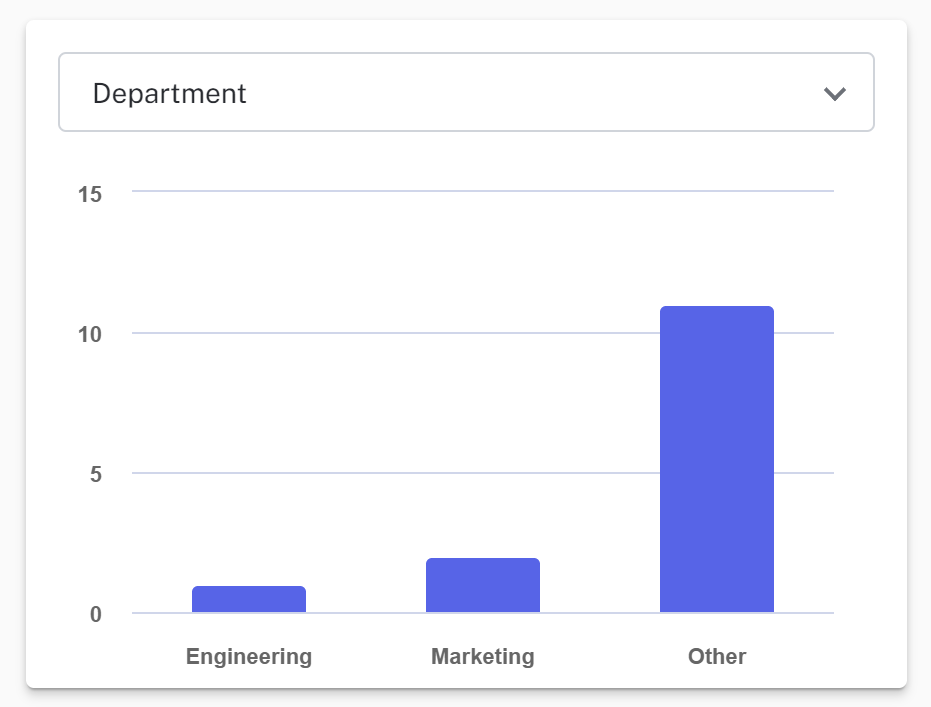
Department
This tile allows you to filter your view according to the Persona Types and or Work Style you have created by using the drop-down menu or clicking a column in the bar chart.
For details about configuring Persona Types and or Work Style, refer to Initial login and user management. To add and configure Personas and Work Style navigate to Solution Settings > Configuration > Persona Management.
Software Centric View
When you select Software Centric View you see the following tiles.
Used and unreported
For details, refer to Device Centric View, Used and unreported
Licensable Software: Top 10 titles by install count
This chart displays licensable software in descending order according to install count. You can filter the page on a specific title by clicking it in the bar chart. By hovering your mouse over each colored section of the bar chart you can see the reclaim value for each category of software, from Used, Rarely Used and Unused.
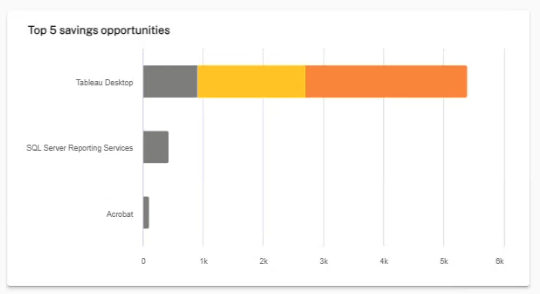
Top 5 savings opportunities
This chart displays the top five savings opportunities in descending order according to dollar saving. You can filter the page on a specific title by clicking it in the bar chart.
Summary table
Displays a summary of devices or titles based on the how you have filtered the Savings Opportunities page. Clicking on elements on each page tile allows you to focus on areas of interest.
Items highlighted blue allow you to filter and explore the results further. For example viewing the Savings Opportunities page using the Software Centric view with Relevant Non-Licensable Software shows there are 6 results of unreported installations of .NET Core Host from Microsoft Corporation. Clicking the total, displays a drawer showing you 6 installations of 3 different version/architecture combinations across 6 devices.
The software title view includes a checkbox that allows users to mark any software title as relevant (check is relevant and uncheck is non-relevant). Once a title is marked as non-relevant, it will be moved to the Configure Relevant Software List page. The dashboard data will be refreshed within 60 minutes.
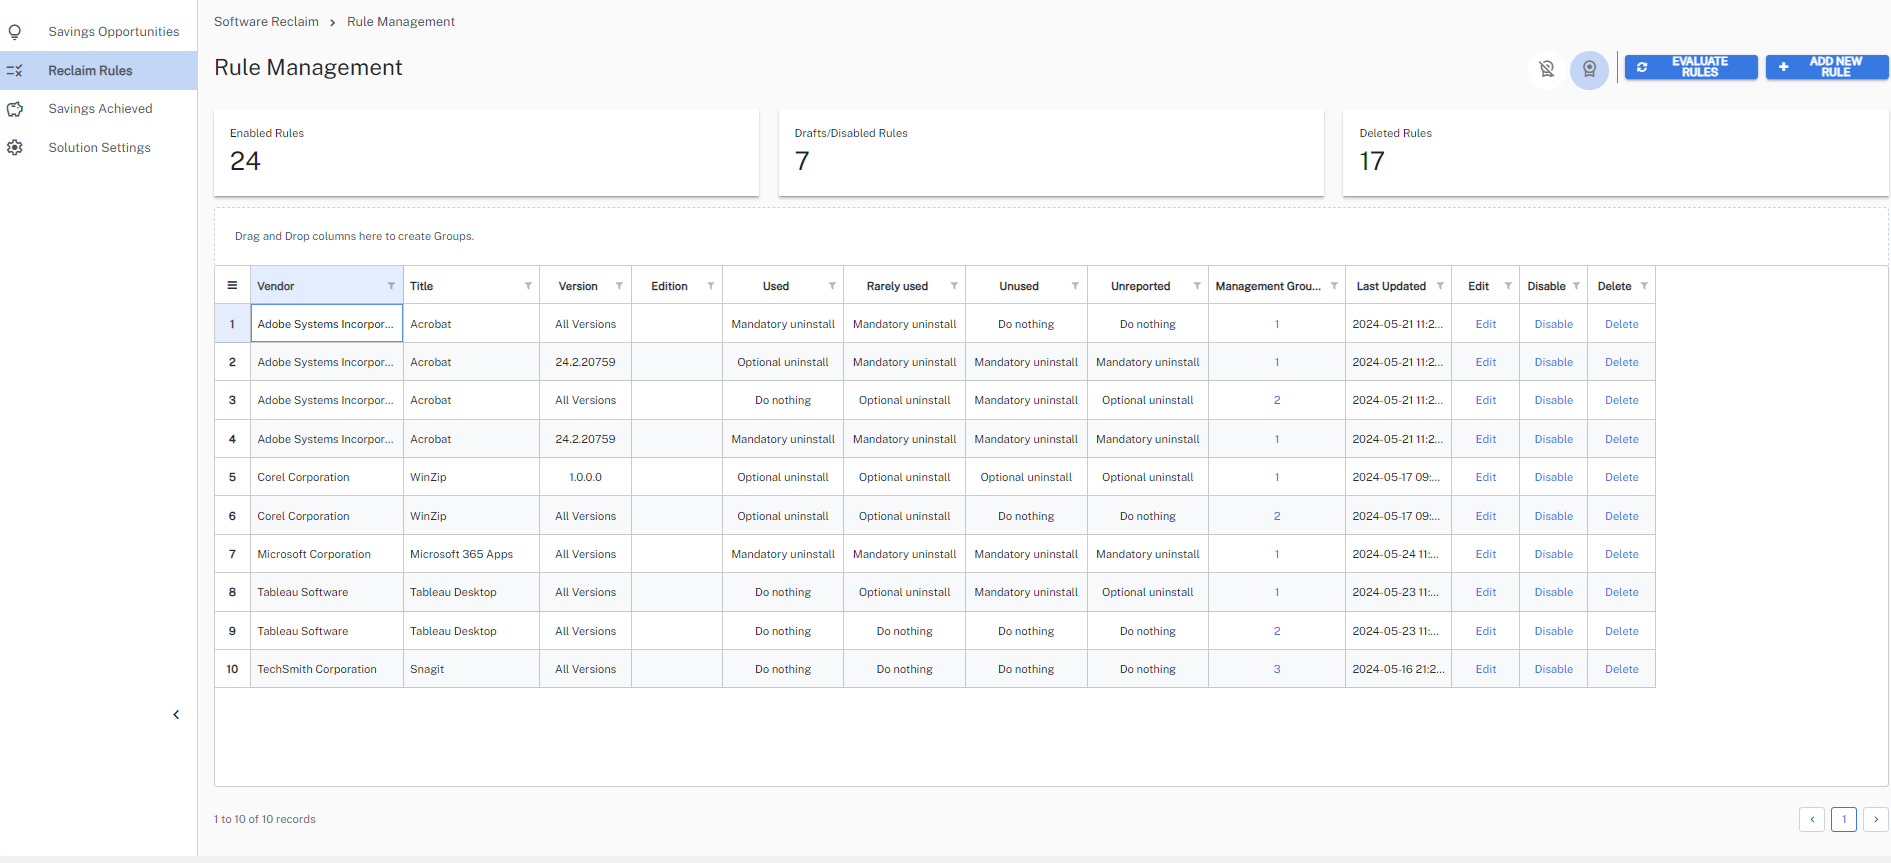
The default view in Rule Management is software centric and shows rules associated with Relevant Non-Licensable Software. You can switch between this view and Relevant Licensable Software using the icons at the top of the page.
- Relevant Non-Licensable Software: Focuses your software that is not licensable and is identified as relevant..
-
Relevant Licensible Software: Highlights licensable software has not been manually marked as non-relevant.
Refer to Evaluate rules and Add new rule for an explanation of these features.
Clicking each of the following panels changes the focus of the page to display each of the following:
- Enabled Rules: Displays all rules you have created and enabled.
- Drafts/Disabled Rules: Displays rules that are in draft or you have set to disabled.
- Deleted Rules: Rules you have deleted.
By default the Rule Management table view is Enabled Rules and displays a summary of Vendor, Title, Version, Edition (VTVE), highlighting details for Used, Rarely Used, Unused and Unreported software. This view includes the Management Groups associated with a title and gives you the option to Edit, Disable or Delete the rule associated with that software title by clicking the Action column's three vertical dots.
To uninstall any application, you can either create a new reclaim rule or modify an existing one by selecting a rule condition and option. After evaluating the reclaim rules, policies will be created based on the selected action, such as Mandatory or Optional.
If you disable a rule, you can enable it by clicking the Draft/Disabled Rules panel and clicking Enable for that rule in the displayed table.
If you delete a rule, you can recover it by clicking Deleted Rules, selecting the rule and choosing Undelete from the Action column.
Evaluate rules
Clicking Evaluate Rules runs all enabled Software Reclaim rules against their targeted software using the rule scope and conditions you have set. Doing this enables Software Reclaim to identify reclaim opportunities across your estate.
Add new rule
Clicking add new rule opens the Create Reclaim Rule page which guides you through the process of creating a new Reclaim rule for Relevant Non-Licensable Software. You can switch between this view and Relevant Licensable Software using the icons at the top of the page.
Add a new rule example
Software Reclaim uses a wizard to guide you through creating a new rule.
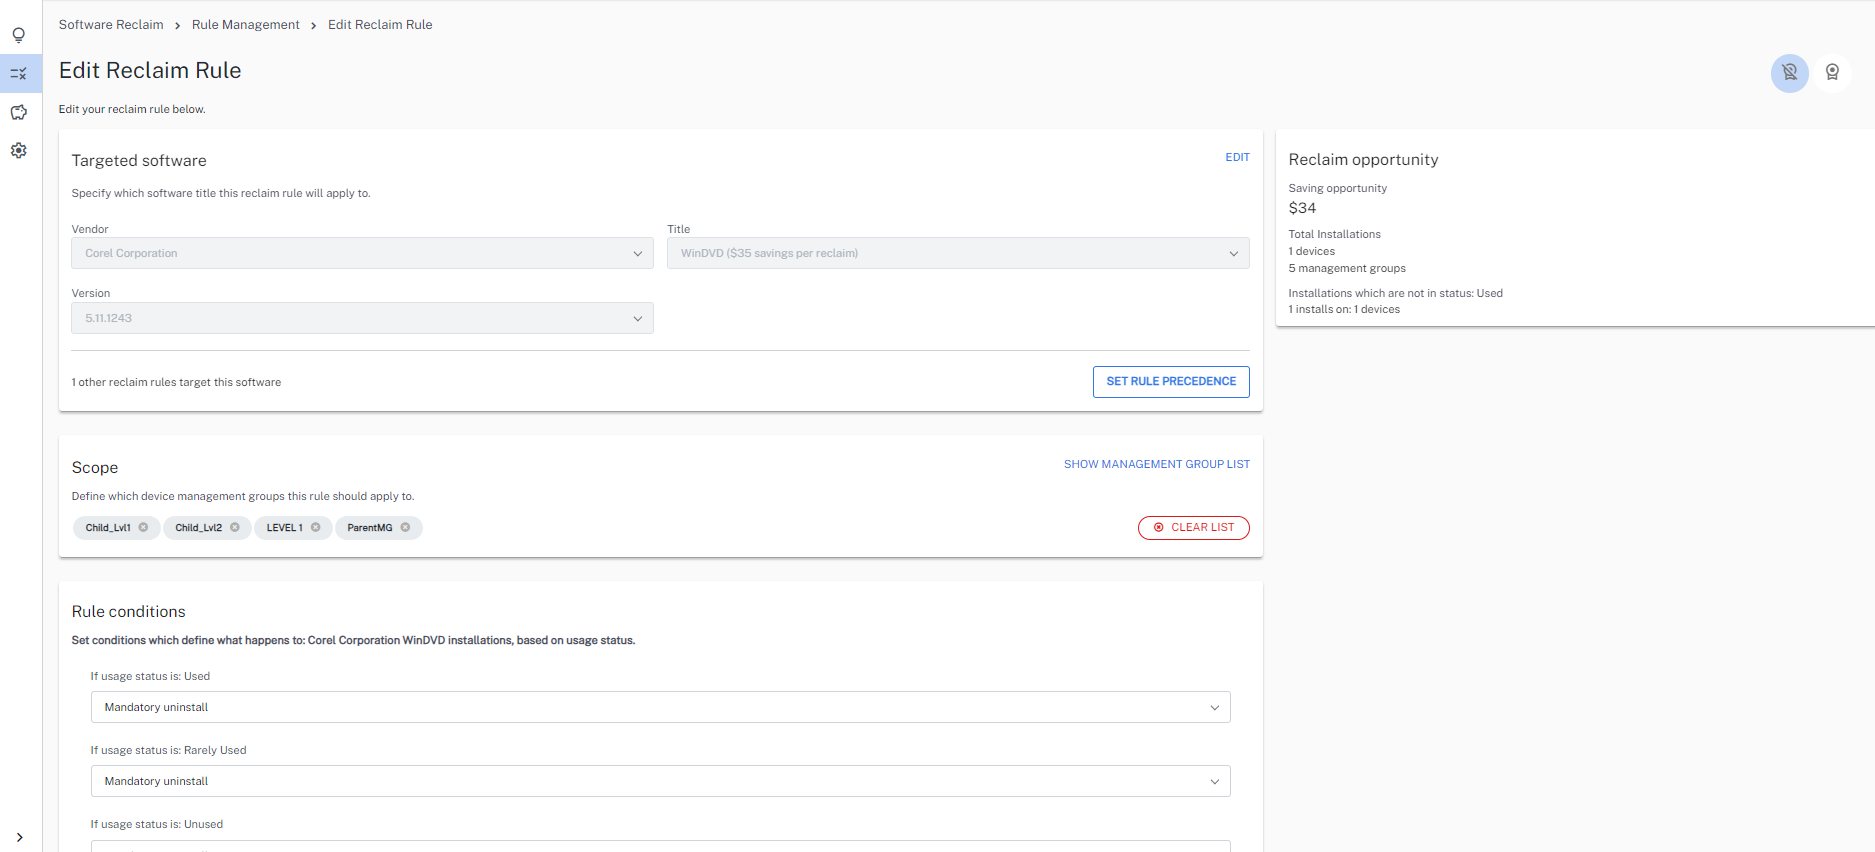
- Select your Targeted Software:
- Select your Targeted Software, using the Vendor drop down menu. In this example we select Corel Corporation.

- Select the Title, we select WinZip PDF Pro.

- Selecting Version allows you to select either a specific version, or choose All Versions, we select version 5.0.0.61.

- At this stage you can reset the wizard or save your changes.
- Select your Targeted Software, using the Vendor drop down menu. In this example we select Corel Corporation.
- If there are existing rules for the targeted software, you can set rule precedence. When you set precedence it allows you to overrule any existing rules associated with the same software. Clicking set rule precedence opens the Set precedence for rules drawer. Drag and drop rules to re-order. The rules precedence will follow the order set. This is important when a device is in more than 1 management group, as it may match several rules. In this case, precedence will decide which rule takes effect. Moving these rules will change the order immediately.
- Create the Scope:
- Once you have selected your new rule's targeted software, you are prompted to define which device management groups this rule should apply to. In our example, we apply the new rule to every Management Group where this software is unused, and if there are savings to be made, maximize the potential reclaim benefits.
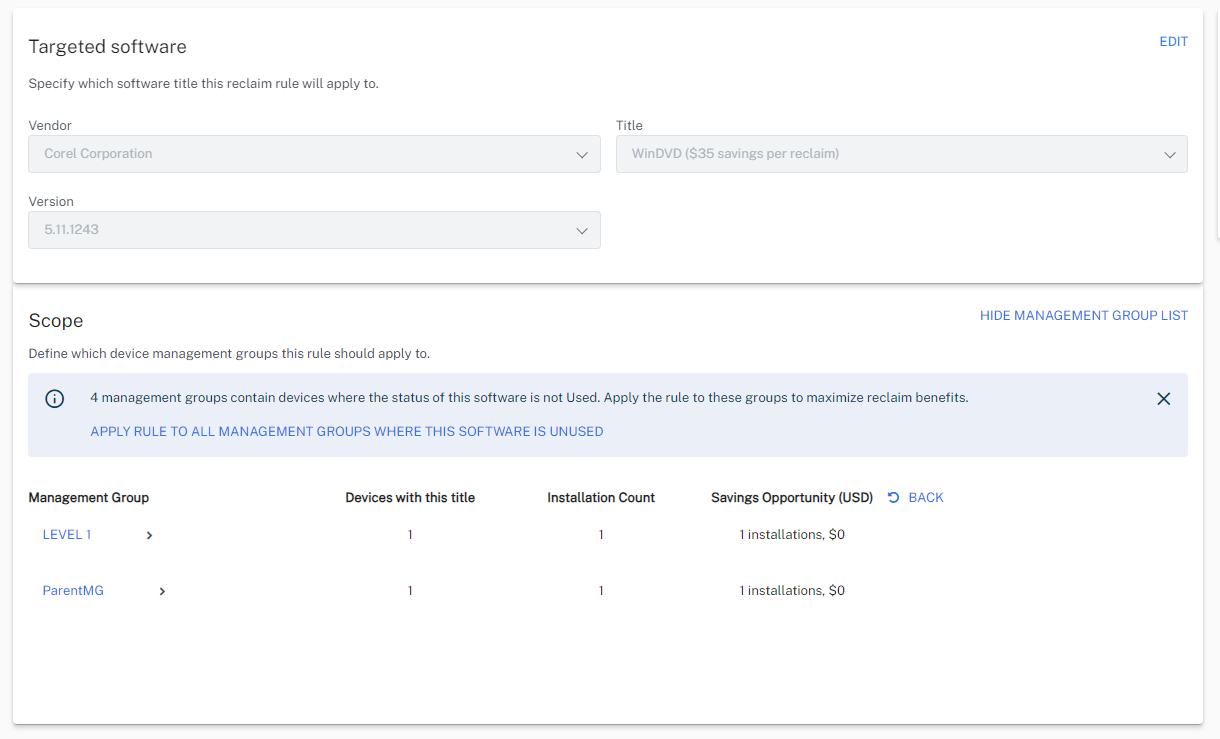
- After choosing to apply the new rule to all Management Groups, Software Reclaim displays a summary of these groups.

- Once you have selected your new rule's targeted software, you are prompted to define which device management groups this rule should apply to. In our example, we apply the new rule to every Management Group where this software is unused, and if there are savings to be made, maximize the potential reclaim benefits.
- Define your rule's conditions:
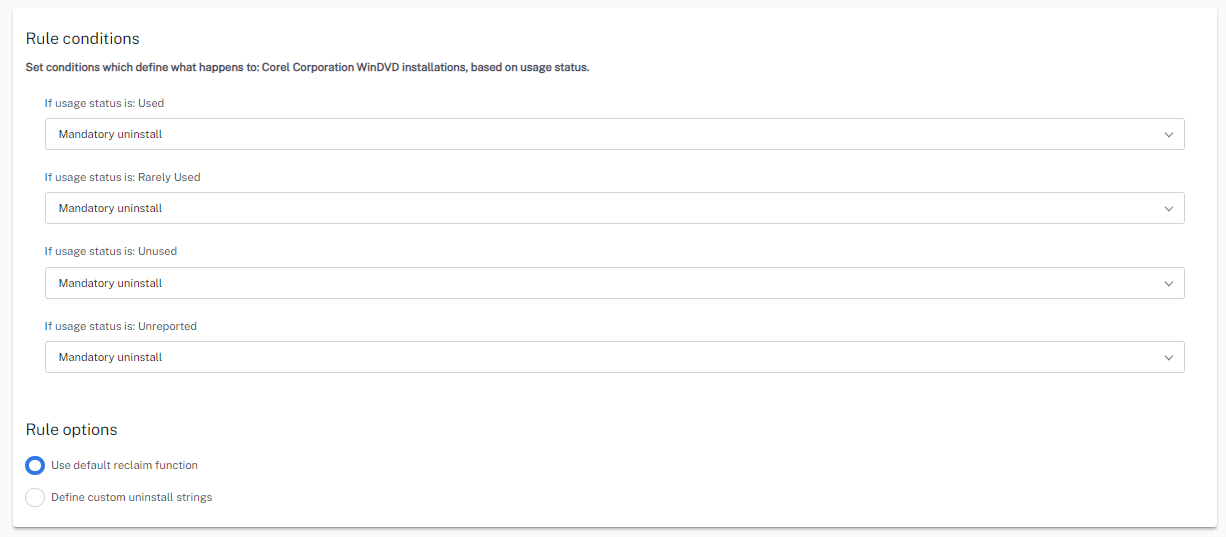
- Next, we set conditions which define what happens to the software installations, based on its usage status.
- For each condition you can choose from the following rule type:
- Mandatory uninstall: The user will not be consulted before the software is removed.
- Optional uninstall: The user can choose any of the options below.
- Remove Now: The user can choose to uninstall the software immediately.
- Remove Later: The users can choose to ignore the notification (for example, if they are in a meeting) by selecting the Remove Later option. The system will send a reminder every 7 days for up to 28 days. After 28 days, an automated uninstallation will be initiated.
- I still need this: If the user selects this option, they can keep the software by providing a reason, which will be sent to the administrator. The system will check again in 28 days to prompt for uninstallation.
- For this example we leave these options as the default Mandatory uninstall.
You can choose the reclaim Rule option from:
Use default reclaim function: Reclaim using the default uninstall mechanism of 1E Client.
Define custom uninstall strings: For custom uninstalls Software Reclaim allows you to set custom uninstall strings.
Run an instruction: Software Reclaim allows an admin (Solutions admin or Full admin) to uninstall software using a specific instruction. You can select the instruction from a list of available options fetched from the 1E Platform.
The DEXPacks related to the Run an instruction option are available in Software Reclaim - DEXPack.
You can select from the rule type:
Mandatory: The user can choose to uninstall the software immediately. The Mandatory policy is triggered within 6 hours to execute the instructions specified in the reclaim rule on the designated devices. The responses are collected and set to expire after a default duration of 1440 minutes. However, if there is no content, or no response, the policy will be re-enabled.
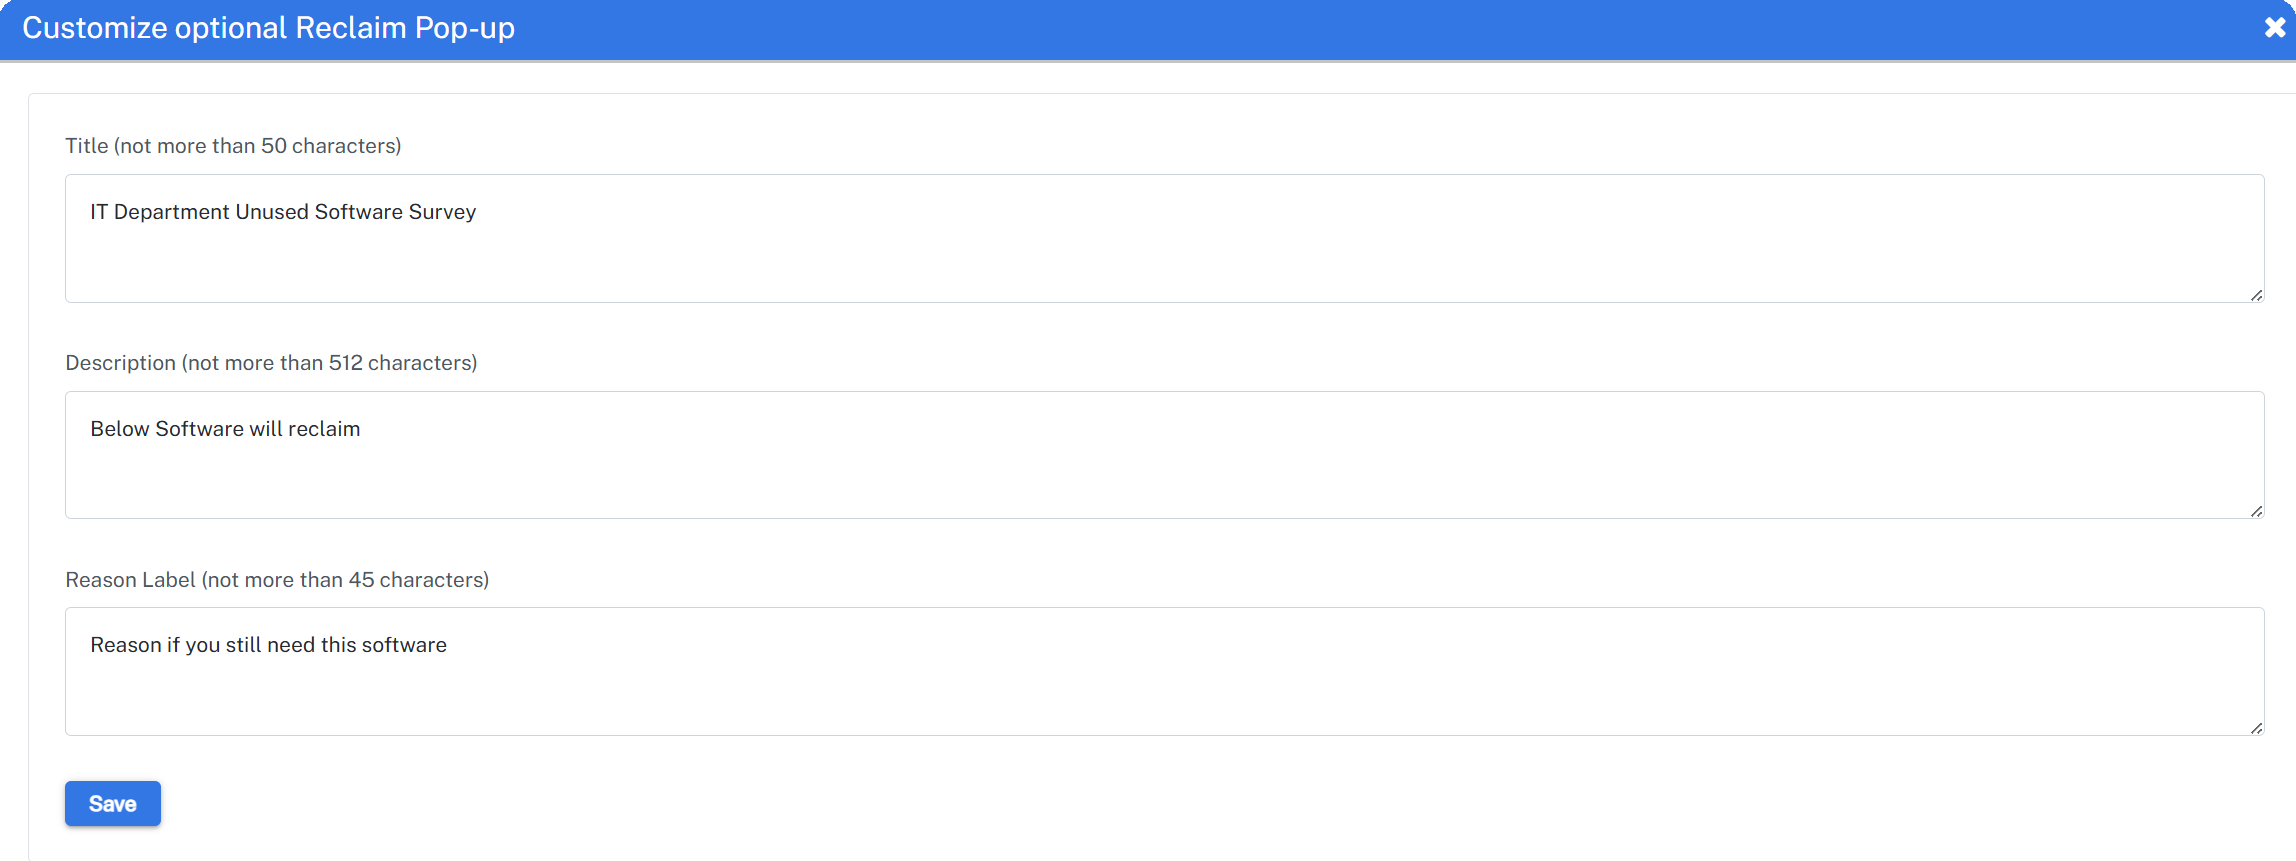
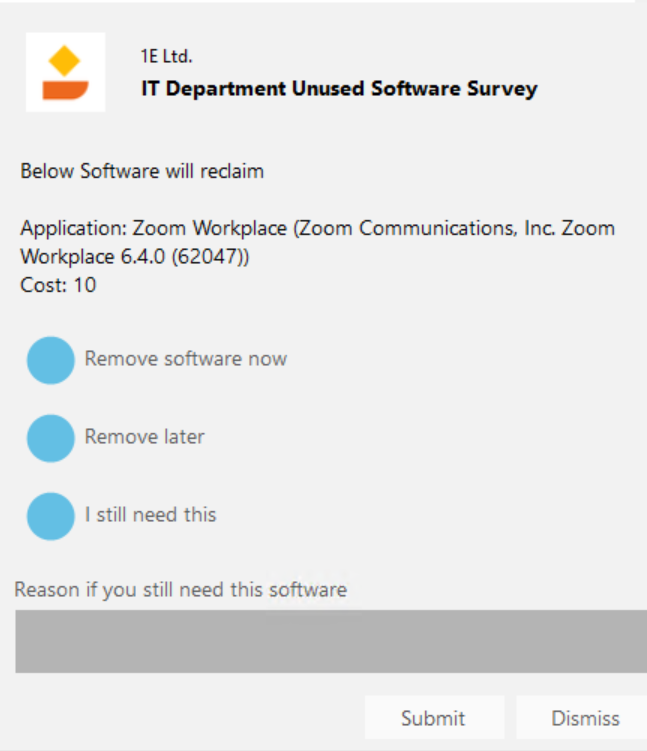
Optional: The Option policy is triggered within 6 hours to execute the instructions specified in the reclaim rule on the designated devices. The responses are collected and set to expire after a default duration of 360 minutes. The reclaim pop-up window provides users with options like Remove software now, Remove later and I still need this. The admin can also customize the title, description and reason label directly from the Software Reclaim settings. Refer to Customize optional Reclaim pop-up.
Currently, the Reclaim pop-up is not available for macOS.
Based on the response received, proceed with the following steps:
Dismiss, no response, no content: The policy will be re-enabled.
Remove software now: Convert the optional policy to mandatory, it will function as a mandatory uninstall.
Remove later: The policy evaluation time will be set to 7 days later.
I still need this: The policy evaluation time will be set to 28 days later.
- Now the rule is complete, we click create reclaim rule. The default rule status is Enable rule selected, deselect this option if needed.
- Our new rule is now listed on the Rule Management page, which is sorted by Last Updated.
Edit a rule
To edit a rule, click the three dots under the Action column for a software titleAdd new rule Once you have made your changes, click the update reclaim rule button at the bottom of the page.
Disable a rule
To edit a rule, click the three dots under the Action column for a software titleAdd new rule Once you click disable, the entry for this title will be listed on the Draft\Disabled Rules page.
Delete a rule
To delete a rule, click the three dots under the Action column for a software titleAdd new rule Once you click delete, the entry for this title will be listed on the Deleted Rules page.
To recover a deleted rule, click the three dots under the Action column for the software title and select Undelete.
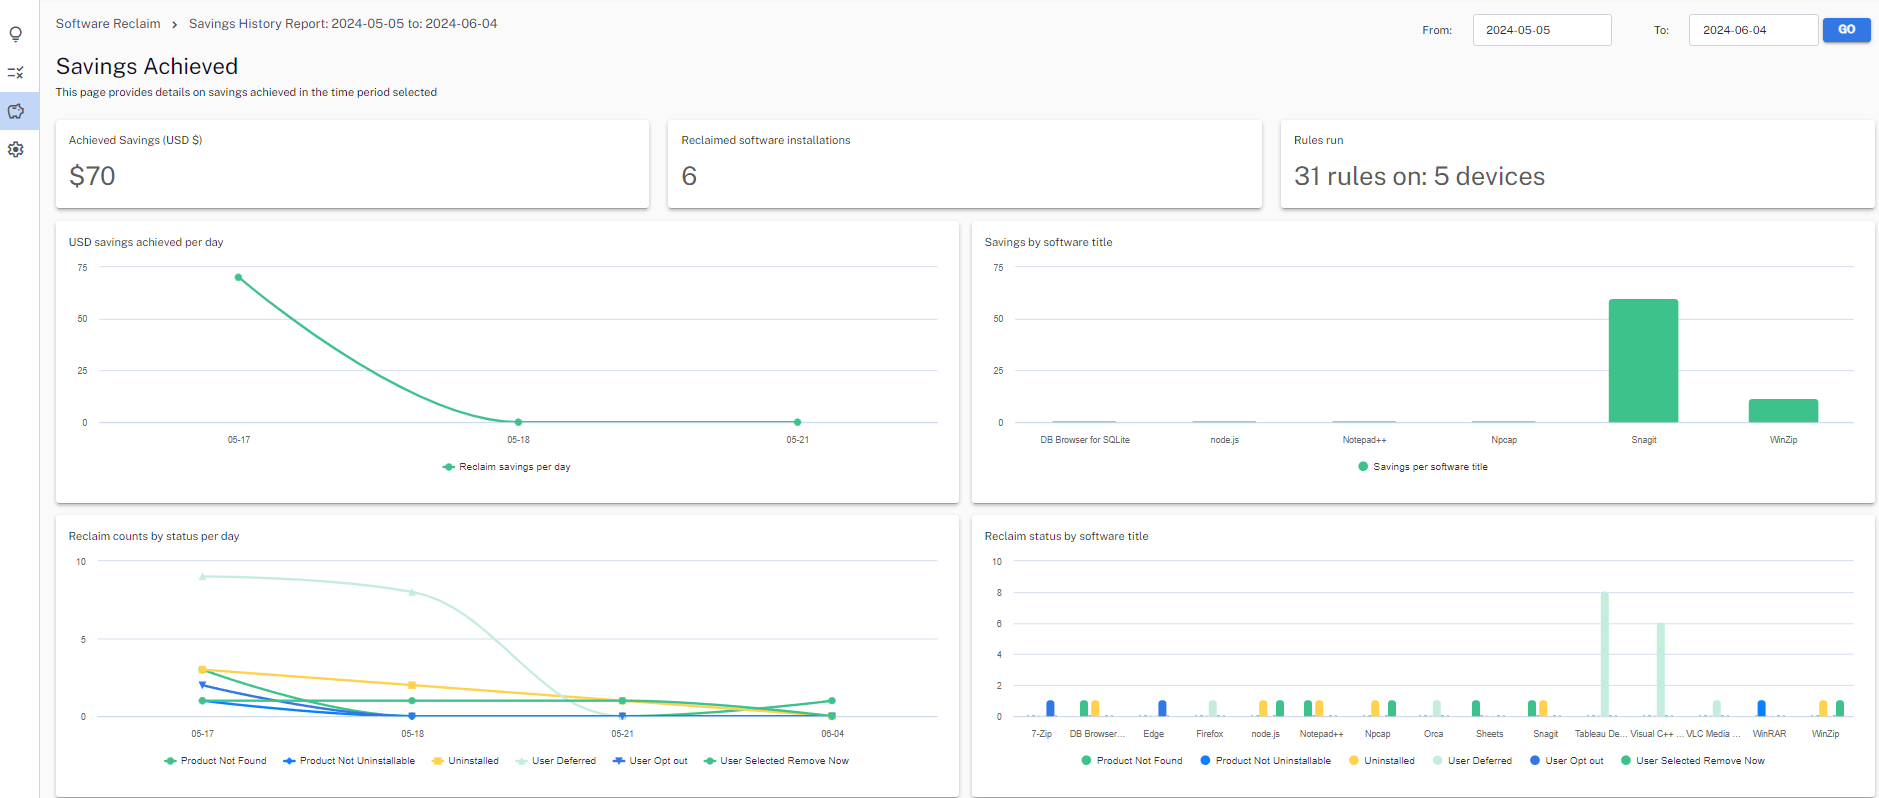
Savings Achieved provides details on savings achieved in the selected time period. For each report you can choose which status you want to view, by clicking the status listed at the bottom of each panel.
Reclaim History
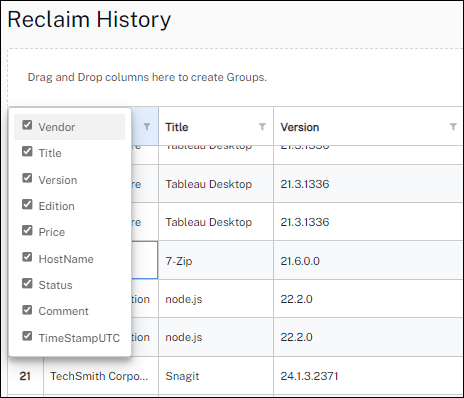
The Reclaim History table can be customized using the filter and by clicking the three lines in the first column and choosing which columns to display.
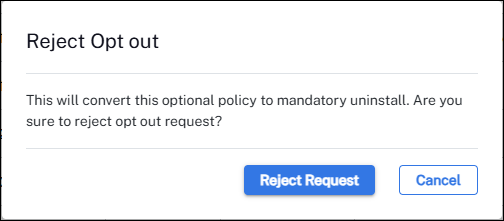
Once a reclaim rule has been created and sent to the end user, you can asses the reasoning provided by the end user for wanting to keep their software. Additionally, you have the option to reject the reasoning and initiate an uninstall event.
Most settings are common to all Solutions. For these common settings, refer to Solutions getting started.
Only settings specific to this Solution are covered below.
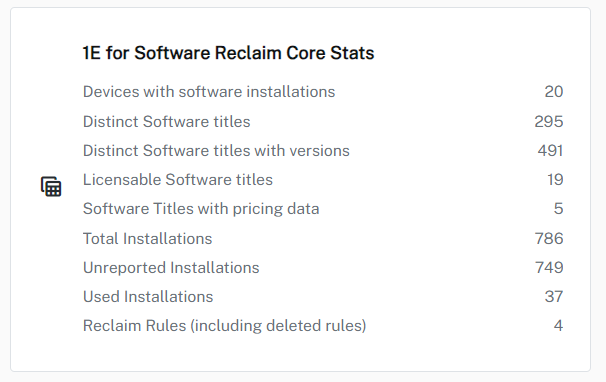
Specific Software Reclaim Core Stats are available to view on this page.
Configure Relevant Software List
You can switch between the Licensable Software and Non-Licensable Software to configure the Relevant software list using the icons at the top of the page..
The Non-Licensable Software list includes all software considered non-relevant. By default, any software that is not licensable is categorized as non-relevant. It includes a checkbox that allows users to designate any software title as relevant (check is relevant and uncheck is non-relevant). Whereas the Licensable Software list includes all reclaimable software that are considered relevant.
Once a title is marked as relevant, it will be moved to the Reclaim dashboard. The data will be refreshed within 60 minutes.
Customize optional Reclaim pop-up
You can configure the optional reclaim policy pop-up window from this setting.
Here is an example of the pop-up window that the user receives, prompting them to choose an option for reclaim.
API Management
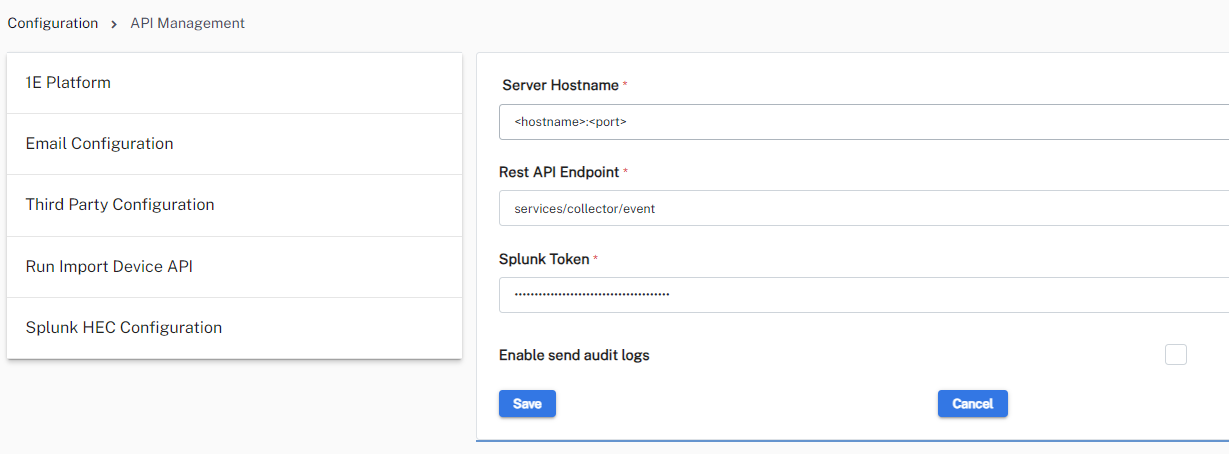
Splunk HEC Configuration
You must have access to both Business Impact and Software Reclaim to use this feature.
Using Splunk HEC Configuration you can offload audit log data from 1E Platform to Splunk. To do this you will need the following information:
- Server Hostname: In the format <hostname>:<port>
- Rest API Endpoint: For example /services/collector/event
- Splunk Token: A Splunk token for HEC
Once you have completed the form, select Enable send audit logs to send audit data to your Splunk instance.
The account used to fetch platform audit log data is your Platform Sync account which is configured under Configuration > API Management > 1E Platform.
