User Engagement page
The User Engagement page lets you create and manage Sentiment and informational surveys to gain direct feedback related to end-user experience, as well as create and manage announcements to communicate with your end users.
There are three types of User Engagement:
-
Sentiment surveys: Have well-defined responses that contribute to the overall Sentiment score, and the returned results can be visualized under the format of charts on the Sentiment page.
-
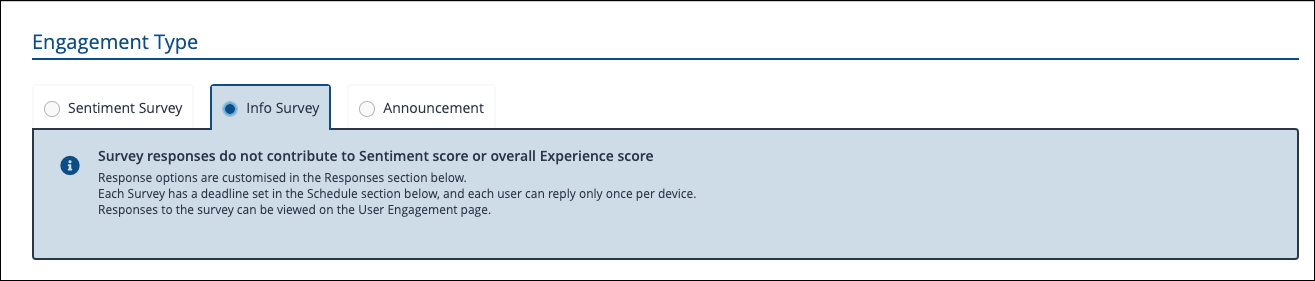
Info surveys: Can be customized to a greater extent than the Sentiment surveys, but they do not contribute to the overall Sentiment score.
-
Announcements: These are one-way communications which can be used for a variety of use cases, such as broadcasting to end users information about organizational changes, IT news and updates and more.
We are currently migrating existing functionality to the new UI. While workflows and naming conventions may change, the underlying use cases will remain the same.
The new UI uses modern design principles and includes the following elements:
-
Expandable left-hand and drop-down menu: The menu can be expanded or collapsed using the chevron icon located at the top of the pane.
-
Search: Execute instructions and search for devices using keyboard shortcuts, including those based on their Fully Qualified Domain Name (FQDN) and Insights.
-
DEX Intelligence: A powerful tool designed to enhance your organization's efficiency and decision-making capabilities.
-
Inventory Insights: Devices and Software are available in the left-hand navigation bar.
-
Investigation: Search, run, schedule, review, and manage device instructions directly from the console, including access to instruction history and scheduled tasks.
-
Observability: Ask questions in natural language and instantly generate and customize reports based on your organization’s data.
-
User Engagements: Create user engagements, surveys, and announcements in an appropriate language.
-
Settings: You can access and configure 1E Client certificates, integrations, Identity Provider certificates and Platform settings.
-
Module launcher: You can launch other Platform modules and any Solutions that are included with your license.
-
User profile: Click this to manage your exports, check your Platform version, or log out.
Dark mode is only available in the new UI. You can control the system theme using the switcher in Settings. For details refer to Appearance.
Module visibility is determined by your license.
User Engagements provide a way to deliver surveys and announcements to end users. By using localized user engagements, administrators can define engagement content once and provide translated versions, allowing users to receive the engagement in the most appropriate language based on their device locale.
Surveys and announcements can be created using the existing functionality in the Experience Analytics module of the classic UI.
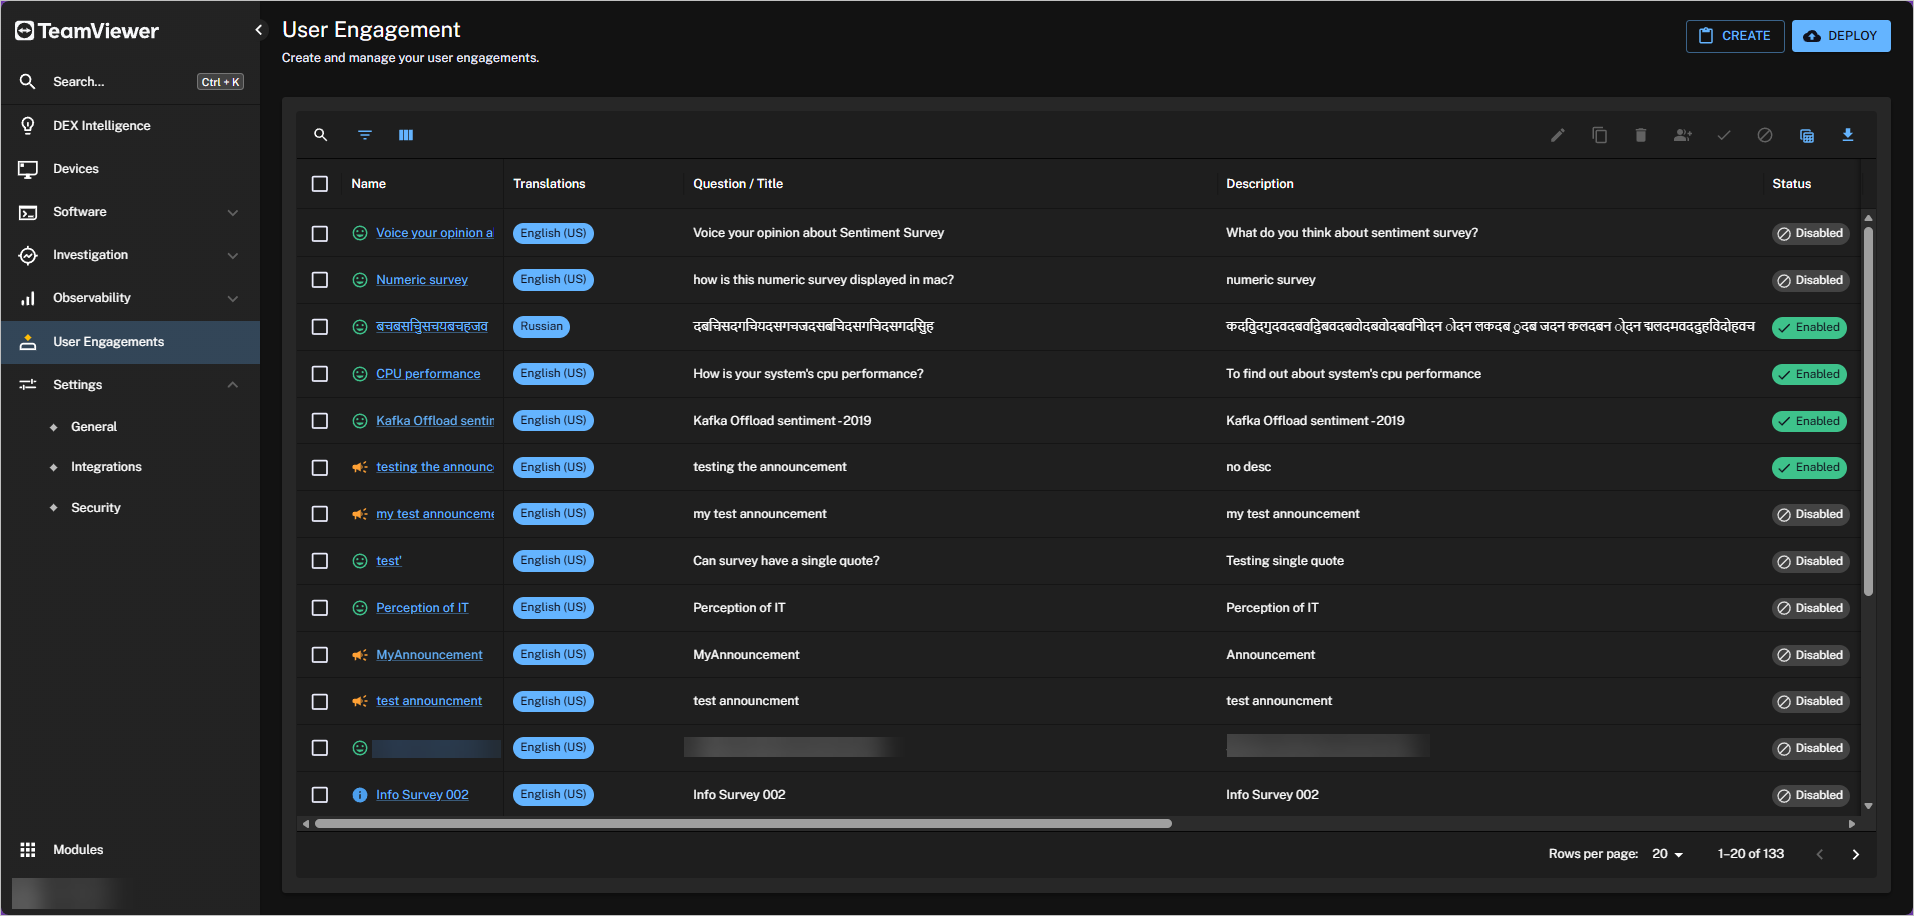
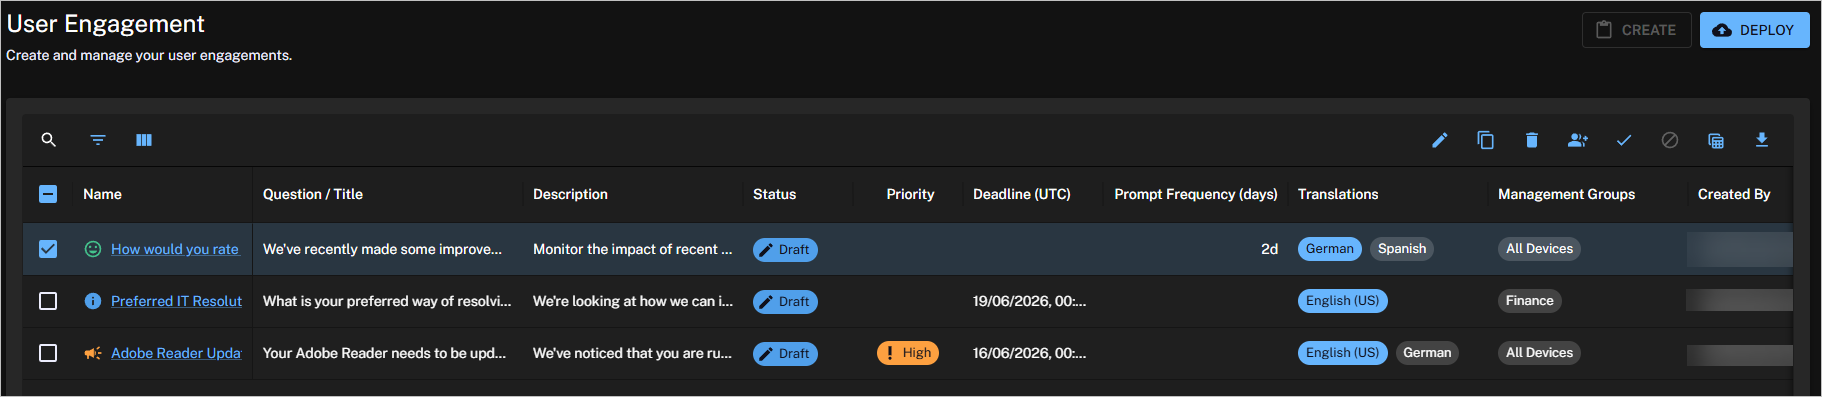
The main part of the User Engagement page is represented by a searchable table, this is a common feature across the new UI. Refer to Page toolbar search, filters, columns, delete, export.
The name of the Engagement is a link to the engagement details page providing information related to the survey responses or other user engagement results.
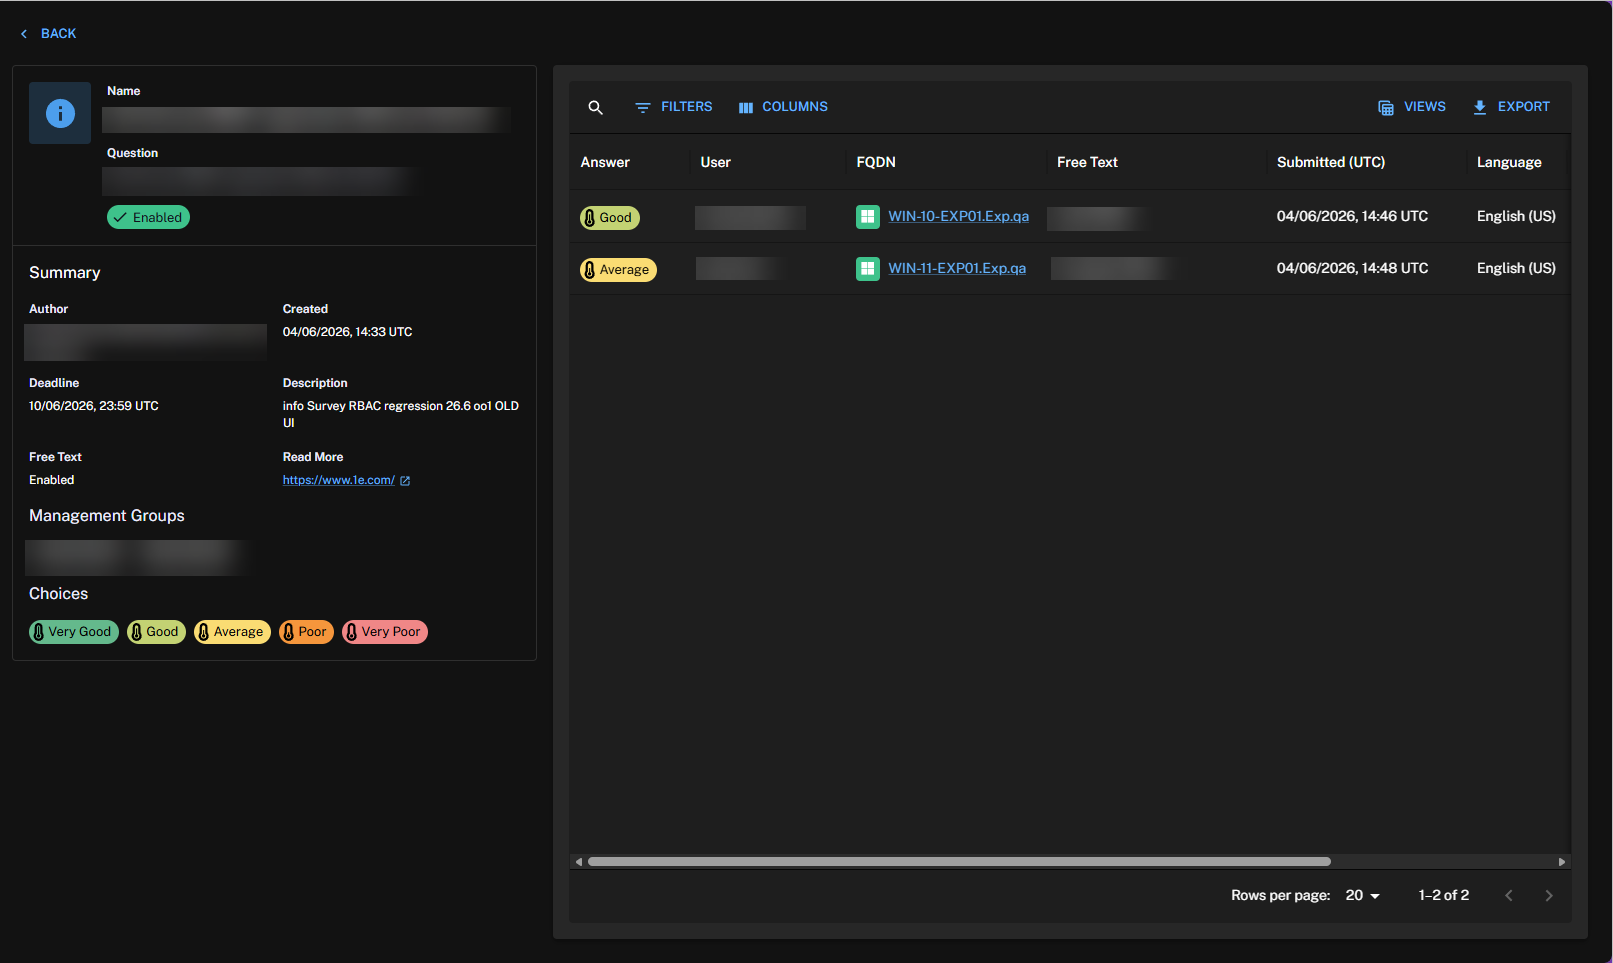
For Sentiment surveys, the name is also a metric that contributes towards the Sentiment score. You can monitor it using a chart on the Experience Sentiment page. Refer to Sentiment page.
-
Sentiment surveys are marked by a survey icon.
-
Info surveys are marked by an exclamation icon.
-
Announcements are marked by an announcement Icon.
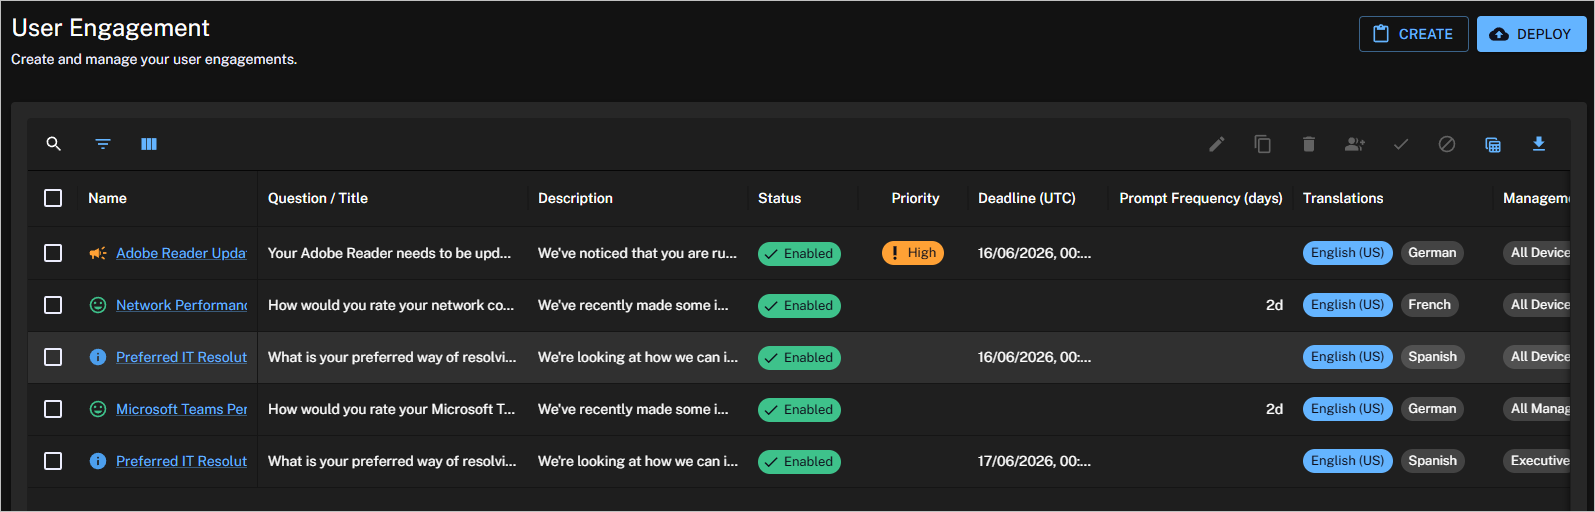
There are also a number of actions related to the table selections.
|
Action |
Description |
|---|---|
|
Create |
Displays the New Engagement page where you can create a new Sentiment survey, Info survey, or announcement. This is only enabled if there are no selections in the User Engagement table. |
|
Clone |
Displays the New Engagement page pre-filled with the details from the survey or announcement currently selected in the User Engagement table. This is only enabled if there is a single selection in the User Engagement table. |
|
Delete |
Deletes the selected survey(s) and/or announcement(s) in the User Engagement table. Clicking this displays the Engagement Deletion pop-up window. This is only enabled if there is one or more selections in the User Engagement table. |
|
Assign Management Groups |
Assigns management groups to the selected survey(s) and/or announcements in the User Engagement table. Clicking this displays the Assign Management Groups pop-up window. This is only enabled if there is one or more selections in the User Engagement table. |
|
Enable |
Enables all the selected survey(s) and/or announcement(s) in the User Engagement table regardless of their current enabled state. Clicking this displays the Enable Engagement pop-up window. This is only enabled if there is one or more selections in the User Engagement table. |
|
Disable |
Disables all the selected survey(s) and/or announcements in the User Engagement table, regardless of their current enabled state. Clicking this displays the Disable Engagement pop-up window. This is only enabled if there is one or more selections in the User Engagement table. |
|
Manage Views |
Applies saved view settings. You can create, manage, and switch between views, and set a default view that loads automatically for a specific table. |
|
Export |
Exports one or more User Engagements as a CSV file. |
Engagement type
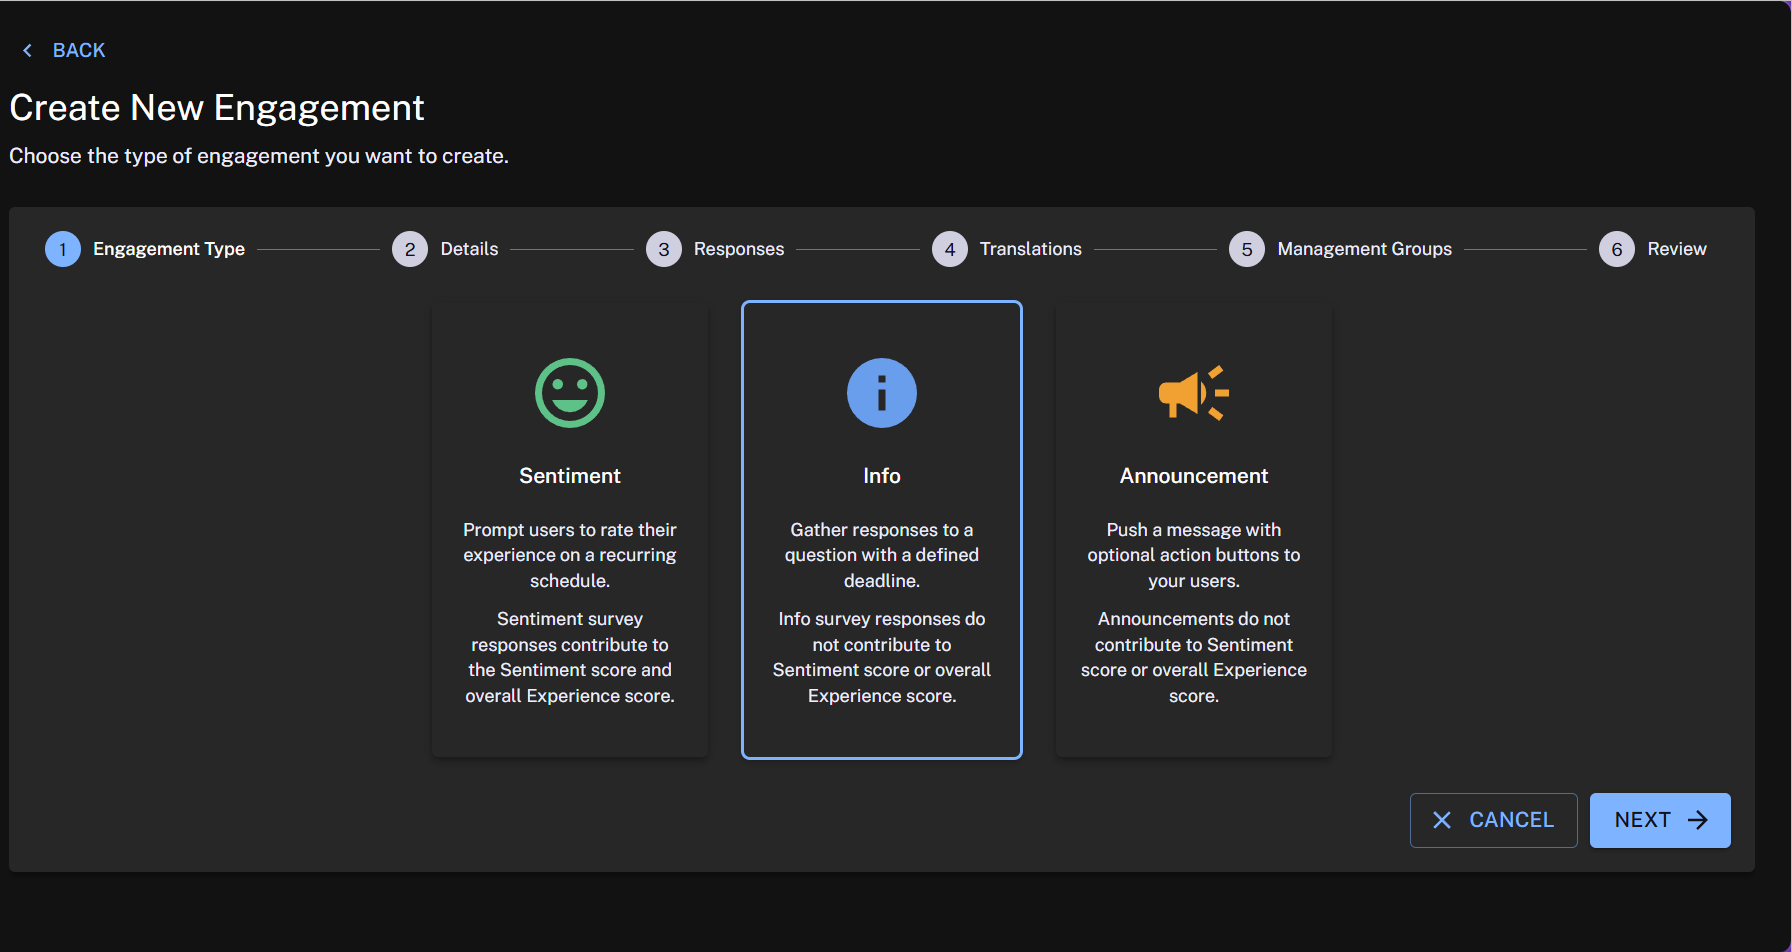
Clicking Create on the User Engagement page displays the Create New Engagement page.
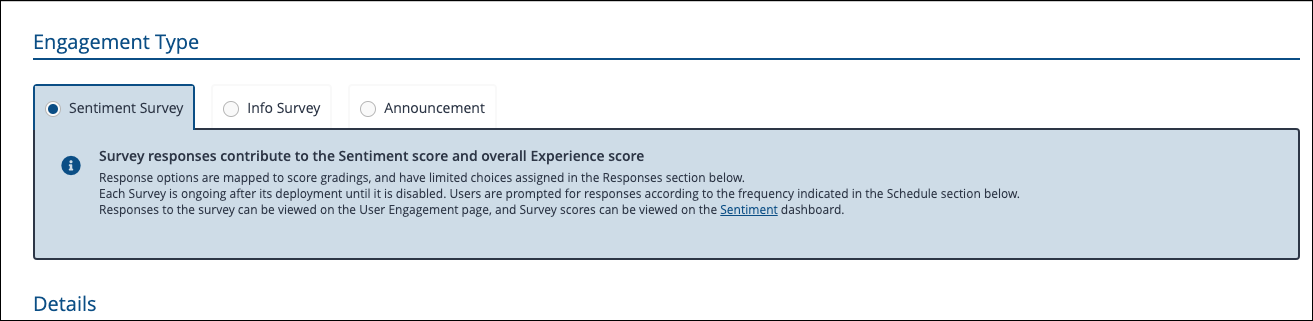
The first choice is the Engagement Type where you can choose between Sentiment survey, Info survey or Announcement. The controls displayed for each type are different. The default Engagement Type selected on the Create New Engagement page is Sentiment.
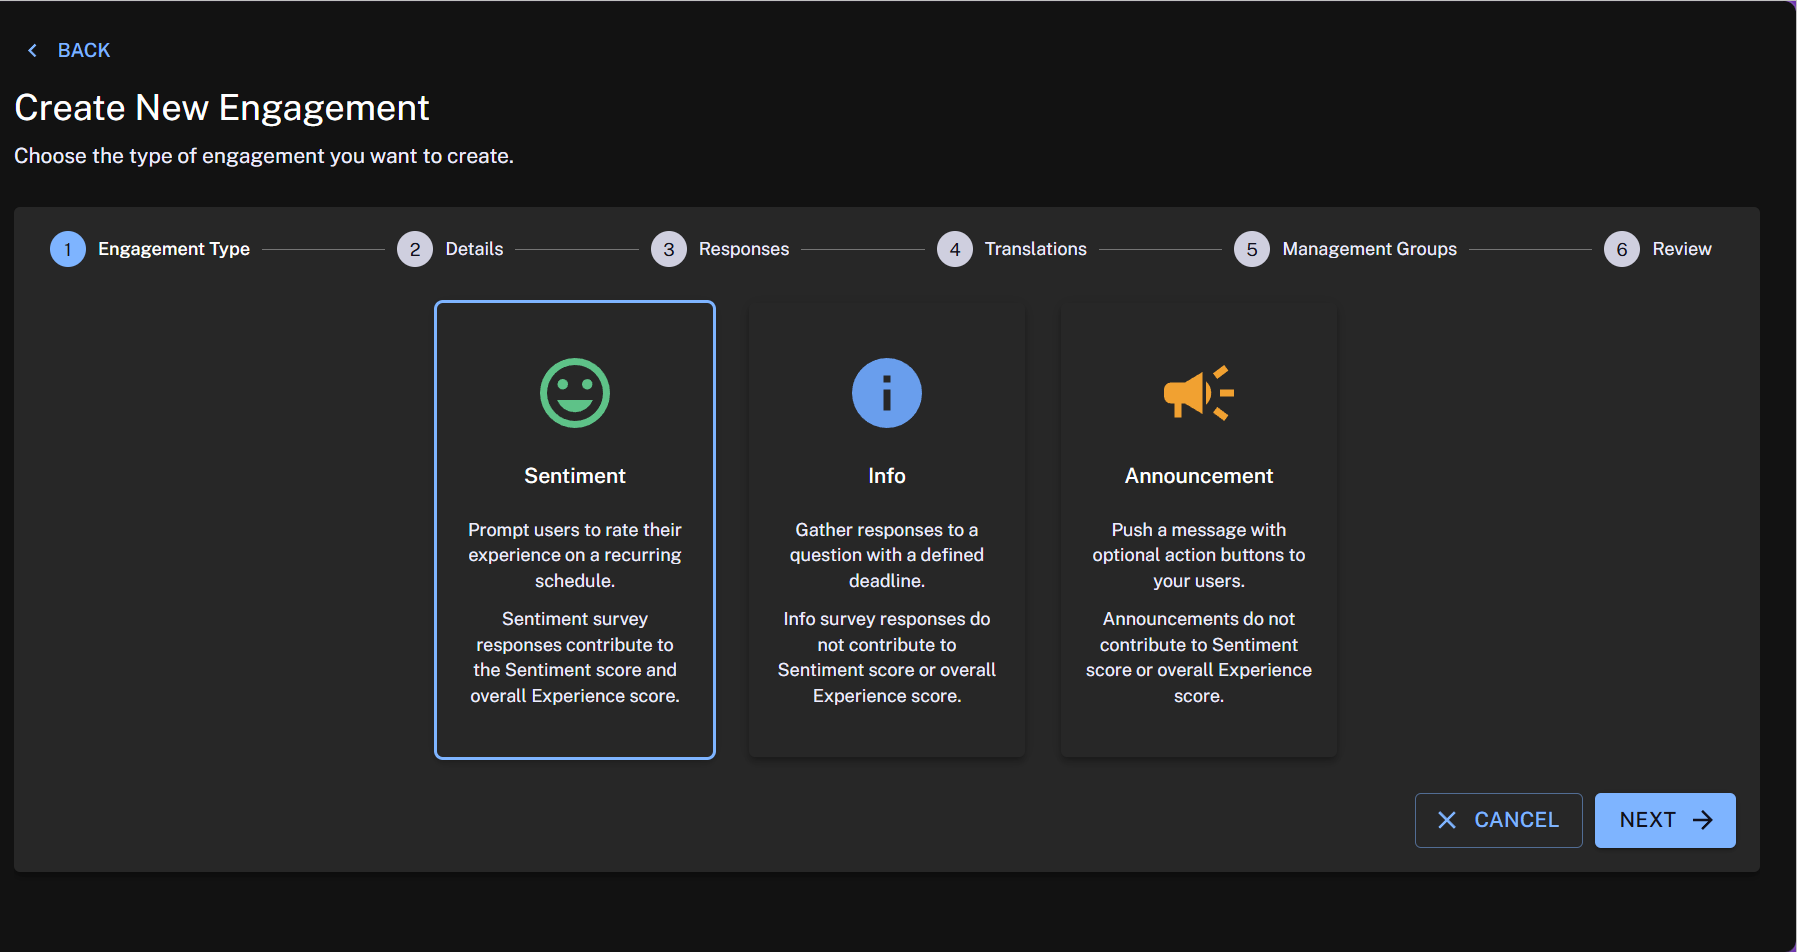
If you want to define an Info survey or an Announcement, select that option under the Engagement Type heading.
Engagement details
Sentiment and Info survey details
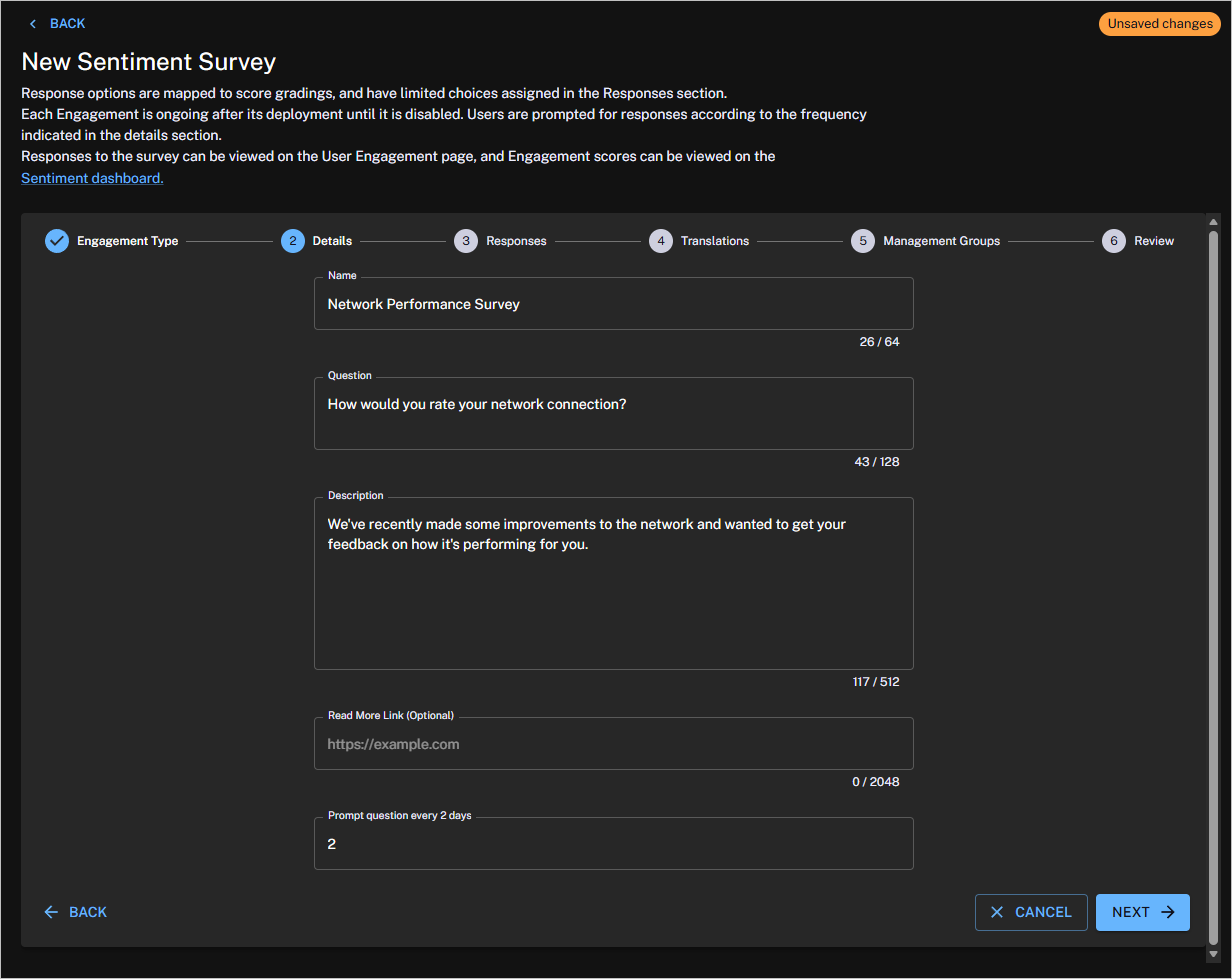
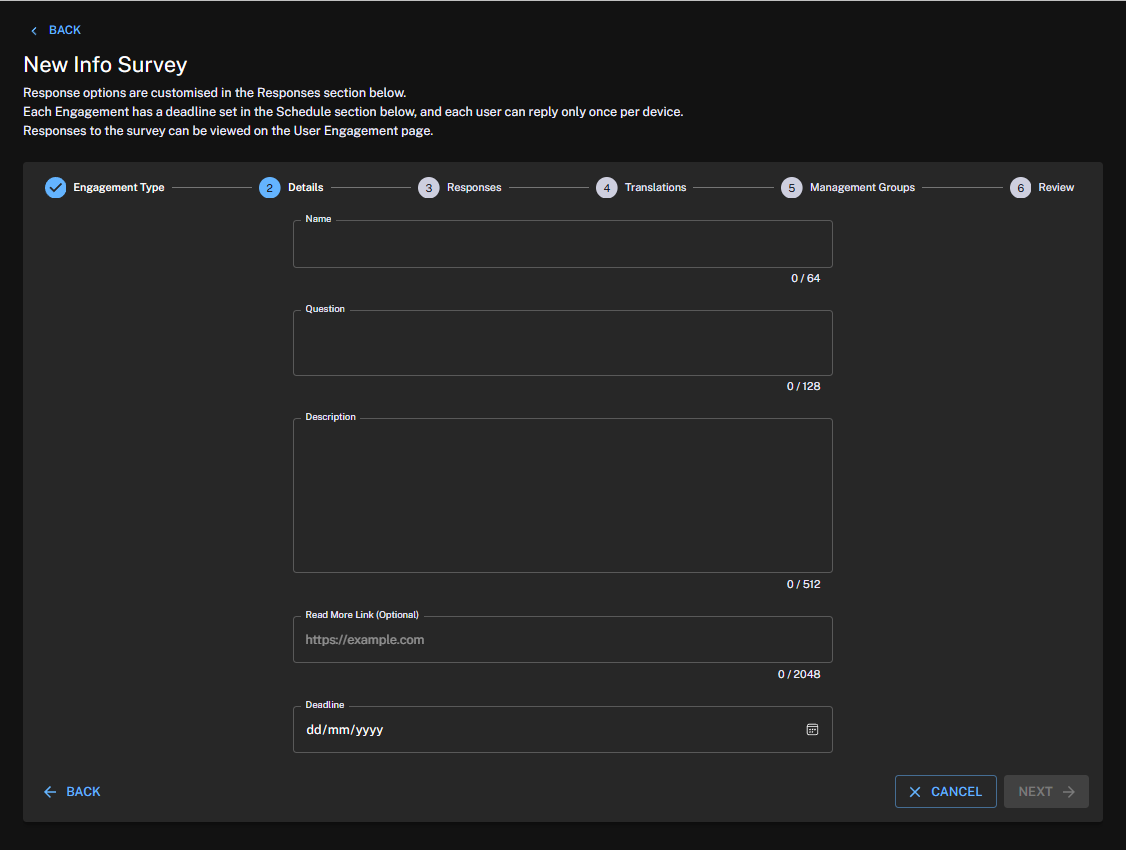
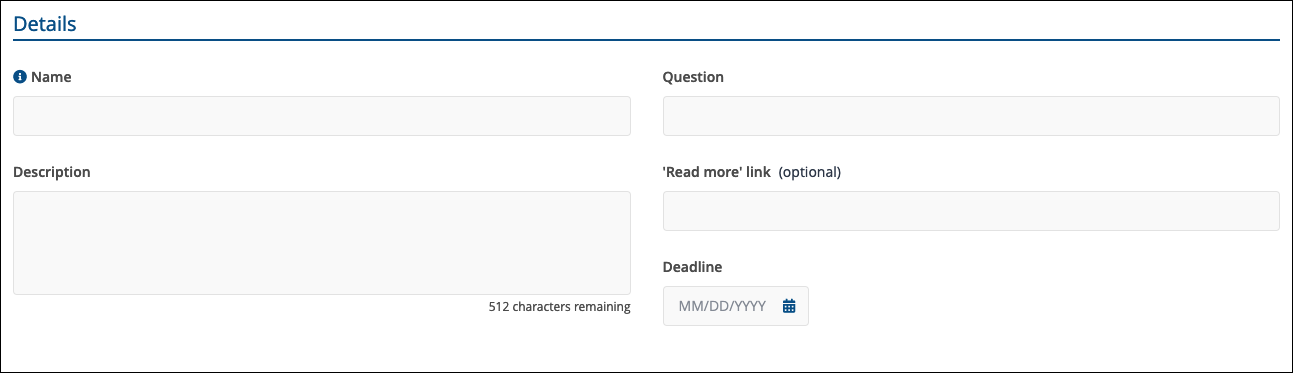
For Sentiment and Info surveys, you define the Name, Question, Description, and an optional Link to further information. The Details section is almost identical for Sentiment and Info surveys, except for the difference described in the last row of the following table.
If two surveys have the same question, the name of the survey will display to the user within parenthesis.
|
Field |
Description |
|---|---|
|
Name |
Defines how the survey is referred to in the Experience UI. For Sentiment surveys, the Name also defines the name of the metric the responses will be scored on. |
|
Question |
Sets the question you will ask your end users. You should design your questions carefully, as they will be sent to end users, and you will want to maximize your responses. Refer to Names, Questions, Descriptions and Frequency. The Question can be a maximum of 128 characters, including the question mark. |
|
Description |
Is used to support and provide context for the Question. The Description is displayed to end users. The Description can be a maximum of 512 characters. |
|
Link (optional) |
Lets you specify the URL to any additional information you want to add to help support and provide context for the question. The text for the link is displayed to end users as Click here to find out more. This field is optional. |
|
Prompt Question Cadence or Deadline |
This section is different for Sentiment surveys and Info surveys and reflects the nature of the two types of survey. Sentiment surveys: Used when you are trying to get information on a metric that you want to measure. This means that you want to prompt your end users to respond on a regular basis. This section provides an option where you can set a prompt to ask the question every x days.
Info surveys: Used where you are trying to get feedback on a particular topic on a one-off basis. Your end users aren't likely to all respond immediately, so you want to send a cut-off date that prevents the survey from going stale but still allows your end users to send responses when they can. For this reason, this section for Info surveys provides a Deadline field with a date picker that lets you choose when to stop prompting users that haven't yet responded.
|
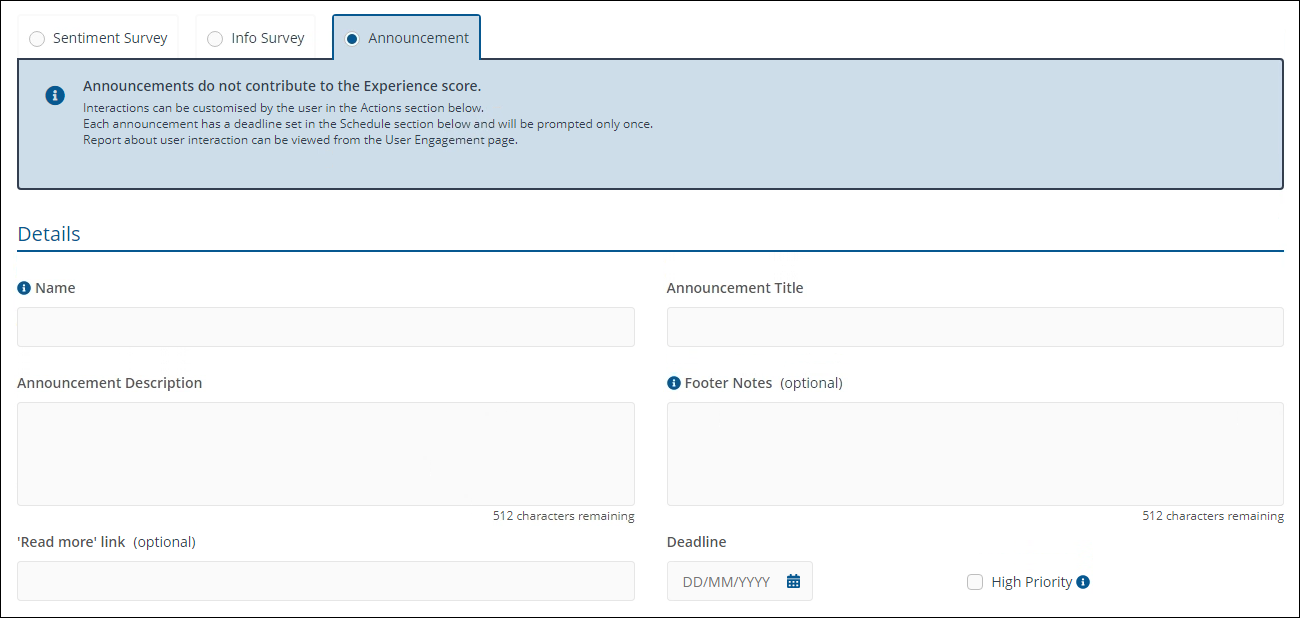
Announcement Details
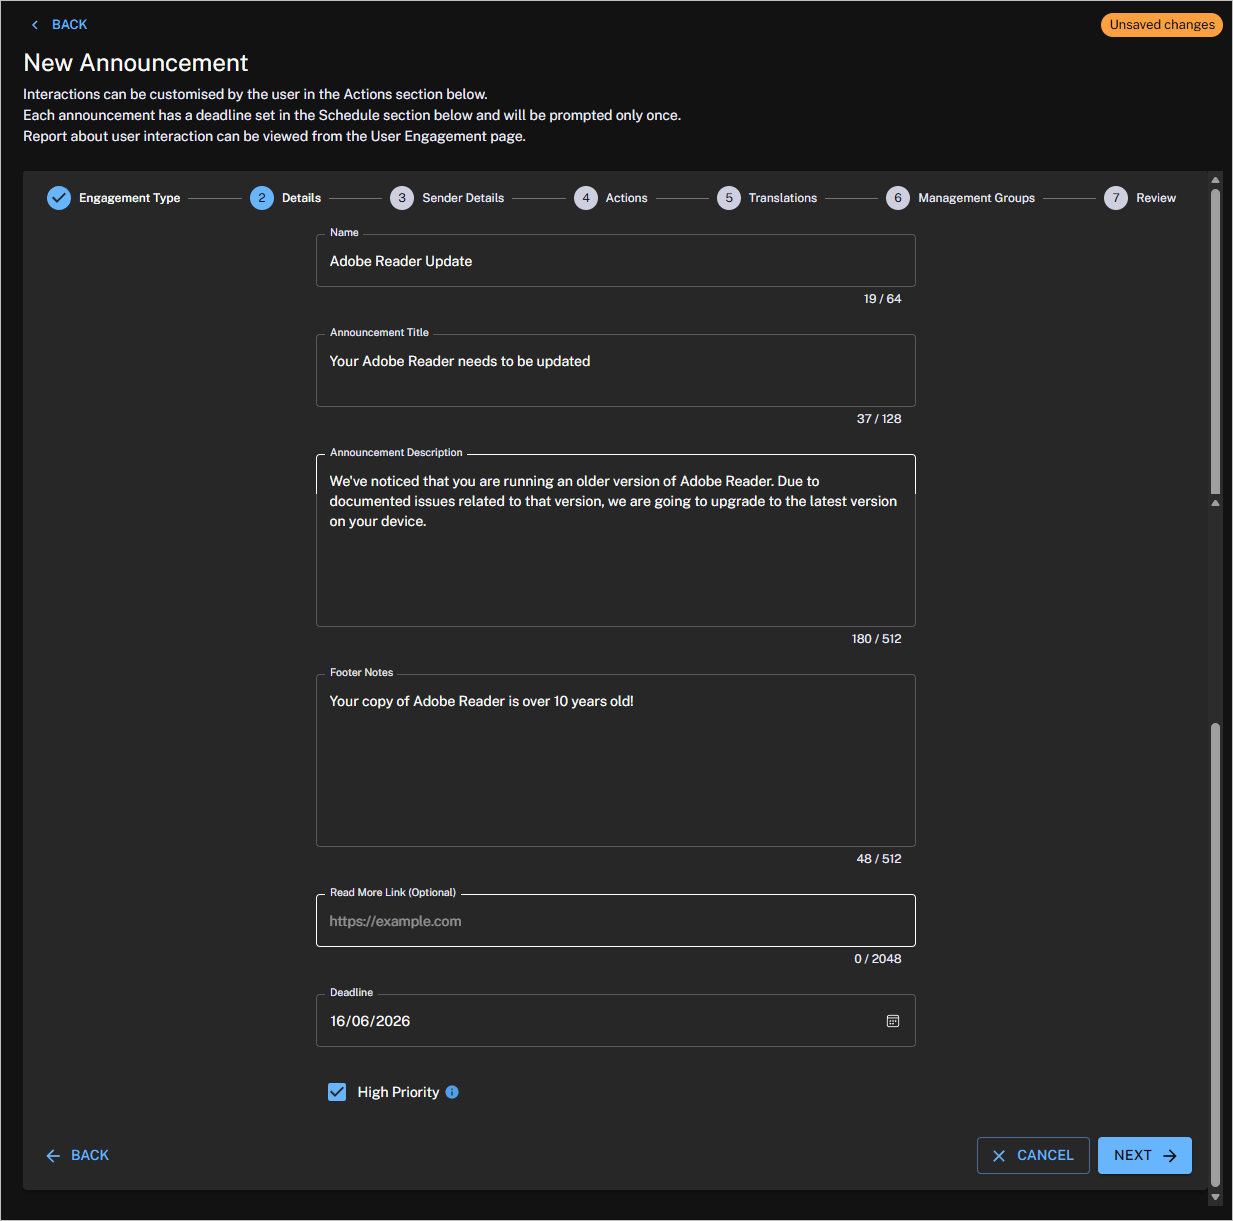
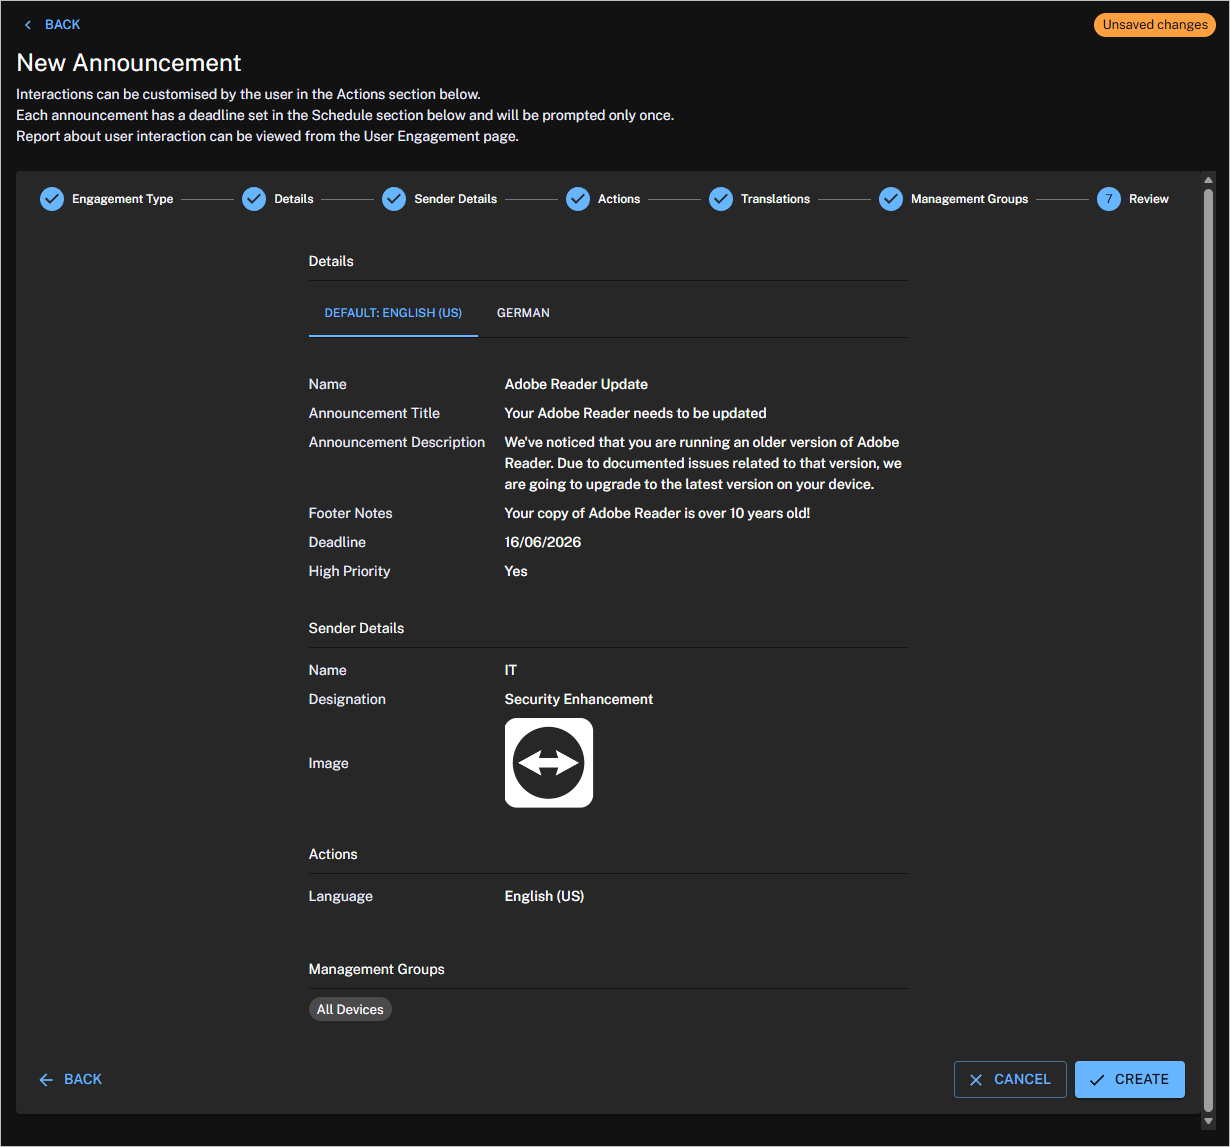
For an Announcement, you define the Name, Announcement Title, Announcement Description, Footer Notes, an optional link to further information, the Deadline, as well whether the Announcement should be High Priority.
Each section described in the following table:
|
Field |
Description |
|---|---|
|
Name |
Defines how the Announcement is referred to in Experience. |
|
Announcement Title |
Sets the title that end users will see when the Announcement displays on their device. The title can be a maximum of 128 characters. |
|
Announcement Description |
Used for the actual content of the Announcement and is displayed to end users. The Description can be a maximum of 512 characters. |
|
Footer Notes (optional) |
This section can be used to add disclaimers or contact information relevant for the Announcement. The Footer Notes can be a maximum of 512 characters. |
|
Deadline |
For announcements, you are trying to broadcast information on a particular topic on a one-off basis. Your end users aren't likely to all review the Announcement immediately, and the Announcement may cease to be relevant after a certain period of time, so you want to send a cut-off date that prevents the Announcement from going stale. For this reason, this section for announcements provides a Deadline field with a date picker that lets you choose when to stop prompting users that haven't yet seen the Announcement. |
|
High Priority |
Select this option for announcements that are considered urgent and must be displayed immediately on end-user devices. If High Priority is selected, the 1E Client, which manages the timing for any engagement displayed to the end-user, will show the Announcement immediately after the Announcement has been deployed, and the 1E Client receives it. |
Sentiment and Info survey responses
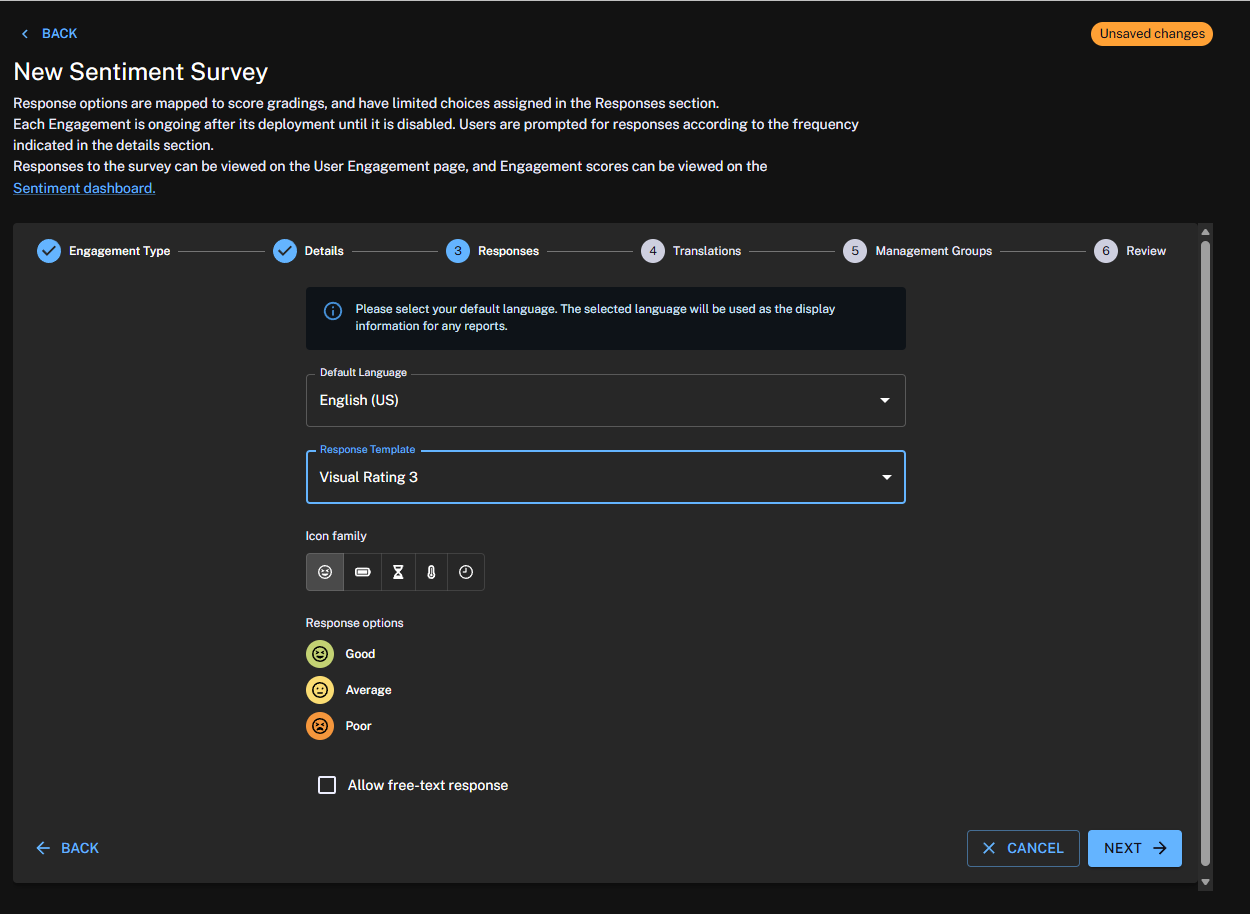
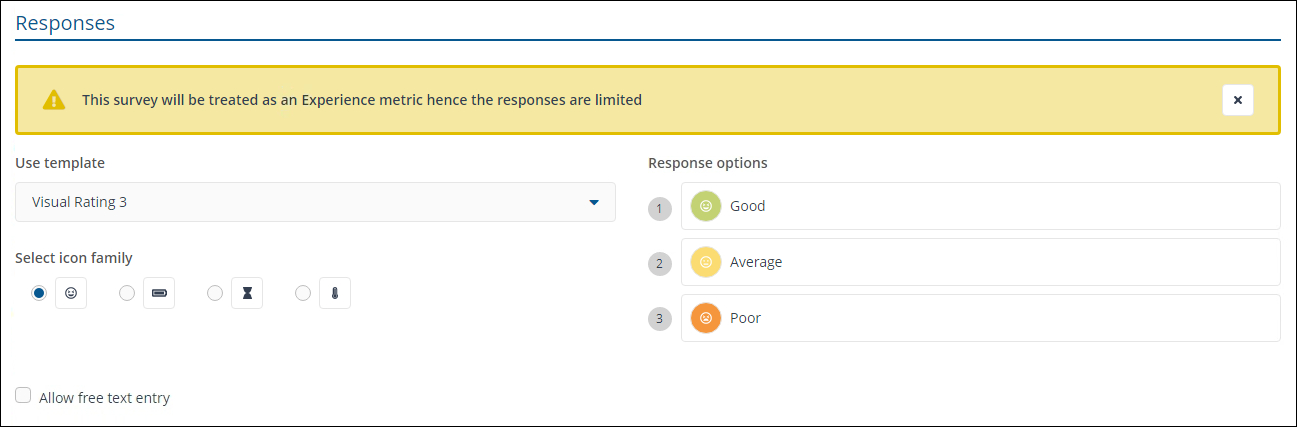
The Responses section of a survey differs slightly depending on whether you are creating a Sentiment or Info survey. The main headings are the same, though. The picture shows the Responses section for a Sentiment survey.
|
Field |
Description |
|---|---|
|
Use template |
Provides a template to base the responses on. For Sentiment responses, the selected templates are fixed and cannot be edited. For Info surveys, you can edit the text for the responses by selecting a template and then adding or deleting more responses, up to a maximum of 10.
|
|
Select icon family |
This heading is only displayed if you have selected either of the Visual Rating templates. It is available to both types of survey and allows you to select the family of icons that will represent the visually rated options. There are four family options available: smileys, bars, hourglasses and thermometers. The icons chosen are for display purposes only and do not affect the responses or their score. |
|
Response options |
This field shows the options corresponding to the currently selected template and icon family (if appropriate). For Info surveys, you can edit the names, icons used and number of options. |
|
Allow free text entry |
This checkbox sets whether the end-user has the option to enter free text to support or qualify their selection. When checked, the end-user will see a text edit field with the label Anything more you'd like to tell us? Free text responses can be viewed along with the response entry on the Survey Responses page. If you allow additional languages, responses are returned in the respondent's device locale language. Responses in other languages must be translated manually. |
The following shows the Responses section for Info surveys. Here you can see that there is a delete option at the end of each response option and there is a + for adding more options. You can add up to 10 options in total. Clicking the text field for an option lets you edit the text.
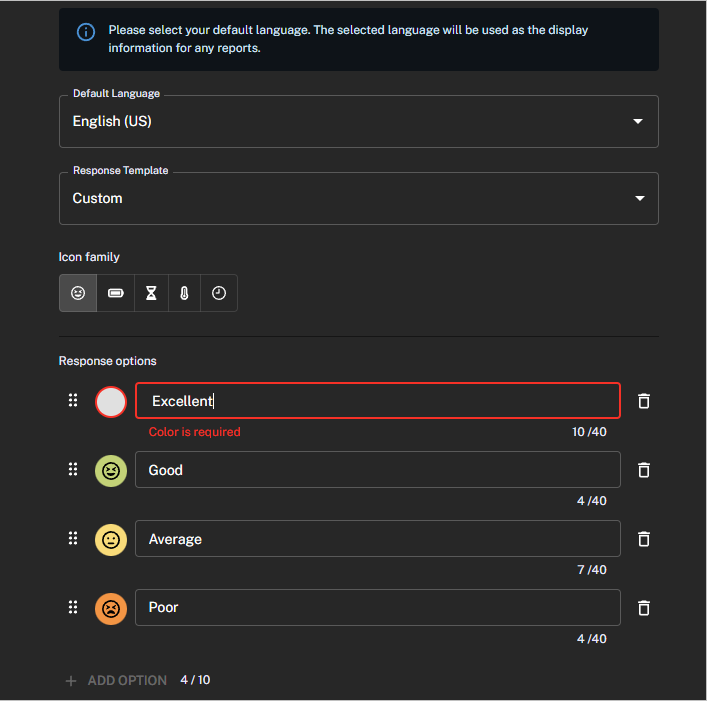
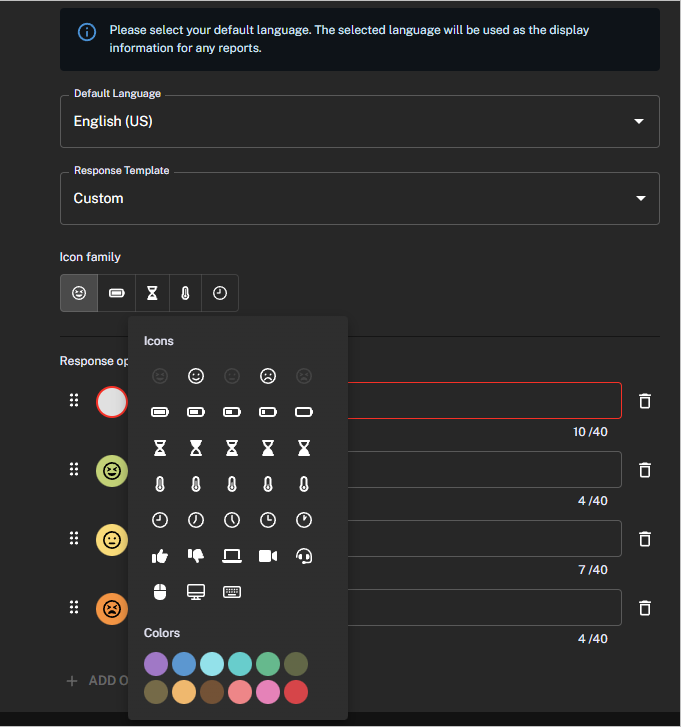
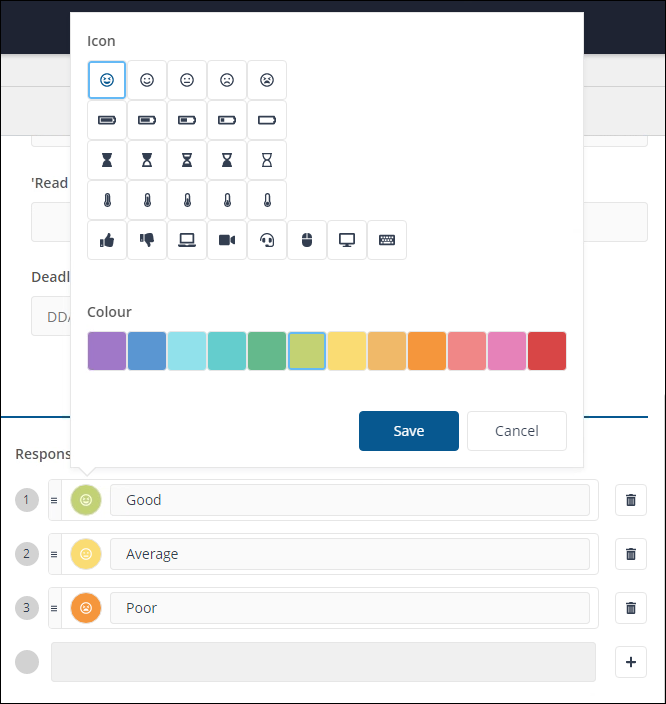
Clicking the colored circle for an option displays a pop-up window where you can change the display color and icon. Click Save when you've finished making changes.
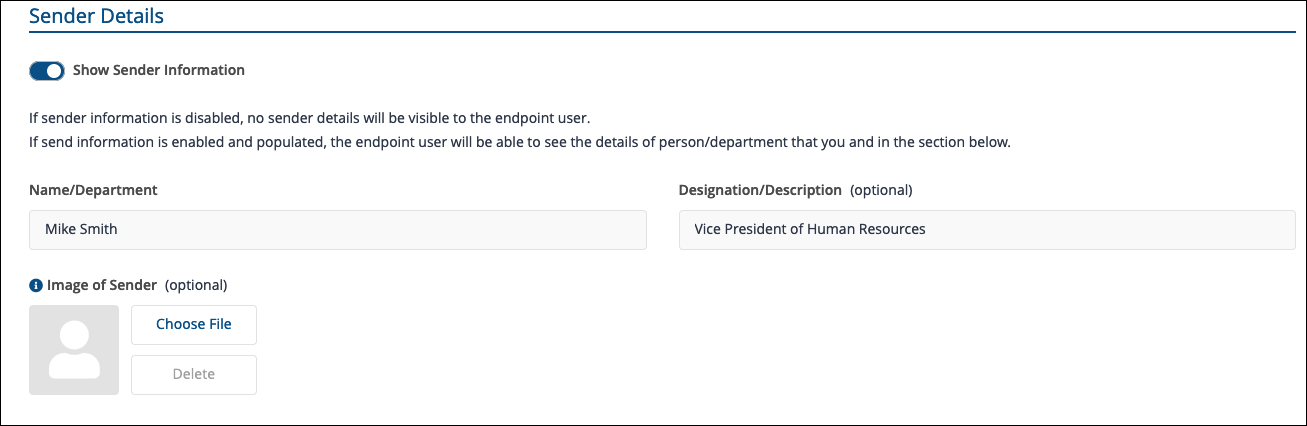
Announcement Sender Details
The Sender Details section of announcements allows you to personalize the user engagement, by adding additional fields to the Announcement. This section can be disabled from an Announcement by switching the Include sender details toggle to off.
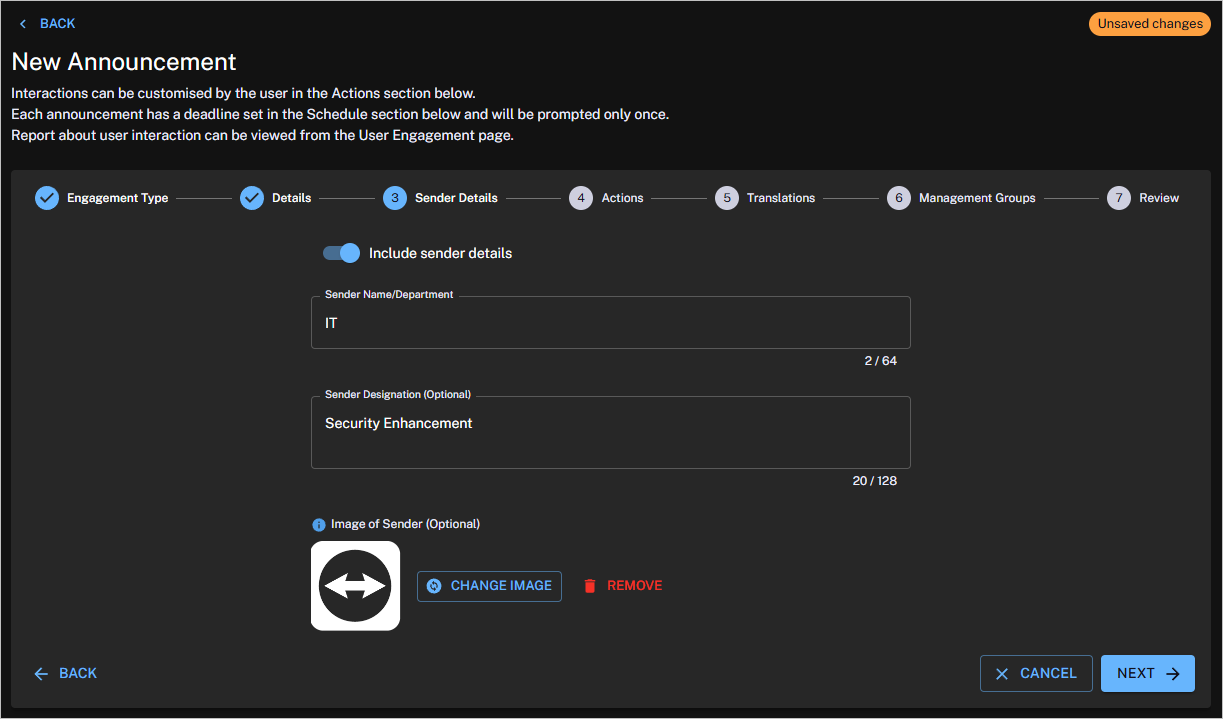
Each section of Sender Details is described in the following table:
|
Field |
Description |
|---|---|
|
Sender Name/Department |
Sets a name or department on behalf of whom the Announcement is sent, and which the end users will see when the Announcement is displayed on their device. The Name/Department can be a maximum of 64 characters. |
|
Sender Designation (optional) |
Sets the designation associated with either the name or department, which the end users see when the Announcement is displayed on their device. Designation can be used to add a Role or Function if the Sender is an Individual. The description can be used to add the department description, when the sender is a department. The designation can be a maximum of 128 characters. |
|
Image of Sender (optional) |
Sets an image associated with either the sender name or department, which end user will see when the Announcement is displayed on their device. If no image is selected, the default user interaction image/logo, as configured for the 1E Client will be used for the Announcement. The supported file types are .png and .jpg and the maximum size is 200 KB. |
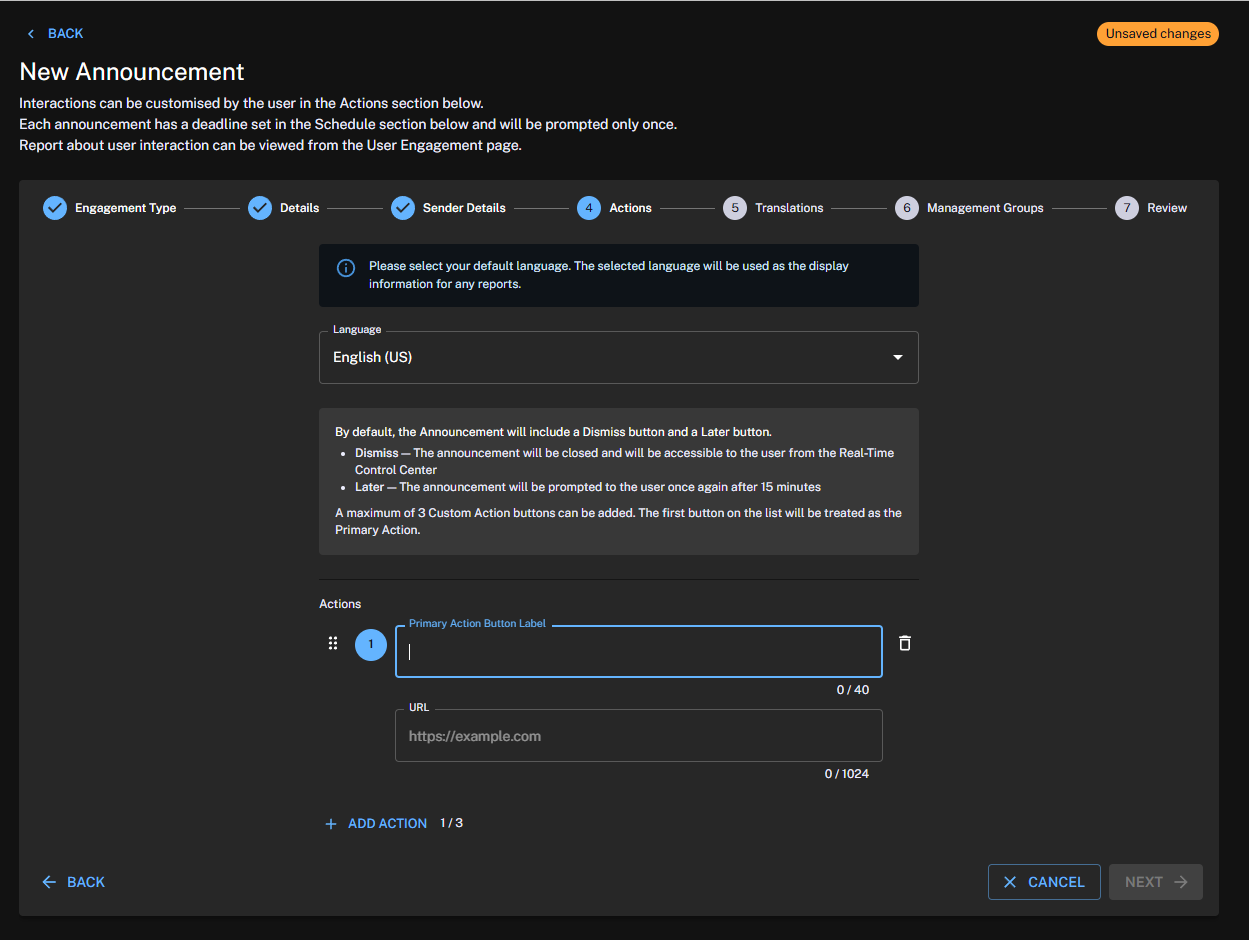
Announcement Actions
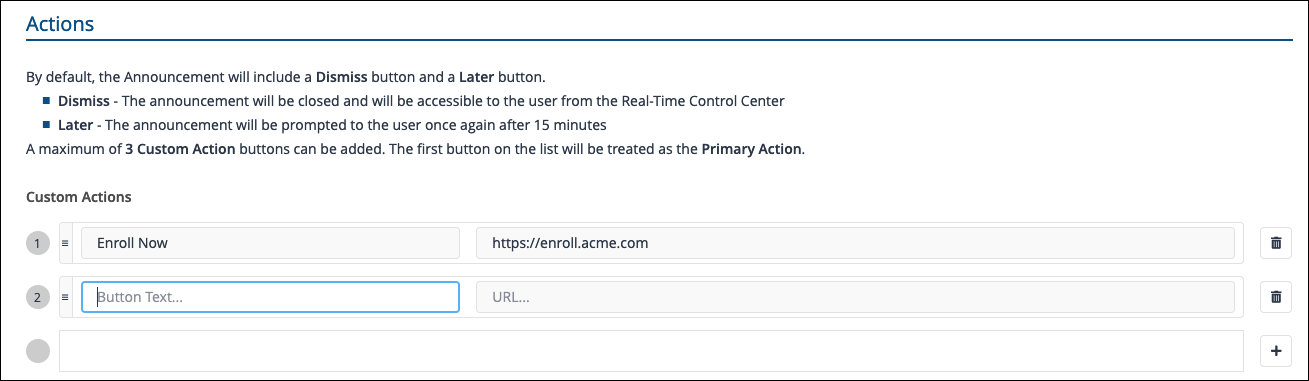
By default, any created Announcement includes Dismiss and Later.
-
Dismiss: The Announcement is closed and will be accessible to the user from the Real-Time Control Center (1E Client User Interface).
-
Later: The Announcement will be prompted to the user again after fifteen minutes.
If additional actions are required, you can add a maximum of 3 custom actions. The first on the list will be treated as the primary action.
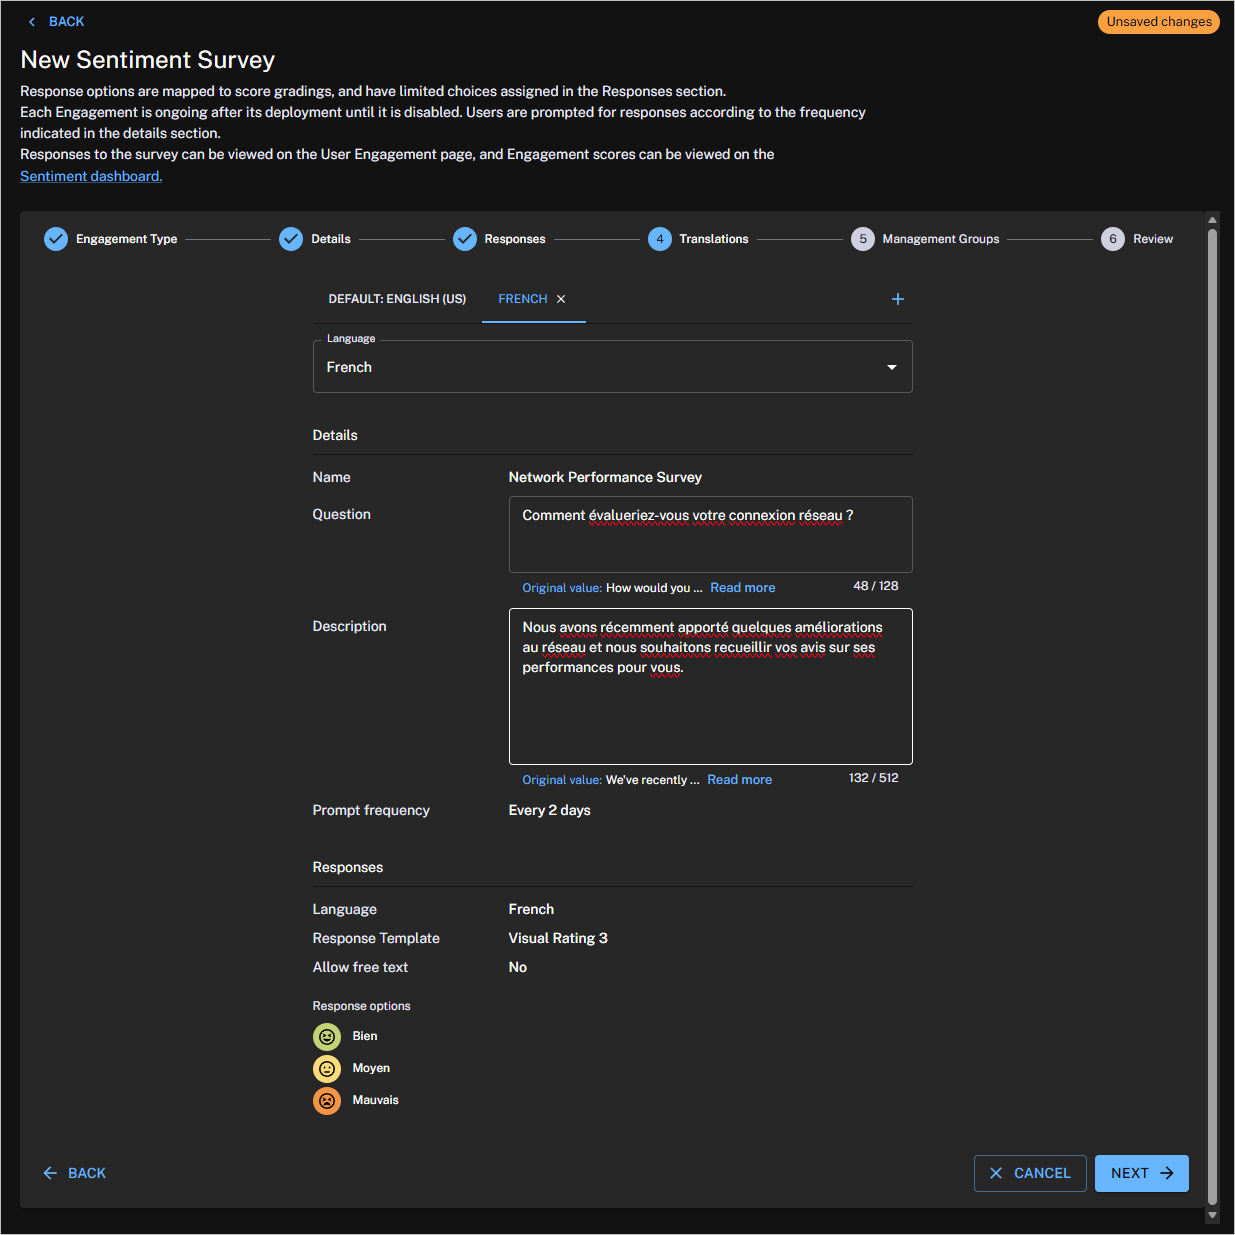
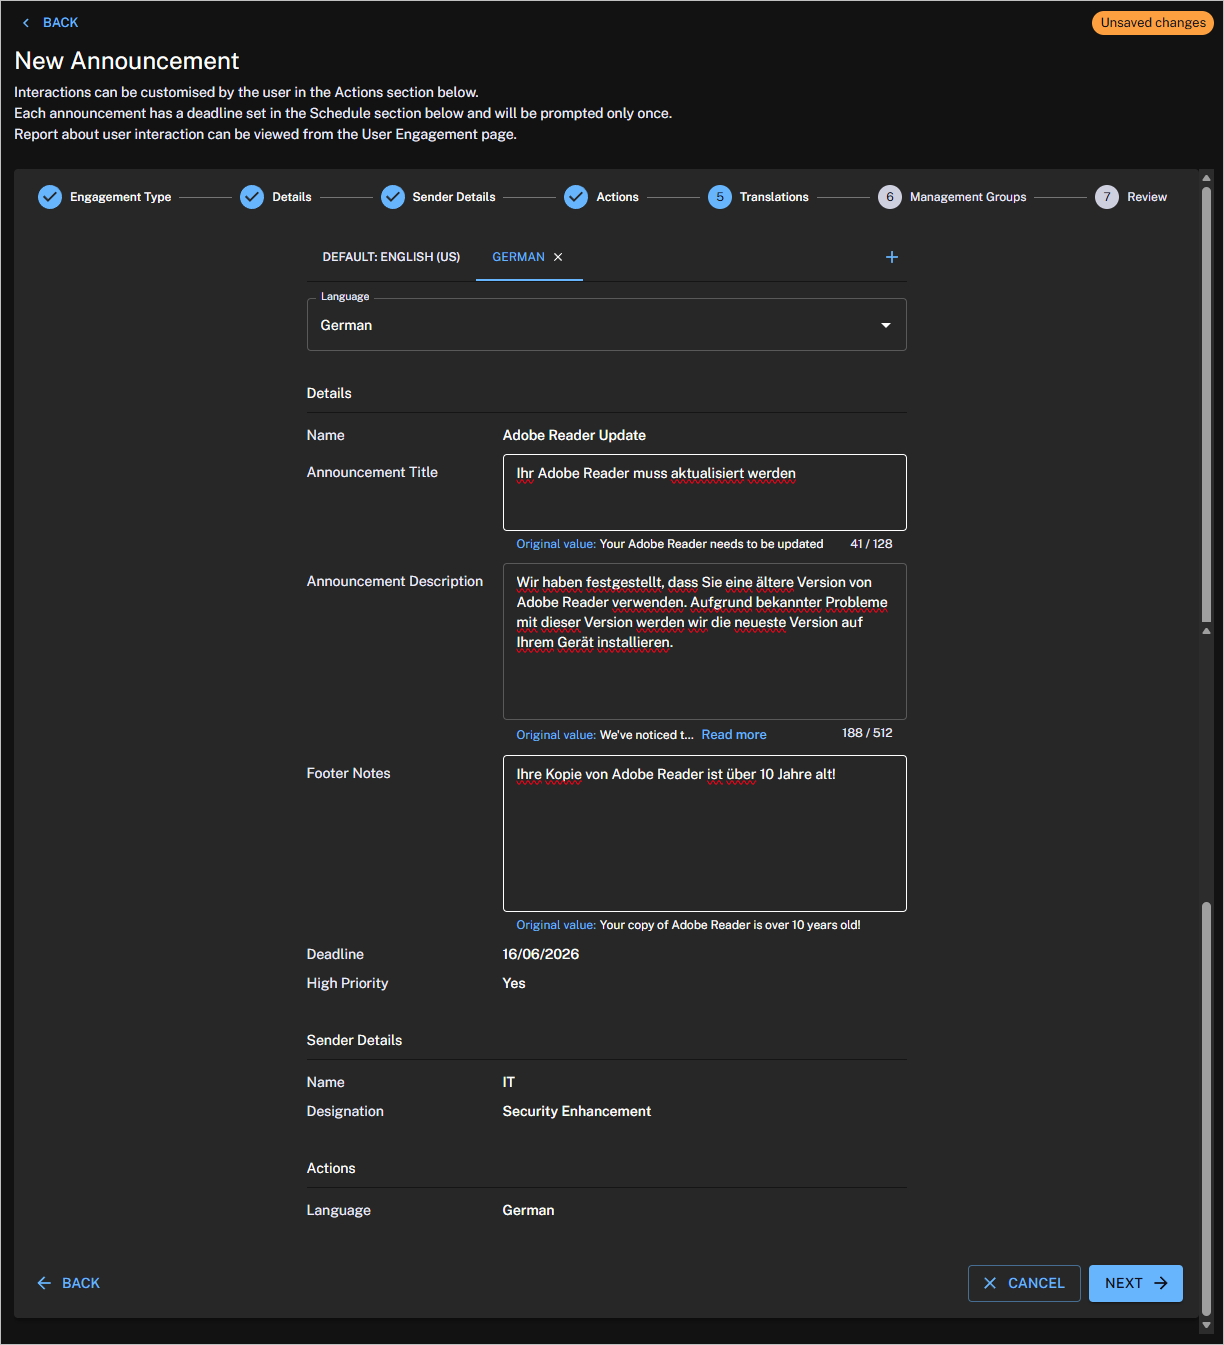
Translations
For Sentiment, Info surveys, and Announcements you can deliver your engagement in multiple languages:
-
User engagement language is selected automatically based on the device locale.
-
If the device locale does not match a supported engagement language, the engagement falls back to the configured default language.
-
Announcements support a default language and additional language translations.
-
Use a single survey across multiple regions by providing translated versions of the same content.
-
Administrators can create, update, and delete translated versions of engagement content in the new UI.
-
Engagements can be edited until they are deployed.
-
For survey administrators, responses to predefined answer options are displayed in the survey's default language.
-
User engagements created by administrators are displayed in both Experience Analytics and the new UI.
-
Existing surveys are automatically assigned English as the default language.
For supported languages refer to Localized 1E Client RTCC.
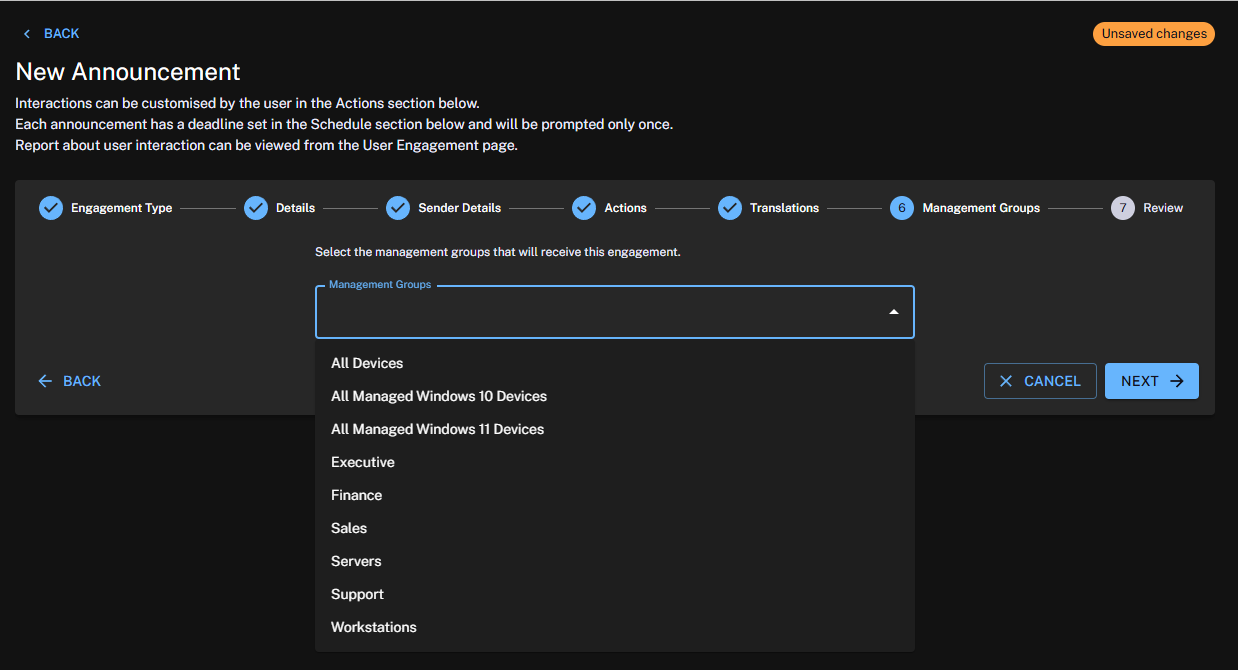
Management Groups
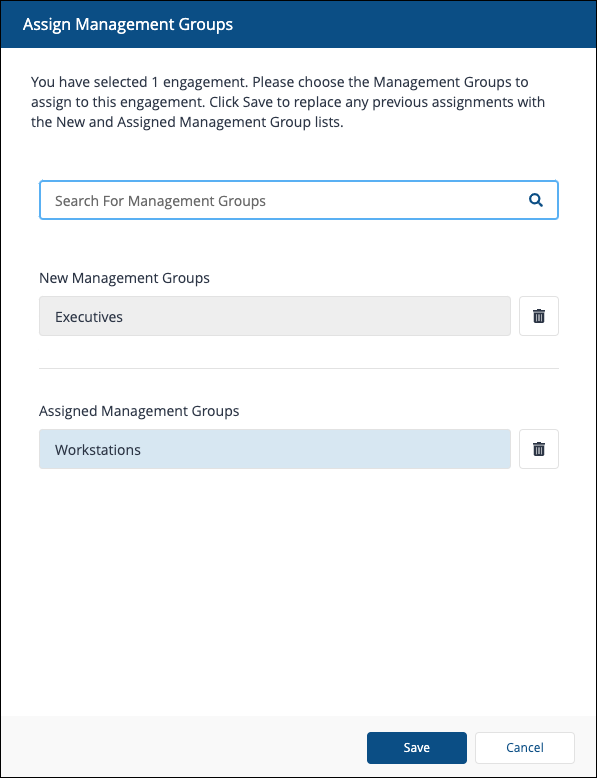
Before an Info survey or Announcement can be deployed, you will need to set a management group to define the devices where the survey and or Announcement will be sent. For Sentiment surveys, the default All Devices management group is set when it is created.
-
You can set management groups by selecting them from the drop-down list.
-
You can search for previously created management groups in the search field and add them to the assigned management groups by clicking on the list of matches.
-
Clicking Next will assign the management groups to the User Engagement.
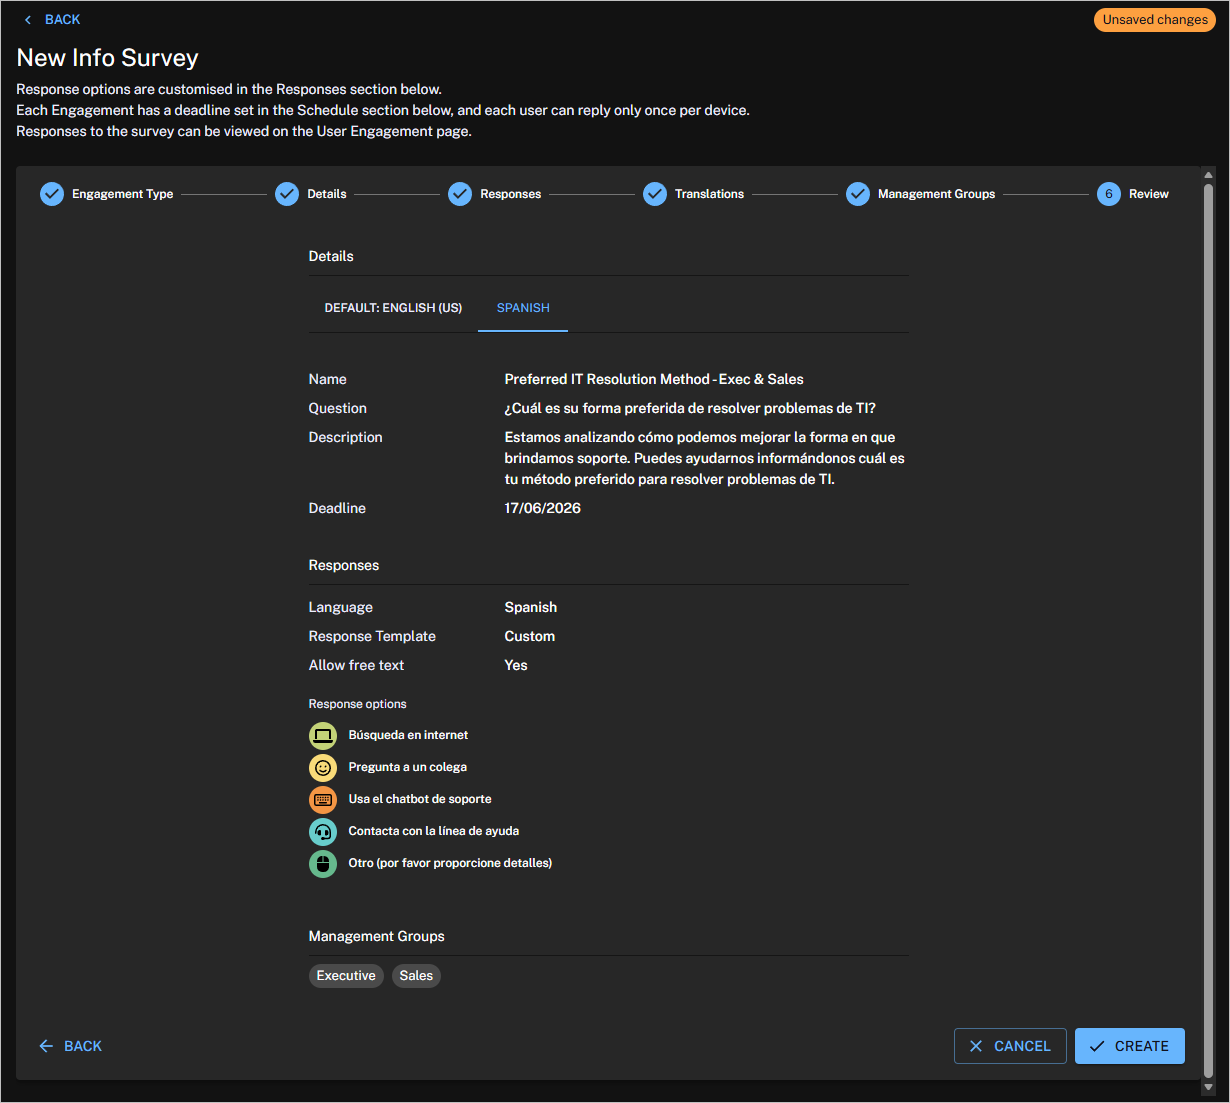
Review
When you have finished making changes to your Sentiment, Info survey, or Announcement, click Create to close the New Engagement page. At this point, your new survey will need to be enabled and deployed before it appears to end users.
Deploying a survey or an Announcement
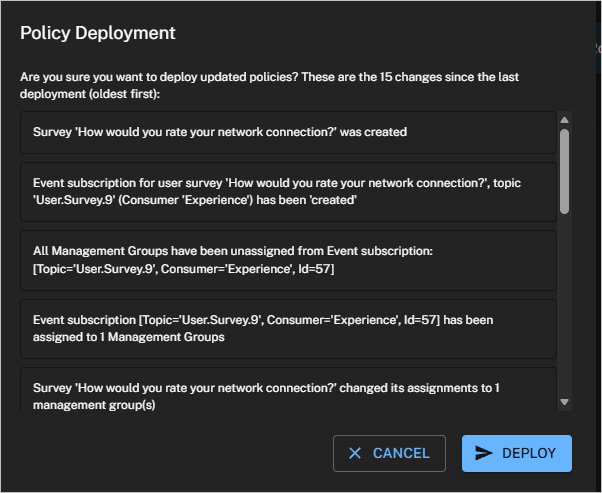
At the top of the User Engagement page in the header, is Deploy. This must be used when you want to apply your changes to the targeted devices. When you click Deploy, a Policy Deployment pop-up window appears with a list of the changes that have been made.
There are a number of reasons why you would choose to create a copy of a User Engagement. You may want to create a survey with a new question and description but keep everything else the same as an existing one. Because User Engagements cannot be edited, once you have created a User Engagement the only way to change it is to create and edit a copy. Subsequently, you would then need to disable the previous one and enable and deploy the copy.
You can copy a single existing User Engagement by selecting it from the User Engagement table and clicking Clone. This displays the New Engagement page pre-filled with all the details from the selected User Engagement. When doing this, you must change the name of the Engagement, so it doesn't clash with the previous one. You then modify the rest of the parameters as needed.
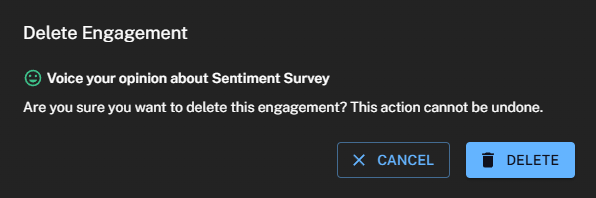
To delete one or more User Engagements, select them from the User Engagements table and click Delete. An Deletion Engagement pop-up window will be displayed asking you to confirm the deletion. Click Delete to remove the selected engagements.
Once deleted, the User Engagement will no longer appear in the User Engagement table. Before the deletions take effect on any previously targeted devices they must be deployed.
To enable one or more User Engagements, select them from the User Engagement table and click Enable. An Enable Engagement pop-up window will be displayed asking you to confirm that you want to enable the selected Engagement. Click Enable to enable the selected Engagement.
The selected User Engagement will appear as enabled in the User Engagement table, however, before the enablement changes take effect on any targeted devices they must be deployed.

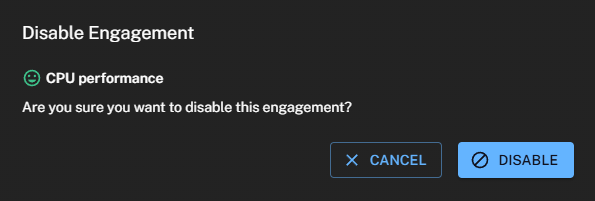
To disable one or more User Engagements, select them from the User Engagement table and click Disable. A Disable Engagement pop-up window will be displayed asking you to confirm that you want to disable the selected User Engagement. Click Disable to disable the selected User Engagement.
The selected User Engagement will appear as disabled in the User Engagement table, however, before the disablement changes take effect on any targeted devices they must be deployed.
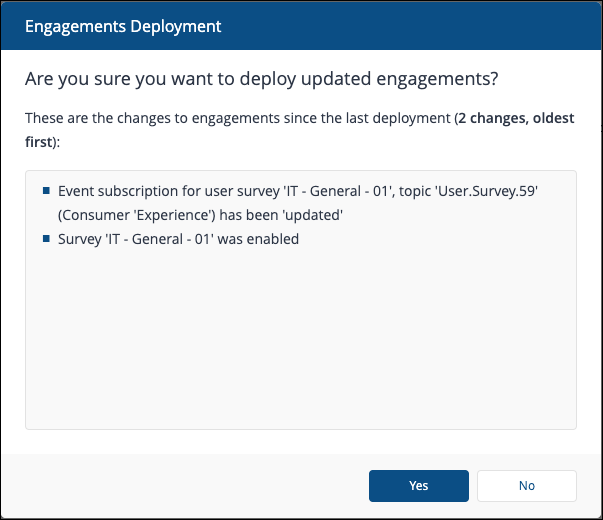
At the top of the page in the header is Deploy. This must be used whenever you want to apply any of the changes you make to the devices targeted by either surveys or announcements. When you click Deploy, an Engagements Deployment pop-up window appears with a list of pending changes.
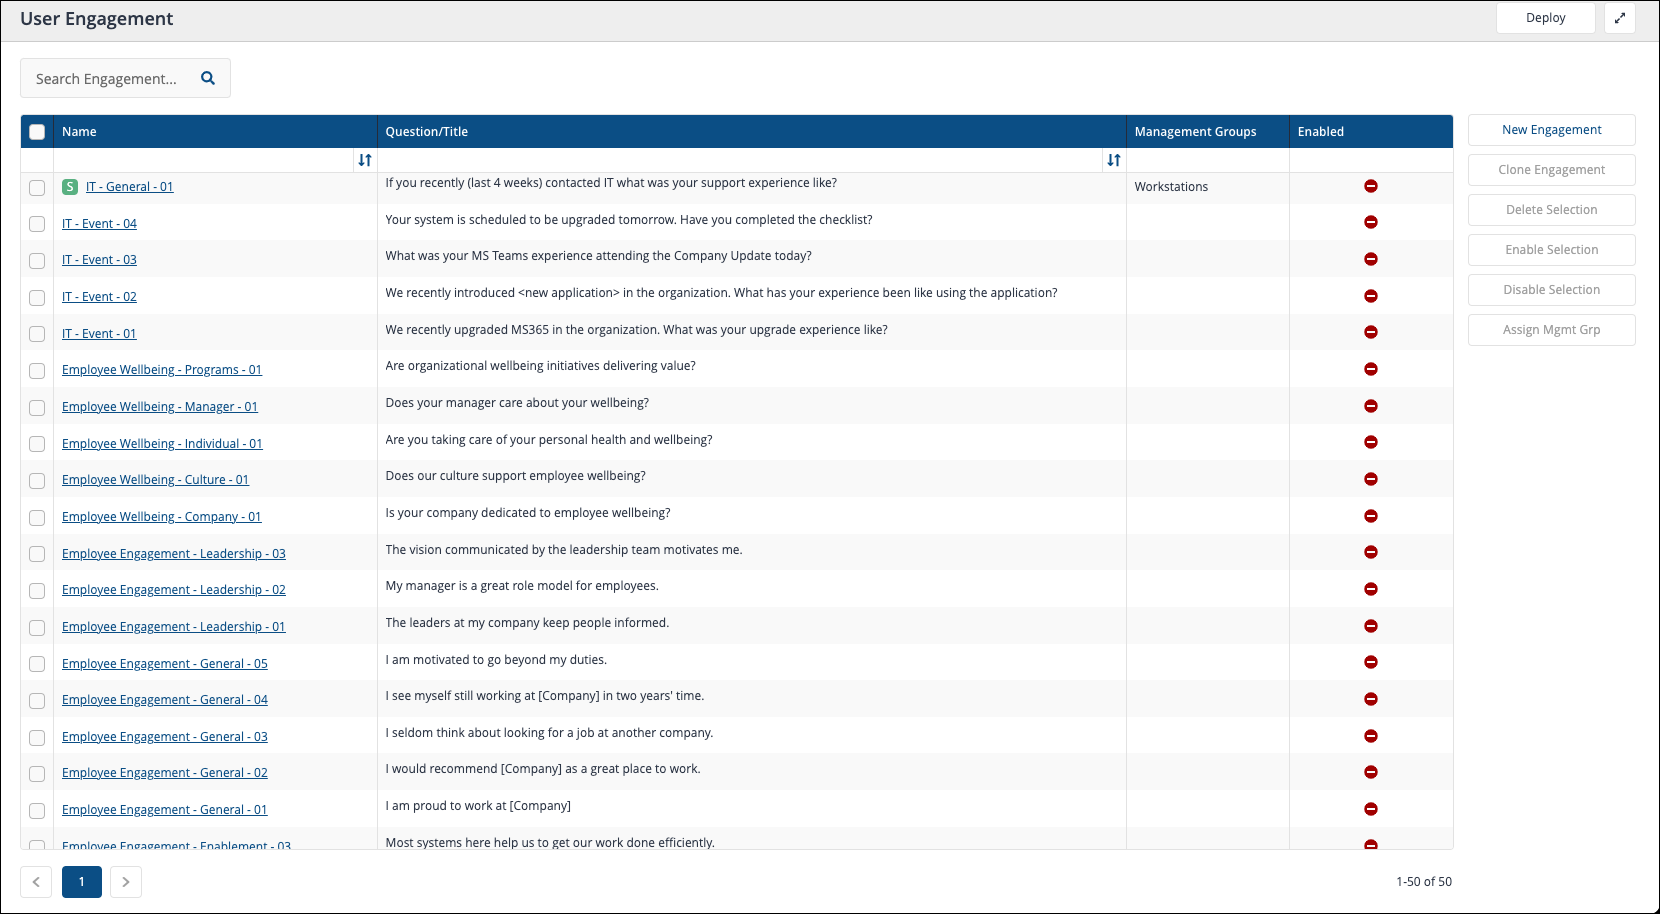
The main part of the User Engagement page is represented by a searchable table:
|
Column |
Description |
|---|---|
|
Name |
The name of the Engagement is a link to the engagement details page providing information related to the survey responses or other user engagement results. For Sentiment surveys, the name is also a metric that contributes towards the Sentiment score. You can monitor it using a chart on the Experience Sentiment page. Refer to Sentiment page.
|
|
Question/Title |
Shows the question set for the survey or the Title for announcements. |
|
Management Groups |
The management groups set for a User Engagement determine which devices the survey or announcement is sent to. |
|
Enabled |
This indicates whether the User Engagement is enabled. Only enabled and deployed Engagements are visible to end users. |
There are also a number of actions related to table selections.
|
Action |
Description |
|---|---|
|
New Engagement |
Displays the New Engagement page where you can create a new Sentiment survey, Info survey, or Announcement. This is only enabled if there are no selections in the User Engagement table. |
|
Clone Engagement |
Displays the New Engagement page pre-filled with details from the survey or Announcement currently selected in the User Engagement table. This is only enabled if there is a single selection in the User Engagement table. |
|
Delete Selection |
Deletes the selected survey (s) and/or Announcement(s) in the User Engagement table. Clicking this displays the Engagement Deletion pop-up window. This is only enabled if there is one or more selections in the User Engagement table. |
|
Enable Selection |
Enables all the selected survey (s) and/or Announcement(s) in the User Engagement table regardless of their current enabled state. Clicking this displays the Enable Engagement pop-up window. This is only enabled if there is one or more selections in the User Engagement table. |
|
Disable Selection |
Disables all the selected survey (s) and/or Announcements in the User Engagement table regardless of their current enabled state. Clicking this displays the Disable Engagement pop-up window. This is only enabled if there is one or more selections in the User Engagement table. |
|
Assign Mgmt Grp |
Assigns management groups to the selected survey (s) and/or Announcements in the User Engagement table. Clicking this displays the Assign Management Groups pop-up window. This is only enabled if there is one or more selections in the User Engagement table. |
Clicking on New Engagement in the User Engagement table displays the New Engagement page, where you define your new Engagement.
Engagement Type
The first choice is the Engagement Type, which determines the controls displayed on the page. You can choose Sentiment Survey, Info Survey, or Announcement. The controls displayed for each type are different. The default engagement type selected on the New Engagement page is Sentiment Survey.
If you want to define an Info Survey or an Announcement, select that option under the Engagement Type heading.
Survey Details
For Sentiment and Info surveys you define the Name, Question, Description, and an optional Link to further information. The Details section is almost the same for Sentiment surveys and Info surveys, with one difference detailed in the last row of the following table.
If two surveys have the same question, the name of the survey will display to the user within parenthesis.
|
Field |
Description |
|---|---|
|
Name |
Defines how the survey is referred to in the Experience UI. For Sentiment surveys, the Name also defines the name of the Metric the responses will be scored on. |
|
Question |
Sets the question you will ask your end users. You should design your questions carefully, as they will be sent to end users, and you will want to maximize your responses. Refer to Names, Questions, Descriptions and Frequency. The Question can be a maximum of 128 characters, including the question mark. |
|
Description |
Used to support and provide context for the Question, the Description is also displayed to end users. The Description can be a maximum of 512 characters. |
|
Link (optional) |
Lets you specify the URL to any additional information you want to add to help support and provide context for the question. The text for the link is displayed to end users as Click here to find out more. This field is optional. |
|
Prompt Question Cadence or Deadline |
This section is different for Sentiment surveys and Info surveys and reflects the nature of the two types of survey . Sentiment surveys: Used when you are trying to get information on a Metric that you want to measure. This means that you want to prompt your end users to respond on a regular basis. For this reason this section provides an option where you can set to prompt question every x days. Info surveys: Used when you are trying to get feedback on a particular topic on a one-off basis. Your end users aren't likely to all respond immediately, so you want to send a cut-off date that prevents the survey from going stale but still allows your end users to send responses when they can. For this reason, this section for Info surveys provides a Deadline field with a date picker that lets you choose when to stop prompting users that haven't yet responded. |
Announcement Details
For Announcements, you define the Name, Announcement Title, Announcement Description, Footer Notes, an optional Link to further information, the Deadline, as well whether the Announcement should be High Priority.
Each section described in the following table:
|
Field |
Description |
|---|---|
|
Name |
Defines how the Announcement is referred to in Experience. |
|
Announcement Title |
Sets the title that end users will see when the Announcement displays on their device. The Title can be a maximum of 128 characters. |
|
Announcement Description |
Used to for the actual content of the Announcement, and is displayed to end users. The Description can be a maximum of 512 characters. |
|
Footer Notes (optional) |
This section can be used to add disclaimers or contact information relevant for the Announcement. The Footer Notes can be a maximum of 512 characters. |
|
Deadline |
For Announcements, you are trying to broadcast information on a particular topic on a one-off basis. Your end users aren't likely to all review the Announcement immediately, and the Announcement may cease to be relevant after a certain period of time, so you want to send a cut-off date that prevents the Announcement from going stale. For this reason, this section for Announcements provides a Deadline field with a date picker that lets you choose when to stop prompting users that haven't yet seen the Announcement. |
|
High Priority |
Select this option for Announcements that are considered urgent and must be displayed immediately on end-user devices. If High Priority is selected, the 1E Client, which manages the timing for any engagement displayed to the end-user, will show the Announcement immediately after the Announcement has been deployed, and the 1E Client receives it. |
Survey Responses
The Responses section of a survey differs slightly depending on whether you are creating a Sentiment survey or Info survey . The main headings are the same, though. The picture shows the Responses section for a Sentiment survey .
|
Field |
Description |
|---|---|
|
Use template |
Provides a template to base the responses on. For Sentiment responses the selected templates are fixed and cannot be edited. For Info surveys you can edit the text for the responses added by selecting a template and then add or delete more responses, up to a maximum of 10.
|
|
Select icon family |
This heading is only displayed if you have selected either of the Visual Rating templates. It is available to both types of survey and lets you select the family of icons that will be used to represent the visually rated options. There are four family options available: smileys, bars, hourglasses and thermometers. The icons chosen are for display purposes only and have no effect on the responses or their score. |
|
Response options |
This field shows the options that correspond to the currently selected template and icon family (if appropriate). For Info Surveys, the names, icons used and number of options can be edited. |
|
Allow free text entry |
This checkbox sets whether the end-user gets the option to enter free text to support or qualify their selection. When checked, the end-user will see a text edit field with the label Anything more you'd like to tell us? The free text responses can be viewed along with the response entry on the Survey Responses page. |
The picture shows the Responses section for Info surveys. Here you can see that there is a delete option at the end of each response option and there is a + for adding more options. You can add up to 10 options in total.
Clicking in the text field for an option lets you edit the text.
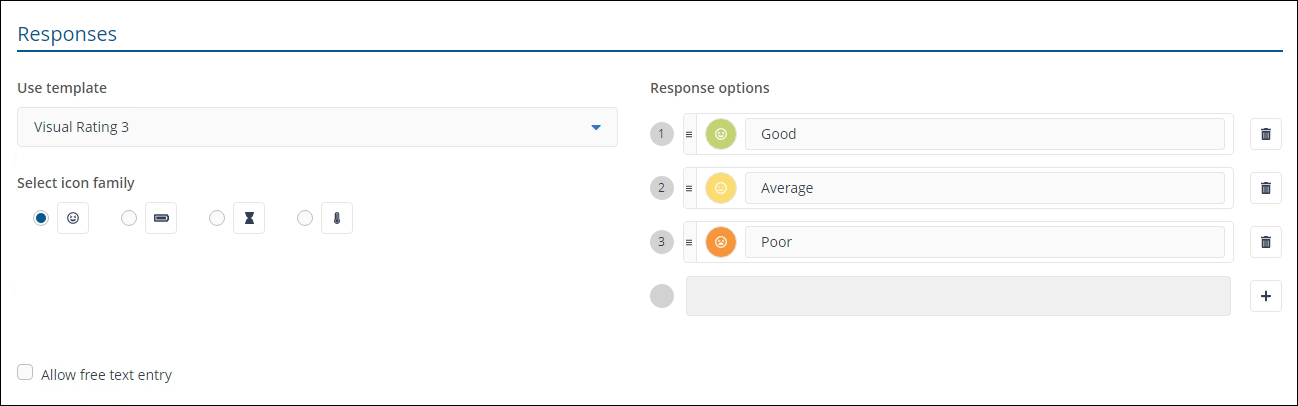
Clicking the colored circle for an option displays a pop-up window where you can change the color and icon used to display the option, as shown in the picture. Click Save when you've finished making changes.
Announcement Sender Details
The Sender Details section allows personalization of this type of user engagement, by adding additional fields to the Announcement. This section can be disabled from an Announcement by switching the Show Sender Information toggle to off.
Each section of Sender Details is described in the following table:
|
Field |
Description |
|---|---|
|
Name/Department |
Sets a Name or a Department on behalf of whom the Announcement is sent and which the end users will see when the Announcement is displayed on their device. The Name/Department can be a maximum of 64 characters. |
|
Designation/ Description (optional) |
Sets the designation or description associated with either the Name or Department, which the end users see when the Announcement is displayed on their device. Designation can be used to add a Role or Function if the Sender is an individual. The description can be used to add the department description, when the sender is a department. The Designation/Description can be a maximum of 128 characters. |
|
Image of Sender (optional) |
Sets an Image associated with either the sender name or department, which the end users will see when the Announcement is displayed on their device. If no image is selected, the default user interaction image/logo, as configured for the 1E Client will be used for the Announcement. The supported file types are .png and .jpg and the maximum size is 200 KB. |
Announcement Actions
By default, any created Announcement includes Dismiss and Later.
-
Dismiss: The Announcement is closed and will be accessible to the user from the Real-Time Control Center (1E Client User Interface).
-
Later: The Announcement will be prompted to the user again after 15 minutes.
If additional actions are required, you can add a maximum of 3 Custom Actions. The first on the list will be treated as the primary action.
User Engagement Summary
This section provides a summary of the entries that you've made in the New Engagement page. It also contains Save and Cancel.
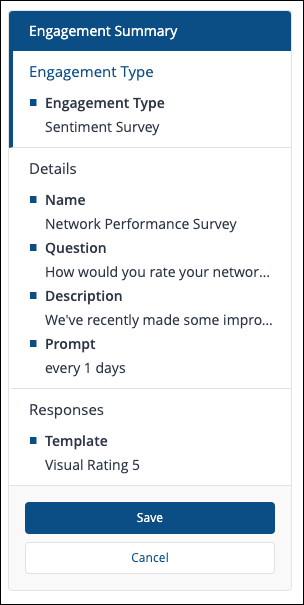
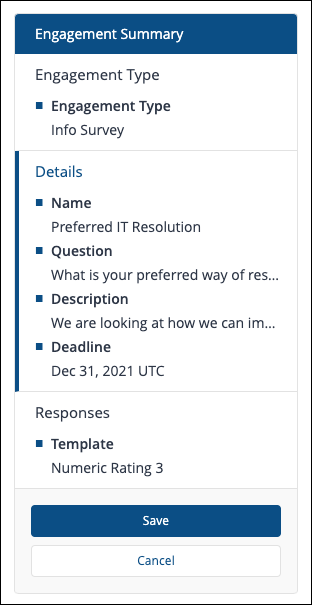
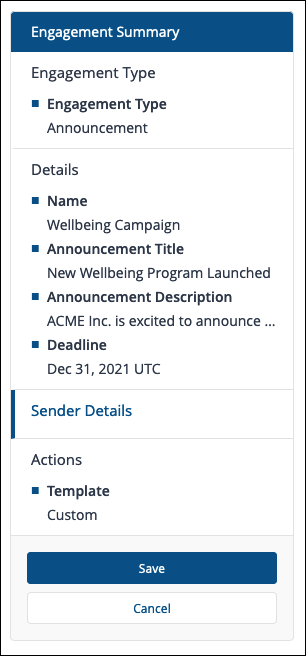
There's a slight difference between the headings in the Engagement Summary for the different types of surveys or Announcement. Sentiment surveys have a heading called Prompt, Info surveys have a heading called Deadline and Announcements have headings that include the Sender Details and Actions.
The picture shows the Engagement Summary for a Sentiment survey .
The picture shows the Engagement Summary for an Info survey .
The picture shows the Engagement Summary for an Announcement.
When you have finished making changes to your survey , click Save to close the page. At this point, your new survey will need to be enabled and deployed before it appears to end users. You will also check the management group assigned to the survey .
There are a number of reasons why you would choose to create a copy of a User Engagement. You may want to create a survey with a new question and description but keep everything else the same as an existing one. User Engagements cannot be edited, once you have created a User Engagement the only way to change it is to create and edit a copy. Subsequently, you would then need to disable the previous one and enable and deploy the copy.
You can copy a single existing User Engagement by selecting it from the User Engagement table and clicking Clone Selection. This displays the New Engagement page pre-filled with all the details from the selected User Engagement. When doing this, you must change the name of the Engagement, so it doesn't clash with the previous one. You then modify the rest of the parameters as needed and click Save to save the copy.
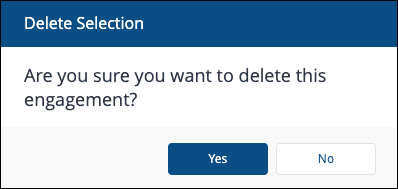
To delete one or more User Engagements, select them from the User Engagement table and click Delete Selection. An Engagement Deletion pop-up window will be displayed asking you to confirm the deletion. Click Yes to remove the Selection from Experience.
The User Engagement will no longer appear in the User Engagement table. Before the deletions take effect on any previously targeted devices they must be deployed.
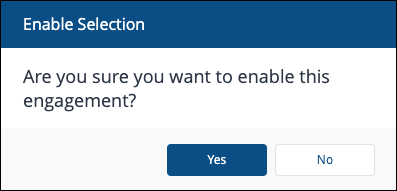
To enable one or more User Engagements, select them from the User Engagement table and click Enable Selection. An Enable Engagement pop-up window will be displayed asking you to confirm that you want to enable the selected Engagement. Click Yes to enable the selected Engagement.
The selected User Engagement will appear as enabled in the User Engagement table, however, before the enablement changes take effect on any targeted devices they must be deployed.
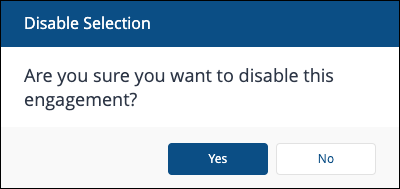
To disable one or more User Engagements, select them from the User Engagement table and click the Disable Selection. A Disable Selection pop-up window will be displayed asking you to confirm that you want to disable the selected User Engagement. Click Yes to disable the selected User Engagement.
The selected User Engagement will appear as disabled in the User Engagement table, however, before the disablement changes take effect on any targeted devices they must be deployed.
Before an Info survey or Announcement can be deployed, you will need to set a management group to define the devices where the survey and or Announcement will be sent. For Sentiment surveys, the default All Devices management group is set when it is created.
-
You can set the management groups for one or more selected surveys or announcements in the User Engagement table by clicking the Assign Mgmt Grp. Doing this displays the Assign Management Groups popup.
-
You can search for previously created management groups in the search field and add them to the Assigned Management Groups by clicking on the list of matches.
-
Clicking Save will assign the management groups to all the selected User Engagements.
-
Before changes to the management groups for a survey or an Announcement take effect, you must deploy them.