1E Virtual Assistant post-installation tasks
Post-installation tasks, which include verification checks and mandatory and optional configuration tasks.
The following tasks must be performed post-installation of 1E Virtual Assistant.
Domain Separation
1E Virtual Assistant is enhanced with robust domain separated capabilities. This ensures that sensitive data from different domains is securely isolated and managed independently. By leveraging advanced access controls and implementing stringent data segregation protocols, 1E Virtual Assistant provides heightened security and privacy, by reducing the risk of unauthorized access and data breaches.
Before using the Domain Separation feature in 1E Virtual Assistant, you need to ensure that the appropriate settings have been made. The domain separation feature (Single-Tenant or Multi-Tenant) will be auto-populated based on whether the Domain Separation feature is activated.
Depending on whether you have a Single-Tenant or Multi-Tenant Instance, you should now follow the instructions in one of these pages:
1E Virtual Assistant has two pages for configuration depending on the domain separation enabled in the instance. It allows an admin user to setup the details that are required by the application to communicate to the 1E Platform.
This page can be accessed by clicking the App Settings tab, available under the 1E Virtual Assistant menu items in the application navigator for single tenant configuration.
App Settings
Some application settings need to be defined for 1E Virtual Assistant before it can be used. The App Settings is available under the 1E Virtual Assistant menu items in the application navigator.
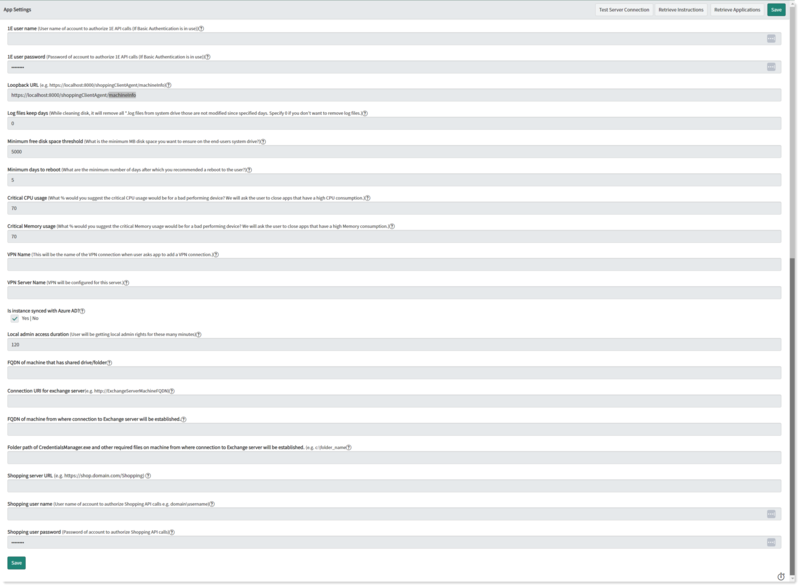
The following table describes the fields available on the App Settings page:
|
Field |
Description |
|---|---|
|
1E username and Password |
A 1E username with the domain and password must be configured on the App Settings page. This user is responsible for fetching and executing instructions in 1E. |
|
Loopback URL |
The 1E Virtual Assistant can use the Shopping Loopback URL to get the FQDN of the device where the browser accessing ServiceNow is running. If you have the 1E Client with the Shopping agent installed, you will need to set this as the location for the loopback. The default value for this is:https://localhost:8000/shoppingClientAgent/machineInfo. |
|
Log files keep days |
When a user tries to fix the Low Disk Space issue on their system using Virtual Assistant, it actually deletes all necessary files from the system to free up some space. Log files can be important some time, that is why it does not delete log files if the value of this property is <=0. In other words, while cleaning disk, it will remove all *.log files from system drive those are not modified since specified days. Specify 0 if you don't want to remove log files. |
|
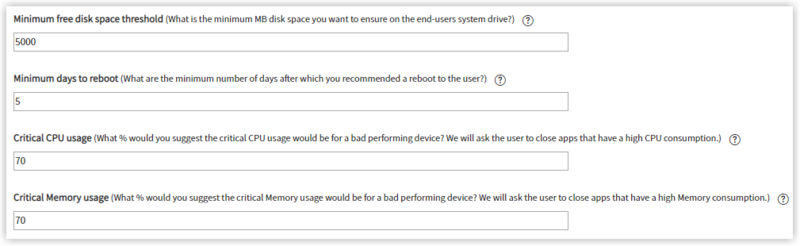
Minimum free disk space threshold |
This property is used by the Computer Slow topic. It allows the admin user to configure what is the minimum MB disk space required on the end-user's system drive. Any non-numeric, invalid and empty values will be treated as 0. |
|
Minimum days to reboot |
This property is used by the Computer Slow topic. It allows the admin user to configure what are the minimum number of days after which a reboot is recommended to the user? Any non-numeric, invalid and empty values will be treated as 0. |
|
Critical CPU usage |
This property is used by the Computer Slow topic. It allows an admin user to configure What % would be the critical CPU usage for a bad performing device? Virtual agent then will ask the user to close apps that have a high CPU consumption. Any non-numeric, invalid and empty values will be treated as 0. |
|
Critical Memory usage |
This property is used by the Computer Slow topic. It allows admin user to configure What % would be the critical Memory usage for a bad performing device? Virtual agent then will ask the user to close apps that have a high Memory consumption. Any non-numeric, invalid and empty values will be treated as 0. |
|
VPN Name |
This property is used by the Add a VPN Connection topic. The value in this property will be the name of the VPN connection when a user asks the app to add a VPN connection. It supports VPN name up to 128 characters. |
|
VPN Server Name |
This property is used by the Add a VPN Connection topic. VPN will be configured for this server (the value in this property). |
|
Is instance synced with Azure AD? |
This property is used by the Reset my Windows password topic. It is a Yes/No type of property that determines whether the ServiceNow instance is synced with Azure AD. |
|
Local admin access duration |
This property is used by the Local admin access topic and contains a numeric value (minutes). When a user requests local admin access on a device, they will get local admin access for this number of minutes. |
|
FQDN of machine that has shared drive/folder |
Specify the FQDN of the machine that has shared folders. This value is used by the Access a shared folder topic. |
|
Connection URl for exchange server |
This property contains the URI of the Exchange server, in the following format: http://<machineFQDN>. This property is used by the following topics: |
|
FQDN of machine from where connection to Exchange server will be established |
In some cases, it may happen that the 1E Client is not installed on an on-premises Exchange server. To run an Exchange server topic, you can use another machine that has the 1E client installed and can access the Exchange server machine. This property contains that device's FQDN. This property is used by the following topics: |
|
Folder path of CredentialsManager.exe and other required files on machine from where connection to Exchange server will be established |
Before executing the Exchange server topics, we need to store the Exchange server username and password in windows credentials manager. And for this activity we need few prerequisite files. This property contains the folder path of those files. This property is used by the following topics: |
|
Shopping server URL |
This property contains the URL of the Shopping server. This property is used by the Install Software using Shopping topic. |
|
Shopping username |
This property contains username (Shopping Admin) for the Shopping server mentioned in the above user's property. It requires a username and AD groups are not accepted due to certain limitations from Shopping. |
|
Shopping user password |
This property contains the password for Shopping server's admin user mentioned in the above property. |
|
Test Sever Connection Button |
This button is used to test whether the settings saved on the page are functional or not. As soon as this button is hit, ServiceNow tries to establish a connection with 1E server. If there was a successful connection, then a success message is displayed on the page, else an appropriate error message is displayed. It may happen that settings are correct on this page, but an error is still displayed, in this case you will need to check the Configuration settings in the 1E Core app. |
|
Retrieve Instructions Button |
This button is used to retrieve the instructions from 1E and cache them all in the 1E Core app. It fetches all the instruction assigned to the user configured in the 1E Username field. On successful retrieval of the instructions, a success message will be displayed on the page. Otherwise, an appropriate error message is displayed. |
|
Retrieve Applications Button |
This button is used to retrieve the list of installable applications from Shopping (1E Product). On successful retrieval of applications, a success message is displayed on the page. In case of failure, no message will come up, but this button will get disabled. |
|
Save Buttons |
There are two Save buttons on the page. They save all the modifications made to the fields on the App Settings page. |
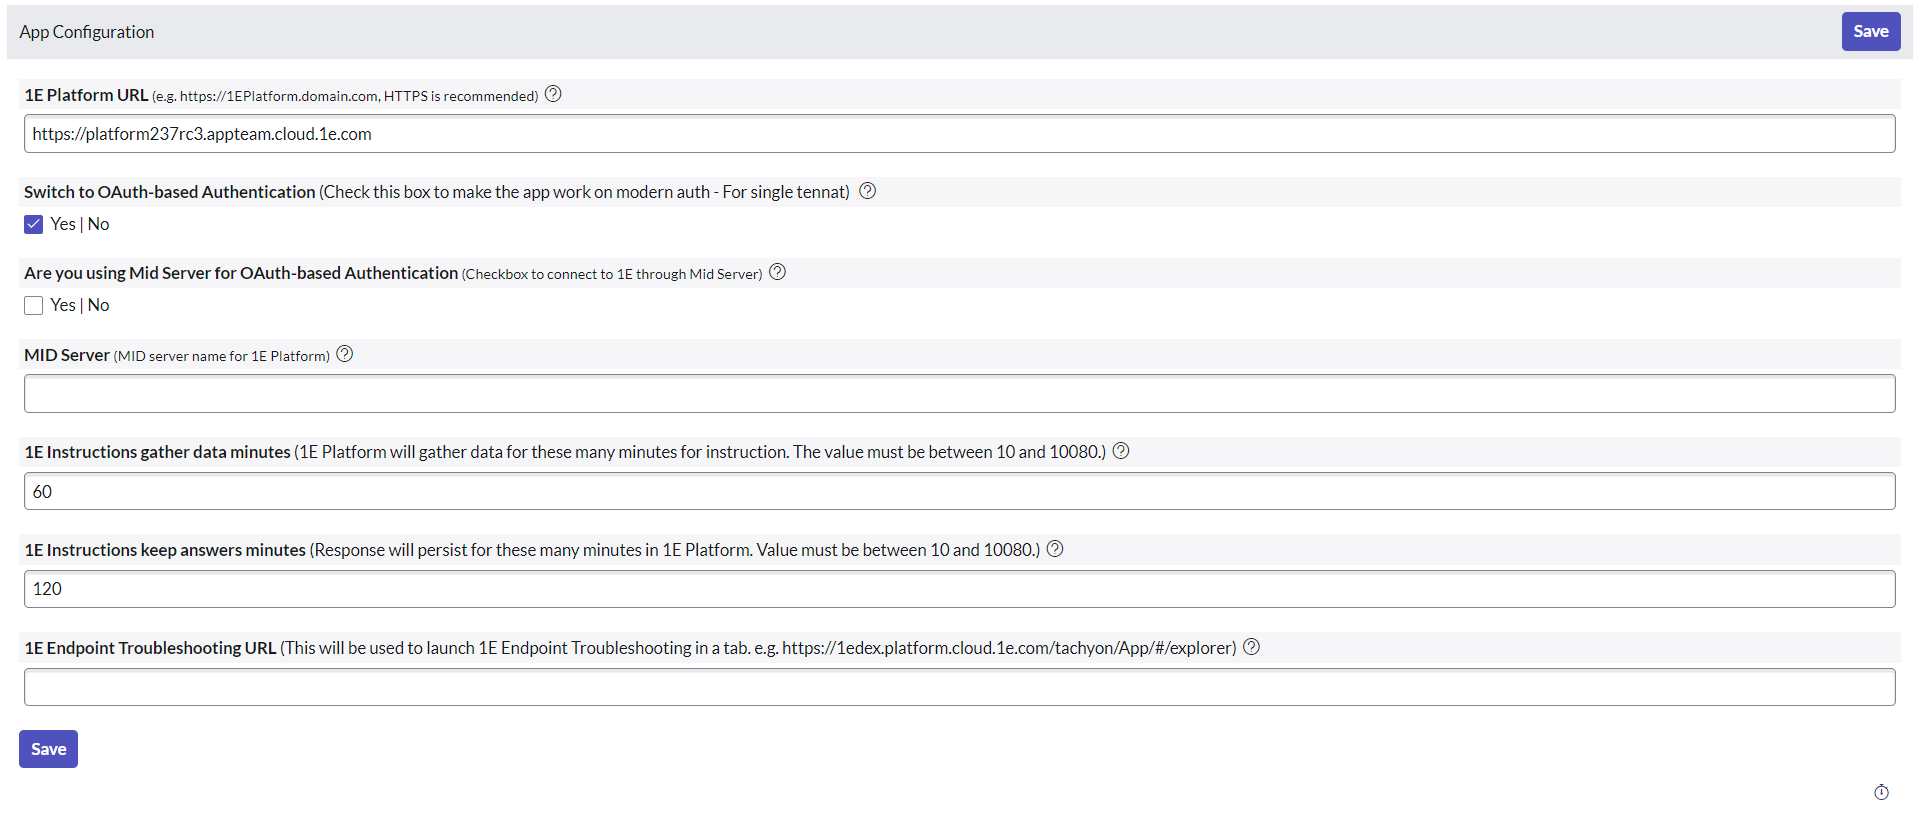
This feature is only available in 1E Virtual Assistant 3.2.10 or later.
1E Virtual Assistant now supports multi-tenant configurations. With this functionality 1E Virtual Assistant is now able to support multiple 1E instances.
It can be configured by setting the value of system property x_1e_core_connect.multi_tenant_instance_va to true as briefed on Configuring multi-tenant. Once the property is set to true, Multi-Tenant configuration page can be used to created configuration records for different domains. Domain specific settings will have to be done on the 1E ITSM Connect Multi-Tenant Configuration page.
The ServiceNow application's authentication to 1E is managed using this checkbox, as shown in the picture below. If checked, the application will authenticate itself via Modern Authentication. Else, the application will authenticate itself via Basic Authentication.
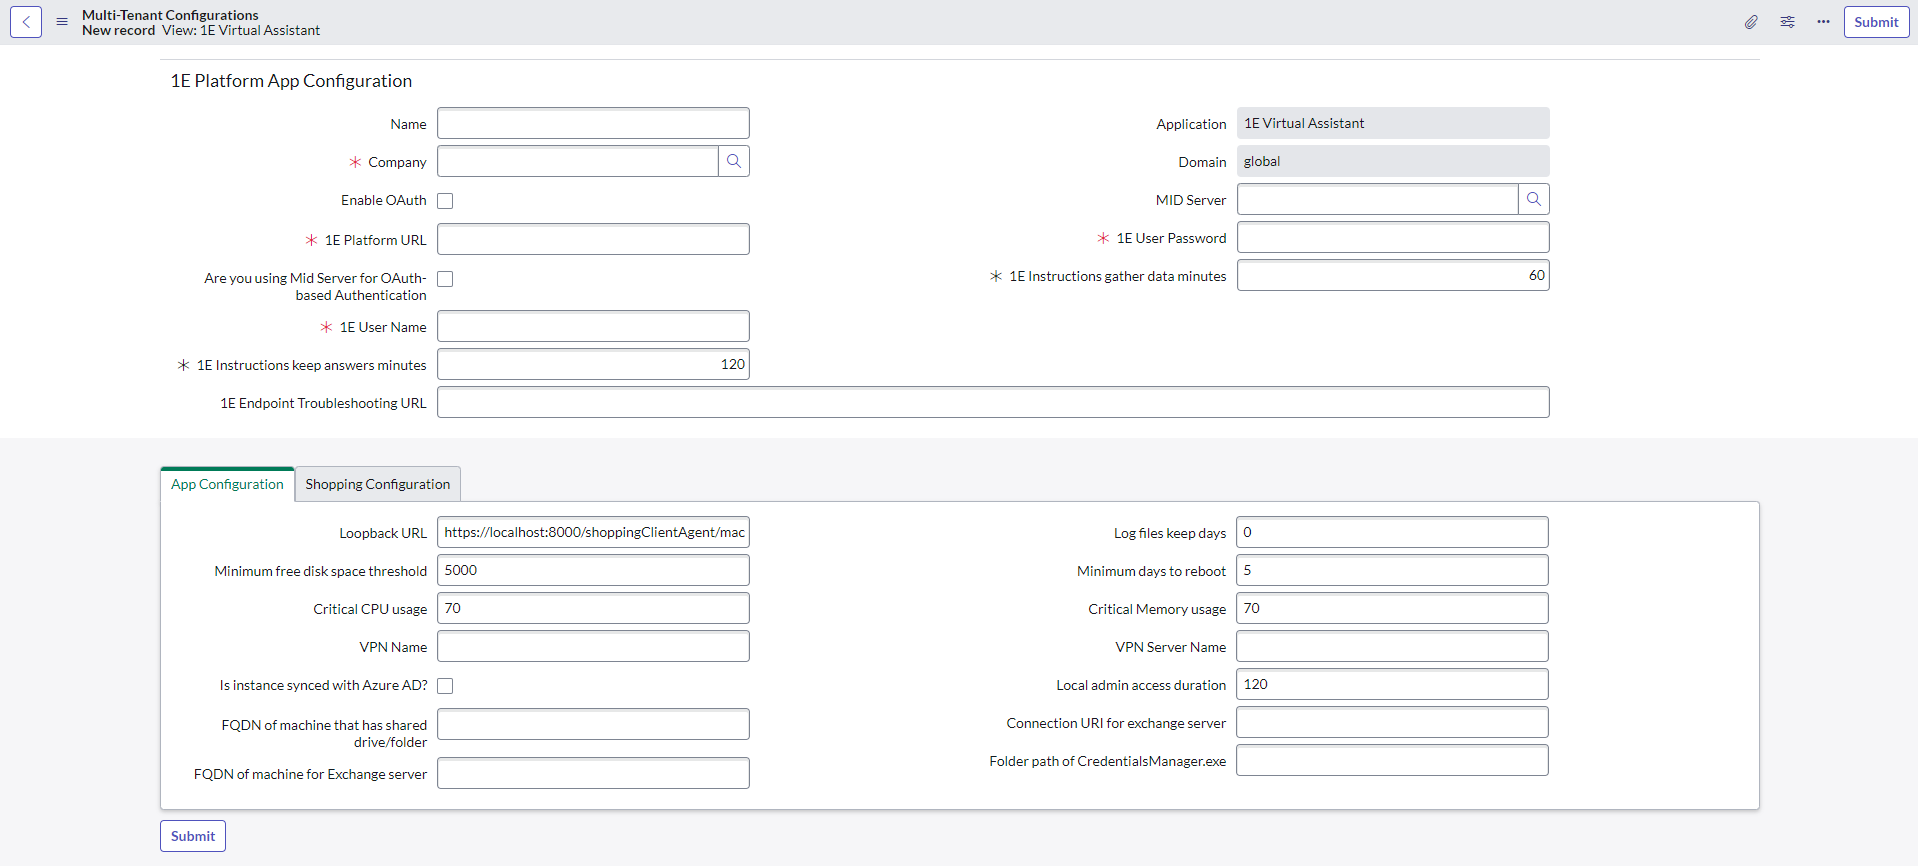
Multi-Tenant Configurations Page
Multi-Tenant Configurations tab is available under 1E Virtual Assistant menu. This page shows the list of all the available multi-tenant configurations.
This page allows an admin user to set up the details required by the application to communicate with 1E in domain separated instances.
Only an admin user is allowed to edit or update the above details, whereas the users with roles x_1e_virtual_agent.admin and x_1e_core_connect.user can only have the read-only access to this table.
To configure a 1E environment and associate with a particular domain, click New. You will then need to fill out the values against each of the settings. A table describing each field, and expected values, is given below. Only one configuration record per domain can exist in the list. The Enable Auth checkbox sets the authentication type accordingly.
The page to add a new configuration for Basic Authentication looks like below:
To enable the OAuth for a tenant, check the checkbox Enable OAuth.The page to add a new configuration for Modern Authentication looks like below:
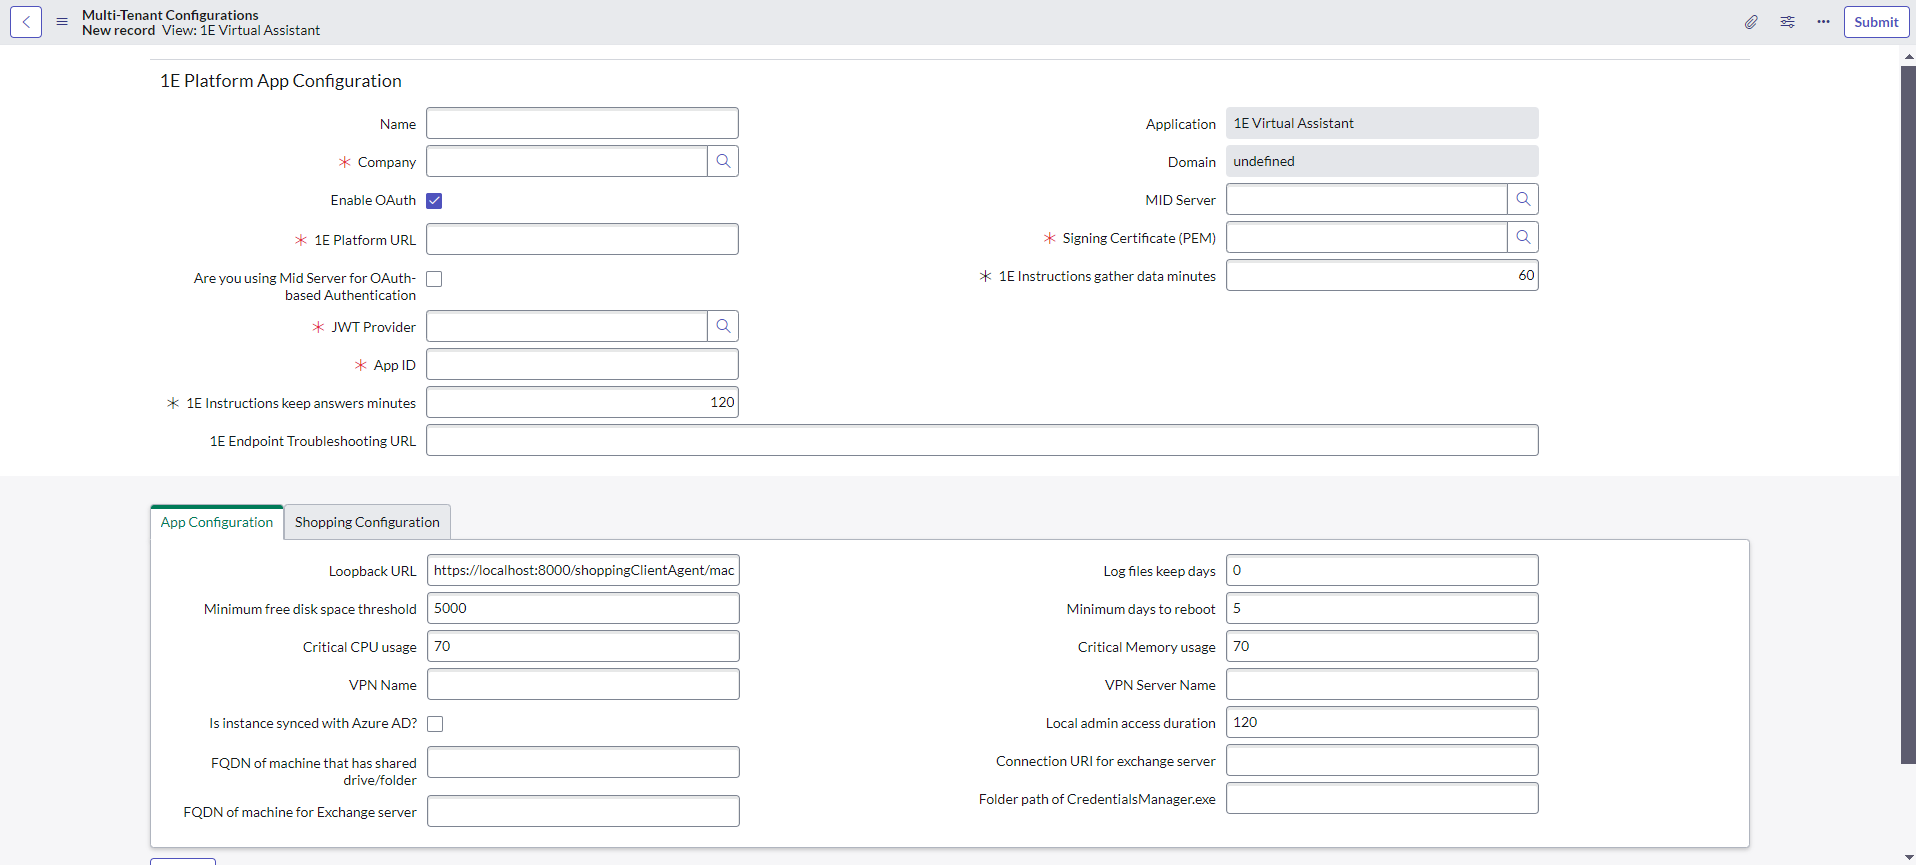
If you are using mid server for Modern Auth based authentication, then a new configuration will look like below:
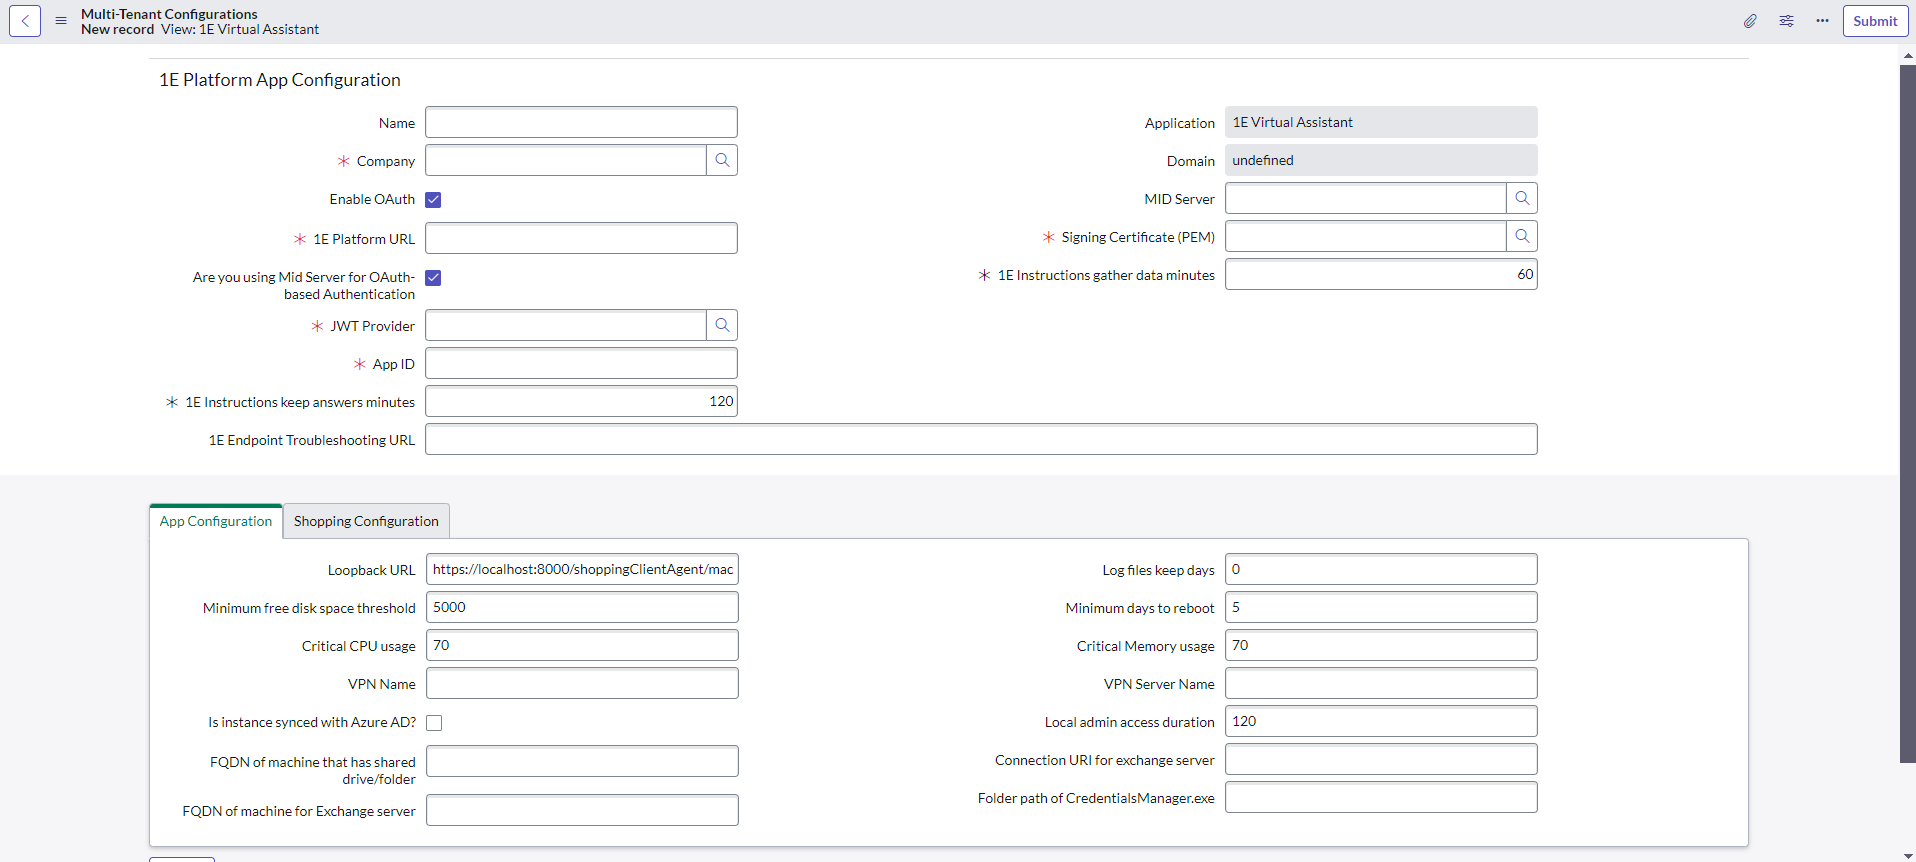
The following table describes the fields available on this page. Each of these settings becomes unique to a particular domain. If you configure multiple domains and have one 1E for each of the domains, you will need to create multiple records. There are few additional fields available for users with Modern Authentication, as mentioned below:
|
Field |
Description |
|---|---|
|
Name |
A free text field to give a unique name to this record. |
|
Application |
Name of the application from where the configuration record is created. Autopopulates 1E Virtual Assistant. |
|
Company |
Use the magnifying glass next to this field to select a Company associated with this Domain. Based on this selection, the domain field is auto populated. The mapping between a Company and a Domain has to be configured in advance, by a ServiceNow Administrator. |
|
Domain |
Read Only field. Autopopulated based on Company field (Not AD Domain). |
|
Enable OAuth |
This checkbox helps to set the authentication of the application. If checked, the application will authenticate itself via Modern Authentication. Else, the application will authenticate itself via Basic Authentication. |
|
MID Server |
The MID server name used by 1E, if applicable. A MId Server is a software application which gets installed on any local machine with internet connectivity, can access 1E Server on the local network and is configured to point to the desired ServiceNow instance on the Internet. MID Servers are specific to the release version of ServiceNow and must be downloaded from the ServiceNow instance itself. For more information about MId Server set up, please refer to the ServiceNow Mid Server installation documentation. Multiple MId Servers can be installed on a single machine and be able to point to the same or different ServiceNow instances. Note : When installing MID Server, ensure to install it in the correct domain in which you will connect the MID Server with 1E. |
|
1E Platform URL |
The URL for the 1E server. |
|
1E User Name and 1E User Password (Basic Authentication) |
This is the domain user name and password of a 1E user that is assigned to an Actioners role in 1E. This user is a proxy for ServiceNow users that are assigned to the 1E ITSM Connect role x_1e_connect.Tachyon_User in order to run those instructions in 1E from ServiceNow, to verify the status of executed instructions, and collect responses from the instructions that have been run. This user is also used by the API Configuration Settings page to retrieve instructions from 1E to make them available in ServiceNow. Enter the user name in the format domain\username |
|
Signing Certificate PEM (Modern Authentication) |
This setting allows you to select the required PEM (.pem) file. It contains a Public key and a Private key in base64 encoded standard format. |
|
Are you using MID Server for OAuth-based Authentication |
This checkbox specifies whether an application will use MID Server with OAuth on-premises or not. However, it plays no role if the application will use Basic Authentication with MID Server and the functionality remains the same. If checked, the application will use MID Server for OAuth. Else, the application will not use MID Server for OAuth. |
|
1E instructions gather data minutes |
This setting is specific to 1E. The value is used when ServiceNow sends an instruction execution request to 1E and controls the number of minutes that 1E should continuously gather an instruction's responses. The setting unit is minutes. This has a default value of 60 minutes with a valid range between 10 and, 10080. |
|
JWT Provider (Modern Authentication) |
This setting contains the JWT Provider that is associated with a JWT Key. Its SysID is passed onto retrieve JWT Token. |
|
App ID (Modern Authentication) |
This setting specifies the App ID, which is unique to an Identity Provider (IdP). This is the key identifier generated by the IdP server. |
|
1E instructions keep answers minutes |
This setting is specific to 1E. The value is used when ServiceNow sends an instruction execution request to 1E and controls the number of minutes that 1E should keep the instruction responses active. The setting unit is minutes. This has a default value of 120 minutes with a valid range between 10 and, 10080. |
|
1E Endpoint Troubleshooting URL |
This setting is used to open the 1E Explorer page from the "Related Links" within an Incident. This does not affect the connectivity between ServiceNow and 1E, but rather points to the Endpoint Troubleshooting directly. |
|
Loopback URL |
The 1E Virtual Assistant can use the Shopping Loopback URL to get the FQDN of the device where the browser accessing ServiceNow is running. If you have the 1E Client with the Shopping agent installed, you will need to set this as the location for the loopback. The default value for this is:https://localhost:8000/shoppingClientAgent/machineInfo. |
|
Log files keep days |
When a user tries to fix the Low Disk Space issue on their system using Virtual Assistant, it actually deletes all necessary files from the system to free up some space. Log files can be important some time, that is why it does not delete log files if the value of this property is <=0. In other words, while cleaning disk, it will remove all *.log files from system drive those are not modified since specified days. Specify 0 if you don't want to remove log files. |
|
Minimum free disk space threshold |
This property is used by the Computer Slow topic. It allows the admin user to configure what is the minimum MB disk space required on the end-user's system drive. Any non-numeric, invalid and empty values will be treated as 0. |
|
Minimum days to reboot |
This property is used by the Computer Slow topic. It allows the admin user to configure what are the minimum number of days after which a reboot is recommended to the user? Any non-numeric, invalid and empty values will be treated as 0. |
|
Critical CPU usage |
This property is used by the Computer Slow topic. It allows an admin user to configure What % would be the critical CPU usage for a bad performing device? Virtual agent then will ask the user to close apps that have a high CPU consumption. Any non-numeric, invalid and empty values will be treated as 0. |
|
Critical Memory usage |
This property is used by the Computer Slow topic. It allows admin user to configure What % would be the critical Memory usage for a bad performing device? Virtual agent then will ask the user to close apps that have a high Memory consumption. Any non-numeric, invalid and empty values will be treated as 0. |
|
VPN name |
This property is used by the Add a VPN Connection topic. The value in this property will be the name of the VPN connection when a user asks the app to add a VPN connection. It supports VPN name up to 128 characters. |
|
VPN Server Name |
This property is used by the Add a VPN Connection topic. VPN will be configured for this server (the value in this property). |
|
Is instance synced with Azure AD? |
This property is used by the Reset my Windows password topic. It is a Yes/No type of property that determines whether the ServiceNow instance is synced with Azure AD. |
|
Local admin access duration |
This property is used by the Local admin access topic and contains a numeric value (minutes). When a user requests local admin access on a device, they will get local admin access for this number of minutes. |
|
FQDN of machine that has shared drive/folder |
Specify the FQDN of the machine that has shared folders. This value is used by the Access a shared folder topic. |
|
Connection URI for exchange server |
This property contains the URI of the Exchange server, in the following format: http://<machineFQDN>. This property is used by the following topics: |
|
FQDN of machine for Exchange server |
In some cases, it may happen that the 1E Client is not installed on an on-premises Exchange server. To run an Exchange server topic, you can use another machine that has the 1E client installed and can access the Exchange server machine. This property contains that device's FQDN. This property is used by the following topics: |
|
Folder path of CredentialsManager.exe |
Before executing the Exchange server topics, we need to store the Exchange server username and password in windows credentials manager. And for this activity we need few prerequisite files. This property contains the folder path of those files. This property is used by the following topics: |
|
Shopping server URL |
This string value specifies the Shopping URL. |
|
Shopping user name |
This field specifies the username used to connect to the Shopping application. |
|
Shopping user password |
This field specifies the user password used to connect to the Shopping application. |
|
Submit |
This button allows you to save your settings. |
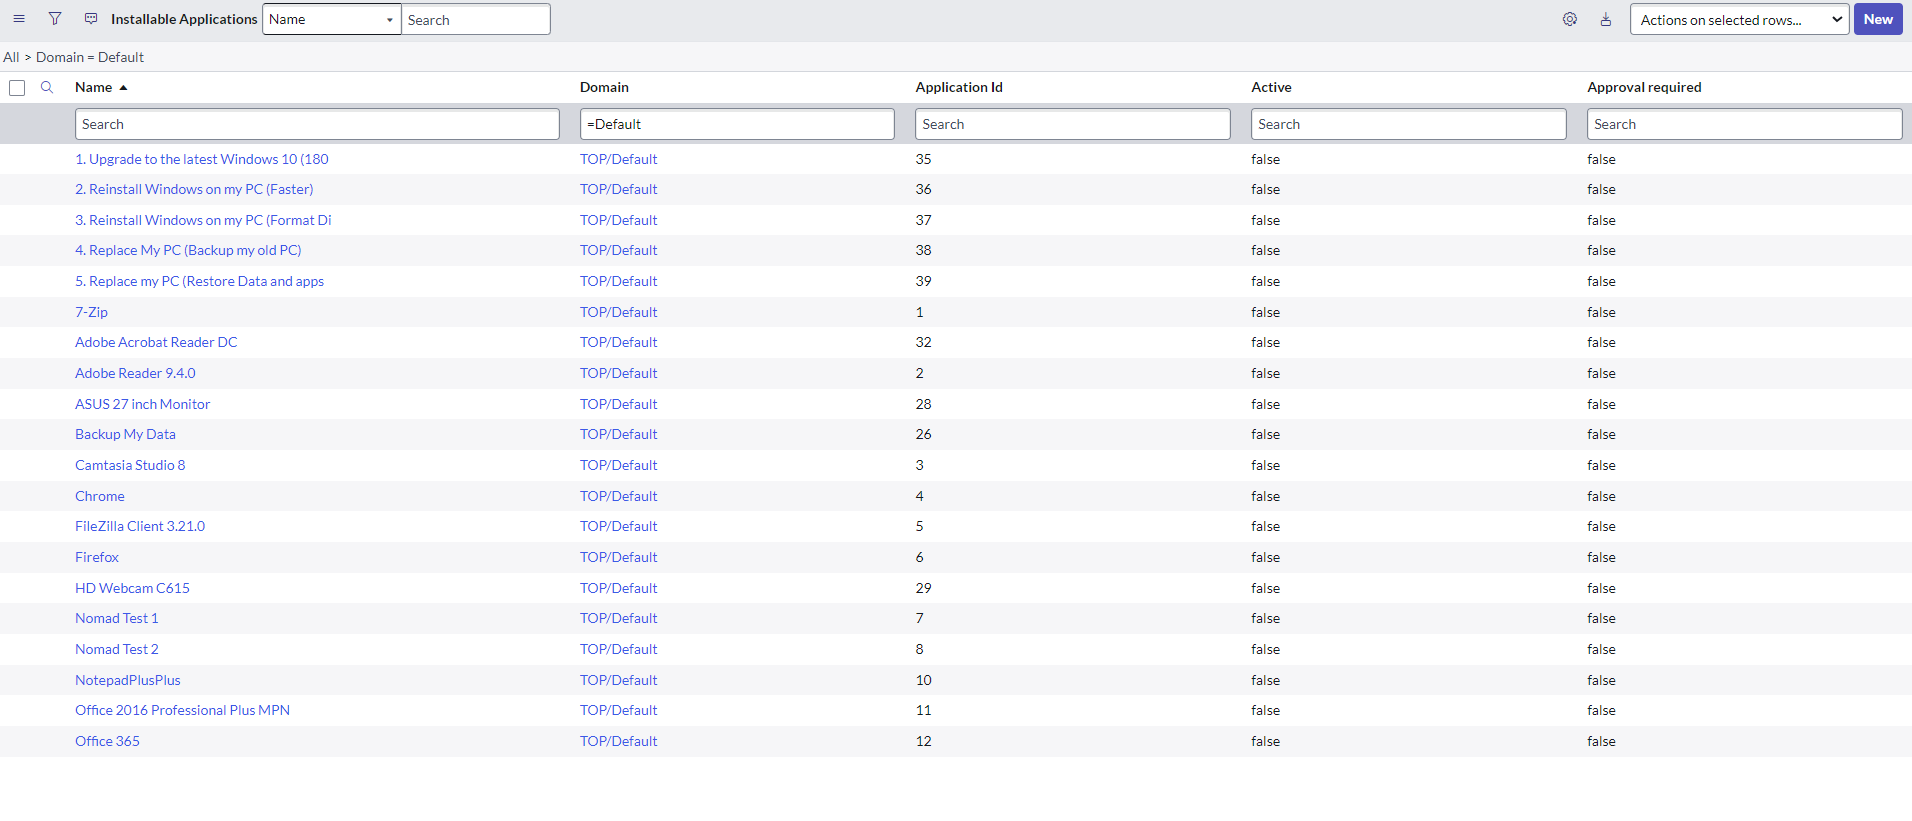
Multi-tenant support for Installable Applications
To provide multi-tenant support, the Installable Applications table are now domain separated. The application records for each domain will be present in their respective domains to provide better control. In case a specific application is not required for a tenant, then the application record in the respective domain is marked as inactive.
Multi-tenant support for Topics
All the Virtual Assistant topics now supports multi-tenant feature. The Virtual Assistant topics use the multi-tenant configuration based on the user domain to connect to the 1E. This ensures a seamless support across the users from different domains.
Logs
The logs for 1E Virtual Assistant are maintained under Logs tab as shown in the picture below. This page provides the details of the log created date and time stamp, level, message and source of log (here in our case is Virtual Assistant).
Only a user with admin role have access to this screen to perform required configuration.
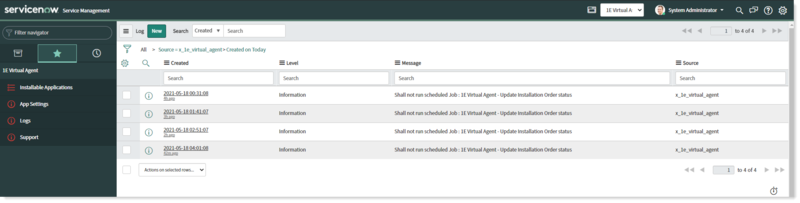
The logging functionality is improved. The logs provide more details about the issue which will help in troubleshooting the problem for users.
This feature is only available in 1E Virtual Assistant 3.2.10 or later.
Post-installation tasks to enable individual topics
|
Topic |
Configuration Steps |
||||||||||||||||||||||||||||||||
|---|---|---|---|---|---|---|---|---|---|---|---|---|---|---|---|---|---|---|---|---|---|---|---|---|---|---|---|---|---|---|---|---|---|
|
Add a Printer |
The following 1E instructions must be added to your 1E system:
When this instruction is executed it opens the Add Printer and Scanner control panel on the requested device. |
||||||||||||||||||||||||||||||||
|
Add a VPN Connection |
The following 1E instructions must be added to your 1E system:
This instruction takes two parameters, VPN name and VPN server name as inputs, and verifies if there's an existing VPN connection on the device with these details. If a VPN connection exists, the VPN connection is updated with the predefined default configuration. Otherwise it adds a new VPN connection to the device with the specified VPN name and VPN server name. The parameter VPNName is passed to set-up the connection on the device and the parameter VPNServer is passed to configure the connection to the server. Prerequisites- The following are required:
|
||||||||||||||||||||||||||||||||
|
Local admin access |
The following 1E instructions must be added to your 1E system:
This instruction takes UserName as an input to identify the user. When this instruction is executed it elevates the end-user privileges to local admin on the assigned device.
This instruction takes UserName as an input to identify the user. When this instruction is executed it removes the allocated local admin access of the end-user on the assigned device. Assumptions:
|
||||||||||||||||||||||||||||||||
|
Remove invalid desktop shortcuts |
The following 1E instructions must be added to your 1E system:
When this instruction is executed it removes all invalid shortcuts from the end-user's desktop. Assumption:
|
||||||||||||||||||||||||||||||||
|
Reset my Windows password |
No 1E instructions are required for this topic. The current instance supports Azure AD. The property given on the App Settings page decides whether the instance is synced with Azure AD or not. |
||||||||||||||||||||||||||||||||
|
Access a shared folder |
The following 1E instructions must be added to your 1E system:
When this instruction is executed, it provides end-user with the requested access to the required shared folder. This instruction takes the following three parameters:
Assumptions:
|
||||||||||||||||||||||||||||||||
|
Create a distribution list |
The following 1E instructions must be added to your 1E system:
When this instruction is executed it adds a distribution group (list) to an on premises Exchange server and Active Directory. This instruction contains these parameters:
This topic is based on the following considerations:
The properties of the change request will be:
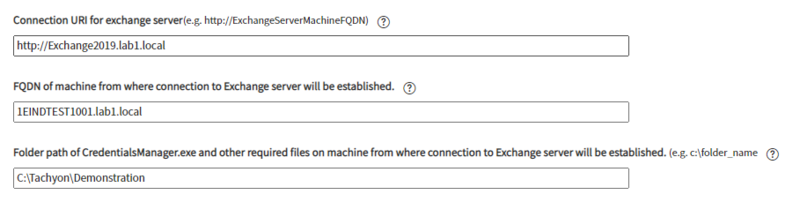
Please ensure the Exchange Server credentials are saved in Windows credential manager with the MyExchangeCred name on the device where the 1E instruction is executed. The following settings must be completed on the 1E Virtual Application App Settings page. Please refer to 1E Virtual Assistant post-installation tasks for more details.
|
||||||||||||||||||||||||||||||||
|
Delete a distribution list |
The following 1E instructions must be added to your 1E system:
When this instruction is executed it deletes a specified distribution group (list) from an on premises Exchange server. This instruction contains these parameters:
This topic is based on the following considerations:
The properties of the change request will be:
|
||||||||||||||||||||||||||||||||
|
Add user to distribution list |
The following 1E instructions must be added to your 1E system:
When this instruction is executed it adds a user to an Exchange Server distribution group. This instruction contains these parameters:
This topic has the following considerations:
The properties of the change request will be:
|
||||||||||||||||||||||||||||||||
|
Share folder |
The following 1E instructions must be added to your 1E system:
When this instruction is executed it shares a local folder on their assigned device. This instruction contains three parameters:
|
||||||||||||||||||||||||||||||||
|
Revoke Folder Access |
The following 1E instructions must be added to your system:
When this instruction is executed it removes access to a shared folder on an absolute or network path. |
||||||||||||||||||||||||||||||||
|
Install Software |
An admin user can fetch the list of installable applications available for installation from "Retrieve Application" button given on the App Configuration page. The data is saved in the "Installable Application" table. The admin user have to check the application's active field to true as shown in the picture below and this adds the name of the respective software as a keyword to the topic list.
The following 1E instructions must be added to your 1E system:
When this instruction is executed it sends a success or failure notification to the requested device. This instruction contains the following parameters:
The scheduled Job 1E Virtual Assistant - Update Installation Order status is configured to run at a default setting of one hour and ten minutes (This setting is configurable as needed) and updates the change task status. The job queries the software installation order status from the Shopping module. If the installation is a success, the task is marked as Successful and closed with a closure note of Installed. If the installation is interrupted due to an error, the task is then marked as Unsuccessful and closed with a note of Order Failed. This topic is based on the following considerations:
|
||||||||||||||||||||||||||||||||
|
Delete a user from a distribution list |
The following 1E instructions must be added to your 1E system:
When this instruction is executed it removes a specified user from a specified distribution group from an on premises Microsoft Exchange server. This topic has the following considerations:
The properties of the raised change request will be:
|
||||||||||||||||||||||||||||||||
|
Computer Slow |
The following 1E instructions must be added to your 1E system:
The options displayed for end-user are based on the result of 1E-Explorer-ServiceNow-PerformanceStats instruction and configuration defined on App Settings page. The properties which are used in Computer Slow topic are defined as shown below -
The properties are defined as -
|
||||||||||||||||||||||||||||||||
|
Enable Remote Connection |
The following 1E instructions must be added to your 1E system
This instruction when executed returns the status of RDP whether enabled or disabled on the selected device.
This instruction takes only one parameter Enable. This parameter is a value picker and and the possible values are Enable and Disable. This instruction when executed enables or disables RDP on the selected device.
This instruction takes only one parameter ServiceName. This parameter accepts free text as name of the Remote Desktop service as shown in the picture below. This instruction when executed starts the Remote Desktop service on the selected device. Assumption: It is assumed that the end-user is already added to the remote desktop users' list. If end-user is not added to the list, then even after enabling RDP settings on the selected device the end-user will be unable to access the remote connection on the device. |
||||||||||||||||||||||||||||||||
|
Low Disk Space |
The following 1E instructions must be added to your 1E system:
This instruction takes a parameter NoOfDays. If the value is 0, then no files are deleted. Else for non-zero numeric value, the unwanted files are deleted those of which are not modified for the specified number of days. This instruction when executed frees up disk space on the system drive. It removes unwanted files from Recycle bin, Temp folder, Event logs etc. It also runs auto clean by using Windows Cleanmgr command. It removes log files available on system drive and those files which are not modified since end-user has defined NoOfDays parameter. The resulted free space is completely based on whether there are unwanted files that can be deleted or not. |
||||||||||||||||||||||||||||||||
|
Microsoft Recovery Assistant |
The following 1E instructions must be added to your 1E system:
This instruction when executed launches Microsoft Recovery Assistant wizard on the selected device. If Microsoft Recovery Assistant is not installed, then it returns the URL for installation. |
||||||||||||||||||||||||||||||||
|
Outlook Issue |
The following 1E instructions must be added to your 1E system:
This instruction takes a parameter called delOST. This parameter is a value picker that accepts two possible values True and False. By default it takes the value False, as the OST file has to be deleted only upon request. This instruction when executed deletes OST/PST files from Outlook to fix the issue raised.
This instruction when executed launches the Microsoft recovery assistant wizard on the selected device. In case the Microsoft recovery assistant is not installed on the device, then it returns the URL to download it.
This instruction takes a parameter called path. The path value is received from 1E-Explorer-ServiceNow-FixPstOstOutlookFiles instruction. This instruction when executed deletes the required file on the specified location. Here in this case it deletes the specified OST file. The following process is followed by the virtual assistant to resolve the issue raised with respect to Outlook:
|
||||||||||||||||||||||||||||||||
|
Upgrade Operating System |
The following 1E instructions must be added to your 1E system:
This instruction takes refId as a parameter. This parameter contains an identifier that is used when data syncs back from Shopping to ServiceNow. This instruction when executed opens a WSA wizard on the requested device. Assumption and Prerequisite:
|

Add widgets to the ServiceNow Service Portal
Two widgets must be added to the Service Portal to get 1E Virtual Assistant to work correctly. To do this:
Open Service Portal
Browse to the Service Portal using a URL with the following format https://<ServiceNowInstance>.service-now.com/sp - where <ServiceNowInstance> is the name of your ServiceNow instance. For example: https://dev19162.service-now.com/sp.
Access the designer
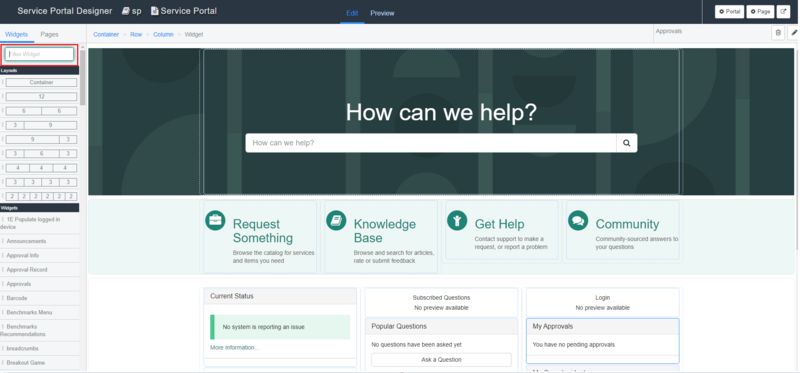
On the Service Portal page, press the <ctrl> key and right-click, a popup will be displayed.
Select the Page in Designer item.
When the Designer screen opens, search for the two widgets listed below and add them to the page. You can add the widgets anywhere by using drag and drop, but make sure you are in Global scope:
-
1E Populate logged in device
-
Virtual Agent Service Portal Widget.
When you have placed the widgets, close this tab and refresh the Service Portal home page.
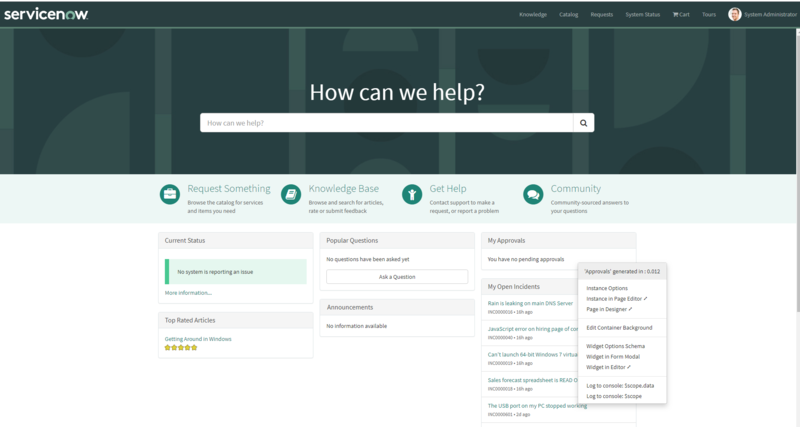
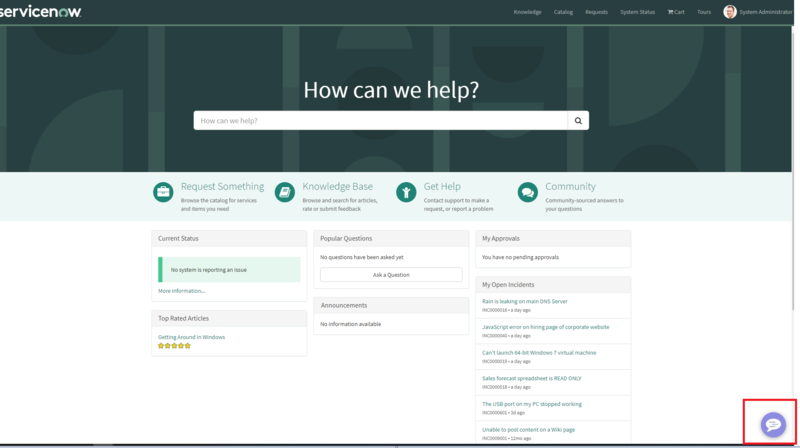
You should now see a Virtual Agent callout icon in the bottom-right corner of the Service Portal home page.
User roles provided by 1E Virtual Assistant
In a custom app in ServiceNow, access to features can be controlled by roles. 1E Virtual Assistant provides only one custom role, and that is for admin. Details of this role are shown in the following table:
|
Role |
User Persona |
Additional Role Required |
Inherited Role |
Description |
|---|---|---|---|---|
|
x_1e_virtual_agent.admin |
App Administrator |
<None> |
x_1e_core_connect.user |
User will be able to configure and set up the App. |